别以为真懂Openstack: 虚拟机创建的50个步骤和100个知识点(3)
四、Nova-compute

步骤17:nova-compute接收到请求后,通过Resource Tracker将创建虚拟机所需要的资源声明占用
步骤18:调用Neutron API配置Network,虚拟机处于Networking的状态
需要注意的是,这一步虽然是配置Network,但是主要是数据结构的准备,真正的设备并没有创建。
由于在创建虚拟机的时候,我们指定了将虚拟机放到哪个private network里面,因而在创建真正的设备之前,所有的信息都需要准备好。
这里的知识点设计Network的创建,然而这一步其实在虚拟机创建之前就应该做好。
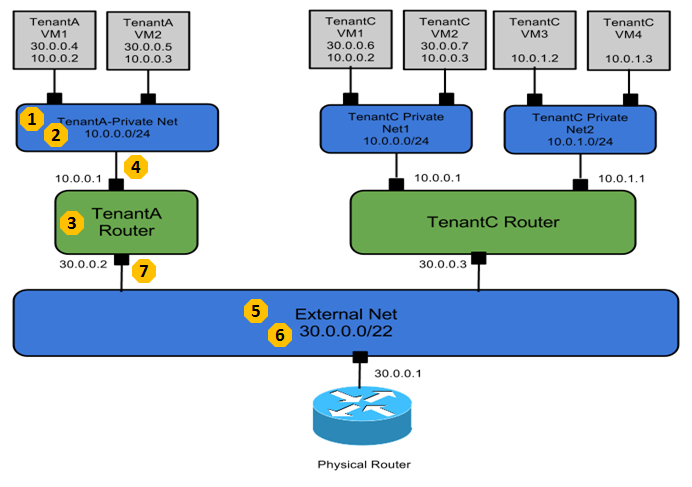
一个最简单的场景是通过下面的脚本创建网络
#!/bin/bash
TENANT_NAME="openstack"
TENANT_NETWORK_NAME="openstack-net"
TENANT_SUBNET_NAME="${TENANT_NETWORK_NAME}-subnet"
TENANT_ROUTER_NAME="openstack-router"
FIXED_RANGE="192.168.0.0/24"
NETWORK_GATEWAY="192.168.0.1"
PUBLIC_GATEWAY="172.24.1.1"
PUBLIC_RANGE="172.24.1.0/24"
PUBLIC_START="172.24.1.100"
PUBLIC_END="172.24.1.200"
TENANT_ID=$(keystone tenant-list | grep " $TENANT_NAME " | awk '{print $2}')
(1) TENANT_NET_ID=$(neutron net-create --tenant_id $TENANT_ID $TENANT_NETWORK_NAME --provider:network_type gre --provider:segmentation_id 1 | grep " id " | awk '{print $4}')
(2) TENANT_SUBNET_ID=$(neutron subnet-create --tenant_id $TENANT_ID --ip_version 4 --name $TENANT_SUBNET_NAME $TENANT_NET_ID $FIXED_RANGE --gateway $NETWORK_GATEWAY --dns_nameservers list=true 8.8.8.8 | grep " id " | awk '{print $4}')
(3) ROUTER_ID=$(neutron router-create --tenant_id $TENANT_ID $TENANT_ROUTER_NAME | grep " id " | awk '{print $4}')
(4) neutron router-interface-add $ROUTER_ID $TENANT_SUBNET_ID
(5) neutron net-create public --router:external=True
(6) neutron subnet-create --ip_version 4 --gateway $PUBLIC_GATEWAY public $PUBLIC_RANGE --allocation-pool start=$PUBLIC_START,end=$PUBLIC_END --disable-dhcp --name public-subnet
(7) neutron router-gateway-set ${TENANT_ROUTER_NAME} public
- 为这个Tenant创建一个private network,不同的private network是需要通过VLAN tagging进行隔离的,互相之间broadcast不能到达,这里我们用的是GRE模式,也需要一个类似VLAN ID的东西,称为Segment ID
- 创建一个private network的subnet,subnet才是真正配置IP网段的地方,对于私网,我们常常用192.168.0.0/24这个网段
- 为这个Tenant创建一个Router,才能够访问外网
- 将private network连接到Router上
- 创建一个External Network
- 创建一个Exernal Network的Subnet,这个外网逻辑上代表了我们数据中心的物理网络,通过这个物理网络,我们可以访问外网。因而PUBLIC_GATEWAY应该设为数据中心里面的Gateway, PUBLIC_RANGE也应该和数据中心的物理网络的CIDR一致,否则连不通,而之所以设置PUBLIC_START和PUBLIC_END,是因为在数据中心中,不可能所有的IP地址都给Openstack使用,另外可能搭建了VMware Vcenter,可能有物理机器,仅仅分配一个区间给Openstack来用。
- 将Router连接到External Network
经过这个流程,从虚拟网络,到物理网络就逻辑上联通了。
然而真正的创建底层的设备,却是通过具体的命令来的,本人总结了一下:
当然还有更复杂的场景,参考这篇文章
步骤19:生成MAC Address
步骤20: 获取DHCP Server的配置
步骤21:获取Network的信息
步骤22:获取Security Group的信息
步骤23:拿着所有的信息,创建Port对象,是一个Tap device,当然真正的设备还没有创建
步骤24:调用Libvirt Driver创建虚拟机
五、Image

在创建Instance之前,当然需要Image,Image后来发现是一个大学问。
在Openstack里面,对于KVM,应用到的Image格式主要是两种RAW和qcow2,
raw格式简单,容易转换为其他的格式。需要文件系统的支持才能支持sparse file,性能相对较高。
qcow2是动态的,相对于raw来说,有下列的好处:
- 即便文件系统不支持sparse file,文件大小也很小
- Copy on write
- Snapshot
- 压缩
- 加密
具体的格式和特点,参考下面的文章
QEMU KVM libvirt手册(4) – images
创建一个image,有多种方法
一种方法是通过virt-install,讲hard disk设为一个image文件, 从CDROM启动一个虚拟机,按照正常的安装流程来,最后操作系统安装好,image再经过qemu-img进行处理,压缩,最终形成image。
参考文章
当然现在有了更先进的方法,就是libguestfs,它可以轻松基于已有版本的image创建一个你想要的image,就是virt-builder
参考文章
当然一个可以在Openstack里面使用的image,绝不是仅仅安装一个操作系统那么简单。
在OpenStack Virtual Machine Image Guide中详细写了一个Linux Image的各种需求
- Disk partitions and resize root partition on boot (cloud-init)
- No hard-coded MAC address information
- Ensure ssh server runs
- Disable firewall
- Access instance by using ssh public key (cloud-init)
- Use cloud-init to fetch the public key
- Process user data and other metadata (cloud-init)
- Ensure image writes boot log to console
另外加几条:
- 包含MBR和bootloader,可以自启动
- 支持virtio的disk和network driver
- 使用DHCP分配IP
当一个Linux的Image安装完毕后,总要测试一下:
- 能通过key ssh上去吗
- 能够文件注入吗
- cloud-init是否运行了
- 文件系统被resize为flavor大小了吗
- hostname设为文件名吗
- timezone设的对吗
- /etc/fstab干净正确吗
- 虚拟机的log被正确输出了吗
- /tmp路径下干净吗
- 能打snapshot吗
- block storage添加后能正常看到和使用吗
对于windows image,却要复杂的多,windows真的不是对cloud友好的。
- 首先必须用virt-install将windows系统安装好。
- windows要想使用virtio,就必须将windows版本的virtio安装好。即便安装好,还要在device manager里面update driver才好。
- Remote Access要打开,要不怎么远程桌面啊。
- 安装一个SSH Server吧,有时候需要创建虚拟机后,自动执行脚本安装东西,不能通过远程桌面来。
- 安装windows版本的cloud-init cloudbase-init
- 别忘了运行windows update来更新windows,否则会有很多安全漏洞。
- 在device manager里面添加一个serial console的device
- windows的硬盘占用通常很大,运行一下disk cleanup tool可以清空一些硬盘。
- 微软有一个SDelete工具,可以讲未分配的空间设为0,从而可以压缩硬盘。
- 别忘了License问题。
- 有时候windows配置网络的时候,会弹出对话框,这是家庭网络,工作网络,还是公共网络?这会使得网络配置死在哪里,在注册表里干掉他。
- 运行sysprep
对于cloud-init,参考下面的文章
http://cloudinit.readthedocs.org/en/latest/index.html
http://www.scalehorizontally.com/2013/02/24/introduction-to-cloud-init/
在ubuntu中,cloud-init主要包括
配置文件在/etc/cloud下面,默认的cloud.cfg如下
root@dfasdfsdafasdf:/etc/cloud# cat cloud.cfg
# The top level settings are used as module
# and system configuration.
# A set of users which may be applied and/or used by various modules
# when a 'default' entry is found it will reference the 'default_user'
# from the distro configuration specified below
users:
- default
# If this is set, 'root' will not be able to ssh in and they
# will get a message to login instead as the above $user (ubuntu)
disable_root: true
# This will cause the set+update hostname module to not operate (if true)
preserve_hostname: false
# Example datasource config
# datasource:
# Ec2:
# metadata_urls: [ 'blah.com' ]
# timeout: 5 # (defaults to 50 seconds)
# max_wait: 10 # (defaults to 120 seconds)
# The modules that run in the 'init' stage
cloud_init_modules:
- migrator
- seed_random
- bootcmd
- write-files
- growpart
- resizefs
- set_hostname
- update_hostname
- update_etc_hosts
- ca-certs
- rsyslog
- users-groups
- ssh
# The modules that run in the 'config' stage
cloud_config_modules:
# Emit the cloud config ready event
# this can be used by upstart jobs for 'start on cloud-config'.
- emit_upstart
- disk_setup
- mounts
- ssh-import-id
- locale
- set-passwords
- grub-dpkg
- apt-pipelining
- apt-configure
- package-update-upgrade-install
- landscape
- timezone
- puppet
- chef
- salt-minion
- mcollective
- disable-ec2-metadata
- runcmd
- byobu
# The modules that run in the 'final' stage
cloud_final_modules:
- rightscale_userdata
- scripts-vendor
- scripts-per-once
- scripts-per-boot
- scripts-per-instance
- scripts-user
- ssh-authkey-fingerprints
- keys-to-console
- phone-home
- final-message
- power-state-change
# System and/or distro specific settings
# (not accessible to handlers/transforms)
system_info:
# This will affect which distro class gets used
distro: ubuntu
# Default user name + that default users groups (if added/used)
default_user:
name: ubuntu
lock_passwd: True
gecos: Ubuntu
groups: [adm, audio, cdrom, dialout, dip, floppy, netdev, plugdev, sudo, video]
sudo: ["ALL=(ALL) NOPASSWD:ALL"]
shell: /bin/bash
# Other config here will be given to the distro class and/or path classes
paths:
cloud_dir: /var/lib/cloud/
templates_dir: /etc/cloud/templates/
upstart_dir: /etc/init/
package_mirrors:
- arches: [i386, amd64]
failsafe:
primary: http://archive.ubuntu.com/ubuntu
security: http://security.ubuntu.com/ubuntu
search:
primary:
- http://%(ec2_region)s.ec2.archive.ubuntu.com/ubuntu/
- http://%(availability_zone)s.clouds.archive.ubuntu.com/ubuntu/
security: []
- arches: [armhf, armel, default]
failsafe:
primary: http://ports.ubuntu.com/ubuntu-ports
security: http://ports.ubuntu.com/ubuntu-ports
ssh_svcname: ssh
工作文件夹在/var/lib/cloud
root@dfasdfsdafasdf:/var/lib/cloud/instance# ls
boot-finished datasource obj.pkl sem user-data.txt.i vendor-data.txt.i
cloud-config.txt handlers scripts user-data.txt vendor-data.txt
另外就是cloud-init的命令
/usr/bin/cloud-init
如果我们打开它,发现他是python文件,如果运行/usr/bin/cloud-init init,则会运行cloud_init_modules:下面的模块,我们以resizefs为例子
/usr/bin/cloud-init 中会调用main_init,里面会调用run_module_section
这就调用到python代码里面去了,所以cloud-init另一个部分就是python代码部分
/usr/lib/python2.7/dist-packages/cloudinit
我们发现里面有这个文件/usr/lib/python2.7/dist-packages/cloudinit/config/cc_resizefs.py
里面是
def _resize_btrfs(mount_point, devpth): # pylint: disable=W0613
return ('btrfs', 'filesystem', 'resize', 'max', mount_point)
def _resize_ext(mount_point, devpth): # pylint: disable=W0613
return ('resize2fs', devpth)
def _resize_xfs(mount_point, devpth): # pylint: disable=W0613
return ('xfs_growfs', devpth)
def _resize_ufs(mount_point, devpth): # pylint: disable=W0613
return ('growfs', devpth)
哈哈,终于找到resize的根源了。
说完了创建image,还需要了解修改image,我们的文件注入,就是对image的修改。
有三种方式:通过mount一个loop device,通过qemu的network block device,或者最先进的,通过libguestfs
总结成了一篇文章
对于qemu-nbd,有文章
QEMU KVM Libvirt手册(6) – Network Block Device
对于libguestfs,我也写了一些笔记
libguestfs手册(2):guestfish command
对于文件注入,有文章
对于如何打snapshot,分多种,有文章
QEMU KVM Libvirt手册(5) – snapshots
[转] External(and Live) snapshots with libvirt
[转] Snapshotting with libvirt for qcow2 images


【推荐】国内首个AI IDE,深度理解中文开发场景,立即下载体验Trae
【推荐】编程新体验,更懂你的AI,立即体验豆包MarsCode编程助手
【推荐】抖音旗下AI助手豆包,你的智能百科全书,全免费不限次数
【推荐】轻量又高性能的 SSH 工具 IShell:AI 加持,快人一步
· AI与.NET技术实操系列:向量存储与相似性搜索在 .NET 中的实现
· 基于Microsoft.Extensions.AI核心库实现RAG应用
· Linux系列:如何用heaptrack跟踪.NET程序的非托管内存泄露
· 开发者必知的日志记录最佳实践
· SQL Server 2025 AI相关能力初探
· winform 绘制太阳,地球,月球 运作规律
· 震惊!C++程序真的从main开始吗?99%的程序员都答错了
· 【硬核科普】Trae如何「偷看」你的代码?零基础破解AI编程运行原理
· 超详细:普通电脑也行Windows部署deepseek R1训练数据并当服务器共享给他人
· AI与.NET技术实操系列(五):向量存储与相似性搜索在 .NET 中的实现