
1下载
http://nginx.org/en/download.html
选择稳定版下载。
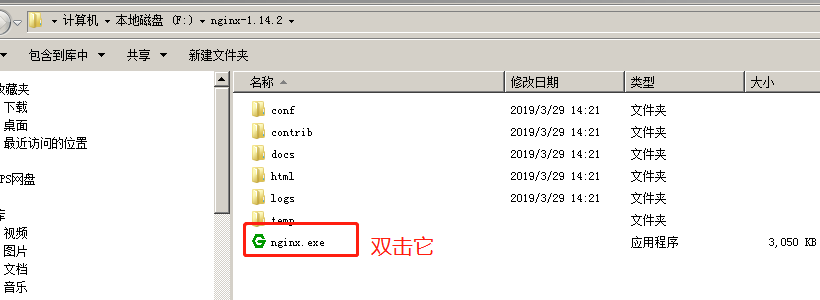
2 解压后 直接双击nginx.exe
双击后一个黑色的弹窗一闪而过
3 修改配置文件nginx.conf
3.1 修改你的站点名称 我这边还是localhost
3.2

   location / {
            #root   html;
            root    E:/ts.p2ps.cn;
            index  index.html index.htm index.php;
            try_files $uri $uri/ /index.php?$query_string;

            if (!-e $request_filename){
                rewrite ^/(.*) /index.php last;
            }

        }
3.3
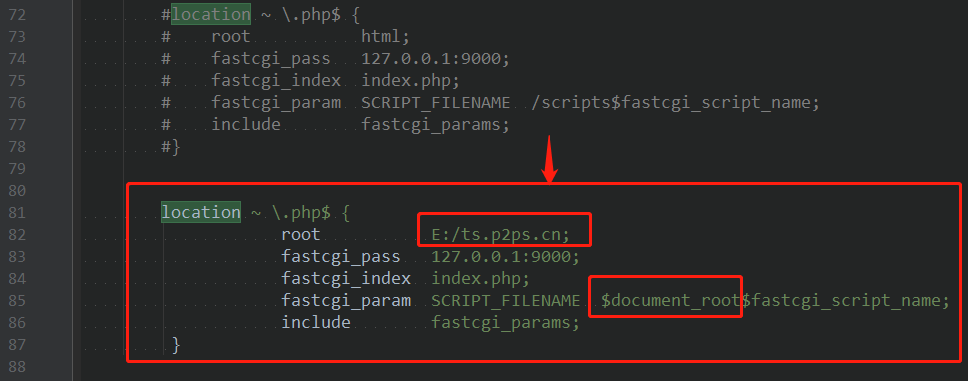
location ~ \.php$ {
                    root           E:/ts.p2ps.cn;
                    fastcgi_pass   127.0.0.1:9000;
                    fastcgi_index  index.php;
                    fastcgi_param  SCRIPT_FILENAME  $document_root$fastcgi_script_name;
                    include        fastcgi_params;
         }
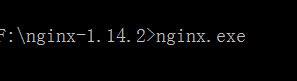
4 启动nginx
在cmd窗口下切换目录 输入命令: nginx.exe
5 修改php.ini配置
修改E:\PHP\php5.5\php5.5.12\ext下的php.ini-development文件,将文件名修改为php.ini,打开php配置文件php.ini:
搜索“extension_dir”,找到: ;extension_dir = “ext” 先去前面的分号再改为 extension_dir = “E:\PHP\php5.5\php5.5.12\ext”
搜索“date.timezone”,找到:;date.timezone = 先去前面的分号再改为 date.timezone = Asia/Shanghai
搜索“enable_dl”,找到:enable_dl = Off 改为 enable_dl = On
搜索“cgi.force_redirect” ;cgi.force_redirect = 1 先去前面的分号再改为 cgi.force_redirect = 0
搜索“fastcgi.impersonate”,找到: ;fastcgi.impersonate = 1 去掉前面的分号
搜索“cgi.rfc2616_headers”,找到:;cgi.rfc2616_headers = 0 先去前面的分号再改为 cgi.rfc2616_headers = 1
搜索“php_mysql”,找到:”extension=php_mysql.dll和extension=php_mysqli.dll 去掉前面的“;”extension=php_mysql.dll和extension=php_mysqli.dll (支持MYSQL数据库)
6 运行php
F:\xmapp\php>php-cgi.exe -b 127.0.0.1:9000 -c php.ini

7 打开浏览器 输入localhost 运行成功
8 停止nginx服务器
nginx -s stop

如果使用cmd命令窗口启动nginx,关闭cmd窗口是不能结束nginx进程的,可使用两种方法关闭nginx
(1)输入nginx命令 nginx -s stop(快速停止nginx) 或 nginx -s quit(完整有序的停止nginx)
(2)使用taskkill taskkill /f /t /im nginx.exe
10 制作批处理命令快速启动与关闭
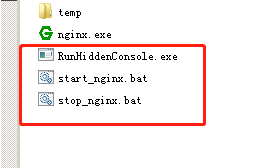
下载软件RunHiddenConsole.exe:
http://redmine.lighttpd.net/attachments/660/RunHiddenConsole.zip
start_nginx.bat
@echo off

REM set PHP_FCGI_CHILDREN=5
set PHP_FCGI_MAX_REQUESTS=1000

echo Starting PHP FastCGI...
F:\nginx-1.14.2\RunHiddenConsole "F:\xmapp\php\php-cgi.exe" -b 127.0.0.1:9000 -c "F:\xmapp\php\php.ini"
echo Starting nginx...
F:\nginx-1.14.2\RunHiddenConsole "F:/nginx-1.14.2/nginx.exe" -p "F:/nginx-1.14.2/"
stop_nginx.bat
@echo off
echo Stopping nginx...
taskkill /F /IM nginx.exe > nul
echo Stopping PHP FastCGI...
taskkill /F /IM php-cgi.exe > nul
exit
就可以双击运行控制启动与停止了。
11 参考资料
https://blog.csdn.net/weixin_41782253/article/details/82706617
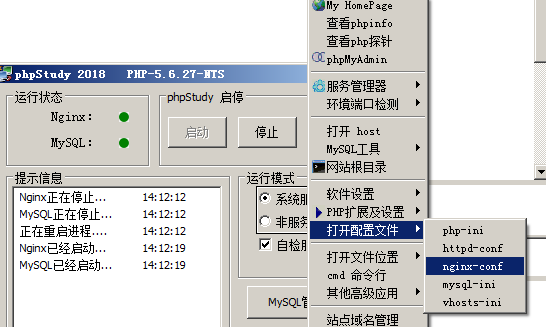
12 直接用phpstudy
#user  nobody;
worker_processes  1;

#error_log  logs/error.log;
#error_log  logs/error.log  notice;
#error_log  logs/error.log  info;

#pid        logs/nginx.pid;


events {
    worker_connections  1024;
}


http {
    include       mime.types;
    default_type  application/octet-stream;

    #log_format  main  '$remote_addr - $remote_user [$time_local] "$request" '
    #                  '$status $body_bytes_sent "$http_referer" '
    #                  '"$http_user_agent" "$http_x_forwarded_for"';

    #access_log  logs/access.log  main;

    sendfile        on;
    #tcp_nopush     on;

    #keepalive_timeout  0;
    keepalive_timeout  65;

    #gzip  on;


server {
        listen          80;
        server_name     localhost;
        root            E:/ts.p2ps.cn;

        #access_log  /tmp/testing.p2ps.cn.log;
        #error_log   /tmp/testing.p2ps.cn.log;

        #"upstream sent too big header" issue
        #nginx 错误
        # FirePHP 等造成头部过大的错误
        fastcgi_buffers  16 16k;
        fastcgi_buffer_size  32k;

        # 设置expires和max-age的时间
        location ~* "^.+\.(jpe?g|gif|css|png|js|ico|pdf|zip|tar|t?gz|mp3|wav|swf)$" {
            expires         30d;
            log_not_found   off;
        }

        #location / {
        #    try_files $uri $uri/ /index.php?$args;
        #}

        #将request指向index.php
        location / {
            index  index.php index.html index.htm;
            if (-f $request_filename) {
                break;
            }
           if (-d $request_filename) {
                break;
            }
           rewrite ^(.+)$ /index.php last;
        }

        #主程序目录不能被访问
        #location  /www/{
        #    deny    all;
        #}
 	location /src/ {
            fastcgi_pass 127.0.0.1:9000;
            fastcgi_index index.php;
            fastcgi_connect_timeout 300;
            fastcgi_send_timeout 300;
            fastcgi_read_timeout 300;
            #fastcgi_param SCRIPT_FILENAME $document_root$fastcgi_script_name;
            fastcgi_param SCRIPT_FILENAME $document_root/src/index.php;
            include fastcgi_params;
            #client_max_body_size  50m;
        }

        #引用PHP CGI
        location ~ .*\.(php|php5)?$ {
            fastcgi_pass   127.0.0.1:9000;
            fastcgi_param  SCRIPT_FILENAME $document_root$fastcgi_script_name;
            fastcgi_read_timeout 600;
            include fastcgi_params;
        }
    }


    # another virtual host using mix of IP-, name-, and port-based configuration
    #
    #server {
    #    listen       8000;
    #    listen       somename:8080;
    #    server_name  somename  alias  another.alias;

    #    location / {
    #        root   html;
    #        index  index.html index.htm;
    #    }
    #}


    # HTTPS server
    #
    #server {
    #    listen       443 ssl;
    #    server_name  localhost;

    #    ssl_certificate      cert.pem;
    #    ssl_certificate_key  cert.key;

    #    ssl_session_cache    shared:SSL:1m;
    #    ssl_session_timeout  5m;

    #    ssl_ciphers  HIGH:!aNULL:!MD5;
    #    ssl_prefer_server_ciphers  on;

    #    location / {
    #        root   html;
    #        index  index.html index.htm;
    #    }
    #}

}

 浙公网安备 33010602011771号