
13_状态模式
1 初识状态模式
- 关键:区分事物内部的状态
事物内部的状态改变往往会带来行为改变
有一个电灯,电灯上面只有一个开关
- 当电灯开着的时候,此时按下开关,电灯会切换到关闭状态
- 再按一次开关,电灯又将被打开
同一个开关按钮,在不同的状态下,表现出来的行为是不一样的
1.1 电灯程序
1. 定义Light类
class Light {}
2. 首先给出不同状态模式的电灯程序实现
constructor() {
  this.state = 'off'; // 记录电灯当前状态
  this.button = null; // 表示具体开关按钮
}
3. 定义init方法:负责在页面中创建一个真实的button节点
假设这个button就是电灯的开关按钮,onclick事件触发时就是电灯开关被按下时
init() {
  let btn = document.createElement('button');
  btn.innerHTML = '开关';
  this.button = document.body.appendChild(btn);
  this.button.onclick = () => {
    this.buttonWasPressed()
  }
}
4. buttonWasPressed方法实现
开关按下之后的行为都被封装在了 buttonWasPressed 方法中
- 状态 -- 打开 | 关闭
buttonWasPressed() {
  if(this.state === 'off') {
    console.log('开灯');
    this.state = 'on';
  } else if(this.state === 'on') {
    console.log('关灯');
    this.state = 'off';
  }
}
- 状态 -- 弱光 | 强光 | 关闭
buttonWasPressed() {
  if(this.state === 'off') {
    console.log('弱光');
    this.state = 'weakLight';
  } else if(this.state === 'weakLight') {
    console.log('强光');
    this.state = 'strongLight';
  } else if(this.state === 'strongLight') {
    console.log('关灯');
    this.state = 'off';
  }
}
5. 缺点
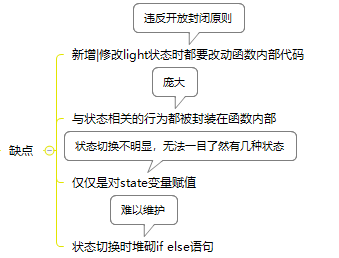
1.2 状态模式改进电灯程序
谈到封装,一般都会优先封装对象的行为,而不是对象的状态
- 关键:把事物的每种状态都封装成单独的类,跟此状态相关的行为都被封装在类的内部
button被按下时只需在上下文中将这个请求委托给当前的状态对象即可,该状态对象会负责渲染它自身的行为

- 把状态的切换规律事先分布在状态类中 -- 消除原本存在的大量条件分支语句
1. 定义状态类
3个状态类都有buttonPressed方法,代表在各自状态下,按钮被按下时将发生的行为
class OffLightState {
  constructor(light) {
    this.light = light
  }
  buttonWasPressed() {
    console.log('弱光'); // offLightState 对应的行为
    this.light.setState(this.light.weakLightState)
  }
}
class WeakLightState {
  constructor(light) {
    this.light = light
  }
  buttonWasPressed() {
    console.log('强光'); // WeakLightState 对应的行为
    this.light.setState(this.light.strongLightState)
  }
}
class StrongLightState {
  constructor(light) {
    this.light = light
  }
  buttonWasPressed() {
    console.log('关灯'); // StrongLightState 对应的行为
    this.light.setState(this.light.offLightState)
  }
}
2. 改写Light类
不再使用一个字符来记录当前状态,而是更加立体化的状态对象
- 在Light类的构造函数里为每个状态类都创建了一个状态对象 --> 可以明显地看到电灯有几种状态
constructor() {
  this.offLightState = new OffLightState(this);
  this.weakLightState = new WeakLightState(this);
  this.strongLightState = new StrongLightState(this);
  this.currState = this.offLightState;
  this.button = null;
}
按钮被按下时,context不再直接进行任何实质性的操作,而是通过 self.currState.buttonPressed() 将请求委托给当前持有的状态对象去执行
init() {
  let btn = document.createElement('button');
  btn.innerHTML = '开关';
  this.button = document.body.appendChild(btn);
  // 设置当前状态
  this.currState = this.offLightState;

  this.button.onclick = () => {
    this.currState.buttonWasPressed()
  }
}
状态对象可以通过 setState() 方法来切换light对象的状态
- 状态的切换规律事先被定义在各个状态类中 --> 在context中不会出现任何一个跟状态切换相关的条件分支语句
setState(newState) {
  this.currState = newState;
}
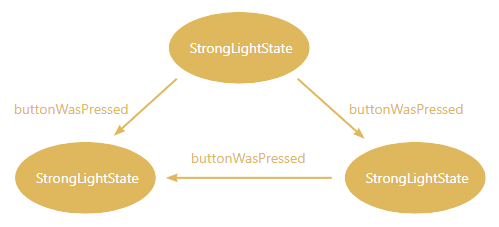
3. 新增状态类superStrongLightSatate类
class SuperStrongLightSatate {
  constructor(light) {
    this.light = light
  }
  buttonWasPressed() {
    console.log('关灯'); // SuperStrongLightSatate 对应的行为
    this.light.setState(this.light.offLightState) // 切换状态到 offLightState
  }
}
在Light构造函数里新增一个superStrongLightSatate对象
constructor() {
  this.offLightState = new OffLightState(this);
  this.weakLightState = new WeakLightState(this);
  this.strongLightState = new StrongLightState(this);
  this.superStrongLightSatate = new SuperStrongLightSatate(this);
  this.currState = this.offLightState;
  this.button = null;
}
最后改变状态类之间的切换规则,从 StrongLightState->OffLightState 变成 StrongLightState->SuperStrongLightSatate->OffLightState
2 状态模式的定义
- 允许一个对象在其内部状态改变时改变它的行为,对象看起来似乎修改了它的类
解析
- 将状态封装成独立的类,并且将请求委托给当前对象,当对象的内部状态改变时会带来不同的行为变化
- 使用的对象在不同的状态下具有不同的行为
3 状态模式的通用结构
在电灯例子中,我们完成了一个状态模式程序的编写
- 首先定义了Light类,即上下文Context
- 随后在Light的构造函数中创建每个状态类的实例对象 -- Context持有对这些状态对象的引用,以便将请求委托给状态对象
- 用户的请求,即点击button的动作也是在Context中实现
4 提供状态父类避免状态类缺乏方法定义
class SuperLightState {
  constructor(light) {
    this.light = light
  }
  buttonWasPressed() {
    throw new Error('父类的buttonWasPressed方法必须被重写')
  }
}
5 例子--文件上传
文件上传程序中会有扫描、正在上传、暂停、上传成功、上传失败这几种状态,在上传中和暂停状态下的行为表现是不一样的,样式也不同
暂停按钮: 上传中‖ 暂停中▶
5.1 更复杂的切换条件
2个按钮
- 暂停|继续上传
- 删除文件
不同状态下,按钮行为不同
- 扫描中,不能进行任何操作,既不能暂停也不能删除
- 扫描完成之后
- 文件已存在于服务器--上传完成
- 文件损坏--上传失败
- 上传中, 暂停|继续上传
- 扫描和上传中,点击删除按钮无效,只有在暂停、上传完成、上传失败之后才能删除文件
5.2 准备工作
上传是一个异步过程,所以控件会不停地调用js提供的一个全局函数 window.external.upload 来通知js目前的上传进度,控件会把当前文件状态作为参数 state塞进 window.external.upload
1. 模拟
setTimeout模拟文件上传进度window.external.upload只负责打印log
window.external.upload = function(state) {
  console.log(state); // sign | uploading | done | error
}
2. 定义用于上传的插件对象
let plugin = (function() {
  let plugin = document.createElement('embed');
  plugin.style.display = 'none';
  plugin.type = 'application/txftn-webkit';
  plugin.sign = function() {
    console.log('开始文件扫描');
  }
  plugin.pause = function() {
    console.log('暂停文件上传');
  }
  plugin.uploading = function() {
    console.log('开始文件上传');
  }
  plugin.del = function() {
    console.log('删除文件上传');
  }
  plugin.done = function() {
    console.log('文件上传完成');
  }
  document.body.appendChild(plugin);
  return plugin;
})()
5.3 定义Upload类
1. 构造函数
控制上传过程的对象将从 Upload 类中创建而来
class Upload {
  constructor(fileName) {
    this.plugin = plugin;
    this.fileName = fileName;
    this.button1 = null;
    this.button2 = null;
    this.state = 'sign'; // 设置初始状态为 waiting
  }
}
2. init方法
进行初始化工作:包括创建节点,起主要作用的是用于控制上传流程的2个按钮
init() {
  // 创建节点:用于控制上传流程的按钮
  this.dom = document.createElement('div');
  this.dom.innerHTML = `
    <span>文件名称:${this.fileName}</span>
    <button data-action="button1">扫描中</button>
    <button data-action="button2">删除</button>
  `
  document.body.appendChild(this.dom)
  this.button1 = this.dom.querySelector('[data-action="button1"]')
  this.button2 = this.dom.querySelector('[data-action="button2"]')
  this.bindEvent()
}
3. bindEvent方法
给2个按钮绑定点击事件
bindEvent() {
  this.button1.onclick = () => {
    switch(this.state) {
      case 'sign': // 扫描状态下,任何操作无效
        console.log('扫描中,点击无效...');
        break;
      case 'uploading': // 上传中,点击切换到暂停
        this.changeState('pause');
        break;
      case 'pause': // 暂停中,点击切换到上传中
        this.changeState('uploading');
        break;
      case 'done':
        console.log('文件已完成上传, 点击无效');
        break;
      case 'error':
        console.log('文件上传失败, 点击无效');
        break;
    }
  }
  this.button2.onclick = () => {
    switch(this.state) {
      case 'done':
      case 'error':
      case 'pause':
        // 上传完成、上传失败和暂停状态下可以删除
        this.changeState('del');
        break;
      case 'sign':
        console.log('文件正在扫描中,不能删除');
        break;
      case 'uploading':
        console.log('文件正在上传中,不能删除');
        break;
    }
  }
}
4. changeState方法
负责切换状态后的具体行为:改变按钮的innerHTML + 调用插件开始‘真正’的操作
changeState(state) {
  switch(state) {
    case 'sign':
      this.plugin.sign();
      this.button1.innerHTML = '扫描中,任何操作无效';
      break;
    case 'uploading':
      this.plugin.uploading();
      this.button1.innerHTML = '正在上传,点击暂停';
      break;
    case 'pause':
      this.plugin.pause();
      this.button1.innerHTML = '已暂停,点击继续上传';
      break;
    case 'done':
      this.plugin.done();
      this.button1.innerHTML = '上传完成';
      break;
    case 'error':
      this.button1.innerHTML = '上传失败';
      break;
    case 'del':
      this.plugin.del();
      this.dom.parentNode.removeChild(this.dom);
      console.log('删除完成');
      break;
  }
  this.state = state;
}
5. 测试
let uploadObj = new Upload('js设计模式及开发实践')
uploadObj.init()

window.external.upload = function(state) {
  uploadObj.changeState(state);
}
window.external.upload('sign') // 文件开始扫描

setTimeout(() => {
  window.external.upload('uploading'); // 1 秒后开始上传
}, 1000);

setTimeout(() => {
  window.external.upload('done'); // 5 秒后上传完成
}, 5000);
这也是一个反例
6. 缺点
- 程序中充斥着if else条件分支
- 状态和行为都被耦合在一个巨大的方法里
- 状态之间的联系非常复杂,更加难以维护
5.4 状态模式重构文件上传程序
1. 提供 window.external.upload 函数 + 定义plugin对象
2. 改造Upload类
在构造函数中为每种状态创建一个实例对象
class Upload {
  constructor(fileName) {
    this.plugin = plugin;
    this.fileName = fileName;
    this.button1 = null;
    this.button2 = null;
    // 设置初始状态为waiting
    this.signState = new SignState(this);
    this.uploadingState = new UploadingState(this);
    this.pauseState = new PauseState(this);
    this.doneState = new DoneState(this);
    this.errorState = new ErrorState(this);
    this.currState = this.signState; // 设置当前状态
  }
}
3. init 方法无需改变
创建节点+事件绑定
init() {
  // 创建节点:用于控制上传流程的按钮
  this.dom = document.createElement('div');
  this.dom.innerHTML = `
    <span>文件名称:${this.fileName}</span>
    <button data-action="button1">扫描中</button>
    <button data-action="button2">删除</button>
  `
  document.body.appendChild(this.dom)
  this.button1
    = this.dom.querySelector('[data-action="button1"]')
  this.button2
    = this.dom.querySelector('[data-action="button2"]')
  // 绑定点击事件
  this.bindEvent()
}
4. 具体的按钮事件实现
Context并不做任何具体的操作,而是将请求委托给当前状态类执行
bindEvent() {
  this.button1.onclick = () => {
    this.currState.clickHandle1();
  }
  this.button2.onclick = () => {
    this.currState.clickHandle2();
  }
}
把状态对应的逻辑行为放在Upload类中
sign() {
  this.plugin.sign();
  this.button1.innerHTML = '扫描中,任何操作无效';
  this.currState = this.signState;
}
uploading() {
  this.plugin.uploading();
  this.button1.innerHTML = '正在上传,点击暂停';
  this.currState = this.uploadingState;
}
pause() {
  this.plugin.pause();
  this.button1.innerHTML = '已暂停,点击继续上传';
  this.currState = this.pauseState;
}
done() {
  this.plugin.done();
  this.button1.innerHTML = '上传完成';
  this.currState = this.uploadingState;
}
error() {
  this.button1.innerHTML = '上传失败';
  this.currState = this.errorState;
}
del() {
  this.plugin.del();
  this.dom.parentNode.removeChild(this.dom);
}
5. 定义各状态类
定义了状态父类,避免状态类缺少方法定义
class State {
  constructor(uploadObj) {
    this.uploadObj = uploadObj;
  }
  clickHandle1() {
    throw new Error('父类的clickHandle1方法必须被重写')
  }
  clickHandle2() {
    throw new Error('父类的clickHandle2方法必须被重写')
  }
}
class SignState extends State {
  constructor(uploadObj) {
    super(uploadObj)
  }
  clickHandle1() {
    console.log('扫描中,点击无效...');
  }
  clickHandle2() {
    console.log('文件正在扫描中,不能删除');
  }
}
class UploadingState extends State {
  constructor(uploadObj) {
    super(uploadObj)
  }
  clickHandle1() {
    this.uploadObj.pause();
  }
  clickHandle2() {
    this.uploadObj.del();
  }
}
class PauseState extends State {
  constructor(uploadObj) {
    super(uploadObj)
  }
  clickHandle1() {
    this.uploadObj.uploading();
  }
  clickHandle2() {
    this.uploadObj.del();
  }
}
class DoneState extends State {
  constructor(uploadObj) {
    super(uploadObj)
  }
  clickHandle1() {
    console.log('文件已完成上传, 点击无效');
  }
  clickHandle2() {
    this.uploadObj.del();
  }
}
class ErrorState extends State {
  constructor(uploadObj) {
    super(uploadObj)
  }
  clickHandle1() {
    console.log('文件上传失败, 点击无效');
  }
  clickHandle2() {
    this.uploadObj.del();
  }
}
测试
let uploadObj = new Upload('js设计模式与开发实践')
uploadObj.init()

window.external.upload = function(state) {
  uploadObj[state]()
}
window.external.upload('sign') // 文件开始扫描

setTimeout(() => {
  window.external.upload('uploading'); // 1 秒后开始上传
}, 1000);

setTimeout(() => {
  window.external.upload('done'); // 5 秒后上传完成
}, 5000);
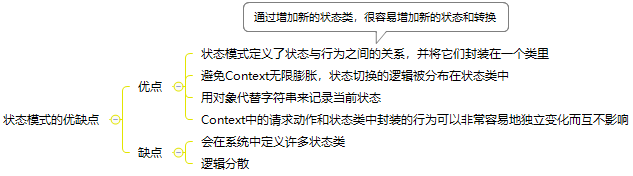
6 状态模式的优缺点
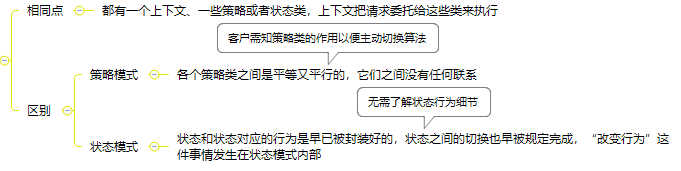
7 状态模式和策略模式的关系
8 js版本的状态机
使用状态机改写电灯
方法1:通过 Function.prototype.call 把请求委托给某个字面量对象来执行
class Light {
  constructor() {
    // 设置当前状态
    this.currState = FSM.off;
    this.button = null;
  }
  init() {
    let button =  document.createElement('button');
    button.innerHTML = '已关灯';
    this.button = () => {
      // 把请求委托给FSM状态机
      this.currState.buttonWasPressed.call(this)
    }
  }
}
let FSM = {
  off: {
    buttonWasPressed() {
      console.log('关灯');
      this.button.innerHTML = '下一次按我是开灯';
      this.currState = FSM.on;
    }
  },
  on: {
    buttonWasPressed() {
      console.log('开灯');
      this.button.innerHTML = '下一次按我是关灯';
      this.currState = FSM.off;
    }
  }
}
方法2:利用delegate函数实现状态机编写
面向对象设计和闭包互换
1. 闭包把变量封装在闭包形成的环境中
let delegate = function(client, delegation) {
  return {
    buttonWasPressed() {
      // 将客户的操作委托给delegation对象
      return delegation.buttonWasPressed.apply(client, arguments);
    }
  }
}
2. 面向对象设计把变量保存为对象的属性
let FSM = {
  off: {
    buttonWasPressed() {
      console.log('关灯');
      this.button.innerHTML = '下一次按我是开灯';
      this.currState = this.onState;
    }
  },
  on: {
    buttonWasPressed() {
      console.log('开灯');
      this.button.innerHTML = '下一次按我是关灯';
      this.currState = this.offState;
    }
  }
}
3. Light类
class Light {
  constructor() {
    this.offState = delegate(this, FSM.off);
    this.onState = delegate(this, FSM.on);
    this.currState = this.offState;
    this.button = null;
  }
  init() {
    let button =  document.createElement('button');
    button.innerHTML = '已关灯';
    this.button = () => {
      // 把请求委托给FSM状态机
      this.currState.buttonWasPressed()
    }
  }
}
9 表驱动的有限状态机
基于表驱动
let fsm = StateMachine.create({
  initial: 'off',
  events: [
    { name: 'buttonWasPressed', from: 'off', to: 'on' },
    { name: 'buttonWasPressed', from: 'on', to: 'off' },
  ],
  callback: {
    onbuttonWasPressed(event, from, to) {
      console.log(arguments);
    }
  },
  error(eventName, from, to, args, errorCode, errorMessage) {
    console.log(arguments);
  }
})
button.onclick = () => {
  fsm.buttonWasPressed();
}
10 实际项目中的其他状态机
- 下拉菜单的hover动作:显示、悬浮、隐藏等
- 一次TCP请求:建立连接、监听、关闭等
- 格斗游戏:攻击、跳跃、防御、跌倒等
let FSM = {
  walk: {
    attack() {
      console.log('攻击');
    },
    defense() {
      console.log('防御');
    },
    jump() {
      console.log('跳跃');
    },
  },
  attack: {
    walk() {
      console.log('攻击的时候不能行走');
    },
    defense() {
      console.log('攻击的时候不能防御');
    },
    jump() {
      console.log('攻击的时候不能跳跃');
    },
  }
}

 浙公网安备 33010602011771号