
5-5 命令行交互原理
1 学习路径
- 掌握
readline-- 输入流events-- 实现 nodejs 事件流stream-- 输入输出流ansi-escapes-- 实现命令行的特殊显示rxjs-- 响应式模型库
- 掌握命令行交互的实现原理,并实现一个可交互的列表
- 分析
inquirer源码掌握其中的关键实现
2 readline 的使用方法和实现原理
逐行读取,该模块提供了一个接口,用于一次一行地从 可读流 中读取数据
2.1 核心用法
const readline = require('readline');
const rl = readline.createInterface({
input: process.stdin,
output: process.stdout
})
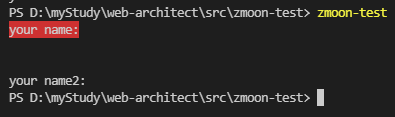
rl.question('your name: ', (answer => {
console.log(answer);
rl.close()
}))

2.2 readline 源码分析
1. 强制将函数转换为构造函数
if(!(this instanceof Interface)) {
  return new Interface(input, output, completer, terminal)
)
2. 继承 EventEmitter
- 使函数具备事件驱动能力
EventEmitter.call(this);
3. readline键盘输入监听实现原理
- 关键事件
emitKeyPressEvents()
bak:generator 函数
function* g() {
  console.log('read');
  const ch = yield;
  console.log(ch);
}
const f = g()
console.log(f); // Object [Generator] {}
// 关键点1:使用 next() 执行函数
f.next()
// 关键点2:调用 next() 继续执行yield之后的代码
f.next('a')
4. readline 核心实现原理
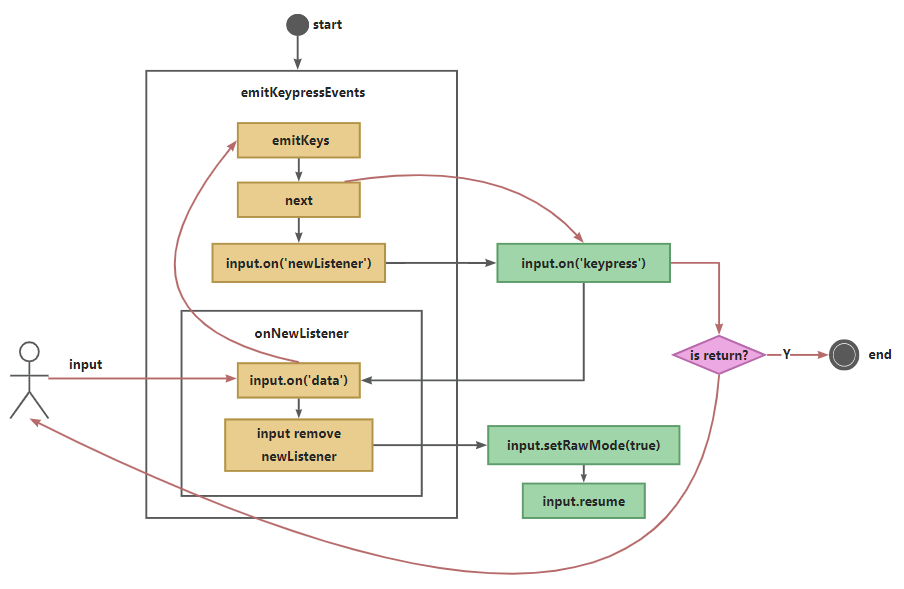
注:readline 利用 Generator 函数的特性
Generator 函数语法
Generator 函数
Generator函数是分段执行的,yield表达式是暂停执行的标记,而next方法可以恢复执行
2.3 手写 readline 核心实现
1. 基础架构
function stepRead(callback) {
  const input = process.stdin
  const output = process.stdout
  let line = '' // 存储用户输入的信息
  function onkeypress(s) {
    output.write(s)
  }
  emitKeypressEvents(input)
  input.on('keypress', onkeypress)
  input.setRawMode(true) // 逐个监听
  input.resume()
}
function emitKeypressEvents(stream) {
  function onData(chunk) {
    g.next(chunk.toString())
  }
  const g = emitKeys(stream)
  g.next()
  stream.on('data', onData) // 暂停执行
}
function* emitKeys(stream) {
  while(true) {
    let ch = yield
    stream.emit('keypress', ch)
  }
}
stepRead()
2. 处理各种用户输入的场景
function onkeypress(s) {
  output.write(s)
  line += s
  switch(s) {
    case '\r':
      input.pause()
      callback(line)
      break
  }
}
stepRead(function(s) {
  console.log('answer: ' + s);
})
3. 总结
- 获取输入输出流
const input = process.stdin
const output = process.stdout
-
存储输入的信息
line -
使用 generator + 绑定输入流--监听用户输入
emitKeypressEvents(input)
function emitKeypressEvents(stream) {
  function onData(chunk) {
    g.next(chunk.toString())
  }
  const g = emitKeys(stream)
  g.next()
  stream.on('data', onData) // 重要:绑定输入流--监听用户输入
}
function* emitKeys(stream) {
  while(true) {
    let ch = yield
    stream.emit('keypress', ch)
  }
}
- 打印输入的内容 + 监听用户输入'回车'就终止
input.on('keypress', onkeypress)
function onkeypress(s) {
  // 打印输入的内容
  output.write(s)
  line += s
  // 监听用户输入'回车'就终止input执行
  switch(s) {
    case '\r':
      input.pause()
      callback(line)
      break
 }
}
3 命令行样式修改的核心原理:ansi转移序列
3.1 color
console.log('\x1B[41m%s\x1B[0m', 'your name:');
数值41 0 表示改变的color

3.2 CSI 序列
console.log('\x1B[2B%s', 'your name2:');
2B 表示光标下移2行
4 响应式库 rxjs
- 将数据处理与展示分离
const { range } = require('rxjs');
const { map, filter } = require('rxjs/operators');

const pipe = range(1, 200).pipe(
  filter(x => x % 2 === 1),
  map(x => x + x),
  filter(x => x % 3 === 0)
)

pipe.subscribe(x => console.log(x));
pipe.subscribe(x => console.log(x + 1));
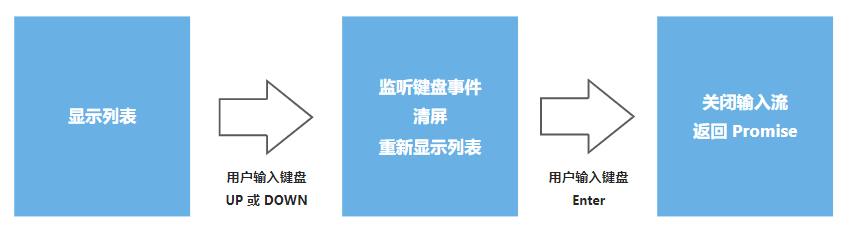
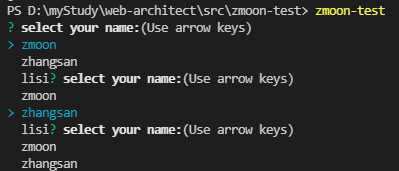
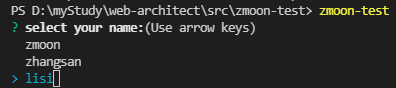
5 手写命令行交互式列表组件
- 实现原理
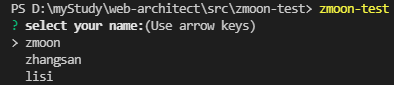
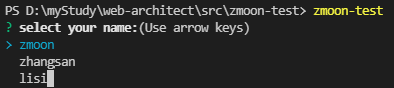
5.1 准备 options
const option = {
  type: 'list',
  name: 'name',
  message: 'select your name:',
  choices: [
    { name: 'zmoon', value: 'zmoon' },
    { name: 'zhangsan', value: 'zhangsan' },
    { name: 'lisi', value: 'lisi' }
  ]
}
5.2 inquirer.Prompt() 返回promise对象
function Prompt(option) {
  return new Promise((resolve, reject) => {
    try {
      const list = new List(option)
      list.render() // 渲染列表
    } catch(e) {
      reject(e)
    }
  })
}
Prompt(option).then(answers => {
  console.log(answers);
})
5.3 交互列表组件
class List extends EventEmitter {
  constructor(option) {}
  // 关键:处理用户输入的信息
  onkeypress = (keymap) => {}
  // 实现列表渲染
  render() {}
  // 关键:渲染用户输入的信息
  getContent() {}
  // 清屏
  clean() {}
}
1. constructor
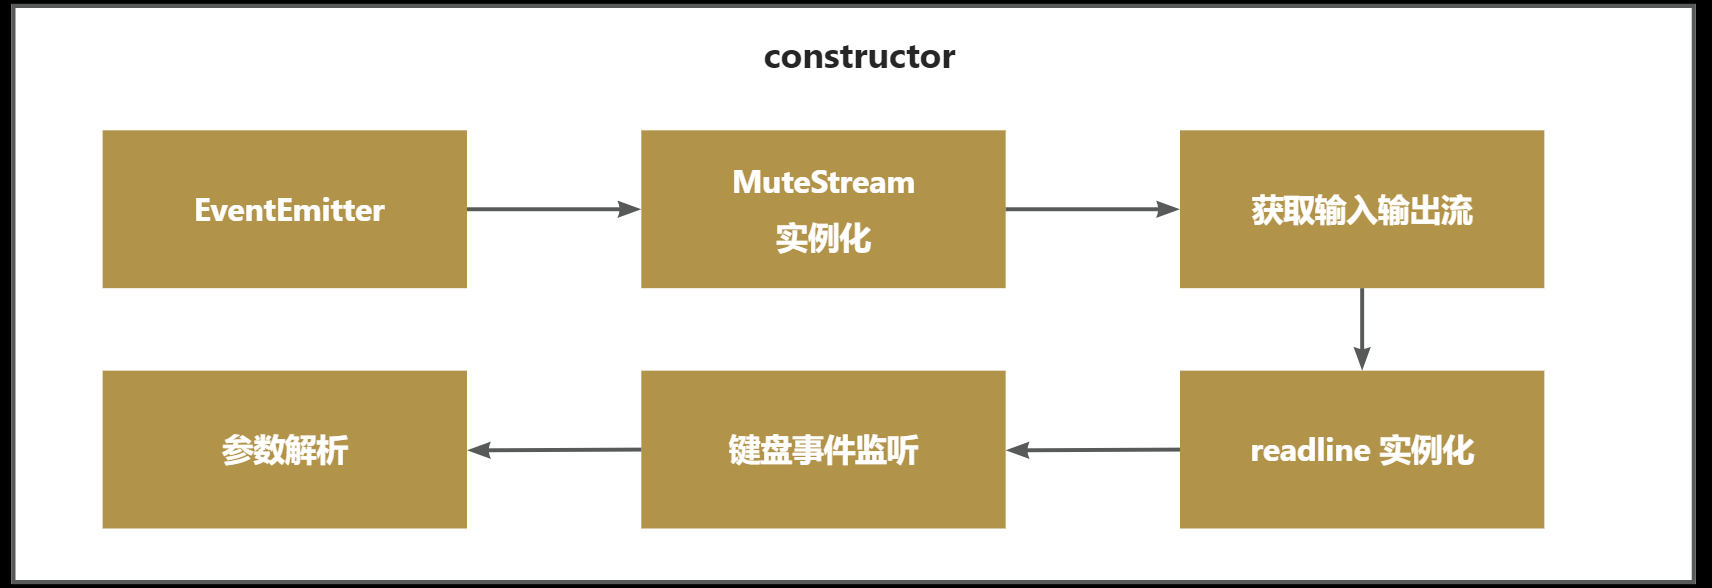
- 继承
events类 -- 实现 nodejs 事件流 MuteStream实例化 -- 使得输出可控- 获取输入输出流
readline实例化 -- 逐行读取- 键盘事件监听
- 参数解析
constructor(option) {
  super()
  this.name = option.name
  this.message = option.message
  this.choices = option.choices
  this.input = process.stdin
  // 使得输出可控 -- mute-stream
  const ms = new MuteStream()
  ms.pipe(process.stdout)
  this.output = ms
  this.rl = readline.createInterface({
    input: this.input,
    output: this.output
  })
  this.selected = 0
  this.height = 0
  this.keypress = fromEvent(this.rl.input, 'keypress')
    .forEach(this.onkeypress)
  this.haveSelected = false; // 是否已选择完毕
}
2. 实现列表渲染
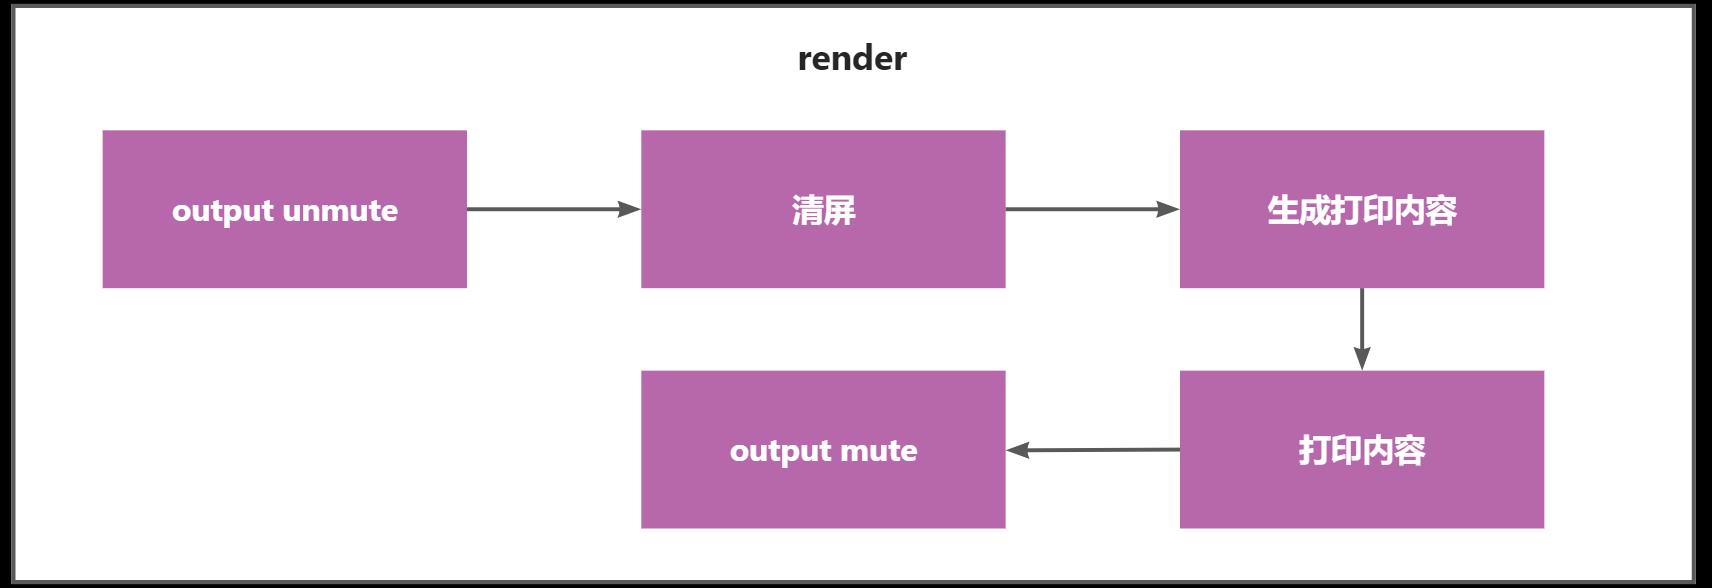
- 解除对
output的禁用 - 清屏
- 生成打印内容 --
this.getContent() - 打印内容
- 禁用
output
render() {
  this.output.unmute()
  this.clean()
  this.output.write(this.getContent())
  this.output.mute()
}
3. 关键:渲染用户输入的信息
getContent() {
  if(!this.haveSelected) {
    let title = this.message + '(Use arrow keys)'
    this.choices.forEach((choice, index) => {
      if(index === this.selected) {
        // 判断是否为最后一个元素,如果是则不加\n
        if(index === this.choices.length - 1) {
          title += '> ' + choice.name
        } else {
          title += '> ' + choice.name + '\n'
        }
      } else {
        if(index === this.choices.length - 1) {
          title += '  ' + choice.name
        } else {
          title += '  ' + choice.name + '\n'
        }
      }
    })
    return title
  } else {
    // 输入结束后的逻辑
  }
}
添加特殊显示
let title = '\x1B[32m?\x1B[39m \x1B[1m' + this.message + '\x1B[22m\x1B[0m\x1B[0m\x1B[2m(Use arrow keys)\x1B[22m\n'
if(index === this.choices.length - 1) {
  title += '\x1B[36m> ' + choice.name + '\x1B[39m'
} else {
  title += '\x1B[36m> ' + choice.name + '\n' + '\x1B[39m'
}
4. 关键:处理用户输入的信息
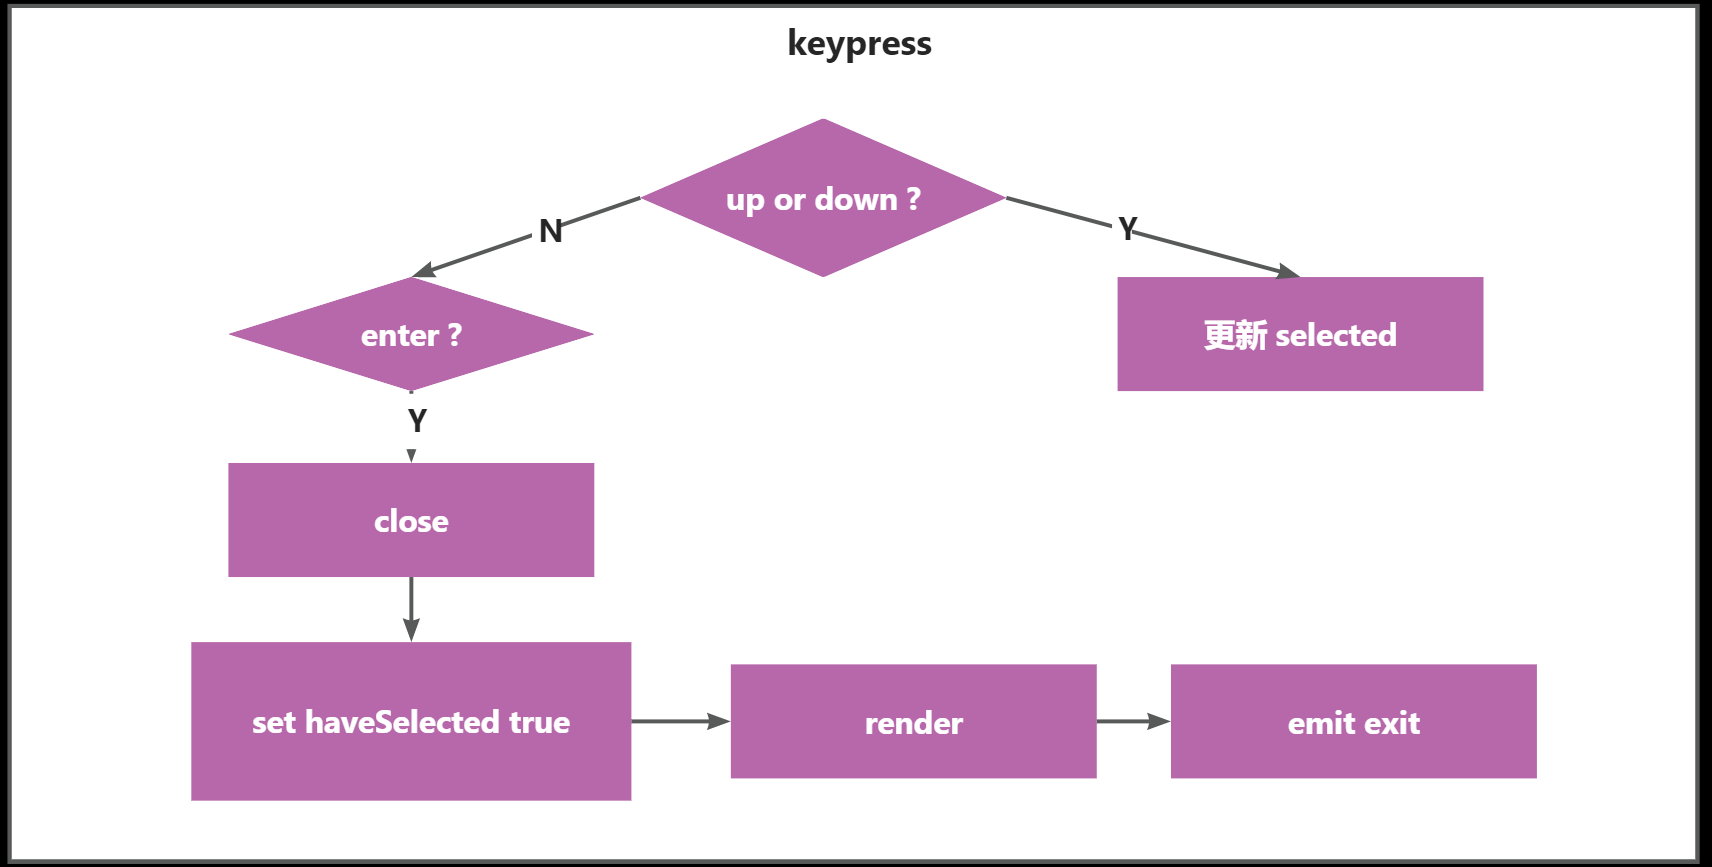
updown按键 ?
- 是则更新
selected
enter按键 ?- 是则关闭输入流
- 设置
haveSelected为true - 列表渲染
emit exit
onkeypress = (keymap) => {
  const key = keymap[1];
  if(key.name === 'down') {
    this.selected++
    if(this.selected > this.choices.length - 1) {
      this.selected = 0
    }
    this.render()
  } else if(key.name === 'up') {
    this.selected--
    if(this.selected < 0) {
      this.selected = this.choices.length - 1
    }
    this.render()
  } else if(key.name === 'return') {
    this.haveSelected = true
    this.render()
    this.close()
    this.emit('exit', this.choices[this.selected])
  }
}
function Prompt(option) {
  return new Promise((resolve, reject) => {
    try {
      const list = new List(option)
      list.render() // 渲染列表
      list.on('exit', answers => {
        resolve(answers)
      })
    } catch(e) {
      reject(e)
    }
  })
}
5. 清屏
clean() {
  // 生成空行数量
  const emptyLines = ansiEscapes.eraseLines(this.height)
  this.output.write(emptyLines)
}
getContent() {
  // ...
  this.height = this.choices.length + 1
  return title
}
6. 输入结束后的逻辑
getContent() {
  if(!this.haveSelected) {
    // ...
  } else {
    const name = this.choices[this.selected].name
    let title = '\x1B[32m?\x1B[39m \x1B[1m' + this.message + '\x1B[22m\x1B[0m\x1B[0m\x1B[36m' + name + '\x1B[39m\x1B[0m\n'
    return title
  }
}
onkeypress = (keymap) => {
  // ...
  // if() {}...
  // else if(key.name === 'return') {
    this.haveSelected = true
    this.render()
    this.close()
    this.emit('exit', this.choices[this.selected])
  // }
}
close() {
  this.output.unmute() // 解除对output的禁用
  // 结束readline 输入流
  this.rl.output.end()
  this.rl.pause() // 使当前rl停止监听
  this.rl.close()
}

 浙公网安备 33010602011771号