1.购买弹性公网IP
产品->网络->弹性公网IP EIP
计费模式:按需计费
区域:华北-北京四
线路:全动态BGP
公网带宽:按流量计费
带宽大小:100
IPv6:不开启
弹性公网IP名称:eip-bigdata1
购买量:1
2.购买MRS集群
产品-》大数据=》MapReduce服务
选择“自定义购买”
区域:华北—北京四
计费模式:按需计费
集群名称:mrs-bigdata
版本类型:普通版
集群版本:MRS 3.1.0 WXL
集群类型:自定义
勾选组件:Hadoop/HBase/Hive/Zookeeper/Ranger
可用区:任意均可
虚拟私有云:vpc-bigdata
子网:subnet-bigdata
安全组:sg-bigdata
弹性公网IP:选择下拉框中已购买的ip
常用模板:默认选项
集群节点:
实例规格:全部选择通用计算增强型
8 vCPUs |32 GB | c6.2xlarge.4
系统盘:高IO 480 GB x 1
数据盘:高IO 600 GB x 1
实例数量:Master节点 3台
分析Core节点:2台
无需添加分析Task节点。
开启“拓扑调整”,勾选master(3)的“DN, NM, RS”。此操作表示在Master3节点分别部署DataNode, NodeManager, RegionServer以解决如上警告。
Kerberos认证:保持关闭状态
用户名:admin
密码:自定义密码,例如12QWqw@@
确认密码:再次输入
登录方式:密码
用户名:root
密码:自定义密码,例如12QWqw@@
确认密码:再次输入
如有其他选项:默认或不用填
通信安全授权:确认授权
3.安装jdk环境
集群目前只有jre环境,无法进行打包操作,仍需安装jdk环境才行。运行下列代码下载jdk1.8压缩文件,直接下载到/home/user目录下即可,方便查找。
wget https://sandbox-expriment-files.obs.cn-north-1.myhuaweicloud.com/hccdp/HCCDP/jdk-8u341-linux-x64.tar.gz

下载完成后,运行下列命令进行解压:
tar -zxvf jdk-8u341-linux-x64.tar.gz4.HDFS实验
HDFS是Hadoop大数据平台中的分布式文件系统,为上层应用或其他大数据组件提供数据存储,因此掌握HDFS的使用对我们更好的理解和掌握大数据大有裨益。本实验是通过JAVA语言来操作HDFS文件系统,主要介绍了HDFS中有关查看路径和文件、新建路径、新建空白文件、创建文件同时写入数据、查看文件内容、删除文件等相关的API,帮助大家更好上手HDFS的大数据开发与应用流程。
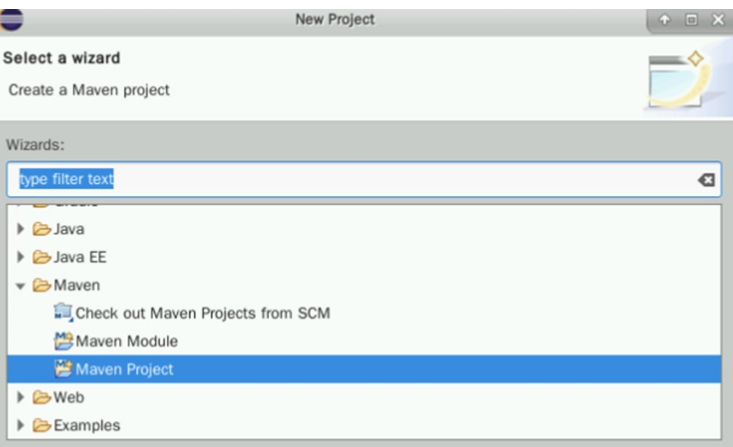
创建Eclipse Maven项目
双击打开桌面上的eclipse,点击左上角的File标签,选择 ”New” > ”project” 按钮,新建一个项目。
在下方找到Maven Project,点选之后点击Next
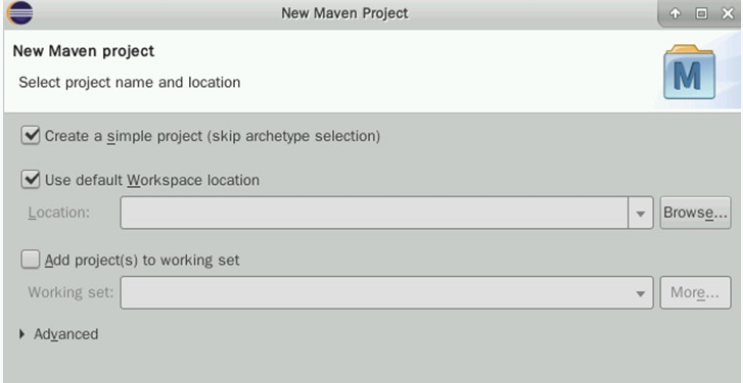
勾选Create a simple project,点击Next
按如下配置项目信息:
① GroupId:com.huawei
② Artifactid:HDFSAPI
③ Version:0.0.1-SNAPSHOT
④ Packaging:jar
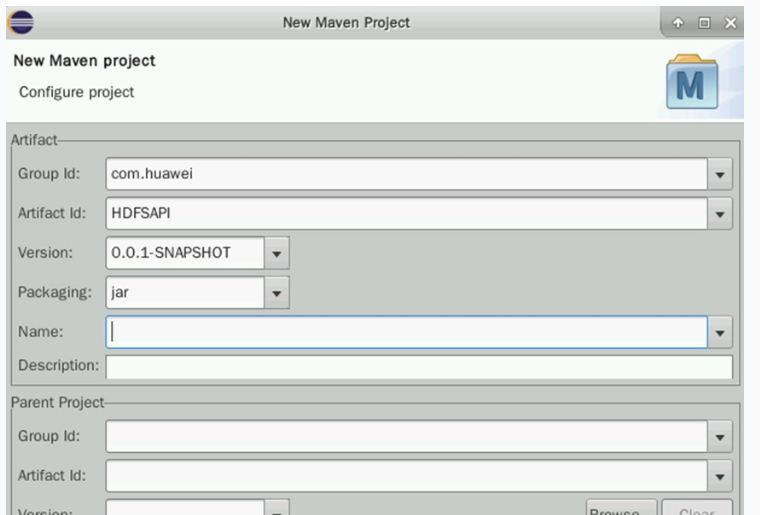
确认无误后点击Finish即可创建项目。
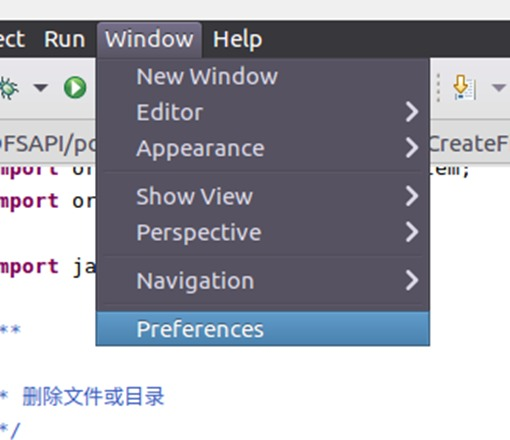
修改JDK路径
右上角选择Window标签,在下拉菜单最后一栏中找到Preferences。
点击Preferences,在新窗口的左侧找到Java->Compiler

右侧找到Compiler Compliance level 16,点击16的下拉菜单,在列表中找到1.8,选择1.8即可

确认改为1.8之后,点击Apply,出现如下弹窗,点击关闭即可
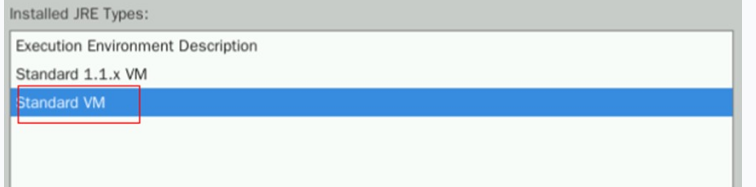
然后在下方还能找到Installed JREs标签,点击Add按钮进行配置

在弹出的新窗口处选择Standard VM,然后点击Next
在JRE home处填入/home/user/jdk1.8.0_341,即可自动匹配关联下方信息。
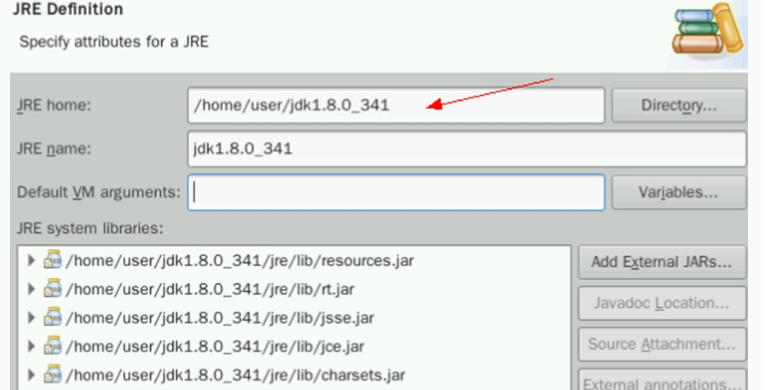
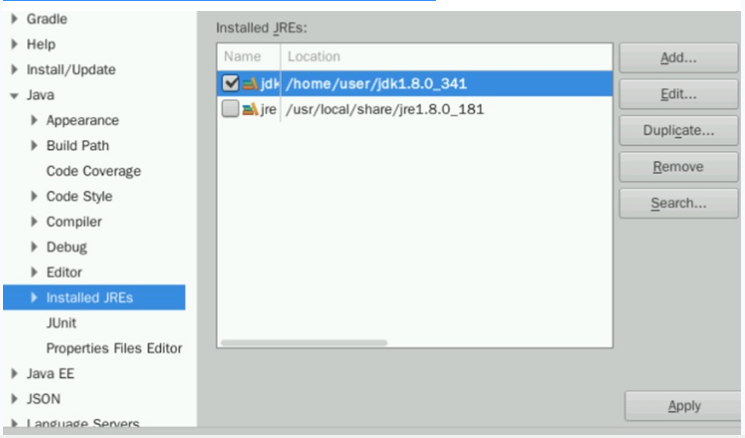
确认无误后点击Finish,然后勾选新增的jdk前的框。点击Apply and Close。
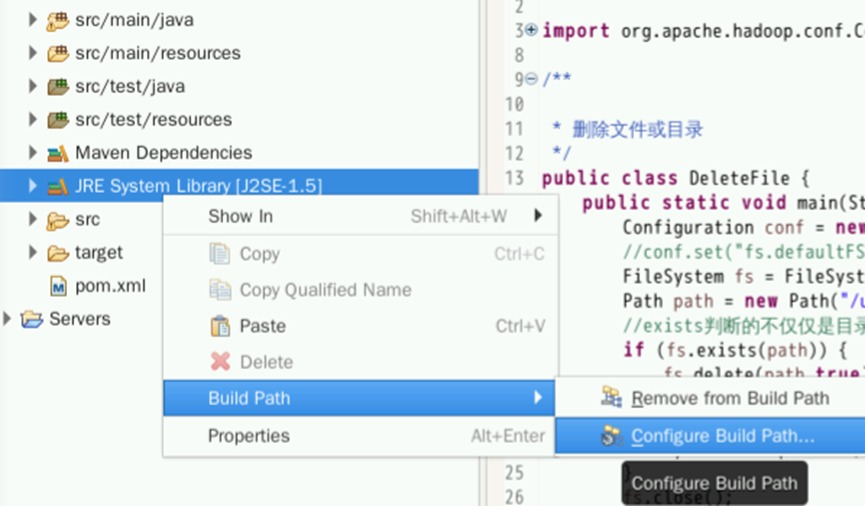
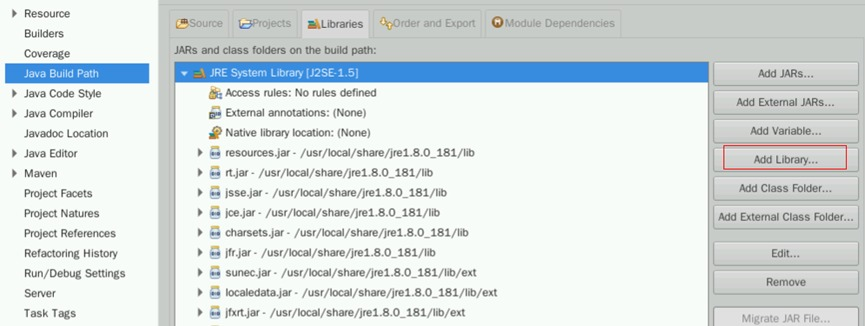
回到初始界面,看到项目名称下有一个类似JRE System Library [J2SE-1.5]的标签。
右键点击该标签,选择Build Path->Configure Build Path:
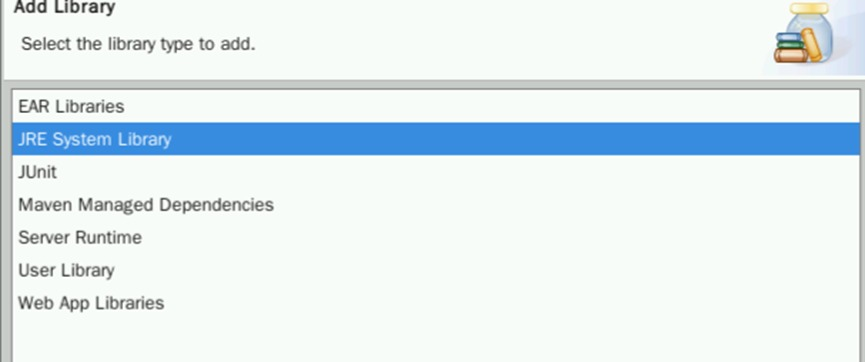
在新窗口点击Add Library
选择JRE System Library,点击Next。
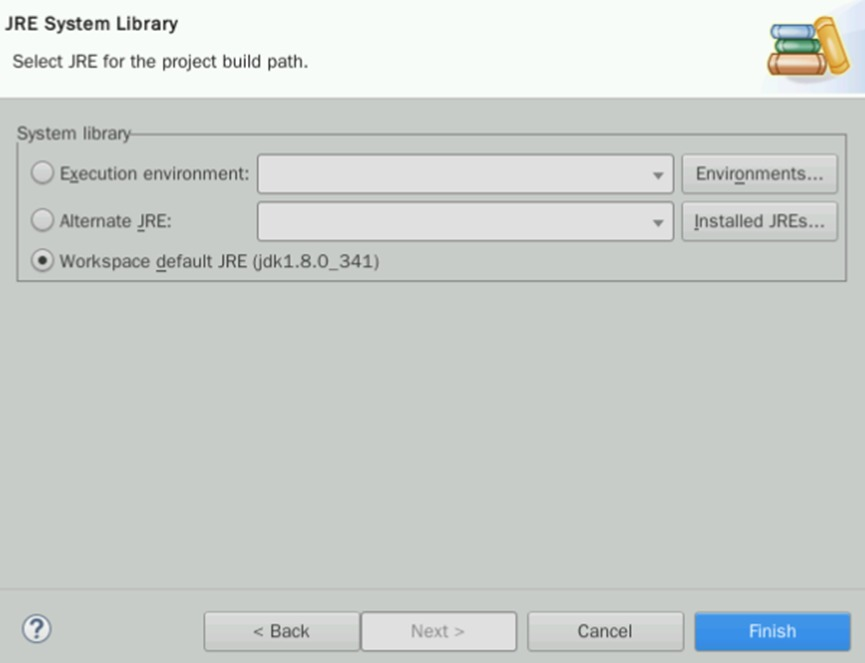
此时应该能看到Workspace default JRE (jdk1.8.0_341),保证勾选后点击Finish:
将之前的J2SE-1.5直接删除。选择该模块,在右边找到Remove:
删除之后,点击右下角的Apply And Close即可。
配置POM文件
在maven项目中,pom文件就是我们配置项目所需jar包的所在地,双击pom文件,在页面中中添加jar包信息。
<?xml version="1.0" encoding="UTF-8"?>
<project xmlns="http://maven.apache.org/POM/4.0.0"
xmlns:xsi="http://www.w3.org/2001/XMLSchema-instance"
xsi:schemaLocation="http://maven.apache.org/POM/4.0.0 http://maven.apache.org/xsd/maven-4.0.0.xsd">
<modelVersion>4.0.0</modelVersion>
<groupId>com.huawei</groupId>
<artifactId>HDFSAPI</artifactId>
<version>1.0-SNAPSHOT</version>
<properties>
<project.build.sourceEncoding>UTF-8</project.build.sourceEncoding>
<maven.compiler.source>1.8</maven.compiler.source>
<maven.compiler.target>1.8</maven.compiler.target>
</properties>
<repositories>
<repository>
<id>huaweicloud2</id>
<name>huaweicloud2</name>
<url>https://mirrors.huaweicloud.com/repository/maven/</url>
</repository>
<repository>
<id>huaweicloud1</id>
<name>huaweicloud1</name>
<url>https://repo.huaweicloud.com/repository/maven/huaweicloudsdk/</url>
</repository>
</repositories>
<dependencies>
<dependency>
<groupId>junit</groupId>
<artifactId>junit</artifactId>
<version>4.12</version>
<scope>test</scope>
</dependency>
<dependency>
<groupId>org.apache.hadoop</groupId>
<artifactId>hadoop-client</artifactId>
<version>3.1.1</version>
</dependency>
</dependencies>
<build>
<finalName>HDFSAPI</finalName>
<plugins>
<plugin>
<artifactId>maven-assembly-plugin</artifactId>
<configuration>
<descriptorRefs>
<descriptorRef>jar-with-dependencies</descriptorRef>
</descriptorRefs>
</configuration>
<executions>
<execution>
<id>make-assembly</id>
<phase>package</phase>
<goals>
<goal>assembly</goal>
</goals>
</execution>
</executions>
</plugin>
</plugins>
</build>
</project>
配置好pom文件后,保存即可刷新maven配置。
判断HDFS文件是否存在
在src>main>java目录下创建包com.huawei.hdfs。右键点击src/main/java,选择Package。
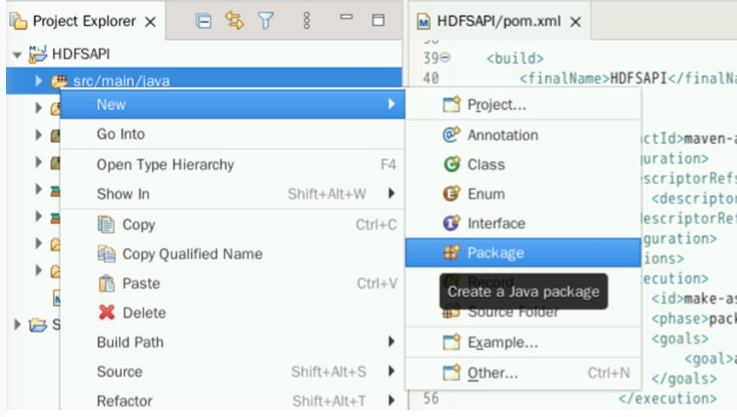
编辑Name为:com.huawei.hdfs。
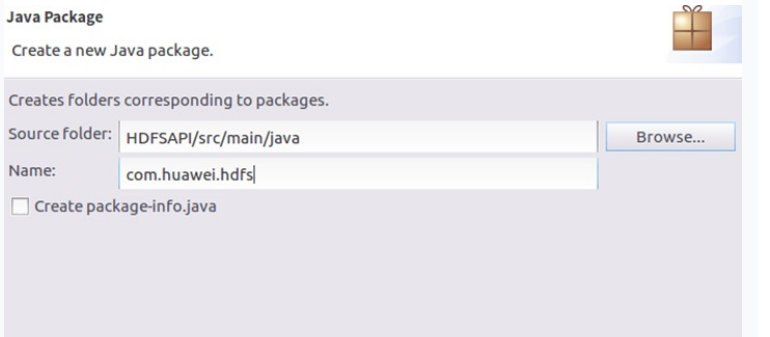
点击Finish即可创建。
右键新建的包,选择New->Class:
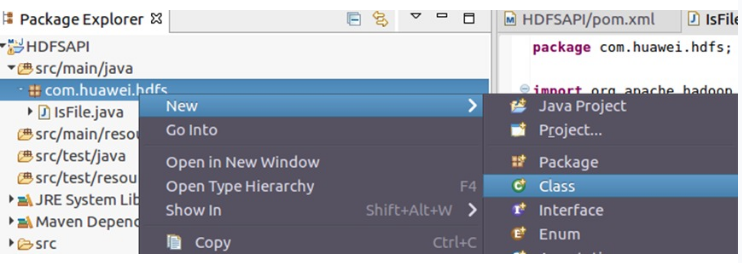
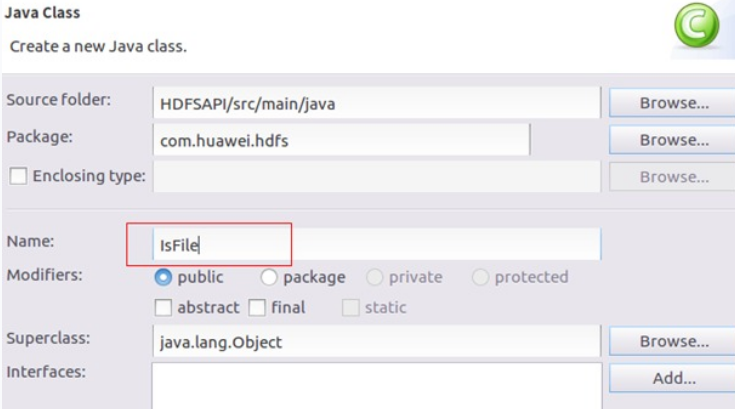
编辑Name为IsFile,用于创建名为IsFile的Java类。该文件的目的就是判断HDFS文件中是否存在一个文件或者路径。
代码如下
package com.huawei.hdfs;
import org.apache.hadoop.conf.Configuration;
import org.apache.hadoop.fs.FileSystem;
import org.apache.hadoop.fs.Path;
import java.io.IOException;
public class IsFile {
public static void main(String[] args) throws IOException {
Configuration conf = new Configuration();
//conf.set("fs.defaultFS", "hdfs:// master:9000");
FileSystem fs = FileSystem.get(conf);
Path path1 = new Path("/user/test/hdfs");
Path path2 = new Path("/user/test/hdfs/file10.txt");
//判断目录是否存在
if (fs.exists(path1)) {
System.out.println(path1+"目录已经存在");
}else{
System.out.println(path1+"目录不存在");
}
//判断文件是否存在
if (fs.exists(path2)) {
System.out.println(path2+"文件已经存在");
}else{
System.out.println(path2+"文件不存在");
}
fs.close();
}
}
创建空白文件
用同样的方法,在com.huawei.hdfs包下面创建名为CreateFile1的Java Class文件,用于在HDFS上创建一个空白文件。
package com.huawei.hdfs;
import org.apache.hadoop.conf.Configuration;
import org.apache.hadoop.fs.FSDataOutputStream;
import org.apache.hadoop.fs.FileSystem;
import org.apache.hadoop.fs.Path;
import java.io.IOException;
/**
* 创建空白文件
*/
public class CreateFile1 {
public static void main(String[] args) throws IOException {
Configuration conf = new Configuration();
//conf.set("fs.defaultFS", "hdfs:// master:9000");
FileSystem fs = FileSystem.get(conf);
boolean create = fs.createNewFile(new Path("/user/test/hdfs/file10.txt"));
System.out.println(create ? "创建成功":"创建失败,文件已经存在");
fs.close();
}
}
创建文件同时添加数据
在com.huawei.hdfs包下面创建名为CreateFile2的Java Class来实现这一目标。
package com.huawei.hdfs;
import org.apache.hadoop.conf.Configuration;
import org.apache.hadoop.fs.FSDataOutputStream;
import org.apache.hadoop.fs.FileSystem;
import org.apache.hadoop.fs.Path;
import java.io.BufferedWriter;
import java.io.IOException;
import java.io.OutputStreamWriter;
/**
* 创建文件的同时向文件里面写入数据
*/
public class CreateFile2 {
public static void main(String[] args) throws IOException {
Configuration conf = new Configuration();
//conf.set("fs.defaultFS", "hdfs:// master:9000");
FileSystem fs = FileSystem.get(conf);
Path path = new Path("/user/test/hdfs/file11.txt");
FSDataOutputStream dos = fs.create(path);
System.out.println(path+"文件创建成功");
BufferedWriter bw = new BufferedWriter(new OutputStreamWriter(dos));
bw.write("huawei");
bw.newLine();
bw.write("bigdata");
bw.newLine();
bw.write("java");
bw.newLine();
bw.close();
dos.close();
fs.close();
}
}
查看文件内容
在com.huawei.hdfs包下面创建名为ScanFile的Java Class来实现查看HDFS文件系统中某个文件的内容。
package com.huawei.hdfs;
import org.apache.hadoop.conf.Configuration;
import org.apache.hadoop.fs.FSDataInputStream;
import org.apache.hadoop.fs.FileSystem;
import org.apache.hadoop.fs.Path;
import java.io.BufferedReader;
import java.io.IOException;
import java.io.InputStreamReader;
public class ScanFile {
public static void main(String[] args) throws IOException {
Configuration conf = new Configuration();
//conf.set("fs.defaultFS", "hdfs://master:9000");
FileSystem fs = FileSystem.get(conf);
Path path = new Path(args[0]);
FSDataInputStream red = fs.open(path);
BufferedReader bf = new BufferedReader(new InputStreamReader(red));
String line = null;
while ((line = bf.readLine()) != null){
System.out.println(line);
}
bf.close();
red.close();
fs.close();
}
}
删除文件
在com.huawei.hdfs包下面创建名为DeleteFile 的Java Class来实现删除HDFS文件系统中的一个文件或者文件夹,具体代码如下:
package com.huawei.hdfs;
import org.apache.hadoop.conf.Configuration;
import org.apache.hadoop.fs.FileSystem;
import org.apache.hadoop.fs.Path;
import java.io.IOException;
/**
* 删除文件或目录
*/
public class DeleteFile {
public static void main(String[] args) throws IOException {
Configuration conf = new Configuration();
//conf.set("fs.defaultFS", "hdfs://master:9000");
FileSystem fs = FileSystem.get(conf);
Path path = new Path(args[0]);
//exists判断的不仅仅是目录也是文件,使用delete可以将文件或者目录删除
if (fs.exists(path)) {
fs.delete(path,true);
System.out.println("删除成功");
}else{
System.out.println("文件不存在");
}
fs.close();
}
}
maven打包并上传
在左侧标签栏,右键项目名称HDFSAPI,选择Run As->Maven Install进行打包。

package结束后会出现BUILD SUCCESS,此时我们就可以在相应的目录下查看jar包。
打开桌面上的xfce终端,利用以下命令进入安装目录:
cd ~/eclipse-workspace/HDFSAPI/target/scp ~/eclipse-workspace/HDFSAPI/target/HDFSAPI-jar-with-dependencies.jar root@xxx.xxx.xxx.xxx:/root此处xxx.xxx.xxx.xxx为之前所购买的EIP公网IP,请按实际修改。
此时会要求输入密码,请输入购买MRS集群时root用户对应的密码
运行并验证
使用ssh命令远程登录到MRS集群中。同样在xfce终端中,输入以下命令:
ssh root@xxx.xxx.xxx.xxx此处的xxx.xxx.xxx.xxx同样是EIP的公网IP,密码是自己设置的密码。
使用ls命令查看HDFSAPI-jar-with-dependencies.jar是否存在。如果不存在,请重新执行之前的scp上传步骤。
利用IsFile类,查看对应目录和文件是否存在。
yarn jar HDFSAPI-jar-with-dependencies.jar com.huawei.hdfs.IsFile
利用CreateFile1创建对应的目录和文件。
yarn jar HDFSAPI-jar-with-dependencies.jar com.huawei.hdfs.CreateFile1
此时再次利用IsFile类,查看是否存在。
yarn jar HDFSAPI-jar-with-dependencies.jar com.huawei.hdfs.IsFile发现输出结果变为已经存在。说明CreateFile1命令确实执行成功了。
但此时如果再次执行CreateFile1命令,会出现报错信息。报错信息提醒我们文件已经存在,无法再次创建。
接下来利用CreateFile2命令,尝试在创建一个文件同时向该文件里面写入一些数据。
yarn jar HDFSAPI-jar-with-dependencies.jar com.huawei.hdfs.CreateFile2
利用ScanFile类查看/user/test/hdfs/file10.txt文件内容。
yarn jar HDFSAPI-jar-with-dependencies.jar com.huawei.hdfs.ScanFile /user/test/hdfs/file10.txt发现输出结果没有任何信息。这是因为/user/test/hdfs/file10.txt是个空文件。但如果我们用ScanFile类查看/user/test/hdfs/file11.txt文件,就有输出结果了。
yarn jar HDFSAPI-jar-with-dependencies.jar com.huawei.hdfs.ScanFile /user/test/hdfs/file11.txtMapReduce是基于Google发布的MapReduce论文设计开发,用于大规模数据集(大于1TB)的并行计算。其计算思想是将一个大的计算问题划分成许多小的计算任务,最终合并成一个结果。整个计算过程分为Map和Reduce阶段,Map阶段又细分为map、partition、sort、combine等,而Reduce阶段来完成聚合结果。从Map到Reduce的阶段称为shuffle。
对于用户而言,最基础的使用过程只要编写map()和reduce()函数就能实现一个简单的MapReduce作业。而针对复杂作业也可进行定制化开发。
本实验将带领大家利用Java代码编写的MapReduce的WordCount作业,以便熟练掌握Map和Reduce阶段的API使用。
创建Maven项目
同上
按如下配置项目信息:
① GroupId:com.huawei
② Artifactid:MRAPI
③ Version:0.0.1-SNAPSHOT
④ Packaging:jar
确认无误后点击Finish即可创建项目。
修改JDK路径
右上角选择Window标签,在下拉菜单最后一栏中找到Preferences。
配置POM文件
<?xml version="1.0" encoding="UTF-8"?>
<project xmlns="http://maven.apache.org/POM/4.0.0"
xmlns:xsi="http://www.w3.org/2001/XMLSchema-instance"
xsi:schemaLocation="http://maven.apache.org/POM/4.0.0 http://maven.apache.org/xsd/maven-4.0.0.xsd">
<modelVersion>4.0.0</modelVersion>
<groupId>com.huawei</groupId>
<artifactId>MRAPI</artifactId>
<version>1.0-SNAPSHOT</version>
<properties>
<project.build.sourceEncoding>UTF-8</project.build.sourceEncoding>
<maven.compiler.source>1.8</maven.compiler.source>
<maven.compiler.target>1.8</maven.compiler.target>
</properties>
<dependencies>
<dependency>
<groupId>junit</groupId>
<artifactId>junit</artifactId>
<version>4.12</version>
<scope>test</scope>
</dependency>
<dependency>
<groupId>org.apache.hadoop</groupId>
<artifactId>hadoop-client</artifactId>
<version>3.1.1</version>
<scope>provided</scope>
</dependency>
</dependencies>
<build>
<finalName>MRAPI</finalName>
<plugins>
<plugin>
<artifactId>maven-assembly-plugin</artifactId>
<configuration>
<descriptorRefs>
<descriptorRef>jar-with-dependencies</descriptorRef>
</descriptorRefs>
</configuration>
<executions>
<execution>
<id>make-assembly</id>
<phase>package</phase>
<goals>
<goal>assembly</goal>
</goals>
</execution>
</executions>
</plugin>
</plugins>
</build>
</project>
编写Wordcount代码
在左侧MRAPI工程内找到/src/main/java并右键新建包package 名为com.huawei.mapreduce.wordcount。
之后在新建的包上,新建类class名为WordCountApp并编写如下代码:
public class WordCountApp {
public static class MyMapper extends Mapper<LongWritable, Text, Text, LongWritable>{
@Override
protected void map(LongWritable key, Text value, Mapper<LongWritable, Text, Text, LongWritable>.Context context) throws IOException, InterruptedException {
String line = value.toString();
String[] splited = line.split("\t");
for (String word : splited) {
Text k2 = new Text(word);
LongWritable v2 = new LongWritable(1);
context.write(k2, v2);
}
}
}
public static class MyReducer extends Reducer<Text, LongWritable, Text, LongWritable>{
@Override
protected void reduce(Text k2, Iterable<LongWritable> v2s,
Reducer<Text, LongWritable, Text, LongWritable>.Context context) throws IOException, InterruptedException {
long count = 0L;
for (LongWritable times : v2s) {
count += times.get();
}
LongWritable v3 = new LongWritable(count);
context.write(k2, v3);
}
}
public static void main(String[] args) throws Exception{
Configuration conf = new Configuration();
Job job = Job.getInstance(conf , WordCountApp.class.getSimpleName());
//必须指定
job.setJarByClass(WordCountApp.class);
//指定本业务job要使用的Mapper业务类
job.setMapperClass(MyMapper.class);
//指定mapper输出数据的<k2,v2>的类型
job.setMapOutputKeyClass(Text.class);
job.setMapOutputValueClass(LongWritable.class);
//指定本业务job要使用的Reducer业务类
job.setReducerClass(MyReducer.class);
//指定reducer输出数据的<k3,v3>的类型
job.setOutputKeyClass(Text.class);
job.setOutputValueClass(LongWritable.class);
//输入数据来自哪里
FileInputFormat.setInputPaths(job, new Path(args[0]));
//输出数据写到哪里
FileOutputFormat.setOutputPath(job, new Path(args[1]));
//true表示将运行进度等信息及时输出给用户
boolean res = job.waitForCompletion(true);
System.exit(res?0:1);
}
}
MapReduce的二次排序原理
在/src/main/java右键新建一个名为com.huawei.mapreduce.mrsort的包。
并在此包内新建一个名为CombinationKey的Java类。
package com.huawei.mapreduce.mrsort;
import org.apache.hadoop.io.IntWritable;
import org.apache.hadoop.io.Text;
import org.apache.hadoop.io.WritableComparable;
import java.io.DataInput;
import java.io.DataOutput;
import java.io.IOException;
/**
* 自定义组合键
*/
public class CombinationKey implements WritableComparable<CombinationKey> {
private Text firstKey;
private IntWritable secondKey;
//无参构造函数
//反序列化时,需要反射调用空参构造函数,需要显示定义一个
public CombinationKey() {
this.firstKey = new Text();
this.secondKey = new IntWritable();
}
//有参构造函数
public CombinationKey(Text firstKey, IntWritable secondKey) {
this.firstKey = firstKey;
this.secondKey = secondKey;
}
public Text getFirstKey() {
return firstKey;
}
public void setFirstKey(Text firstKey) {
this.firstKey = firstKey;
}
public IntWritable getSecondKey() {
return secondKey;
}
public void setSecondKey(IntWritable secondKey) {
this.secondKey = secondKey;
}
//序列化方法
public void write(DataOutput out) throws IOException {
this.firstKey.write(out);
this.secondKey.write(out);
}
//反序列化方法
public void readFields(DataInput in) throws IOException {
this.firstKey.readFields(in);
this.secondKey.readFields(in);
}
/**
* 自定义比较策略
* 注意:该比较策略用于MapReduce的第一次默认排序
* 也就是发生在Map端的sort阶段
* 发生地点为环形缓冲区(可以通过io.sort.mb进行大小调整)
*/
public int compareTo(CombinationKey combinationKey) {
int minus = this.getFirstKey().compareTo(combinationKey.getFirstKey());
if (minus != 0){
return minus;
}
return this.getSecondKey().get() - combinationKey.getSecondKey().get();
}
@Override
public int hashCode() {
final int prime = 31;
int result = 1;
result = prime * result + ((firstKey == null) ? 0 : firstKey.hashCode());
return result;
}
@Override
public boolean equals(Object obj) {
if (this == obj)
return true;
if (obj == null)
return false;
if (getClass() != obj.getClass())
return false;
CombinationKey other = (CombinationKey) obj;
if (firstKey == null) {
if (other.firstKey != null)
return false;
} else if (!firstKey.equals(other.firstKey))
return false;
return true;
}
}
编写成功后仍在com.huawei.mapreduce.mrsort包下新建一个名为DefinedGroupSort的Java类,通过继承WritableComparator来实现自定义分组。
package com.huawei.mapreduce.mrsort;
import org.apache.hadoop.io.WritableComparable;
import org.apache.hadoop.io.WritableComparator;
/**
\* 自定义分组有中方式,一种是继承WritableComparator
\* 另外一种是实现RawComparator接口
*/
public class DefinedGroupSort extends WritableComparator {
protected DefinedGroupSort() {
super(CombinationKey.class,true);
}
@Override
public int compare(WritableComparable a, WritableComparable b) {
System.out.println("---------------进入自定义分组----------------");
CombinationKey combinationKey1 = (CombinationKey) a;
CombinationKey combinationKey2 = (CombinationKey) b;
System.out.println("-------分组结果:" + combinationKey1.getFirstKey().compareTo(combinationKey2.getFirstKey()));
System.out.println("------------结束自定义分组-------------");
//自定义按原始数据中第一个key分组
return combinationKey1.getFirstKey().compareTo(combinationKey2.getFirstKey());
}
}
编写成功后仍在com.huawei.mapreduce.mrsort包下新建一个名为DefinedPartition的Java Class。该类实现自定义分区将数据中的bigdata放在第一个分区中,将zjhw放在分区第二个分区中,其余的全部放在第三个分区中。
package com.huawei.mapreduce.mrsort;
import org.apache.hadoop.io.IntWritable;
import org.apache.hadoop.mapreduce.Partitioner;
/**
\* 自定义分区
*/
public class DefinedPartition extends Partitioner<CombinationKey, IntWritable> {
/**
\* 数据输入来源:map输出 我们这里根据组合键的第一个值作为分区 如果不自定义分区的话,MapReduce会根据默认的Hash分区方法 将整个组合键相等的分到一个分区中,这样的话显然不是我们要的效果
\* @param key map输出键值
\* @param value map输出value值
\* @param numPartitions 分区总数,即reduce task个数
*/
public int getPartition(CombinationKey key, IntWritable value, int numPartitions) {
if (key.getFirstKey().toString().endsWith("bigdata")){
return 0;
} else if (key.getFirstKey().toString().endsWith("zjhw")){
return 1;
} else {
return 2;
}
}
}
最后在包com.huawei.mapreduce.mrsort下创建主函数来实现MapReduce,java类名为SecondSortMapReduce。该类中,包括Mapper函数和Reducer函数共同实验了MapReduce的实现过程。
package com.huawei.mapreduce.mrsort;
import org.apache.hadoop.conf.Configuration;
import org.apache.hadoop.conf.Configured;
import org.apache.hadoop.fs.FileSystem;
import org.apache.hadoop.fs.Path;
import org.apache.hadoop.io.IntWritable;
import org.apache.hadoop.io.Text;
import org.apache.hadoop.mapreduce.Job;
import org.apache.hadoop.mapreduce.Mapper;
import org.apache.hadoop.mapreduce.Reducer;
import org.apache.hadoop.mapreduce.lib.input.FileInputFormat;
import org.apache.hadoop.mapreduce.lib.input.KeyValueLineRecordReader;
import org.apache.hadoop.mapreduce.lib.input.KeyValueTextInputFormat;
import org.apache.hadoop.mapreduce.lib.output.FileOutputFormat;
import org.apache.hadoop.mapreduce.lib.output.TextOutputFormat;
import org.apache.hadoop.util.Tool;
import org.apache.hadoop.util.ToolRunner;
import java.io.IOException;
import java.net.URI;
public class SecondSortMapReduce extends Configured implements Tool {
public static void main(String[] args) {
try {
ToolRunner.run(new SecondSortMapReduce(), args);
} catch (Exception e) {
e.printStackTrace();
}
}
public static class SecondSortMapper extends Mapper<Text, Text, CombinationKey, IntWritable> {
/**
* 这里要特殊说明一下,为什么要将这些变量写在map函数外边
* 对于分布式的程序,我们一定要注意到内存的使用情况,对于MapReduce框架
* 每一行的原始记录的处理都要调用一次map()函数,假设,这个map()函数要处理
* 一亿条输入记录,如果将这些变量都定义在map函数里面则会导致这4个变量的对象句柄
* 非常的多(极端情况下将产生4*1亿个句柄,当然java也是有自动的GC机制的,一定不会达到这么多)
* 导致栈内存被浪费掉,我们将其写在map函数外面,顶多就只有4个对象句柄
*/
private CombinationKey combinationKey = new CombinationKey();
Text sortName = new Text();
IntWritable score = new IntWritable();
String[] splits = null;
protected void map(Text key, Text value, Mapper<Text, Text, CombinationKey, IntWritable>.Context context) throws IOException, InterruptedException {
System.out.println("---------------------进入map()函数---------------------");
//过滤非法记录(这里用计数器比较好)
if (key == null || value == null || key.toString().equals("")){
return;
}
//构造相关属性
sortName.set(key.toString());
score.set(Integer.parseInt(value.toString()));
//设置联合key
combinationKey.setFirstKey(sortName);
combinationKey.setSecondKey(score);
//通过context把map处理后的结果输出
context.write(combinationKey, score);
System.out.println("---------------------结束map()函数---------------------");
}
}
public static class SecondSortReducer extends Reducer<CombinationKey, IntWritable, Text, Text> {
/**
\* 这里要注意一下reduce的调用时机和次数:
\* reduce每次处理一个分组的时候会调用一次reduce函数。
\* 所谓的分组就是将相同的key对应的value放在一个集合中
\* 例如:<sort1,1> <sort1,2>
\* 分组后的结果就是
\* <sort1,{1,2}>这个分组会调用一次reduce函数
*/
protected void reduce(CombinationKey key, Iterable<IntWritable> values, Reducer<CombinationKey, IntWritable, Text, Text>.Context context)
throws IOException, InterruptedException {
//将联合Key的第一个元素作为新的key,遍历values将结果写出去
for (IntWritable val : values){
context.write(key.getFirstKey(), new Text(String.valueOf(val.get())));
}
}
}
public int run(String[] args) throws Exception {
try {
// 创建配置信息
Configuration conf = new Configuration();
conf.set(KeyValueLineRecordReader.KEY_VALUE_SEPARATOR, "\t");
// 创建任务
Job job = Job.getInstance(conf, SecondSortMapReduce.class.getName());
//设置成jar运行型
job.setJarByClass(SecondSortMapReduce.class);
//设置自定义Mapper类和设置map函数输出数据的key和value的类型
job.setMapperClass(SecondSortMapper.class);
job.setMapOutputKeyClass(CombinationKey.class);
job.setMapOutputValueClass(IntWritable.class);
//设置分区和reduce数量(reduce的数量,和分区的数量对应)
job.setPartitionerClass(DefinedPartition.class);
job.setNumReduceTasks(3);
//设置自定义分组策略
job.setGroupingComparatorClass(DefinedGroupSort.class);
//设置自定义比较策略(因为CombineKey重写了compareTo方法,所以这个可以省略)
//job.setSortComparatorClass(DefinedComparator.class);
//指定Reducer类和输出key和value的类型
job.setReducerClass(SecondSortReducer.class);
job.setOutputKeyClass(Text.class);
job.setOutputValueClass(Text.class);
//设置输入目录和设置输入数据格式化的类
FileInputFormat.setInputPaths(job, args[0]);
job.setInputFormatClass(KeyValueTextInputFormat.class);
// 创建文件系统
FileSystem fs = FileSystem.get(new URI(args[1]), conf);
// 如果输出目录存在,我们就删除
if (fs.exists(new Path(args[1]))) {
fs.delete(new Path(args[1]), true);
}
//指定输出的路径和设置输出的格式化类
FileOutputFormat.setOutputPath(job, new Path(args[1]));
job.setOutputFormatClass(TextOutputFormat.class);
// 提交作业 退出
System.exit(job.waitForCompletion(true) ? 0 : 1);
} catch (Exception e) {
e.printStackTrace();
}
return 0;
}
}
此时我们的所有代码编写流程就结束了。
maven打包并上传
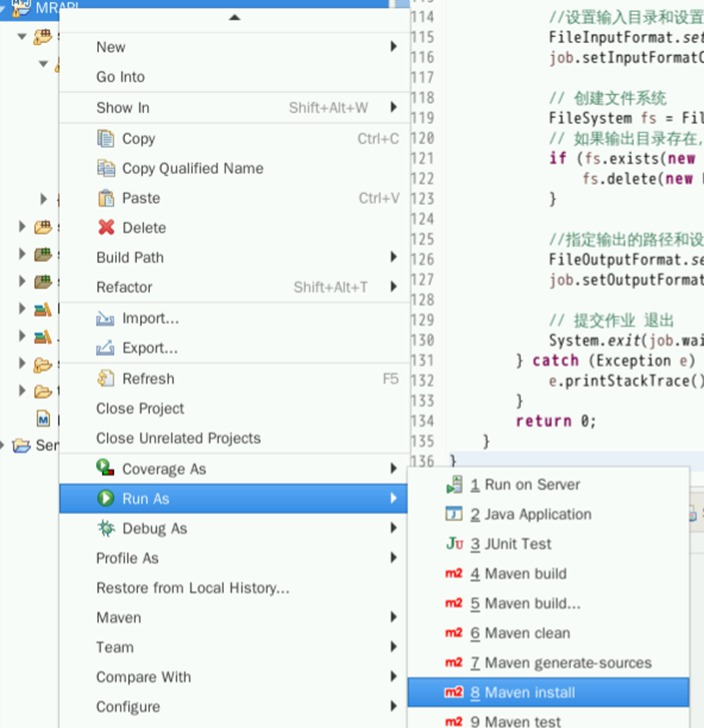
在左侧标签栏,右键项目名称MRAPI,选择Run As->Maven Install进行打包。
打包需要一定时间,请耐心等待。
package结束后会出现BUILD SUCCESS,此时我们就可以在相应的目录下查看jar包。
打开桌面上的xfce终端,利用以下命令进入安装目录:
cd ~/eclipse-workspace/MRAPI/target/
利用scp命令将MRAPI-jar-with-dependencies.jar上传到MRS集群中:
scp ~/eclipse-workspace/MRAPI/target/MRAPI-jar-with-dependencies.jar root@xxx.xxx.xxx.xxx:/root
运行并验证
使用ssh命令远程登录到MRS集群中。同样在xfce终端中,输入以下命令:
ssh root@xxx.xxx.xxx.xxx
使用ls命令查看MRAPI-jar-with-dependencies.jar是否存在。如果不存在,请重新执行WinSCP上传步骤。
在Linux本地环境使用Vim编辑器创建一个名为MR_data的文件。回车进入Vim编辑器界面。
vim MR_datahello world
hello is my
is my my my
my a skate
put
保存退出
将保存好的文件上传到HDFS路径下。
hdfs dfs -mkdir /user/user1
hdfs dfs -put MR_data /user/user1/
然后执行如下命令,运行MapReduce的WordCountAPP,以便统计每个单词的词频。此处/user/user1/MR_data就是上传数据的位置,即MapReduce需要读取的输入数据;/user/user1/MR_out是输出结果所在路径,必须是不存在的路径,由MapReduce自行创建。
yarn jar MRAPI-jar-with-dependencies.jar com.huawei.mapreduce.wordcount.WordCountApp /user/user1/MR_data /user/user1/MR_out此时说明WordCount已经执行成功。
接下来执行二次分组排序。
同样,在Linux本地创建名为mrsort.txt的文本文件。
vim mrsort.txt使用如下命令,生成对应的任务。
yarn jar MRAPI-jar-with-dependencies.jar com.huawei.mapreduce.mrsort.SecondSortMapReduce /user/user1/MR/input /user/user1/MR/output
注意,此时有三个Reduce任务,因为mrsort.txt文件里有三个关键词,我们希望每个关键词属于一个结果文件,最终希望得到3个结果文件。
使用HDFS的shell命令,查看/user/user1/MR/output目录以及最终结果
hdfs dfs -ls /user/user1/MR/output
hdfs dfs -cat /user/user1/MR/output/part-r-00000
hdfs dfs -cat /user/user1/MR/output/part-r-00001
hdfs dfs -cat /user/user1/MR/output/part-r-00002

 浙公网安备 33010602011771号