前言:应上级要求,搭建一个公司内部的vue组件库,由于临近我预计的离职时间,所以只将流程梳理实践了一遍。假设组件库名称为ui-library。
一、使用vue-cli3创建ui-library项目
vue create ui-library
创建项目时选择自定义模板,我的配置如下

记得vue版本需要选择2.x。
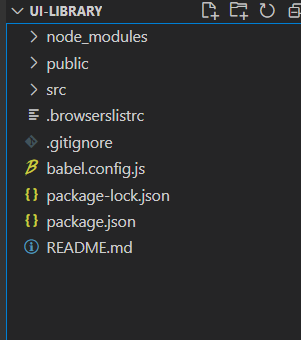
ui-library目录如下
二、在根目录添加vue.config.js添加开发和打包配置
vue.config.js代码如下
const path = require('path')
const join = path.join; // 拼接路径
const fs = require('fs');

function resolve(dir) { //获取绝对路径
  return path.resolve(__dirname, dir)
}
// 获取文件夹下所有index.js的绝对路径
function getEntries(path) {
  let files = fs.readdirSync(resolve(path)); // 获取文件夹下所有文件名称数组
  const entries = files.reduce((ret, item) => {
    const itemPath = join(path, item) // 获取每个文件路径
    const isDir = fs.statSync(itemPath).isDirectory(); // 判断是否为文件夹
    if (isDir) { // 文件夹
      ret[item] = resolve(join(itemPath, 'index.js')) // 获取index.js的绝对路径
    } else { // 不是文件夹
      const [name] = item.split('.') // key值
      ret[name] = resolve(`${itemPath}`) // 获取path文件夹跟目录下的index.js绝对路径
    }
    return ret
  }, {})
  return entries
}

const devConfig = { // 开发配置
  lintOnSave: false,
  pages: {
    index: {
      entry: 'examples/main.js', // 入口文件
      template: 'public/index.html',
      filename: 'index.html'
    }
  },
  configureWebpack: {
    resolve: {
      extensions: ['.js', '.vue', '.json'],
      alias: { // 别名
        "@": resolve('packages'),
        "assets": resolve('examples/assets'),
        "views": resolve("examples/views")
      }
    }
  },
  chainWebpack: config => {
    // 将新增的packages文件夹加入babel编译
    config.module
      .rule('js')
      .include
      .add('/packages')
      .end()
      .use('babel')
      .loader('babel-loader')
      .tap(options => {
        return options
      })
  }
}

const buildConfig = { // 打包配置
  outputDir: 'lib', // 输出文件夹名
  productionSourceMap: false, // 禁止打包生成源码映射
  // 在css.extract.filename上配置样式打包路径和文件名称
  css: {
    sourceMap: true,
    extract: {
      filename: 'style/[name].css' // 在lib文件夹中建立style文件夹中,生成对应的css文件。
    }
  },
  configureWebpack: {
    entry: {
      ...getEntries('packages') // 入口文件
    },
    output: { // 出口文件
      filename: '[name]/index.js', // 文件名
      libraryTarget: 'commonjs2',
    }
  },
  chainWebpack: config => {
    // 在生产环境下也要将新增的packages文件夹加入babel转码编译
    config.module
      .rule('js')
      .include
      .add('/packages')
      .end()
      .use('babel')
      .loader('babel-loader')
      .tap(options => {
        return options
      })
    // 删除Vue CLI3原先打包编译的一些无用功能
    config.optimization.delete('splitChunks') // 删除splitChunks,因为每个组件是独立打包,不需要抽离每个组件的公共js出来
    config.plugins.delete('copy') // 删除copy,不要复制public文件夹内容到lib文件夹中。
    config.plugins.delete('html') // 删除html,只打包组件,不生成html页面。
    config.plugins.delete('preload')
    config.plugins.delete('prefetch') // 删除preload以及prefetch,因为不生成html页面,所以这两个也没用。
    config.plugins.delete('hmr') // 删除hmr,删除热更新。
    config.entryPoints.delete('app') // 删除自动加上的入口App。
    // 配置字体的loader
    config.module
      .rule('fonts')
      .use('url-loader')
      .tap(option => {
        option.fallback.options.name = 'static/fonts/[name].[hash:8].[ext]'
        return option
      })
  }
}

module.exports = process.env.NODE_ENV === 'development' ? devConfig : buildConfig // 判断环境变量使用相应的配置
三、组件库开发
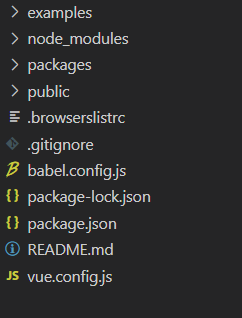
将ui-library根目录下的src文件夹名称修改为examples,用于在本地测试开发的组件(你也可以用来编写组件库使用文档页面,我并没有考虑到这块,所以将examples打包成项目的配置需要自己写,大致思路是把默认的打包配置的入口文件改为examples)
在ui-library跟目录下新建packages文件夹,用于存放组件库核心代码
此时目录如下图
我们编写两种组件,一种为html调用的,另一种为vue全局api调用的
(1)html调用
我们创建一个button组件:
在packages文件夹下创建th-button文件夹
在th-button文件夹下创建src文件夹,src文件夹为组件核心代码
在src文件夹下创建index.vue,内容如下
<!-- 按钮组件 -->
<template>
    <button class="th-button">
      <slot></slot>
    </button>
</template>

<script>
export default {
  name: 'ThButton', // name必须,在给组件命名时会用到
  data() {
    return {

    };
  }
}
</script>

<style lang='scss' scoped>
@import "./css/index.scss";
</style>
在th-button文件夹下创建index.js,内容如下
// 导入组件,组件必须声明 name
import ThButton from './src/index.vue'

// 为组件提供 install 安装方法,供按需引入
ThButton.install = function(Vue) {
  Vue.component(ThButton.name, ThButton)
}

// 导出组件
export default ThButton
简单的button组件就此完成
(2)vue全局api调用
目标:创建一个消息提示组件
在packages文件夹下新建toast文件夹
在toast文件夹下新建src文件夹
在src文件夹下新建index.vue,用来编写主要改组件,内容如下
<!-- 消息提示组件 -->
<template>
  <!-- 添加过渡动画 -->
  <transition name="toast-from-top" appear @after-leave="handleAfterLeave">
    <div class="my-toast" v-show="show">
      <div class="my-toast-content">
        {{ message }}
      </div>
    </div>
  </transition>
</template>

<script>
export default {
  name: "MyToast",
  data() {
    return {
      time: 2000, // toast 展示时长
      timer: null, // 存储延时器id
      show: false, // toast 是否展示
      message: "", // 消息内容
      onClose: null // 关闭后的回调
    };
  },
  watch: {
    show(val) { // 监听显示,设置延时器自动消失
      if (val) {
        this.timer = setTimeout(() => {
          this.show = false;
          this.timer = null;
          // 消失后执行onClose
          if (typeof this.onClose === 'function') {
            this.onClose(this);
          }
        }, this.time);
      }
    },
  },
  methods: {
    // 销毁组件
    handleAfterLeave() {
      this.$destroy() // 销毁组件
      this.$el.remove() // 移除页面dom
    },
  },
};
</script>

<style lang="scss">
.my-toast {
  position: fixed;
  top: 25%;
  width: 100%;
  text-align: center;
}

.my-toast-content {
  display: inline-block;
  text-align: center;
  max-width: 80%;
  box-sizing: border-box;
  padding: 10px;
  background-color: hsla(0, 0%, 7%, 0.7);
  color: #fff;
  border-radius: 3px;
}
.toast-from-top-enter-active,
.toast-from-top-leave-active{
  transition: all 0.5s;
}
.toast-from-top-enter,
.toast-from-top-leave-active {
  opacity: 0;
  transform: translateY(-10px);
}
</style>
在src文件夹下新建main.js,内容如下
import Vue from 'vue'
// 引入组件
import Index from './index.vue'

// 创建toast构造器
let ToastConstructor = Vue.extend(Index)

let instance;

// 定义toast函数
const Toast = function(options) {
  options = options || {} // 添加options默认值
  if (typeof options === 'string') { // options为字符串,放入展示内容中
    options = {
      message: options
    }
  }

  instance = new ToastConstructor({ // 创建toast实例,替换data中与options键值相同的项
    data: options
  })
  instance.$mount() // 挂载空dom,生成$el对象
  document.body.appendChild(instance.$el) // 将dom放至body下
  instance.show = true // 显示组件
}

export default Toast
在toast文件夹下新建index.js,导出toast组件,内容如下
import Toast from './src/main.js'
export default Toast
在packages文件夹下新建index.js,用于全局引入配置,内容如下
// 导入组件
import ThButton from './th-button/index.js'
import Toast from './toast/index.js'

// 需要全局注册的组件放在此
const components = [
  ThButton
]

const install = function(Vue) {
  if (install.installed) return
  // 全局注册组件
  components.map(component => Vue.component(component.name, component))

  // 声明vue全局函数
  Vue.prototype.$toast = Toast
}

if (typeof window !== undefined && window.Vue) {
  install(window.Vue)
}

export default {
  install,
  ThButton,
  Toast
}
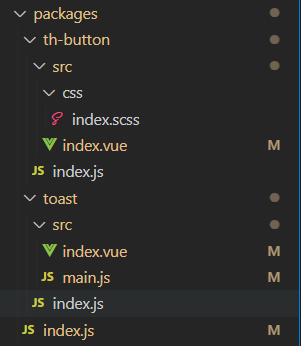
此时packages文件夹目录如下图
四、本地测试
整个过程和使用组件库流程一致(在本地最好全局引入,局部引入需要一个一个引入),以下是我自己简单的测试内容
在examples下的main.js中引入和注册组件库,main.js内容如下
import Vue from 'vue'
import App from './App.vue'

// 引入组件库
import ThUI from '../packages/index.js'
// 注册组件库
Vue.use(ThUI)

Vue.config.productionTip = false

new Vue({
  render: h => h(App),
}).$mount('#app')
在App.vue中使用,内容如下
<template>
  <div id="app">
    <img alt="Vue logo" src="./assets/logo.png">
    <HelloWorld msg="Welcome to Your Vue.js App"/>
    <th-button>我是猪</th-button>
    <button @click="test">消息提示</button>
  </div>
</template>

<script>
import HelloWorld from './components/HelloWorld.vue'

export default {
  name: 'App',
  components: {
    HelloWorld
  },
  data() {
    return {

    }
  },
  methods: {
    test() {
      // this.$toast('hhhhhhhhhh')
      this.$toast({
        message: 'wwwwwwwwwwww',
        onClose() {
          alert('ooooooooooooo')
        }
      })
    }
  }
}
</script>

<style lang="scss">
#app {
  font-family: Avenir, Helvetica, Arial, sans-serif;
  -webkit-font-smoothing: antialiased;
  -moz-osx-font-smoothing: grayscale;
  text-align: center;
  color: #2c3e50;
  margin-top: 60px;
}
</style>
五、发布准备
(1)项目准备
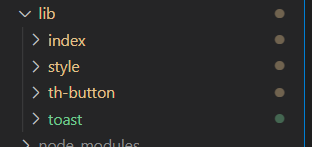
组件库打包,执行
npm run build
打包后生成lib文件夹,结构如下
配置package.json,其中name:组件库的名称,version:版本号(每次上传需要进行更新),设置private:false,description:项目描述,main:组件库入口文件,keyword:搜索关键字。具体内容如下
{
  "name": "thsm-ui",
  "version": "0.1.4",
  "private": false,
  "description": "基于vue的桃花水母组件库",
  "main": "lib/index/index.js",
  "keyword": "thsm-ui th-ui",
  "scripts": {
    "serve": "vue-cli-service serve",
    "build": "vue-cli-service build",
    "lint": "vue-cli-service lint"
  },
  "dependencies": {
    "core-js": "^3.6.5",
    "vue": "^2.6.11"
  },
  "devDependencies": {
    "@vue/cli-plugin-babel": "~4.5.0",
    "@vue/cli-plugin-eslint": "~4.5.0",
    "@vue/cli-service": "~4.5.0",
    "babel-eslint": "^10.1.0",
    "eslint": "^6.7.2",
    "eslint-plugin-vue": "^6.2.2",
    "sass": "^1.26.5",
    "sass-loader": "^8.0.2",
    "vue-template-compiler": "^2.6.11"
  },
  "eslintConfig": {
    "root": true,
    "env": {
      "node": true
    },
    "extends": [
      "plugin:vue/essential",
      "eslint:recommended"
    ],
    "parserOptions": {
      "parser": "babel-eslint"
    },
    "rules": {}
  },
  "browserslist": [
    "> 1%",
    "last 2 versions",
    "not dead"
  ]
}
在ui-library下新建.npmignore文件,此文件用于npm发布时配置忽略的文件,内容如下
#忽略目录
/examples
/packages
/public

#忽略文件
vue.config.js
babel.config.js
最后的项目目录如下
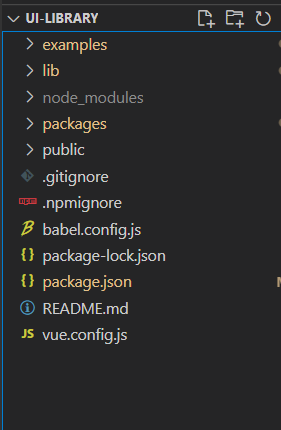
(2)npm内网的搭建
使用xshell或其他方式连接到内网服务器,由于服务器是Ubuntu的,安装nodejs方式仅以参考。
首先确认是否装有nodejs(nodejs版本需要在14以上)和npm
node -v
v14.16.0

npm -v
6.14.8
如果没有安装nodejs,Ubuntu的以下作为参考,其他请自行查找
添加下载源,14.x为nodejs大版本号,可按自己需求修改
curl -sL https://deb.nodesource.com/setup_14.x | sudo -E bash -

下载nodejs,执行后需要输入密码
sudo apt-get install -y nodejs

如果没有npm,下载npm
sudo apt-get install npm
安装verdaccio
sudo npm i verdaccio -g
运行verdaccio,查看配置文件位置,然后ctrl+c停止verdaccio运行
verdaccio
verdaccio执行后内容如下,图中红框部分为verdaccio配置文件地址

修改verdaccio配置文件,添加listen地址
进入编辑配置文件
vim /home/yg/.config/verdaccio/config.yaml

备注:按i键进入插入模式,完成后按Esc取消插入,按shift+左边加好键+冒号后输入wq,按enter保存并退出编辑
添加listen,之后可以使用服务器地址:4873访问
listen: 0.0.0.0:4873
下载pm2挂起verdaccio服务,挂起后可以通过服务器地址:4873访问
sudo npm i pm2 -g

挂起verdaccio服务,pm2其他命令请自行搜索
pm2 start verdaccio
六、发布组件库
在ui-library下使用命令行(这里假设npm内网地址为192.168.50.14:4873)
设置npm下载镜像
npm set registry http://192.168.50.14:4873

添加用户,需要输入用户名、密码和邮箱,该操作完成会自动处于登录状态
npm adduser

注:添加用户后,以后使用npm login登录

发布组件库
npm publish
成功后访问192.168.50.14:4873如下图

七、使用组件库
背景:项目使用vue-cli3搭建
下载插件前需要确认当前npm的下载源(不要使用cnpm,两者并不相同)
确认npm下载源
npm get registry
http://192.168.50.14:4873/

如果不是npm内网地址,设置下载源
npm set registry http://192.168.50.14:4873/

下载组件库,我们的组件库名称是packages.json中name值thsm-ui
npm i thsm-ui -S
备注:如果你需要一次性下载所有依赖,可以直接执行npm i,npm会现在下载源上寻找,然后到npm外网寻找
(1)整体引入
在/src/main.js中加入下面代码
import ThUI from 'thsm-ui'
Vue.use(ThUI)
(2)局部引入
安装babel插件,为什么需要安装babel
npm install babel-plugin-import -D
在根目录babel.config.js添加配置,内容如下
module.exports = {
  presets: ["@vue/cli-plugin-babel/preset"],
  plugins: [
   // 其他组件库的babel配置
    [
      "component",
      {
        "libraryName": "element-ui",
        "styleLibraryName": "theme-chalk"
      }
    ],
   // 自己开发的组件库的babel配置
    [
      "import",
      {
        "libraryName": "thsm-ui",
        "style": (name) =>{
          const cssName = name.split('/')[2];
          return `thsm-ui/lib/style/${cssName}.css`
        }
      }
    ]
]};
在/src/main.js中添加以下内容
import { ThButton, Toast } from 'thsm-ui'
Vue.use(ThButton)
Vue.use(Toast)
调用方式
// th-button
<th-button>test<th-button>

// toast
this.$toast('测试')
八、参考


