数字麦克风PDM信号采集与STM32 I2S接口应用(三)
本文是数字麦克风笔记文章的数据处理篇。
读取数字麦克风的信号,需要嵌入式驱动和PC应用的结合,驱动负责信号采集,应用代码负责声音分析。
一般而言,在完成特征分析和实验之后,把优化过的代码固化到嵌入式端,实现目标应用。本文记录了分析过程的一些基本步骤。
1、ARM驱动
使用STM32F4芯片,驱动使用ST-CUBE MX生成,节约了大量的时间。
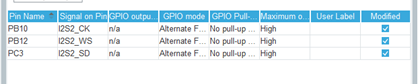
1)GPIO
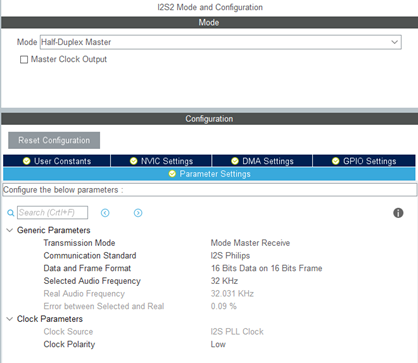
2)I2S配置
目标是16khz音频采样,这里选择为32khz的I2S频率,原因上一篇文章已经阐述了,计算方法为32khz*2*16/64=16khz。
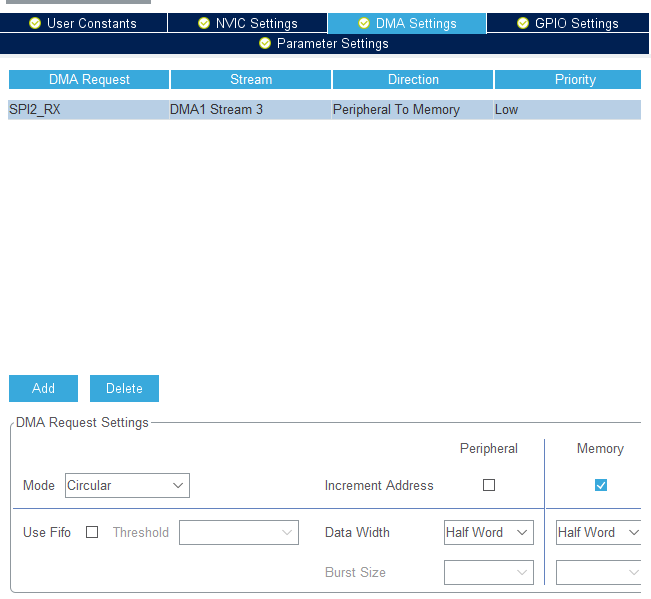
3)DMA配置
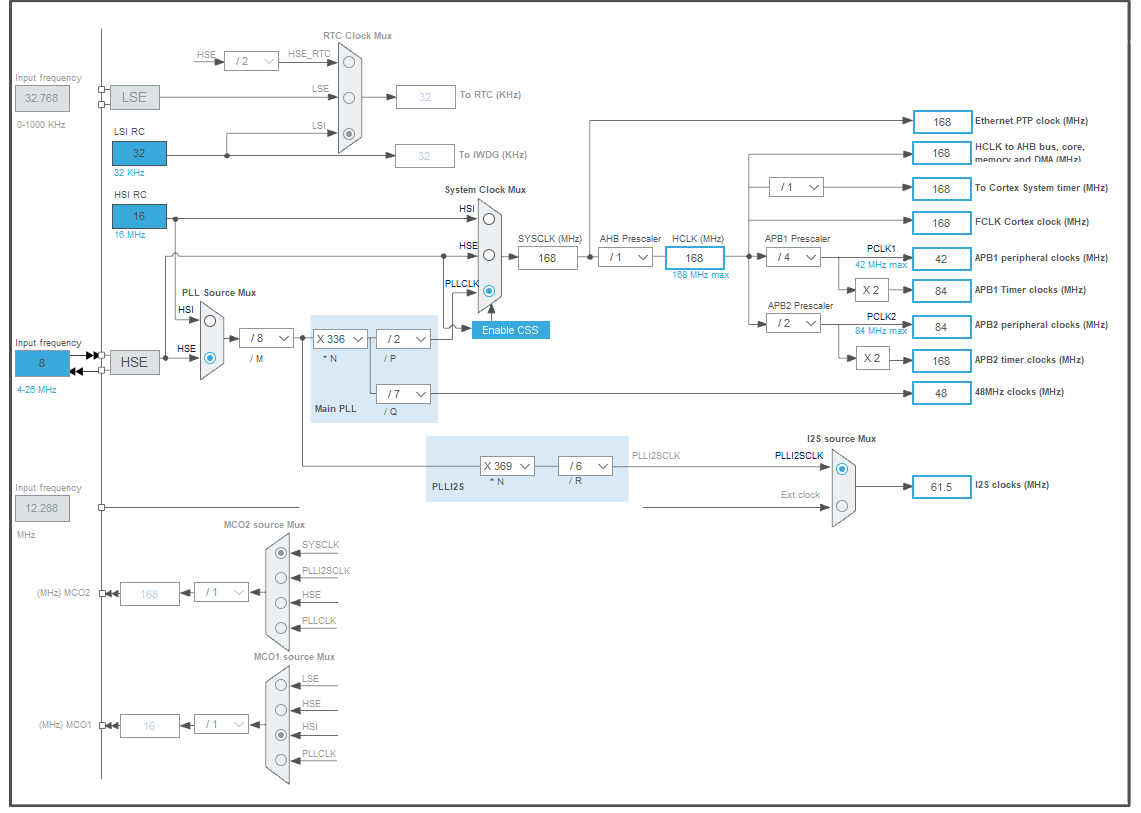
4)系统时钟配置
5)I2S驱动编写
/* I2S2 init function */
void MX_I2S2_Init(void)
{

  hi2s2.Instance = SPI2;
  hi2s2.Init.Mode = I2S_MODE_MASTER_RX;
  hi2s2.Init.Standard = I2S_STANDARD_PHILIPS;
  hi2s2.Init.DataFormat = I2S_DATAFORMAT_16B;
  hi2s2.Init.MCLKOutput = I2S_MCLKOUTPUT_DISABLE;
  hi2s2.Init.AudioFreq = I2S_AUDIOFREQ_32K;
  hi2s2.Init.CPOL = I2S_CPOL_HIGH;//I2S_CPOL_LOW;
  hi2s2.Init.ClockSource = I2S_CLOCK_PLL;
  hi2s2.Init.FullDuplexMode = I2S_FULLDUPLEXMODE_DISABLE;
  if (HAL_I2S_Init(&hi2s2) != HAL_OK)
  {
    Error_Handler();
  }
}
6)PDM2PCM配置
ST公司提供PDM2PCM的解码包,在cube下载驱动即可,使用方式参考UM2372。抽样因子选择64。
由于PDM的采样率为32khz*2=64khz,而目标PCM信号的频率设定目标为16khz,所以4个PDM数据将产生1个PCM数据,所以申请内存空间时候需要注意这个比例关系。
首先配置PDM函数的参数。
PDMFilter_InitStruct Filter;
#define PDM_SAM_POINTS  (640)
#define PCM_SAM_POINTS  (160) // 16khz频率,10ms数据160个采样点

/* Filter LP & HP Init */
Filter.LP_HZ = 7500;
Filter.HP_HZ = 100;
Filter.Fs = 16000;
Filter.Out_MicChannels = 1;
Filter.In_MicChannels = 1;
PDM_Filter_Init((PDMFilter_InitStruct *)&Filter);
PDM函数驱动原型为:
int32_t PDM_Filter_64_LSB(uint8_t* data, uint16_t* dataOut, uint16_t MicGain, PDMFilter_InitStruct * Filter);
其中因为PDM处理的是按byte处理,而STM32 DMA接收的数据是u16类型,所有需要颠倒下字节顺序。
for(int i=0; i<PDM_SAM_POINTS; i++)
{
  uint16_t a = srcBuf[i];
  srcBuf[i] = HTONS(a);
}
代码中调用驱动函数。
PDM_Filter_64_LSB((uint8_t *)&srcBuf[i], (uint16_t *)&dstBuf[i/4], volumeGain , (PDMFilter_InitStruct *)&Filter);
7)数据发送
if(USBD_OK != CDC_Transmit_FS((uint8_t *)dstBuf,  2*PCM_SAM_POINTS) )
{
  UsbTxErr++;
}
使用DMA接收数据,使用USB CDC传输。PC端接收到的文件为:

(传输附件很不方便,直接复制数据到这里了,拷贝到本地重命名之后就可以运行后面的分析程序,听一听声音,保真度还是很高的,音频是一句海阔天空的歌)
99 FF 96 FF 6E FF 2F FF 3A FF 74 FF B9 FF C8 FF C5 FF DF FF 35 00 A6 00 CA 00 9A 00 1D 00 C5 FF A5 FF 87 FF 4C FF 0B FF 34 FF 9B FF 1B 00 59 00 78 00 74 00 62 00 4C 00 13 00 DF FF C3 FF AC FF 75 FF 66 FF 6F FF 8A FF E1 FF 51 00 A0 00 AB 00 E1 00 DD 00 97 00 09 00 85 FF 48 FF 4D FF 6B FF 9B FF D2 FF 26 00 8F 00 DB 00 F8 00 E1 00 9E 00 7A 00 53 00 3A 00 0B 00 CC FF A8 FF AB FF BB FF 9E FF AA FF 23 00 D0 00 DA 00 37 00 D4 FF 15 00 4D 00 E4 FF 2B FF EA FE 76 FF F8 FF CD FF 8B FF AF FF 51 00 C3 00 DA 00 7D 00 0D 00 DC FF A7 FF 55 FF DE FE C8 FE 20 FF A3 FF 0F 00 4F 00 85 00 AB 00 CC 00 E4 00 A1 00 32 00 E1 FF F6 FF E9 FF 75 FF 0A FF 26 FF B1 FF 30 00 6D 00 77 00 A3 00 D2 00 B1 00 29 00 AC FF 61 FF 62 FF 7F FF 97 FF C9 FF 05 00 2C 00 42 00 60 00 95 00 A8 00 8F 00 48 00 09 00 E1 FF DE FF D7 FF C5 FF C8 FF F2 FF 36 00 AB 00 0E 01 E7 00 72 00 2C 00 2A 00 06 00 8D FF FC FE D4 FE 3B FF 9D FF 93 FF 6B FF A8 FF 2A 00 8B 00 99 00 5D 00 21 00 F6 FF E7 FF B7 FF 77 FF 5D FF 73 FF D3 FF 2B 00 51 00 68 00 5A 00 44 00 22 00 08 00 F4 FF E1 FF BA FF 87 FF 64 FF 6B FF 98 FF 0C 00 65 00 67 00 63 00 88 00 AE 00 96 00 5E 00 2B 00 05 00 E8 FF D0 FF D3 FF EF FF 05 00 13 00 27 00 59 00 7F 00 98 00 89 00 5E 00 27 00 10 00 FE FF CA FF C5 FF E5 FF D9 FF C8 FF 00 00 71 00 9A 00 5C 00 E4 FF D8 FF 24 00 38 00 CA FF 3A FF 32 FF 76 FF 8A FF 60 FF 7E FF 06 00 8F 00 A2 00 34 00 EB FF E8 FF F8 FF DC FF A8 FF 84 FF 96 FF C7 FF F2 FF 26 00 3D 00 34 00 1C 00 08 00 02 00 FB FF 00 00 04 00 F6 FF AA FF 4E FF 35 FF 7B FF C8 FF 1F 00 4F 00 6C 00 7B 00 8A 00 81 00 62 00 57 00 39 00 1D 00 0D 00 F8 FF 00 00 2E 00 21 00 E4 FF CB FF FA FF 31 00 3A 00 46 00 42 00 0B 00 E0 FF E6 FF F3 FF 13 00 29 00 44 00 86 00 96 00 5F 00 3D 00 56 00 29 00 B6 FF 4C FF 41 FF 8D FF 9E FF 78 FF 51 FF 6D FF CC FF 01 00 1E 00 2C 00 62 00 8B 00 67 00 18 00 EF FF DA FF C6 FF B6 FF C0 FF D9 FF F0 FF FF FF 24 00 1F 00 F8 FF CE FF BE FF D4 FF D4 FF C7 FF BF FF C3 FF D2 FF 0F 00 4F 00 51 00 4C 00 62 00 8D 00 63 00 24 00 1D 00 3D 00 37 00 EF FF DA FF D1 FF D8 FF C4 FF CF FF FF FF 22 00 42 00 9D 00 DD 00 BF 00 81 00 65 00 60 00 25 00 CA FF BF FF EA FF 30 00 26 00 F8 FF EA FF 3C 00 61 00 10 00 90 FF 3E FF 78 FF B4 FF 87 FF 35 FF 5A FF D2 FF 23 00 26 00 08 00 FF FF 00 00 FA FF E9 FF C4 FF 94 FF A4 FF EE FF 1D 00 1A 00 15 00 3B 00 5F 00 43 00 16 00 E4 FF BE FF BB FF C1 FF 9E FF 48 FF 70 FF E5 FF 4F 00 54 00 52 00 68 00 68 00 30 00 F0 FF F2 FF 1D 00 5B 00 76 00 67 00 60 00 65 00 68 00 4E 00 13 00 D0 FF 87 FF 82 FF BD FF E5 FF E8 FF CB FF E6 FF 3A 00 5E 00 3B 00 3A 00 9F 00 B5 00 46 00 9B FF 82 FF 01 00 65 00 16 00 8F FF 5E FF AD FF 10 00 0D 00 CE FF CA FF 07 00 03 00 B1 FF 8C FF D0 FF 1B 00 0E 00 BE FF 85 FF C8 FF 2B 00 5E 00 42 00 1C 00 DE FF D9 FF E8 FF B6 FF 77 FF 64 FF 7D FF 9E FF A2 FF AF FF D3 FF 1A 00 7A 00 B6 00 9C 00 51 00 3D 00 2C 00 0F 00 AC FF 63 FF 93 FF 1C 00 99 00 BD 00 AC 00 A0 00 A3 00 96 00 4D 00 D5 FF 76 FF 73 FF 9D FF B8 FF BE FF E7 FF 44 00 77 00 6C 00 33 00 3B 00 A0 00 BD 00 12 00 3B FF 0F FF 73 FF A1 FF 6E FF 73 FF F7 FF 95 00 CD 00 99 00 3A 00 3C 00 47 00 0F 00 A8 FF 56 FF 7A FF B3 FF E9 FF CB FF AB FF C6 FF 2B 00 72 00 71 00 46 00 2E 00 0B 00 DD FF B3 FF A6 FF AF FF BB FF D2 FF E3 FF C2 FF 94 FF A4 FF 0B 00 78 00 85 00 5B 00 33 00 2D 00 15 00 DA FF C0 FF E8 FF 39 00 7A 00 A7 00 A6 00 9D 00 B7 00 A4 00 33 00 D0 FF AF FF BE FF CC FF B2 FF 8D FF AE FF E0 FF 2E 00 67 00 71 00 71 00 8F 00 9C 00 45 00 C1 FF 98 FF CA FF D0 FF 6A FF 12 FF 4E FF F3 FF 26 00 CA FF 65 FF 8C FF D1 FF F2 FF C6 FF B4 FF BC FF E8 FF 1E 00 22 00 27 00 4C 00 77 00 85 00 7D 00 59 00 40 00 0D 00 DE FF B0 FF 8A FF 72 FF 81 FF 9B FF CA FF DE FF D9 FF FC FF 50 00 84 00 6D 00 2B 00 FB FF F3 FF E8 FF CE FF 98 FF 92 FF CF FF 27 00 5A 00 69 00 5D 00 88 00 A0 00 76 00 20 00 EE FF 04 00 2C 00 31 00 04 00 E3 FF 0F 00 4A 00 62 00 4D 00 6D 00 9A 00 81 00 00 00 6C FF 4F FF 99 FF AA FF 5F FF 3F FF A0 FF 48 00 71 00 24 00 CF FF D1 FF FD FF 17 00 FF FF EC FF DC FF C6 FF B7 FF B9 FF D6 FF FD FF 13 00 4A 00 74 00 60 00 31 00 06 00 FF FF FE FF CA FF 84 FF 6E FF B1 FF FC FF 2D 00 15 00 11 00 4C 00 8F 00 8B 00 6C 00 5E 00 30 00 E4 FF 89 FF 4A FF 4C FF 7C FF CA FF 21 00 62 00 7D 00 79 00 7C 00 6F 00 3D 00 01 00 DE FF E0 FF C6 FF BC FF B9 FF D7 FF 00 00 0B 00 0E 00 38 00 95 00 D9 00 9C 00 EC FF 8B FF BB FF E3 FF 96 FF 18 FF 02 FF 80 FF E0 FF DB FF D2 FF 2E 00 9F 00 95 00 33 00 D8 FF DB FF D4 FF AC FF 91 FF 80 FF 93 FF AA FF FC FF 52 00 79 00 56 00 36 00 12 00 DE FF A2 FF 76 FF 7E FF 89 FF A3 FF C0 FF FB FF 5F 00 CF 00 13 01 15 01 E0 00 94 00 4F 00 05 00 A0 FF 48 FF 44 FF 98 FF E8 FF 12 00 3B 00 69 00 9A 00 95 00 6A 00 33 00 23 00 21 00 13 00 EF FF CF FF DE FF ED FF 12 00 1F 00 2B 00 3C 00 71 00 8A 00 2C 00 91 FF 4A FF 8D FF D7 FF 9D FF 36 FF 3A FF B1 FF 26 00 33 00 1A 00 0B 00 3C 00 73 00 66 00 47 00 0B 00 C6 FF 8C FF 8D FF 8E FF 79 FF 92 FF DF FF 25 00 1C 00 07 00 10 00 3C 00 3A 00 1C 00 F0 FF D7 FF E8 FF F2 FF D7 FF B7 FF DE FF 39 00 7A 00 6B 00 31 00 01 00 D5 FF C2 FF 93 FF 70 FF 60 FF B2 FF 30 00 A6 00 DC 00 CC 00 AE 00 9B 00 72 00 13 00 E8 FF 0D 00 40 00 17 00 C0 FF 98 FF E7 FF 51 00 87 00 44 00 E9 FF FC FF 47 00 27 00 8A FF FC FE 22 FF A8 FF F2 FF A5 FF 77 FF BF FF 4B 00 58 00 E9 FF BC FF FF FF 4C 00 60 00 27 00 DC FF B0 FF D7 FF 06 00 11 00 0D 00 17 00 35 00 41 00 26 00 FE FF F5 FF 02 00 07 00 C9 FF 92 FF 78 FF AA FF E8 FF F1 FF DD FF 05 00 72 00 C6 00 DB 00 9F 00 45 00 10 00 CB FF 82 FF 3F FF 30 FF 4D FF B4 FF 23 00 66 00 8A 00 AD 00 DB 00 EA 00 AE 00 4D 00 F6 FF E4 FF DE FF BE FF 98 FF CB FF 20 00 5A 00 82 00 8F 00 90 00 91 00 6E 00 DB FF 34 FF 12 FF 5C FF 82 FF 5E FF 43 FF 92 FF 0B 00 52 00 5D 00 53 00 69 00 6B 00 48 00 FA FF CC FF A5 FF 96 FF 79 FF 59 FF 61 FF 80 FF D8 FF 33 00 51 00 3A 00 12 00 10 00 14 00 09 00 F7 FF DF FF D6 FF C8 FF B2 FF C7 FF 1F 00 9D 00 DE 00 C7 00 9C 00 62 00 2C 00 EB FF AD FF 73 FF 41 FF 60 FF A8 FF F2 FF 2D 00 59 00 71 00 8A 00 8D 00 7C 00 30 00 F8 FF E3 FF D2 FF B7 FF B4 FF C5 FF 02 00 33 00 4D 00 52 00 68 00 81 00 62 00 DA FF 5F FF 82 FF DF FF CA FF 53 FF 04 FF 47 FF DF FF 16 00 FA FF F2 FF 33 00 81 00 94 00 66 00 42 00 19 00 FB FF FC FF EE FF CA FF 9B FF 87 FF C5 FF 07 00 08 00 DD FF D1 FF E9 FF 07 00 10 00 12 00 08 00 F3 FF D2 FF AC FF DC FF 1A 00 62 00 7A 00 86 00 83 00 71 00 5D 00 1B 00 AD FF 2F FF 0A FF 47 FF 80 FF A3 FF C0 FF 11 00 8B 00 C6 00 B1 00 90 00 93 00 B0 00 B0 00 61 00 12 00 F7 FF 02 00 11 00 FD FF E6 FF 10 00 30 00 F5 FF 85 FF 52 FF 89 FF E8 FF C5 FF 29 FF E7 FE 48 FF EA FF 17 00 E6 FF E8 FF 35 00 82 00 88 00 70 00 51 00 36 00 0B 00 FD FF F8 FF E8 FF AA FF 7C FF 87 FF A3 FF 78 FF 64 FF 97 FF 0D 00 5F 00 5D 00 47 00 38 00 3B 00 0A 00 BA FF 86 FF A9 FF D5 FF F8 FF 07 00 20 00 5C 00 7F 00 54 00 0B 00 D2 FF AB FF AA FF AE FF 97 FF A7 FF E1 FF 4C 00 9B 00 99 00 71 00 7B 00 9D 00 88 00 59 00 0F 00 FD FF EB FF EC FF F2 FF EF FF 2E 00 67 00 3C 00 F2 FF E5 FF 38 00 27 00 A1 FF 17 FF 02 FF 68 FF B5 FF D4 FF E4 FF F8 FF 22 00 4E 00 7D 00 6C 00 19 00 DB FF D2 FF F3 FF E3 FF C5 FF C3 FF E4 FF EE FF D0 FF 91 FF 86 FF CC FF 13 00 23 00 0D 00 FA FF 1B 00 34 00 27 00 02 00 F0 FF 00 00 31 00 60 00 68 00 63 00 5E 00 64 00 40 00 EC FF A1 FF 98 FF B3 FF BC FF A2 FF 82 FF AC FF 0D 00 64 00 74 00 7F 00 97 00 A8 00 A3 00 79 00 4B 00 2A 00 11 00 DC FF D0 FF F0 FF 13 00 27 00 E0 FF AF FF CE FF F6 FF DC FF 7D FF 39 FF 5A FF 8F FF 9E FF 98 FF AD FF 13 00 85 00 C4 00 BD 00 71 00 14 00 D9 FF D4 FF EE FF CE FF 78 FF 5D FF 8E FF F7 FF 0B 00 D2 FF 89 FF 96 FF D7 FF 06 00 0E 00 1B 00 35 00 56 00 53 00 38 00 24 00 3D 00 4E 00 53 00 2E 00 00 00 EC FF FF FF 0F 00 FA FF D0 FF B3 FF C4 FF E9 FF F7 FF F3 FF F8 FF 21 00 4D 00 4F 00 63 00 64 00 69 00 78 00 66 00 52 00 2B 00 0C 00 03 00 09 00 03 00 CD FF A7 FF 8B FF B7 FF 09 00 1D 00 D0 FF 6B FF 6C FF CE FF 03 00 C9 FF 68 FF 61 FF DE FF 71 00 B3 00 99 00 45 00 26 00 49 00 7D 00 64 00 1C 00 D9 FF BC FF D0 FF F3 FF EF FF AC FF 54 FF 61 FF AF FF F8 FF 17 00 27 00 4B 00 45 00 41 00 1E 00 0B 00 00 00 13 00 47 00 4B 00 34 00 31 00 78 00 8D 00 56 00 F9 FF C6 FF C4 FF B9 FF A7 FF A1 FF AA FF C0 FF E1 FF 30 00 7D 00 8D 00 AB 00 9E 00 8F 00 76 00 56 00 3B 00 2F 00 18 00 F0 FF AF FF 82 FF 8F FF CA FF E8 FF C6 FF 7E FF 6E FF C5 FF F8 FF EC FF C0 FF B0 FF D1 FF 30 00 94 00 C4 00 AC 00 7E 00 71 00 62 00 33 00 E1 FF B2 FF A0 FF BB FF CB FF A2 FF 6B FF 57 FF 70 FF 9D FF CD FF ED FF 06 00 3A 00 76 00 B8 00 A9 00 5E 00 1E 00 00 00 1D 00 36 00 31 00 2E 00 3D 00 51 00 56 00 16 00 B6 FF 66 FF 30 FF 28 FF 50 FF 84 FF BF FF F4 FF 31 00 96 00 DD 00 EF 00 E6 00 BD 00 87 00 33 00 ED FF C7 FF DF FF F3 FF FB FF D7 FF B6 FF BF FF F8 FF 2C 00 27 00 D0 FF 84 FF 68 FF 73 FF 84 FF 8E FF 9D FF B4 FF E8 FF 4B 00 99 00 9A 00 81 00 62 00 61 00 68 00 1A 00 AB FF 5A FF 63 FF 97 FF 99 FF 5F FF 3E FF 64 FF BD FF FA FF 0B 00 12 00 3B 00 62 00 65 00 4A 00 08 00 E9 FF F3 FF 26 00 3D 00 2B 00 26 00 3C 00 68 00 77 00 5E 00 35 00 FD FF BE FF 79 FF 57 FF 61 FF 91 FF C2 FF F4 FF 2D 00 74 00 B8 00 D0 00 CC 00 B1 00 8A 00 5D 00 47 00 25 00 FD FF D6 FF A9 FF 7A FF 87 FF D4 FF 15 00 0D 00 E6 FF C9 FF DC FF DF FF B3 FF 93 FF 7B FF 69 FF 75 FF BB FF FD FF 4E 00 56 00 5A 00 5C 00 73 00 6C 00 2A 00 C2 FF 93 FF A3 FF A8 FF 8E FF 62 FF 57 FF 75 FF C2 FF 17 00 5A 00 7B 00 86 00 85 00 62 00 25 00 ED FF BE FF A2 FF A4 FF AF FF D4 FF 03 00 3C 00 5F 00 71 00 5E 00 33 00 F3 FF B7 FF A6 FF B5 FF CD FF CF FF D3 FF ED FF 2E 00 5A 00 5D 00 54 00 5A 00 77 00 7E 00 74 00 48 00 0D 00 D2 FF B0 FF B0 FF B6 FF A3 FF B2 FF FC FF 3D 00 3C 00 05 00 DE FF DE FF D0 FF CA FF B2 FF 7A FF 52 FF 77 FF B2 FF F7 FF 21 00 27 00 2E 00 4D 00 47 00 2C 00 05 00 F2 FF BE FF 91 FF 8E FF AF FF B4 FF A4 FF AC FF EC FF 4D 00 B2 00 CB 00 AC 00 5E 00 2C 00 0E 00 E7 FF BA FF 95 FF 9E FF E6 FF 49 00 7C 00 70 00 53 00 3B 00 3C 00 0E 00 D0 FF 91 FF 74 FF 80 FF A7 FF BB FF C1 FF E4 FF 2F 00 78 00 88 00 6A 00 63 00 7E 00 8D 00 53 00 23 00 F5 FF F2 FF E7 FF E0 FF E6 FF 18 00 5D 00 68 00 3B 00 D1 FF 91 FF 99 FF B2 FF 93 FF 49 FF 35 FF 71 FF E3 FF 2B 00 4C 00 3B 00 25 00 36 00 36 00 28 00 01 00 EC FF D6 FF D7 FF BE FF C4 FF EA FF 0E 00 23 00 2D 00 3B 00 56 00 7D 00 86 00 67 00 3C 00 FA FF AF FF 83 FF 84 FF BA FF E6 FF 09 00 26 00 31 00 40 00 4E 00 4E 00 21 00 DF FF BE FF BD FF DB FF DD FF D5 FF DA FF FD FF 27 00 36 00 35 00 31 00 4F 00 76 00 5A 00 10 00 C6 FF 91 FF 96 FF BC FF C0 FF B7 FF E3 FF 47 00 7B 00 6A 00 30 00 12 00 04 00 DC FF C5 FF AC FF AC FF A7 FF 93 FF 76 FF 90 FF F3 FF 37 00 3D 00 33 00 3D 00 5E 00 59 00 27 00 F4 FF B6 FF 70 FF 51 FF 62 FF 8F FF CD FF 13 00 60 00 9F 00 B8 00 C8 00 9F 00 56 00 01 00 C6 FF A0 FF 94 FF B7 FF E6 FF 15 00 33 00 37 00 3C 00 3D 00 2E 00 10 00 EF FF C1 FF 9A FF 82 FF 8C FF B1 FF E4 FF 09 00 15 00 0F 00 34 00 61 00 75 00 7C 00 76 00 3E 00 EA FF A2 FF 95 FF 80 FF 7A FF 8C FF BD FF F9 FF 2E 00 62 00 7E 00 89 00 84 00 6A 00 35 00 F5 FF C4 FF A7 FF B2 FF B7 FF C0 FF DC FF 09 00 10 00 F4 FF 0D 00 5B 00 79 00 42 00 F3 FF AF FF 84 FF 56 FF 3A FF 50 FF 92 FF EC FF 3D 00 67 00 8F 00 8F 00 6F 00 3D 00 0E 00 D9 FF D0 FF E4 FF F3 FF F5 FF 0B 00 33 00 68 00 6C 00 49 00 1E 00 0D 00 12 00 F5 FF BB FF 72 FF 44 FF 4D FF 54 FF 73 FF A7 FF F5 FF 33 00 68 00 8C 00 95 00 7D 00 47 00 33 00 2E 00 29 00 19 00 12 00 12 00 05 00 F8 FF FF FF 2B 00 43 00 24 00 E6 FF D9 FF E1 FF EE FF D3 FF A5 FF 79 FF 7D FF A0 FF D1 FF 27 00 63 00 68 00 6A 00 75 00 75 00 80 00 73 00 3C 00 DA FF AB FF AF FF BE FF A4 FF 72 FF 7B FF DA FF 27 00 10 00 C1 FF 85 FF 7B FF 9E FF 1A 00 9A 00 BD 00 70 00 11 00 F9 FF 11 00 39 00 36 00 1A 00 D6 FF B2 FF D4 FF 16 00 3A 00 10 00 BD FF 94 FF A0 FF D9 FF 26 00 66 00 6D 00 6D 00 59 00 53 00 3B 00 1E 00 00 00 C8 FF C5 FF E9 FF F6 FF D4 FF B3 FF AC FF D1 FF 0A 00 21 00 21 00 0C 00 03 00 03 00 F2 FF DE FF C1 FF C0 FF C0 FF D2 FF 0E 00 26 00 42 00 56 00 67 00 53 00 1C 00 EF FF D4 FF CD FF CF FF C8 FF CF FF FC FF 32 00 4A 00 2E 00 09 00 FD FF F8 FF 03 00 08 00 06 00 08 00 D8 FF 9F FF 75 FF 89 FF CD FF F8 FF E5 FF C8 FF EE FF 4F 00 68 00 1A 00 D5 FF C7 FF EC FF D6 FF D0 FF FF FF 2B 00 15 00 D2 FF CA FF 10 00 44 00 43 00 16 00 DF FF C1 FF D5 FF 01 00 04 00 E8 FF ED FF FA FF 0D 00 59 00 AC 00 B0 00 76 00 4A 00 3B 00 31 00 F5 FF A8 FF 8B FF AD FF E6 FF C5 FF 8C FF 93 FF DB FF 30 00 4A 00 36 00 0E 00 E1 FF AF FF 8A FF 89 FF A4 FF B6 FF CB FF FD FF 45 00 8C 00 94 00 68 00 26 00 03 00 17 00 65 00 6E 00 F1 FF 5C FF 27 FF 56 FF 91 FF B4 FF B9 FF D7 FF 13 00 47 00 76 00 64 00 40 00 FF FF F8 FF 01 00 1C 00 27 00 FC FF F3 FF 19 00 27 00 14 00 CA FF 9C FF 8A FF B7 FF CA FF CD FF DD FF 01 00 10 00 E1 FF D9 FF 08 00 3B 00 72 00 73 00 79 00 64 00 32 00 16 00 00 00 D4 FF A5 FF 94 FF 93 FF 8B FF 9D FF CA FF F2 FF 1B 00 6C 00 87 00 65 00 30 00 0E 00 0D 00 FD FF ED FF FA FF 01 00 ED FF D1 FF F4 FF 40 00 5D 00 1D 00 C0 FF 87 FF 98 FF BD FF C8 FF C0 FF 9A FF A4 FF EB FF 62 00 A6 00 BD 00 A5 00 92 00 84 00 76 00 3B 00 DF FF 9A FF 93 FF A5 FF A4 FF 93 FF 94 FF 82 FF 8C FF BC FF 06 00 3E 00 60 00 74 00 80 00 6D 00 71 00 76 00 5D 00 2F 00 12 00 FB FF D5 FF B8 FF B9 FF C9 FF C0 FF 9E FF 8A FF 8E FF AF FF C3 FF E1 FF 04 00 1A 00 1D 00 3D 00 6F 00 9B 00 A6 00 91 00 83 00 6A 00 34 00 E4 FF 93 FF 68 FF 73 FF 94 FF 7E FF 7D FF 9B FF D9 FF 10 00 42 00 43 00 32 00 09 00 0D 00 2C 00 47 00 47 00 40 00 30 00 29 00 26 00 1A 00 F6 FF E4 FF CF FF B9 FF 87 FF 78 FF 8E FF BE FF 02 00 24 00 13 00 ED FF EE FF 0F 00 56 00 7E 00 72 00 30 00 00 00 F2 FF F2 FF E6 FF D4 FF D4 FF C5 FF C1 FF D0 FF FD FF 25 00 23 00 F7 FF DE FF DF FF F9 FF 2E 00 4E 00 44 00 25 00 28 00 3A 00 35 00 12 00 F0 FF FC FF 0C 00 11 00 1A 00 13 00 02 00 EE FF E3 FF DF FF EE FF FA FF E6 FF CB FF AE FF BB FF F4 FF 22 00 23 00 28 00 39 00 62 00 77 00 55 00 1A 00 EA FF DA FF EB FF E1 FF C4 FF C0 FF ED FF 0B 00 04 00 09 00 FF FF F6 FF D0 FF BF FF D4 FF D0 FF CF FF DE FF F0 FF 1C 00 41 00 6C 00 7B 00 6F 00 44 00 27 00 30 00 45 00 21 00 DB FF B1 FF D0 FF F7 FF 02 00 E4 FF CD FF CA FF C8 FF ED FF F8 FF FC FF EA FF D4 FF E9 FF 06 00 1C 00 38 00 42 00 52 00 56 00 5B 00 4C 00 31 00 12 00 EB FF CA FF D2 FF F0 FF 04 00 D8 FF AA FF A7 FF DB FF 2B 00 3E 00 1B 00 DC FF D5 FF 19 00 3A 00 25 00 CE FF 8A FF A6 FF 00 00 46 00 41 00 21 00 1F 00 52 00 6A 00 68 00 4A 00 35 00 0E 00 EE FF C5 FF CA FF F9 FF 24 00 3D 00 27 00 1D 00 22 00 1F 00 F8 FF B4 FF 7B FF 94 FF D9 FF 10 00 10 00 09 00 1C 00 49 00 56 00 35 00 17 00 24 00 30 00 17 00 E4 FF B5 FF A7 FF B9 FF B5 FF BC FF D8 FF 04 00 17 00 15 00 05 00 12 00 32 00 4F 00 54 00 4C 00 3D 00 42 00 3A 00 1E 00 00 00 DF FF E1 FF D7 FF B8 FF A9 FF C5 FF 00 00 0E 00 F7 FF DC FF EB FF 0E 00 0E 00 18 00 17 00 1D 00 13 00 0A 00 08 00 06 00 0B 00 07 00 FC FF D9 FF C0 FF AC FF B3 FF C5 FF BB FF B6 FF D4 FF F6 FF 08 00 11 00 0B 00 0B 00 11 00 32 00 51 00 61 00 48 00 08 00 E5 FF E9 FF F2 FF E1 FF BA FF C6 FF F4 FF 10 00 0B 00 FC FF F5 FF E4 FF DF FF E8 FF 06 00 0C 00 FA FF F1 FF ED FF F5 FF F3 FF F3 FF 00 00 12 00 40 00 67 00 58 00 00 00 B3 FF 94 FF A0 FF C5 FF FA FF 0D 00 F9 FF 09 00 47 00 76 00 68 00 17 00 DD FF D1 FF D3 FF D0 FF B9 FF BA FF D8 FF FF FF 29 00 60 00 7C 00 7B 00 5D 00 31 00 0D 00 F0 FF DF FF D0 FF BF FF CA FF 02 00 22 00 21 00 15 00 22 00 1F 00 1C 00 0B 00 F7 FF E0 FF C4 FF CA FF D8 FF EC FF F3 FF F7 FF 05 00 35 00 59 00 71 00 5B 00 24 00 F3 FF D7 FF C7 FF AD FF AD FF C6 FF FA FF 15 00 1D 00 1F 00 1C 00 3B 00 60 00 68 00 71 00 58 00 3B 00 01 00 C3 FF 8E FF 66 FF 62 FF 7F FF AF FF F4 FF 1C 00 FD FF E0 FF D5 FF F3 FF 10 00 14 00 0B 00 0C 00 1C 00 18 00 16 00 05 00 13 00 27 00 36 00 3B 00 2C 00 1B 00 F5 FF C1 FF 7B FF 62 FF 71 FF B4 FF E1 FF 09 00 16 00 3F 00 5C 00 40 00 0C 00 E4 FF E0 FF D9 FF BD FF AD FF B2 FF BF FF E0 FF FD FF 23 00 3D 00 4E 00 4D 00 22 00 ED FF D9 FF C8 FF D0 FF C9 FF E4 FF 03 00 30 00 5E 00 5C 00 25 00 E8 FF E3 FF F0 FF E6 FF CE FF CB FF E9 FF 09 00 1F 00 2B 00 0E 00 17 00 30 00 38 00 0C 00 D7 FF E8 FF F5 FF 00 00 D2 FF 89 FF 7A FF FC FF 7C 00 41 00 96 FF CF FF 70 00 99 00 DE FF 24 FF 53 FF 22 00 C2 00 3D 00 E1 FF 08 00 21 00 01 00 E2 FF 05 00 5E 00 6D 00 99 00 36 00 71 FF 3C FF EB FF 05 00 C0 FF 10 00 1A 00 67 FF 7C FF B9 00 59 01 D7 00 F0 FF FC FF 3D 00 01 00 FD FE CF FE 75 FF 3D 00 5D 00 E5 FF BD FF 27 00 2A 00 B1 FF EB FF 9C 00 A1 00 C8 FF 60 FF B4 FF 49 00 46 00 20 00 32 00 48 00 65 00 53 00 FD FF AA FF 74 FF B2 FF 82 FF 5D FF CA FF 54 00 8A 00 24 00 DC FF 7C FF AC FF 34 00 8B 00 5C 00 BF FF A5 FF 17 00 ED FF 9E FF D2 FF 76 00 7D 00 DA FF 6D FF 87 FF BD FF 6C FF 7E FF 31 00 94 00 65 00 FA FF 70 FF 75 FF DD FF 84 00 9F 00 72 00 03 00 D9 FF C2 FF A1 FF A1 FF DB FF 4A 00 81 00 88 00 2C 00 B2 FF 70 FF AA FF 0F 00 88 00 63 00 E8 FF B1 FF D3 FF B0 FF A3 FF 1B 00 76 00 77 00 56 00 2F 00 DC FF CB FF D2 FF 3D 00 75 00 36 00 D5 FF AB FF AF FF C4 FF D8 FF E3 FF 06 00 5D 00 83 00 51 00 C1 FF A0 FF F2 FF 30 00 4C 00 2E 00 1E 00 2B 00 33 00 3B 00 31 00 63 00 69 00 06 00 C3 FF CE FF DA FF 8F FF 5D FF 8C FF 9E FF 90 FF C8 FF FD FF ED FF 0B 00 74 00 CC 00 68 00 E6 FF F2 FF 38 00 2D 00 EF FF 13 00 32 00 F7 FF AD FF F9 FF 4B 00 40 00 30 00 49 00 1D 00 BD FF 7A FF 8C FF C3 FF 10 00 54 00 63 00 66 00 48 00 11 00 EF FF 38 00 31 00 BB FF C1 FF F1 FF FE FF CD FF 92 FF 9F FF EF FF 35 00 8B 00 AF 00 81 00 41 00 F4 FF 84 FF BA FF 10 00 0B 00 A6 FF 6B FF 9F FF DB FF D5 FF FA FF 30 00 2A 00 03 00 03 00 0D 00 15 00 1C 00 EE FF C0 FF 01 00 5B 00 85 00 01 00 A5 FF 0D 00 B5 00 C5 00 56 00 D3 FF 9E FF BC FF E8 FF D8 FF C3 FF C1 FF 03 00 46 00 3B 00 18 00 E8 FF 25 00 99 00 9E 00 56 00 1A 00 CC FF 8C FF 9D FF 02 00 44 00 6F 00 F5 FF A0 FF E1 FF 00 00 01 00 06 00 30 00 30 00 0B 00 DA FF E9 FF 1D 00 D5 FF C9 FF 21 00 45 00 27 00 E9 FF BF FF CF FF E3 FF 2C 00 49 00 42 00 2D 00 08 00 D8 FF FB FF E9 FF D3 FF 04 00 2C 00 47 00 29 00 AA FF 90 FF D3 FF E9 FF E6 FF EE FF 0D 00 C8 FF 80 FF 9C FF EA FF 30 00 90 00 BC 00 9C 00 21 00 8F FF BC FF 23 00 26 00 F3 FF E7 FF DF FF CF FF C8 FF F0 FF 02 00 EB FF 26 00 89 00 7E 00 E4 FF 7F FF B8 FF 1F 00 3D 00 56 00 18 00 FC FF 16 00 6E 00 56 00 D9 FF 6E FF BC FF 3D 00 52 00 DC FF 7B FF 87 FF C2 FF 01 00 47 00 4A 00 C8 FF 9E FF E8 FF 4C 00 4D 00 01 00 C5 FF 02 00 2E 00 46 00 1C 00 A5 FF 6D FF E8 FF 76 00 5E 00 BE FF 46 FF 8C FF 17 00 29 00 D3 FF 94 FF C3 FF 24 00 20 00 F1 FF F5 FF 1F 00 11 00 E8 FF E3 FF 00 00 E3 FF A7 FF B8 FF F5 FF 14 00 36 00 38 00 0E 00 15 00 56 00 6A 00 0A 00 B9 FF FA FF 2C 00 F6 FF 78 FF 84 FF D3 FF 2C 00 29 00 1C 00 E1 FF D7 FF FA FF 2F 00 4E 00 56 00 4D 00 EE FF C6 FF 9B FF E4 FF 42 00 8B 00 24 00 CD FF D3 FF F4 FF A7 FF AC FF 1A 00 2E 00 C7 FF 75 FF C3 FF 16 00 F0 FF B3 FF FC FF 4E 00 49 00 21 00 04 00 C0 FF A0 FF AF FF E8 FF FC FF CF FF B3 FF D4 FF 09 00 38 00 67 00 8B 00 51 00 FF FF EE FF F6 FF 27 00 06 00 E5 FF 2B 00 4F 00 D4 FF 91 FF E4 FF 71 00 47 00 DD FF C7 FF 01 00 26 00 1F 00 2B 00 1D 00 0D 00 28 00 33 00 52 00 5C 00 4E 00 4E 00 45 00 36 00 04 00 E3 FF C8 FF C6 FF D5 FF D5 FF CA FF AB FF 81 FF 59 FF 5A FF 89 FF FD FF 1A 00 26 00 35 00 45 00 D7 FF 9B FF 0B 00 57 00 29 00 CA FF CC FF F6 FF D2 FF D7 FF 02 00 71 00 AB 00 66 00 F8 FF A2 FF BE FF 06 00 30 00 6D 00 4A 00 D5 FF 86 FF DE FF 31 00 54 00 64 00 70 00 67 00 12 00 EA FF E3 FF DE FF EB FF 02 00 05 00 CF FF 72 FF 5E FF C1 FF 33 00 3C 00 33 00 3D 00 56 00 43 00 F9 FF FB FF FC FF DE FF CA FF F5 FF 5A 00 92 00 77 00 4C 00 58 00 6D 00 24 00 C1 FF B9 FF 04 00 EB FF AB FF A7 FF CA FF DE FF 0C 00 19 00 E3 FF 3E 00 29 00 C1 FF 6D FF 92 FF D8 FF B6 FF 77 FF 3E FF 76 FF CF FF FA FF 4F 00 45 00 2F 00 CA FF E7 FF 95 00 28 00 B1 FF 24 00 09 00 F1 FF C6 FF B8 FF 71 00 CA 00 08 01 06 00 8C 00 9C 00 9A 00 1C 00 B2 FF 89 FF E9 FF A0 FF E7 FF B1 FF 80 00 51 00 EB FF D6 FF 90 00 2C 00 3D FF 8A FF AB FF EB FF 44 00 D2 FF 9E FF E4 FF 3B FF 0D 00 A4 00 06 00 C6 FF 3F 00 79 00 3D 00 E7 FF 8E FF A1 FF B1 FF 08 00 7E 00 15 00 4E 00 91 00 77 00 78 00 65 00 DF FF 4E 00 10 00 94 FF A6 FF 0E 00 61 FF 99 FF 37 00 20 00 D7 FF 8C FF 34 FF 13 00 55 00 06 00 B3 FF 5A FF 41 FF 92 FF 98 FF D6 FF 33 00 9E 00 61 00 CF FF 83 FF 12 00 C8 00 A4 00 7F 00 F8 FF AE FF BE FF FA FF E3 FF 31 00 24 00 24 00 E1 FF 17 00 1D 00 7C 00 C1 00 98 00 BA FF 02 FF B2 FF 56 00 39 00 11 00 F2 FF 0F 00 59 00 15 00 45 00 35 00 1D 00 13 00 3E 00 2B 00 A7 FF B0 FF 7D FF 6B FF C9 FF C5 FF F7 FF 4C 00 6A 00 CB FF 11 00 69 00 4A 00 96 FF 8A FF 3D 00 31 00 B8 FF 37 00 20 00 18 00 EF FF C8 FF 09 00 6C 00 84 FF 03 FF AF FF 5B 00 2C 00 80 FF 03 FF 57 FF E9 FF FC FF 19 00 3B 00 3D 00 40 00 0E 00 07 00 B2 FF 49 FF B3 FF 59 00 0D 00 60 FF A8 FF 17 00 39 00 53 00 67 00 B9 00 A6 00 4A 00 DC FF 04 00 F2 FF F7 FF 72 00 45 00 B1 FF A1 FF FF FF 9D 00 4F 00 DC FF 64 00 5E 00 56 00 FF FF C5 FF 93 FF FA FF D2 FF FC FF D9 FF 4F FF 61 FF 2B 00 41 00 4C 00 44 00 72 00 5C 00 E3 FF 61 FF A3 FF EB FF 17 00 D0 FF AF FF D9 FF 0B 00 ED FF F3 FF 36 00 48 00 1D 00 1E 00 48 00 31 00 C2 FF 61 FF DB FF 98 00 58 00 AF FF A5 FF 3E 00 F0 00 78 00 F3 FF C5 FF 30 00 F8 FF 72 FF 5D FF 90 FF 8E FF 52 FF 67 FF EA FF 4E 00 A5 00 7C 00 8E FF 96 FF 3B 00 BE 00 C7 00 30 00 D7 FF 4A 00 A6 00 4E 00 21 00 81 00 21 00 6C 00 26 00 D9 FF 96 FF 18 00 53 00 DF FF EE FF DC FF 75 FF A5 FF 83 FF 5D 00 6F 00 AD 00 18 00 D0 FF E9 FF B6 FF 24 00 65 00 D8 FF 94 FF C5 FF F2 FF CA FF BC FF A5 FF DF FF 2C 00 E1 FF F3 FF A1 00 7F 00 00 00 EE FF 6C 00 97 00 88 00 DF FF DA FF 23 00 7A 00 62 00 E4 FF 10 00 E4 FF F7 FF C3 FF EB FF DE FF FD FF CD FF 45 FF 88 FF 71 FF 6E FF FF FF 4F 00 17 00 04 00 CA FF 2C 00 4F 00 4E 00 B3 FF 9C FF EE FF D9 FF B2 FF 12 00 2B 00 10 00 91 FF F4 FF 8A 00 69 00 2C 00 5D 00 45 00 A3 FF C1 FF 03 00 B6 FF 96 FF AB FF 37 00 6C 00 C8 FF E2 FF 29 00 06 00 A0 FF F5 FF 6B 00 29 00 CF FF B9 FF FF FF 29 00 D8 FF 9A FF 73 FF C2 FF 1D 00 22 00 7B 00 33 00 A2 FF C7 FF 2D 00 E5 FF 7D FF B7 FF 64 00 88 00 8E 00 48 00 37 00 24 00 D1 FF 16 00 6B 00 8B 00 F6 FF AF FF F3 FF E6 FF 22 00 50 00 FF FF 49 FF 44 FF 0E 00 88 00 32 00 34 FF B0 FE 27 FF AD FF 0D 00 1F 00 03 00 77 00 74 00 31 00 CB FF 9B FF ED FF 60 00 64 00 DF FF 91 FF D9 FF 49 00 6A 00 47 00 3C 00 2C 00 D1 FF 85 FF 09 00 1D 00 03 00 A2 FF CD FF 06 00 A7 FF D4 FF 39 00 30 00 DB FF F3 FF DC FF 13 00 E0 FF 9D FF E1 FF DF FF 24 00 4F 00 27 00 9D FF 8E FF 06 00 ED 00 03 01 29 00 D8 FF DB FF FA FF ED FF 84 FF 88 FF 42 00 0E 00 E4 FF D4 FF 91 00 5F 00 F6 FF 10 00 D9 FF A7 FF D3 FF 4F 00 53 00 0B 00 8D FF 46 FF B4 FF DB FF 6E 00 AA 00 E3 FF DA FF C9 FF 67 FF 95 FF AC FF 08 00 38 00 DC FF 37 FF AE FF 51 00 F0 00 60 00 E0 FF E2 FF 1D 00 A7 00 58 00 0D 00 EB FF 00 00 F6 FF F3 FF 98 FF 01 00 49 00 44 00 F6 FF B7 FF 29 00 7C 00 84 FF BE FE 78 FF 9C 00 74 00 A2 FF 87 FF 01 00 3B 00 DE FF EB FF 85 00 96 00 C7 00 64 00 04 00 D2 FF 58 FF CB FF 4B 00 1E 00 08 00 09 00 45 00 AF 00 60 00 38 00 9F FF 54 00 55 00 7D 00 31 00 C0 FF DB FF 8D FF 96 FF 85 FF D9 FF AC 00 33 00 D1 FF B2 FF E5 FF E0 FF DA FF 8B FF CC FE EF FE FA FF 08 00 12 00 66 FF EA FF 88 00 AE 00 C5 FF 4A FF AB 00 5D 01 97 00 98 FF A5 FF F2 FF BE FF A3 FF 32 00 0F 00 F8 FF ED FF 35 00 8D 00 09 00 8C FF EA FF 5A 00 E4 FF 03 00 1C 00 07 00 77 FF 97 FF 04 00 79 00 02 00 A3 FF E7 FF 3D 00 5E 00 AD FF B1 FF CC FF BE FF E6 FF 1C 00 6F 00 34 00 FF FF 1F 00 DD 00 04 01 7D 00 4F 00 E7 00 97 00 4F 00 09 00 25 00 A0 FF A0 FF F3 FF FB FF 12 00 FC FF E8 FF 12 00 CD FF DE FF CE FF A2 FF 15 FF 23 FF 23 00 D8 00 5A 00 9C FF 80 FF 22 00 0B 00 C0 FF 2C FF 88 FF 3F 00 B9 FF ED FE 2D FF A5 FF 38 00 42 00 4D 00 7B 00 DF 00 A2 00 67 00 06 00 32 00 63 00 3B 00 B5 FF 9B FF 03 00 8D 00 D2 00 64 00 C6 FF 88 FF 01 00 15 00 CA FF 71 FF E0 FF 1A 00 E4 FF 52 FF 5F FF 08 00 53 00 B6 FF EE FF BE 00 74 00 27 00 EC FF F9 FF FD FF DE FF C1 FF 8A FF F0 FF C8 FF 03 00 45 00 4A 00 4A 00 62 00 7C 00 B6 00 D0 00 AD 00 D0 FF 77 FF 44 FF 76 FF 93 FF 8C FF 96 FF 32 00 47 00 F6 FF 70 FF BC FF 33 00 10 00 42 FF 3E FF AB FF F6 FF 78 FF 2A FF DC FF 30 00 5D 00 EE FF 4A 00 52 00 D9 00 6B 00 C6 FF 80 FF 72 FF F3 FF 45 00 57 00 2C 00 2D 00 60 00 51 00 1A 00 F7 FF 21 00 90 00 77 00 C1 FF 20 FF CB FF 9A 00 DB FF 45 FF A2 FF EC 00 C7 00 C3 FF 43 FF 1F 00 F8 00 F3 FF 3F FF D3 FF 42 00 04 00 BD FF D2 FF 4F 00 FD FF DC FF E1 FF 2B 00 E3 FF FD FF 68 00 75 00 F7 FF BB FF 44 00 31 00 DD FF 05 00 3E 00 37 00 1A 00 93 FF 95 FF A8 FF A4 FF FB FF D9 FF 97 FF 3E FF 05 00 5B 00 DC FF 8B FF 75 FF D2 FF 90 FF 9E FF 16 00 64 00 86 00 E3 FF CF FF E3 FF E4 FF 1A 00 30 00 4A 00 F9 FF C2 FF 3D 00 2E 00 14 00 FE FF 8F 00 88 00 FF FF 92 FF C6 FF 6F 00 88 00 47 00 FF FF CD FF BA FF 22 00 E1 FF 39 00 63 00 81 00 F3 FF 87 FF 93 FF 15 00 8F 00 08 00 CB FF A0 FF CF FF EE FF FA FF 23 00 41 00 0B 00 FA FF D5 FF D2 FF 33 00 08 00 39 00 54 00 6A 00 BC FF FD FF 89 00 72 00 D0 FF 88 FF 5E 00 6F 00 A7 FF 3E FF ED FF 75 00 FF FF 4B FF 3E FF C8 FF 3E 00 D9 FF C8 FF 1F 00 D0 FF 98 FF FD FF 13 00 0D 00 0E 00 0C 00 13 00 0D 00 F5 FF 21 00 28 00 44 00 17 00 CF FF 1C 00 12 00 DF FF EF FF 4A 00 BF 00 EB 00 83 00 C5 FF A8 FF 4D 00 9B 00 7F 00 ED FF 93 FF 8C FF E6 FF 15 00 26 00 01 00 FA FF 3E 00 19 00 F2 FF 46 00 73 00 F8 FF D7 FF A8 FF C8 FF 20 00 D1 FF BB FF FD FF 47 00 65 00 30 00 DD FF FC FF 38 00 F8 FF D7 FF ED FF D8 FF BC FF B7 FF 53 00 66 00 B5 FF BD FF 2D 00 6C 00 88 00 76 00 F6 FF CE FF 03 00 49 00 1E 00 75 FF 21 FF AB FF 20 00 6E FF 5D FF 2D 00 A1 00 E3 FF 49 FF D2 FF E0 00 6F 00 3B FF 07 FF B7 FF AE 00 E2 00 2A 00 13 00 B0 00 DE 00 B3 00 21 00 06 00 67 00 97 00 F9 FF 57 FF 94 FF ED FF 2C 00 ED FF 0D 00 6E 00 2E 00 03 00 1C 00 24 00 1F 00 26 00 F3 FF 92 FF 8B FF FC FF 31 00 36 00 ED FF 00 00 56 00 44 00 FB FF AE FF BE FF D5 FF C8 FF B6 FF C0 FF E6 FF 07 00 D1 FF 18 00 47 00 9F 00 7C 00 4E 00 67 00 2C 00 2F 00 36 00 F4 FF E5 FF C1 FF 74 FF 59 FF 96 FF D4 FF D6 FF CF FF B3 FF 0A 00 67 00 F8 FF 2D FF 42 FF CA FF F7 FF 4E FF 68 FF 81 00 19 01 F8 00 1F 00 C5 FF 8F 00 F6 00 54 00 B1 FF E9 FF 19 00 D2 FF 80 FF 6F FF 1C 00 58 00 21 00 D8 FF F5 FF 5D 00 3A 00 29 00 0D 00 B4 FF D0 FF CB FF D0 FF 63 FF 6C FF 16 00 37 00 B9 FF 7D FF 94 FF 27 00 53 00 49 00 19 00 31 00 70 00 45 00 3B 00 12 00 D1 FF F4 FF CE FF CC FF 89 FF DE FF 0B 00 DB FF 01 00 62 00 76 00 6C 00 E4 FF E9 FF 33 00 7E 00 53 00 05 00 DE FF D6 FF 50 00 5D 00 EA FF B7 FF A2 FF 3E 00 0F 00 97 FF 7D FF 9E FF CB FF 28 FF F9 FE 61 FF DC FF 08 00 8E FF C1 FF 76 00 81 00 0B 00 C2 FF 83 00 07 01 84 00 11 00 4C 00 24 00 03 00 F1 FF 58 00 D9 00 1F 00 1C FF 4C FF 39 00 72 00 62 00 C9 FF F5 FF D7 FF 8A FF 54 FF D1 FF 08 00 AC FF A0 FF E4 FF 15 00 14 00 EB FF CC FF 7C 00 A3 00 0C 00 9F FF 77 FF 0B 00 79 00 9F 00 13 00 E1 FF 22 00 5B 00 65 00 59 00 1F 00 18 00 08 00 33 00 4A 00 5D 00 36 00 10 00 E6 FF 1D 00 FE FF 09 00 10 00 D0 FF 91 FF 8D FF F7 FF 32 00 B0 FF 86 FF A0 FF C0 FF A8 FF 7F FF 9F FF 30 00 2E 00 7A FF 49 FF B5 FF F5 FF 2C 00 13 00 18 00 01 00 F2 FF E1 FF D7 FF 4C 00 97 00 A7 00 30 00 29 00 6C 00 DD 00 D1 00 1B 00 CB FF 60 00 16 00 75 FF 9F FF 98 FF D1 FF 27 00 FA FF C0 FF 7C FF 82 FF 12 00 3D 00 B2 FF 4B FF 0E 00 46 00 A3 FF 80 FF 24 00 91 00 49 00 C3 FF 03 00 6D 00 4D 00 CF FF EB FF D2 FF 18 00 1C 00 02 00 18 00 E7 FF 27 00 E4 00 B5 00 35 00 DF FF 0C 00 2A 00 2F 00 0F 00 FE FF D8 FF F7 FF 05 00 0C 00 B3 FF A5 FF 86 FF 9E FF BE FF B6 FF 7B FF 8E FF 73 FF B3 FF E1 FF 12 00 45 00 0F 00 CB FF FA FF 26 00 E3 FF C0 FF C6 FF F2 FF 33 00 0E 00 38 00 87 00 B7 00 61 00 49 00 70 00 53 00 E3 FF 13 00 2D 00 5A 00 4C 00 F0 FF 91 FF A0 FF 01 00 1C 00 E0 FF DA FF DC FF 23 00 F4 FF 46 FF 3B FF D2 FF 0D 00 DA FF 29 00 24 00 2D 00 FF FF FF FF C6 FF 09 00 19 00 52 00 C4 00 5D 00 3F 00 54 00 38 00 C4 FF A2 FF D3 FF 36 00 26 00 BD FF DA FF 21 00 74 00 68 00 4C 00 3B 00 0D 00 0E 00 02 00 AA FF D7 FF B8 FF 01 00 FC FF FF FF F4 FF EF FF E3 FF D1 FF 2A 00 BB FF 76 FF 09 FF 65 FF D2 FF BC FF 6E FF CB FF 71 00 46 00 80 FF AD FF 6F 00 C5 00 31 00 CD FF 51 00 98 00 23 00 B7 FF E8 FF 77 00 8F 00 4A 00 CF FF CF FF 1E 00 99 00 8D 00 60 00 E5 FF CB FF 04 00 54 00 5F 00 2B 00 E0 FF B6 FF 8C FF 84 FF 88 FF 9E FF D4 FF 01 00 E0 FF 16 00 76 00 43 00 D0 FF 8D FF 99 FF 06 00 7F 00 93 00 36 00 25 00 12 00 1C 00 4F 00 1D 00 04 00 D3 FF 06 00 21 00 12 00 B4 FF A8 FF EB FF 2C 00 31 00 0A 00 1E 00 65 00 A1 00 0E 00 D2 FF C5 FF B0 FF 70 FF 78 FF 99 FF D6 FF F0 FF B7 FF AF FF B1 FF D9 FF E8 FF E9 FF 03 00 EE FF A3 FF AD FF 26 00 6D 00 1D 00 A6 FF 04 00 69 00 60 00 1E 00 13 00 37 00 7F 00 FC FF 5A FF 59 FF 31 00 86 00 2F 00 C5 FF 13 00 DF 00 CE 00 33 00 14 00 44 00 30 00 19 00 C1 FF E0 FF EF FF DF FF AA FF C4 FF 8F FF 89 FF 83 FF 75 FF AE FF C6 FF E9 FF 00 00 12 00 03 00 DE FF 25 00 37 00 78 00 85 00 4F 00 1B 00 3B 00 11 00 ED FF F1 FF 04 00 4E 00 5A 00 0B 00 B6 FF 9D FF DC FF 38 00 77 00 33 00 A7 FF 73 FF E1 FF F0 FF 7A FF 76 FF E3 FF F3 FF DF FF F0 FF 13 00 E9 FF AD FF 4F FF 78 FF 0E 00 6F 00 40 00 1D 00 3D 00 82 00 69 00 08 00 04 00 31 00 E2 FF 6E FF C1 FF 29 00 E3 FF 5C FF 94 FF 06 00 F7 FF D4 FF DC FF 8E 00 DB 00 9B 00 59 00 99 00 A0 00 08 00 51 00 90 00 71 00 E6 FF B1 FF D7 FF 17 00 E1 FF A5 FF 6E FF A6 FF D6 FF 6C FF 94 FF C7 FF FC FF D6 FF 9B FF BF FF 67 00 A0 00 48 00 09 00 09 00 17 00 F6 FF 07 00 10 00 09 00 A7 FF 85 FF 69 FF 9F FF FF FF 29 00 6C 00 92 00 A1 00 58 00 51 00 9B 00 A1 00 0C 00 E6 FF F4 FF 48 00 3C 00 A3 FF 8F FF 47 00 0B 00 9E FF 5F FF 95 FF 8B FF B7 FF AE FF D0 FF 21 00 F9 FF 84 FF CB FF 5B 00 CD 00 78 00 39 00 1F 00 EF FF 2A 00 00 00 9F FF 94 FF EF FF F7 FF D0 FF A1 FF D3 FF 18 00 29 00 D8 FF 1D 00 B3 00 B7 00 18 00 15 00 32 00 71 00 B7 00 7C 00 1F 00 53 00 7C 00 16 00 E4 FF 8C FF C1 FF 3D 00 5F 00 D7 FF 65 FF B5 FF 02 00 DE FF 5A FF 10 FF A0 FF 14 00 EC FF DC FF 68 00 EA 00 79 00 8F FF 7B FF 15 00 53 00 1C 00 E4 FF 12 00 60 00 8F 00 48 00 04 00 F2 FF FF FF F5 FF EA FF FB FF F6 FF 2E 00 37 00 13 00 CD FF C3 FF 09 00 18 00 E8 FF 3F 00 3F 00 06 00 A7 FF 71 FF AB FF 82 FF 5C FF 6E FF FE FF 3A 00 E8 FF CF FF C9 FF C5 FF E8 FF 34 00 4C 00 3F 00 A8 FF B8 FF 05 00 7E 00 BF 00 81 00 08 00 C0 FF DF FF DD FF 19 00 60 00 44 00 27 00 1C 00 0A 00 24 00 1E 00 15 00 7B 00 68 00 ED FF B2 FF 2F 00 57 00 61 00 62 00 2C 00 22 00 24 00 F0 FF B1 FF 93 FF F0 FF F1 FF C2 FF 8F FF B0 FF B1 FF 50 FF 41 FF 9E FF C6 FF F1 FF E6 FF 37 00 3D 00 2A 00 22 00 15 00 FE FF 0D 00 B2 FF F7 FF 5D 00 95 00 9F 00 64 00 2C 00 EC FF FA FF 0D 00 40 00 45 00 24 00 ED FF DA FF F1 FF F8 FF 20 00 41 00 46 00 C9 FF B2 FF C8 FF E6 FF 87 FF 57 FF 5F FF 69 FF 91 FF 77 FF 7D FF E6 FF 3D 00 59 00 1D 00 AA FF 8A FF B7 FF F8 FF 03 00 B1 FF 8C FF 4D 00 E7 00 9C 00 0D 00 3C 00 3A 00 5B 00 E8 FF D1 FF 22 00 1C 00 2B 00 4B 00 27 00 F0 FF F4 FF 45 00 37 00 FB FF D1 FF B6 FF 88 FF 6A FF A7 FF 16 00 3A 00 47 00 5D 00 1D 00 EA FF D5 FF 0D 00 0A 00 0A 00 D3 FF AB FF 6E FF 7C FF C3 FF DD FF 0F 00 54 00 7D 00 28 00 AC FF D2 FF F9 FF A9 FF BA FF 0F 00 42 00 09 00 3D 00 07 01 0F 01 95 00 0E 00 03 00 FA FF BA FF 78 FF F6 FF 3E 00 30 00 A2 FF 9E FF 1C 00 54 00 F2 FF AB FF E1 FF CF FF 9B FF B3 FF E5 FF 13 00 02 00 0D 00 1C 00 1A 00 E4 FF B9 FF DF FF 4D 00 45 00 E3 FF 85 FF F8 FF 92 00 8A 00 0D 00 96 FF 09 00 2D 00 54 00 E1 FF BE FF C5 FF 1B 00 38 00 4E 00 06 00 EE FF 5E 00 6D 00 01 00 E7 FF FD FF FF FF DE FF DC FF 0D 00 3D 00 67 00 F7 FF A3 FF CA FF 2B 00 50 00 0E 00 8F FF 83 FF 27 00 40 00 FA FF FF FF 21 00 D2 FF 7C FF 9D FF A7 FF 7F FF 23 FF 85 FF 33 00 1F 00 E1 FF E4 FF 7C 00 A9 00 3B 00 39 00 3F 00 2F 00 27 00 10 00 26 00 56 00 23 00 2B 00 54 00 44 00 13 00 3A 00 28 00 17 00 C4 FF 00 00 DE FF EE FF F4 FF D0 FF 9D FF 96 FF DA FF 38 00 2B 00 7C FF 81 FF 34 00 27 00 99 FF 73 FF DA FF 61 00 1A 00 F7 FF EE FF 24 00 15 00 C0 FF 9D FF 07 00 8F 00 53 00 F3 FF FA FF 35 00 61 00 25 00 08 00 01 00 CA FF D9 FF 03 00 27 00 E9 FF AA FF CE FF 62 00 62 00 17 00 FA FF 2C 00 40 00 EB FF C4 FF 06 00 33 00 03 00 0E 00 49 00 A3 00 7B 00 ED FF F7 FF 1A 00 EE FF 9A FF A9 FF 01 00 1D 00 DC FF A4 FF BB FF E7 FF E3 FF CD FF 1F 00 33 00 11 00 F5 FF F7 FF BF FF 94 FF CD FF E9 FF 0E 00 F1 FF DA FF EB FF 06 00 4D 00 6D 00 38 00 62 00 4D 00 5C 00 33 00 0C 00 08 00 EC FF CD FF CA FF 15 00 1C 00 1F 00 D2 FF B5 FF FF FF 29 00 CD FF A3 FF BC FF 06 00 D4 FF 86 FF 89 FF BE FF C2 FF B1 FF F7 FF 94 00 AD 00 00 00 F0 FF 5D 00 9F 00 54 00 FF FF E3 FF F0 FF 09 00 ED FF 80 FF 8A FF D9 FF 3C 00 43 00 3D 00 F7 FF 87 FF CE FF 0E 00 47 00 49 00 48 00 26 00 FC FF 34 00 FA FF 36 00 4B 00 3C 00 00 00 F6 FF E8 FF 9B FF A8 FF D2 FF FD FF F0 FF 85 FF A7 FF 18 00 81 00 4D 00 D5 FF D7 FF 20 00 0F 00 B6 FF 9E FF 28 00 3C 00 ED FF B7 FF 23 00 40 00 02 00 F2 FF 14 00 0F 00 0D 00 0C 00 F2 FF FA FF DC FF A7 FF D5 FF 0F 00 31 00 4E 00 77 00 81 00 12 00 E9 FF 35 00 5D 00 F4 FF A8 FF E8 FF 0B 00 21 00 FB FF 17 00 2B 00 D8 FF CF FF C5 FF E9 FF 06 00 2F 00 4E 00 E2 FF AD FF F8 FF 29 00 10 00 E9 FF D7 FF 01 00 0B 00 0C 00 F8 FF F2 FF 09 00 16 00 E6 FF F3 FF 04 00 D9 FF F5 FF E1 FF E0 FF F3 FF 31 00 0B 00 03 00 16 00 03 00 2D 00 6A 00 5E 00 51 00 1D 00 29 00 0A 00 F0 FF AC FF DC FF 1F 00 59 00 63 00 FB FF EE FF 38 00 7C 00 54 00 FF FF 10 00 F8 FF D0 FF A0 FF C9 FF F4 FF FF FF FA FF E6 FF 04 00 35 00 18 00 8E FF 57 FF 9B FF CF FF CF FF ED FF 0E 00 C3 FF B7 FF 27 00 12 00 11 00 23 00 24 00 1C 00 38 00 24 00 29 00 20 00 DA FF FC FF 5E 00 76 00 3F 00 0E 00 EB FF ED FF B7 FF DF FF E8 FF E7 FF D2 FF 00 00 EF FF FC FF 0B 00 03 00 1E 00 F5 FF 17 00 5D 00 17 00 02 00 44 00 1C 00 D9 FF C4 FF B1 FF DF FF F5 FF F1 FF 16 00 54 00 3C 00 29 00 24 00 36 00 2E 00 37 00 F7 FF D1 FF 33 00 21 00 07 00 E0 FF D9 FF 3D 00 9A 00 47 00 1D 00 3E 00 35 00 EB FF 9F FF 79 FF D0 FF 21 00 FA FF F3 FF 03 00 56 00 26 00 D0 FF 03 00 7E 00 6F 00 01 00 0B 00 F3 FF 0B 00 DF FF B4 FF D9 FF 17 00 68 00 43 00 0D 00 18 00 07 00 94 FF 75 FF 9D FF 93 FF 44 FF 8A FF D7 FF EF FF 04 00 32 00 29 00 F8 FF D7 FF 0F 00 8B 00 67 00 03 00 AD FF E3 FF 1E 00 ED FF C0 FF 21 00 7E 00 33 00 F7 FF 19 00 54 00 3D 00 CE FF 8F FF E4 FF 1A 00 F0 FF B2 FF 1A 00 68 00 1A 00 F5 FF 14 00 66 00 F0 FF BE FF A7 FF EE FF 10 00 C3 FF 91 FF BC FF 17 00 10 00 D9 FF E8 FF 71 00 99 00 1F 00 D2 FF EA FF 2C 00 4D 00 35 00 1F 00 04 00 F7 FF CF FF B2 FF FB FF 0E 00 FC FF C8 FF AD FF E5 FF F6 FF 08 00 F2 FF EA FF F0 FF 18 00 60 00 5D 00 52 00 04 00 E8 FF EC FF DE FF F3 FF 1F 00 D4 FF C8 FF EE FF 13 00 F0 FF E2 FF D4 FF 0B 00 F8 FF C1 FF F5 FF 00 00 1F 00 E4 FF F7 FF FD FF FE FF B9 FF F2 FF 21 00 12 00 05 00 01 00 C5 FF 97 FF C5 FF 0E 00 3D 00 3D 00 41 00 14 00 1C 00 F7 FF F3 FF 3B 00 42 00 54 00 17 00 04 00 2C 00 E1 FF 69 FF 69 FF E8 FF 1F 00 DF FF DE FF 49 00 44 00 2D 00 1C 00 27 00 69 00 0F 00 DF FF 06 00 26 00 F1 FF D7 FF B5 FF A9 FF D9 FF 22 00 33 00 03 00 CC FF A7 FF B6 FF C3 FF 02 00 DC FF E9 FF CD FF 1F 00 4F 00 42 00 4E 00 5D 00 EB FF CD FF 01 00 03 00 F6 FF B6 FF 61 FF 48 FF AA FF DC FF 10 00 2E 00 87 00 7A 00 26 00 27 00 6A 00 4E 00 12 00 06 00 29 00 21 00 DE FF 09 00 23 00 E6 FF DE FF DA FF ED FF E4 FF F7 FF 37 00 4E 00 03 00 CD FF C8 FF EB FF D3 FF E4 FF F7 FF FE FF 15 00 05 00 F0 FF FC FF FF FF E4 FF F7 FF D0 FF A2 FF B6 FF 8A FF C7 FF 26 00 28 00 23 00 2B 00 02 00 17 00 87 00 6F 00 E6 FF BA FF F1 FF 07 00 ED FF A2 FF B3 FF BC FF DB FF 18 00 05 00 E4 FF EB FF 06 00 08 00 67 00 83 00 3D 00 BC FF E9 FF 20 00 32 00 DF FF C5 FF EE FF 1D 00 12 00 B9 FF 8F FF 8C FF BF FF CA FF 0F 00 09 00 EC FF E7 FF FA FF 13 00 60 00 81 00 40 00 15 00 EF FF 58 00 51 00 F2 FF 9E FF C9 FF F2 FF CE FF D4 FF 10 00 18 00 F2 FF A7 FF 98 FF C4 FF AF FF DA FF 37 00 1A 00 1A 00 3C 00 4A 00 26 00 29 00 32 00 4F 00 FE FF 00 00 0B 00 CA FF 83 FF 91 FF D9 FF F3 FF 26 00 EF FF F3 FF 16 00 43 00 17 00 11 00 F9 FF 1D 00 2B 00 38 00 44 00 06 00 E3 FF 0F 00 04 00 E6 FF AF FF 8A FF EE FF 1A 00 02 00 F8 FF 05 00 1F 00 0B 00 2E 00 31 00 13 00 D5 FF EC FF E9 FF FA FF 1F 00 E2 FF C6 FF F5 FF 00 00 E4 FF E5 FF 03 00 DE FF A2 FF CB FF F7 FF EF FF BC FF AC FF 3E 00 60 00 2E 00 F5 FF 10 00 35 00 1B 00 F5 FF E4 FF 0D 00 F8 FF 0E 00 01 00 3B 00 13 00 FA FF B2 FF C9 FF 0B 00 ED FF B1 FF 88 FF 8C FF 04 00 2B 00 22 00 79 00 6A 00 5B 00 33 00 03 00 01 00 2D 00 F4 FF D2 FF AB FF B1 FF DC FF A0 FF 96 FF E7 FF 2D 00 2A 00 47 00 53 00 5B 00 5B 00 3F 00 14 00 1B 00 10 00 F6 FF 16 00 42 00 2B 00 D0 FF C8 FF E4 FF EB FF B4 FF BD FF 02 00 08 00 EA FF F5 FF E9 FF BC FF 9E FF ED FF 1F 00 01 00 B8 FF 0B 00 48 00 3F 00 FA FF 0A 00 0D 00 FF FF DC FF 01 00 27 00 F8 FF BB FF B7 FF 06 00 26 00 37 00 4B 00 4F 00 04 00 0F 00 35 00 F5 FF BF FF 89 FF C0 FF 3F 00 40 00 C2 FF AB FF 2D 00 6A 00 3C 00 F3 FF CD FF CA FF D4 FF CF FF 0F 00 F9 FF E9 FF 09 00 2C 00 30 00 56 00 3C 00 2E 00 03 00 D5 FF F5 FF 06 00 FE FF CA FF E6 FF 1C 00 30 00 15 00 27 00 65 00 2C 00 17 00 5A 00 80 00 3D 00 CF FF D0 FF FD FF FA FF CD FF C4 FF 13 00 14 00 04 00 07 00 FC FF E4 FF C8 FF F1 FF FC FF 00 00 D9 FF 4A 00 6C 00 42 00 00 00 20 00 54 00 26 00 E1 FF ED FF 17 00 08 00 04 00 13 00 EB FF A9 FF AC FF 00 00 E9 FF 87 FF 84 FF FA FF 1A 00 06 00 01 00 19 00 29 00 24 00 45 00 4F 00 24 00 DC FF D9 FF E4 FF F5 FF FB FF F7 FF FB FF E3 FF C5 FF DF FF 60 00 AB 00 4E 00 C0 FF BB FF 25 00 76 00 34 00 F6 FF 27 00 65 00 5A 00 20 00 D7 FF AD FF D8 FF F9 FF F0 FF AD FF AA FF CC FF EB FF F2 FF F7 FF D5 FF C4 FF F8 FF 17 00 10 00 D7 FF E6 FF FF FF 3C 00 33 00 10 00 F2 FF 27 00 46 00 04 00 D7 FF DB FF FF FF C3 FF 9C FF BE FF E3 FF F0 FF CF FF 02 00 5E 00 6B 00 4F 00 12 00 F7 FF 0B 00 53 00 51 00 15 00 09 00 1A 00 36 00 10 00 27 00 04 00 F5 FF B7 FF DF FF 1F 00 1F 00 E8 FF E4 FF 16 00 31 00 1D 00 F5 FF DC FF AD FF DC FF 4A 00 40 00 E9 FF F5 FF 2B 00 02 00 D8 FF C4 FF E4 FF 14 00 F8 FF F5 FF 13 00 1C 00 F0 FF B4 FF E6 FF 21 00 3F 00 49 00 52 00 2E 00 1A 00 16 00 42 00 F3 FF 00 00 14 00 E8 FF E2 FF DA FF 0B 00 E4 FF EB FF 02 00 25 00 0B 00 A8 FF C2 FF 12 00 18 00 E1 FF B7 FF DE FF 26 00 2D 00 1F 00 12 00 2C 00 10 00 02 00 FB FF DF FF DE FF EF FF 0F 00 06 00 E3 FF F2 FF 18 00 FD FF FF FF F7 FF 18 00 14 00 00 00 F5 FF F7 FF 1C 00 F0 FF D5 FF 08 00 18 00 1F 00 18 00 0C 00 1A 00 FB FF D5 FF D5 FF 49 00 A3 00 44 00 E9 FF 18 00 7E 00 13 00 A9 FF A8 FF D6 FF F6 FF C6 FF D6 FF D3 FF F8 FF F8 FF 03 00 EB FF D9 FF D5 FF D5 FF E4 FF DE FF FA FF E4 FF E6 FF EB FF 1C 00 46 00 58 00 3B 00 2F 00 35 00 ED FF C1 FF DE FF 16 00 14 00 EE FF D6 FF 41 00 53 00 15 00 EE FF 25 00 36 00 2D 00 17 00 E3 FF F8 FF 09 00 33 00 1B 00 C6 FF B0 FF 06 00 3B 00 18 00 33 00 32 00 00 00 D5 FF EB FF 02 00 3D 00 F4 FF B1 FF 91 FF CA FF EB FF C7 FF 7D FF D3 FF 31 00 18 00 FE FF 05 00 41 00 1A 00 C4 FF A2 FF 27 00 2B 00 D6 FF BB FF FA FF 48 00 67 00 21 00 CA FF C4 FF E0 FF 1A 00 30 00 2D 00 40 00 1C 00 08 00 27 00 18 00 01 00 0A 00 09 00 08 00 1E 00 30 00 ED FF DA FF E4 FF 0B 00 0D 00 09 00 1C 00 12 00 F2 FF 9D FF BA FF F0 FF C4 FF AE FF D1 FF FD FF 04 00 E4 FF F1 FF 05 00 3F 00 4E 00 29 00 04 00 08 00 E1 FF C3 FF D2 FF FF FF 26 00 45 00 18 00 08 00 1A 00 5C 00 65 00 18 00 CD FF CA FF 06 00 0E 00 13 00 FD FF 28 00 21 00 E9 FF F0 FF 30 00 21 00 C6 FF B4 FF B7 FF C1 FF CB FF 9C FF 8E FF B5 FF 2D 00 62 00 3E 00 18 00 18 00 24 00 EE FF A7 FF B1 FF C9 FF D0 FF 9D FF A9 FF 1F 00 6C 00 2F 00 0C 00 21 00 35 00 E0 FF B7 FF F5 FF 30 00 09 00 E9 FF 05 00 3C 00 58 00 50 00 42 00 5E 00 63 00 31 00 F5 FF BE FF CB FF D0 FF BB FF D3 FF 06 00 32 00 2E 00 0F 00 1B 00 26 00 E3 FF 89 FF A8 FF DE FF D8 FF DC FF 08 00 29 00 26 00 F8 FF E8 FF FE FF 2A 00 2E 00 4E 00 3D 00 60 00 1B 00 E1 FF AD FF B2 FF 96 FF EA FF 1C 00 FF FF E8 FF 36 00 60 00 4D 00 35 00 03 00 ED FF D4 FF F0 FF EE FF E8 FF F8 FF 27 00 01 00 E0 FF 03 00 3B 00 FF FF BB FF BA FF E1 FF FB FF EE FF EB FF D5 FF F0 FF EE FF 1A 00 3D 00 E5 FF C1 FF D6 FF 04 00 F7 FF FF FF E1 FF FD FF 49 00 80 00 44 00 35 00 4A 00 5D 00 12 00 A8 FF 9A FF A5 FF C0 FF BE FF D0 FF 01 00 22 00 2B 00 0E 00 32 00 26 00 0D 00 01 00 29 00 11 00 14 00 3F 00 44 00 12 00 ED FF 1B 00 32 00 FF FF CA FF D6 FF E7 FF AA FF BB FF DF FF FF FF F4 FF F0 FF 2B 00 21 00 DC FF D3 FF D2 FF E3 FF E7 FF 0E 00 20 00 22 00 26 00 29 00 2B 00 0B 00 F1 FF 21 00 4F 00 04 00 D5 FF DE FF F3 FF EC FF E3 FF 01 00 0D 00 30 00 19 00 5E 00 64 00 47 00 13 00 FC FF EB FF F5 FF F0 FF F0 FF FC FF EB FF BD FF C8 FF D0 FF DD FF 22 00 10 00 02 00 30 00 42 00 F2 FF AA FF A7 FF DF FF F8 FF D5 FF ED FF 31 00 41 00 01 00 23 00 45 00 49 00 FD FF 8D FF 8A FF B9 FF CE FF AB FF D6 FF 0E 00 39 00 40 00 2B 00 2B 00 2E 00 4E 00 3A 00 1E 00 22 00 13 00 E9 FF F8 FF 36 00 7A 00 7F 00 4F 00 20 00 01 00 13 00 F5 FF D9 FF B6 FF CD FF C2 FF B1 FF 86 FF 9B FF C4 FF FA FF EA FF CF FF 02 00 21 00 EB FF D9 FF 36 00 80 00 53 00 F7 FF D0 FF E9 FF 09 00 E2 FF AC FF BB FF F7 FF FD FF C3 FF CF FF 31 00 73 00 44 00 F6 FF 01 00 44 00 48 00 11 00 00 00 06 00 2E 00 27 00 08 00 FA FF 13 00 01 00 DE FF B4 FF C5 FF E8 FF E9 FF F2 FF E6 FF E2 FF BD FF C3 FF C3 FF 12 00 45 00 35 00 12 00 FA FF FF FF 1C 00 62 00 49 00 31 00 FC FF C1 FF D6 FF D6 FF AD FF B2 FF DF FF 1F 00 22 00 15 00 54 00 88 00 63 00 10 00 1F 00 00 00 F0 FF F1 FF F5 FF E9 FF D9 FF 03 00 44 00 74 00 5A 00 13 00 E5 FF E3 FF DA FF AE FF 84 FF 8B FF CB FF B8 FF 90 FF D2 FF 53 00 71 00 1C 00 F0 FF 1E 00 0A 00 D6 FF D2 FF 02 00 33 00 F3 FF 8D FF B4 FF FC FF 27 00 0A 00 1A 00 30 00 52 00 36 00 24 00 35 00 19 00 0A 00 D7 FF E9 FF EB FF 10 00 1E 00 1C 00 D4 FF CD FF 08 00 1D 00 F1 FF E9 FF EA FF E4 FF D4 FF D3 FF CA FF C7 FF DE FF CA FF DF FF F3 FF 0E 00 0A 00 F6 FF 2B 00 3D 00 30 00 F5 FF 0E 00 2B 00 13 00 AB FF C6 FF 1E 00 38 00 18 00 1A 00 25 00 F3 FF E2 FF C6 FF E0 FF 1F 00 53 00 36 00 E6 FF 9D FF DD FF 30 00 27 00 04 00 12 00 53 00 4C 00 06 00 EB FF 2C 00 46 00 FA FF C9 FF BB FF BB FF A8 FF 94 FF B1 FF DA FF E4 FF 01 00 08 00 DE FF DA FF 30 00 60 00 31 00 D4 FF F2 FF 1D 00 0A 00 30 00 51 00 35 00 0F 00 F9 FF 11 00 38 00 1C 00 D0 FF E2 FF F5 FF DB FF C1 FF DA FF D9 FF CA FF F3 FF 27 00 44 00 2E 00 2D 00 53 00 4F 00 1D 00 2B 00 12 00 EF FF E5 FF E9 FF 07 00 01 00 D2 FF BC FF F0 FF CC FF B2 FF D0 FF 16 00 FA FF BF FF E3 FF 21 00 1C 00 E4 FF F5 FF 21 00 6C 00 51 00 0B 00 07 00 31 00 24 00 E0 FF AB FF CC FF C1 FF 95 FF B2 FF EF FF E5 FF E2 FF 06 00 2E 00 18 00 20 00 2A 00 40 00 36 00 24 00 04 00 F9 FF F3 FF 1D 00 3F 00 21 00 FB FF 24 00 2A 00 F4 FF BB FF CA FF 1A 00 EC FF 62 FF 43 FF B1 FF 0D 00 FC FF EF FF FE FF 1D 00 FA FF E2 FF 0B 00 24 00 2D 00 1A 00 1E 00 02 00 FE FF 1D 00 4E 00 12 00 AA FF CB FF 19 00 02 00 F9 FF 25 00 51 00 25 00 04 00 26 00 32 00 0A 00 0B 00 26 00 01 00 0B 00 10 00 EB FF D6 FF D0 FF E1 FF 06 00 16 00 09 00 19 00 12 00 FA FF C5 FF DE FF BC FF BF FF CA FF 09 00 30 00 12 00 DF FF 1C 00 74 00 79 00 21 00 E2 FF F5 FF 07 00 FB FF E8 FF F5 FF D4 FF 8E FF AA FF 0E 00 57 00 39 00 00 00 F7 FF F6 FF 32 00 64 00 45 00 2C 00 21 00 1E 00 0D 00 E1 FF D4 FF DE FF F7 FF C3 FF D2 FF F0 FF 2B 00 35 00 08 00 EF FF E8 FF C1 FF 9B FF AC FF DE FF D0 FF C6 FF E9 FF 12 00 0F 00 DE FF ED FF 2F 00 63 00 3B 00 EB FF BD FF CA FF E3 FF F5 FF E4 FF B5 FF EE FF 51 00 32 00 E2 FF 04 00 55 00 3B 00 F3 FF DE FF 62 00 7C 00 33 00 D8 FF E3 FF 12 00 1A 00 CC FF CC FF DB FF E6 FF 04 00 22 00 27 00 21 00 3E 00 21 00 D5 FF 9A FF 92 FF B1 FF BB FF C8 FF E4 FF 03 00 EE FF E6 FF 07 00 30 00 17 00 0A 00 27 00 1E 00 F6 FF B8 FF F9 FF 0F 00 03 00 E1 FF F8 FF 22 00 52 00 31 00 FF FF 18 00 11 00 0B 00 12 00 C3 FF BF FF EC FF 0B 00 1C 00 20 00 2E 00 38 00 37 00 25 00 0A 00 EE FF EF FF BA FF AC FF F8 FF 31 00 30 00 CA FF 94 FF AE FF F0 FF 08 00 F7 FF DC FF D3 FF D7 FF CF FF 2B 00 97 00 6A 00 10 00 FA FF 04 00 32 00 79 00 63 00 12 00 E7 FF FB FF EE FF F3 FF FB FF 09 00 00 00 B6 FF F3 FF 4B 00 58 00 CD FF 95 FF FA FF 12 00 E5 FF C0 FF 17 00 11 00 E1 FF E9 FF 0D 00 1B 00 DB FF AC FF B1 FF E1 FF E1 FF C6 FF E3 FF 0B 00 1D 00 16 00 1D 00 18 00 06 00 0E 00 1C 00 0F 00 F3 FF F3 FF 2C 00 49 00 36 00 0A 00 17 00 02 00 E3 FF F0 FF 29 00 1C 00 EA FF E1 FF BC FF E1 FF 40 00 68 00 17 00 E3 FF 46 00 84 00 47 00 01 00 FB FF 0D 00 FE FF DE FF 1C 00 1F 00 E1 FF 96 FF BB FF D8 FF B9 FF B2 FF DD FF FF FF 06 00 01 00 06 00 F9 FF E3 FF E5 FF FE FF 09 00 45 00 61 00 51 00 09 00 EC FF 25 00 59 00 2E 00 ED FF F7 FF F6 FF E8 FF C2 FF B7 FF DE FF 1D 00 12 00 05 00 0A 00 1D 00 22 00 20 00 00 00 09 00 4E 00 55 00 FD FF C5 FF EB FF F5 FF E9 FF DF FF DE FF F2 FF 1C 00 45 00 09 00 D6 FF A0 FF C0 FF EC FF 30 00 22 00 27 00 35 00 1D 00 EE FF 17 00 4E 00 34 00 35 00 30 00 1A 00 C5 FF B2 FF B1 FF 9E FF AC FF D7 FF F4 FF 04 00 EE FF BC FF 22 00 50 00 3E 00 22 00 1C 00 FE FF 0E 00 39 00 47 00 3D 00 13 00 F1 FF F7 FF 21 00 45 00 30 00 EE FF DA FF F5 FF EF FF CF FF CD FF DA FF 01 00 0D 00 00 00 E9 FF DC FF C0 FF DE FF FA FF FF FF 1D 00 1C 00 ED FF D1 FF E9 FF 0E 00 0B 00 F7 FF CD FF E9 FF 11 00 18 00 16 00 0B 00 3B 00 21 00 1D 00 18 00 05 00 01 00 0C 00 F2 FF E8 FF ED FF BE FF AF FF BB FF E4 FF 0D 00 03 00 12 00 1F 00 FD FF CD FF 93 FF DF FF 13 00 EB FF B8 FF 0C 00 4F 00 07 00 B1 FF D5 FF 36 00 45 00 19 00 06 00 04 00 E0 FF D0 FF 1A 00 42 00 EB FF 99 FF 96 FF 01 00 65 00 7B 00 5D 00 06 00 CA FF D3 FF 0C 00 03 00 22 00 29 00 22 00 1A 00 09 00 24 00 47 00 14 00 E1 FF 14 00 27 00 EE FF A3 FF 86 FF A3 FF DD FF D7 FF E1 FF 26 00 47 00 ED FF B4 FF FF FF 50 00 E8 FF 53 FF 6A FF 03 00 54 00 6D 00 6C 00 54 00 27 00 DF FF EE FF 4D 00 60 00 08 00 E1 FF 35 00 27 00 D1 FF B4 FF E1 FF 0C 00 15 00 53 00 6C 00 30 00 E4 FF B4 FF BF FF F0 FF CF FF D3 FF DA FF CA FF D0 FF 15 00 24 00 20 00 13 00 10 00 06 00 ED FF D2 FF BE FF BE FF CB FF FD FF 0D 00 E9 FF C3 FF F9 FF 79 00 86 00 2C 00 F4 FF F8 FF F0 FF FC FF 10 00 33 00 29 00 C5 FF A6 FF F2 FF 27 00 2B 00 58 00 55 00 1C 00 D0 FF E4 FF 28 00 0C 00 C1 FF BE FF D5 FF D5 FF 05 00 3A 00 59 00 61 00 64 00 45 00 1C 00 1D 00 E6 FF F0 FF DC FF B0 FF B6 FF D4 FF DF FF F8 FF E6 FF 02 00 25 00 02 00 DC FF DD FF C9 FF D7 FF 20 00 28 00 14 00 E2 FF E3 FF 03 00 45 00 4E 00 4E 00 39 00 25 00 10 00 08 00 F5 FF D9 FF BB FF A3 FF BF FF 17 00 3A 00 22 00 0D 00 1A 00 03 00 E8 FF C9 FF D0 FF D7 FF C8 FF E4 FF 3D 00 45 00 1A 00 0A 00 22 00 2A 00 0E 00 DC FF CF FF F5 FF 1D 00 1C 00 0B 00 FA FF F0 FF E9 FF DD FF 17 00 63 00 65 00 26 00 FF FF 00 00 12 00 F5 FF C6 FF B1 FF E6 FF D7 FF BA FF FC FF 10 00 15 00 2C 00 3F 00 3A 00 31 00 21 00 41 00 4F 00 28 00 0A 00 FF FF F5 FF CC FF CA FF 00 00 2E 00 2C 00 01 00 F9 FF 09 00 0D 00 EC FF DC FF DF FF B2 FF 90 FF 93 FF C8 FF F1 FF E6 FF C4 FF B4 FF E3 FF 60 00 61 00 2F 00 32 00 53 00 3C 00 0A 00 26 00 54 00 58 00 F7 FF BF FF D9 FF 2A 00 3A 00 15 00 1C 00 39 00 3B 00 2C 00 21 00 14 00 15 00 29 00 09 00 EE FF FD FF DB FF BE FF B6 FF FD FF F2 FF E0 FF E8 FF DA FF E6 FF C0 FF D3 FF 01 00 06 00 DF FF CD FF E5 FF 04 00 22 00 0B 00 09 00 FD FF E1 FF D9 FF 24 00 4A 00 10 00 D0 FF D0 FF FB FF 49 00 7B 00 8D 00 4F 00 1B 00 F8 FF 15 00 2D 00 22 00 0E 00 F0 FF FD FF 29 00 2A 00 21 00 1B 00 24 00 04 00 EB FF E4 FF FE FF FE FF FE FF E3 FF E8 FF E1 FF B6 FF C5 FF 0B 00 28 00 0C 00 06 00 03 00 EE FF EE FF D7 FF A0 FF A1 FF CC FF D7 FF E1 FF 1C 00 5B 00 60 00 67 00 45 00 28 00 45 00 0B 00 CB FF B1 FF 07 00 07 00 F1 FF 34 00 79 00 49 00 F0 FF CF FF EB FF FD FF D5 FF CA FF DE FF BC FF 85 FF 91 FF C8 FF 06 00 10 00 17 00 32 00 47 00 79 00 5B 00 12 00 C0 FF A0 FF C0 FF ED FF D9 FF D4 FF EA FF 13 00 2B 00 23 00 3B 00 27 00 2E 00 35 00 2D 00 15 00 FF FF 00 00 F1 FF CF FF EB FF 13 00 04 00 E9 FF D4 FF 09 00 3D 00 1C 00 CB FF C5 FF 09 00 17 00 04 00 00 00 E3 FF DE FF 3D 00 80 00 76 00 22 00 DE FF E8 FF 0C 00 14 00 06 00 06 00 FC FF F2 FF DC FF FA FF 22 00 F2 FF C3 FF D2 FF 01 00 FC FF BB FF CA FF 01 00 18 00 F0 FF C5 FF C8 FF E4 FF 08 00 44 00 51 00 0B 00 94 FF 86 FF B4 FF DE FF D9 FF 32 00 5E 00 5A 00 33 00 33 00 56 00 36 00 1E 00 FA FF DF FF D2 FF FB FF 23 00 26 00 1E 00 FD FF FA FF 09 00 0D 00 F5 FF 01 00 EF FF A0 FF 9F FF C9 FF FF FF E3 FF E4 FF 06 00 27 00 F0 FF F6 FF 1C 00 31 00 1A 00 E3 FF E2 FF F7 FF F2 FF DE FF D2 FF E7 FF 1C 00 1A 00 FB FF 13 00 58 00 7E 00 33 00 DF FF D9 FF D7 FF B9 FF E9 FF 22 00 49 00 F8 FF B4 FF D9 FF 2B 00 37 00 35 00 38 00 1C 00 C8 FF CA FF 30 00 63 00 45 00 13 00 E3 FF DB FF EA FF EA FF FB FF 19 00 F9 FF C5 FF C4 FF C8 FF CA FF B3 FF BE FF AC FF A8 FF AD FF D4 FF BE FF 0D 00 18 00 F5 FF F5 FF 0B 00 3D 00 61 00 41 00 0E 00 30 00 11 00 13 00 FF FF 13 00 39 00 37 00 13 00 30 00 35 00 4C 00 41 00 00 00 CC FF BE FF F8 FF DC FF AC FF AD FF CD FF E4 FF FD FF 1B 00 10 00 E5 FF F0 FF 37 00 35 00 E0 FF A3 FF C0 FF C0 FF C6 FF BB FF D0 FF E9 FF DE FF 0E 00 53 00 42 00 1C 00 22 00 35 00 38 00 25 00 E4 FF B8 FF AD FF E2 FF 2B 00 36 00 18 00 07 00 03 00 DF FF BC FF DD FF 10 00 C3 FF A0 FF BC FF EF FF F3 FF E6 FF FC FF 45 00 67 00 3B 00 1A 00 1D 00 2B 00 25 00 4D 00 4D 00 FC FF E0 FF F8 FF 07 00 ED FF DC FF E6 FF E9 FF BF FF 93 FF B9 FF E3 FF D5 FF CD FF AA FF CD FF D0 FF CD FF C9 FF E1 FF 0D 00 47 00 4C 00 11 00 FF FF 27 00 57 00 3C 00 0E 00 F9 FF F3 FF C8 FF D0 FF F8 FF 25 00 2B 00 12 00 01 00 0D 00 0B 00 03 00 FA FF F3 FF 04 00 F4 FF FD FF FD FF F0 FF D0 FF E0 FF 04 00 F5 FF AD FF BB FF E8 FF 10 00 0D 00 06 00 F5 FF 12 00 0F 00 0D 00 1C 00 12 00 FC FF F6 FF 01 00 28 00 10 00 FA FF 07 00 04 00 F8 FF 10 00 12 00 1A 00 29 00 17 00 EF FF EA FF F2 FF DA FF AA FF A3 FF D4 FF 33 00 4E 00 17 00 E9 FF E3 FF 0B 00 24 00 19 00 16 00 1F 00 01 00 EB FF F0 FF E8 FF F1 FF 01 00 01 00 D6 FF B1 FF E4 FF FF FF DE FF 9B FF A7 FF F5 FF 14 00 DA FF CB FF 22 00 43 00 1C 00 06 00 24 00 3A 00 FE FF BF FF D2 FF FC FF 00 00 2C 00 38 00 29 00 23 00 16 00 17 00 24 00 2D 00 13 00 EA FF E5 FF CF FF E8 FF 17 00 3F 00 30 00 F8 FF D5 FF DB FF 1C 00 06 00 BB FF B3 FF F6 FF EB FF C1 FF C3 FF D9 FF FA FF F6 FF F3 FF F0 FF F9 FF DE FF D4 FF E6 FF E8 FF 08 00 16 00 03 00 18 00 38 00 45 00 41 00 1C 00 0E 00 18 00 15 00 FD FF F7 FF 03 00 15 00 23 00 1D 00 21 00 2F 00 06 00 06 00 1C 00 E8 FF 9E FF BB FF F8 FF 19 00 2C 00 0D 00 EA FF E0 FF E4 FF 17 00 5A 00 2C 00 DB FF E3 FF 20 00 36 00 0D 00 D9 FF CF FF E8 FF DF FF CD FF CD FF E9 FF FF FF F2 FF CE FF E1 FF 0E 00 D9 FF C8 FF 0C 00 39 00 0E 00 ED FF FE FF 1C 00 07 00 02 00 22 00 47 00 3F 00 FC FF CA FF DF FF 0B 00 00 00 D3 FF ED FF 18 00 12 00 17 00 14 00 55 00 86 00 7D 00 52 00 24 00 EB FF B1 FF B6 FF EF FF 05 00 FE FF CC FF D4 FF EF FF DC FF C1 FF EE FF 34 00 3F 00 F5 FF D1 FF FC FF 1A 00 FC FF CA FF FC FF 0D 00 08 00 FD FF 3F 00 4D 00 29 00 26 00 20 00 10 00 10 00 08 00 ED FF C6 FF E2 FF 0E 00 21 00 10 00 1A 00 31 00 2D 00 13 00 17 00 56 00 4A 00 24 00 04 00 E4 FF EC FF D8 FF F7 FF F9 FF E9 FF EB FF 12 00 1B 00 18 00 1A 00 4D 00 58 00 2B 00 05 00 12 00 44 00 44 00 1D 00 0C 00 33 00 35 00 DF FF 9B FF BE FF FD FF DC FF A7 FF 9F FF D1 FF E1 FF D7 FF C3 FF D4 FF D9 FF C8 FF E8 FF 05 00 31 00 36 00 40 00 42 00 3A 00 17 00 23 00 10 00 D2 FF B9 FF E6 FF E7 FF E4 FF 02 00 00 00 30 00 45 00 2D 00 06 00 15 00 2B 00 27 00 16 00 0B 00 01 00 F6 FF D6 FF B9 FF EE FF 26 00 3E 00 24 00 FC FF 24 00 4F 00 13 00 CB FF C2 FF DE FF DC FF C4 FF C8 FF 27 00 40 00 33 00 34 00 30 00 26 00 0F 00 0F 00 0C 00 1D 00 18 00 12 00 EE FF D0 FF FE FF 49 00 3A 00 00 00 1F 00 3D 00 28 00 13 00 F2 FF DE FF CF FF C6 FF CD FF D6 FF ED FF 03 00 37 00 13 00 FA FF 1A 00 4C 00 33 00 1C 00 16 00 07 00 F6 FF CE FF E6 FF 15 00 38 00 11 00 D5 FF DE FF F5 FF F5 FF DD FF FE FF 10 00 1B 00 D9 FF AF FF D0 FF E9 FF CB FF E3 FF 0C 00 15 00 ED FF FC FF 1E 00 29 00 FF FF D8 FF 0D 00 4D 00 46 00 36 00 26 00 2B 00 26 00 F3 FF E5 FF 04 00 06 00 C8 FF CA FF 09 00 47 00 40 00 22 00 27 00 2C 00 16 00 01 00 D5 FF D9 FF D4 FF CB FF C5 FF E9 FF FD FF 09 00 EC FF EA FF 1B 00 42 00 29 00 EB FF D9 FF E0 FF D6 FF E1 FF 06 00 F3 FF EA FF 27 00 3F 00 36 00 2E 00 35 00 22 00 E7 FF D4 FF F1 FF 09 00 01 00 FF FF 11 00 27 00 1D 00 12 00 F7 FF EA FF 01 00 08 00 EA FF D2 FF B7 FF C0 FF 0F 00 49 00 21 00 00 00 DF FF D2 FF F1 FF 04 00 0F 00 04 00 DC FF E3 FF EC FF FA FF F1 FF F7 FF 17 00 2A 00 18 00 30 00 4B 00 30 00 DC FF AF FF D0 FF F3 FF E6 FF B5 FF C3 FF D0 FF 06 00 26 00 21 00 F3 FF D7 FF C6 FF E5 FF ED FF FF FF E0 FF F3 FF 21 00 2E 00 00 00 16 00 3C 00 62 00 53 00 3C 00 22 00 19 00 24 00 F3 FF E6 FF FD FF FD FF E9 FF FA FF 2D 00 3B 00 39 00 11 00 EE FF D9 FF CD FF C1 FF E2 FF FA FF E7 FF C9 FF BC FF F6 FF 04 00 DF FF D7 FF 00 00 FD FF E6 FF C0 FF CB FF ED FF F3 FF F8 FF F6 FF E6 FF E2 FF 17 00 41 00 2D 00 FF FF EB FF 22 00 4A 00 18 00 EB FF 03 00 0D 00 1F 00 25 00 1F 00 1F 00 EC FF F3 FF 2E 00 10 00 E4 FF E9 FF F7 FF F0 FF EA FF DB FF FC FF 15 00 E8 FF DC FF 1A 00 13 00 A3 FF 99 FF BE FF E3 FF 17 00 18 00 10 00 1D 00 3F 00 52 00 59 00 2C 00 00 00 01 00 D0 FF BF FF A8 FF B9 FF CF FF CF FF DD FF 06 00 31 00 1B 00 07 00 18 00 19 00 0A 00 C8 FF 98 FF 80 FF 9B FF CA FF 02 00 27 00 4E 00 3B 00 FA FF 0D 00 4B 00 73 00 44 00 E3 FF CD FF EB FF E8 FF F8 FF 21 00 21 00 F6 FF E2 FF F6 FF 3E 00 34 00 02 00 E9 FF FA FF F5 FF B4 FF A2 FF D2 FF EB FF EB FF DB FF 09 00 1D 00 0D 00 F3 FF 03 00 18 00 08 00 DE FF CF FF FA FF 12 00 01 00 F8 FF 15 00 1A 00 0D 00 FC FF 06 00 23 00 ED FF BB FF CD FF 2E 00 4C 00 21 00 0E 00 35 00 28 00 24 00 1D 00 21 00 0C 00 F3 FF F7 FF DB FF AF FF B2 FF DE FF E1 FF ED FF EC FF F2 FF 1A 00 41 00 4C 00 40 00 14 00 26 00 33 00 36 00 1A 00 0E 00 28 00 38 00 0B 00 D3 FF F0 FF F2 FF D5 FF BA FF B4 FF B7 FF C0 FF D8 FF DE FF F8 FF DE FF BC FF CB FF 0F 00 29 00 04 00 E9 FF 06 00 15 00 F9 FF CD FF E0 FF 0E 00 06 00 E5 FF DD FF 13 00 5C 00 26 00 D9 FF F5 FF 5C 00 76 00 44 00 1A 00 2E 00 3F 00 06 00 F7 FF 09 00 2E 00 13 00 EE FF DA FF DE FF E9 FF E2 FF DC FF C9 FF C0 FF D0 FF F4 FF F1 FF E6 FF DF FF DE FF 13 00 4F 00 2B 00 F1 FF DD FF 19 00 1C 00 FF FF E4 FF 0D 00 F5 FF D3 FF D3 FF 03 00 22 00 13 00 01 00 0A 00 3D 00 31 00 F3 FF E9 FF 17 00 3B 00 0F 00 D2 FF B2 FF DF FF 18 00 18 00 FC FF F2 FF ED FF F5 FF CD FF B5 FF CA FF F6 FF DB FF DA FF FC FF 3D 00 3B 00 17 00 F0 FF CD FF DC FF F0 FF FC FF 15 00 33 00 33 00 4B 00 63 00 45 00 35 00 3B 00 1F 00 30 00 16 00 D7 FF B1 FF A5 FF A1 FF A8 FF B1 FF C6 FF B4 FF 91 FF 96 FF D8 FF F1 FF F3 FF 02 00 FF FF F0 FF FE FF 28 00 38 00 44 00 3A 00 22 00 33 00 3D 00 51 00 3D 00 15 00 07 00 46 00 6A 00 42 00 ED FF CA FF 1A 00 1D 00 C5 FF C5 FF F1 FF E4 FF C9 FF D6 FF 03 00 27 00 09 00 E2 FF ED FF EA FF FF FF FB FF DC FF D1 FF D9 FF 03 00 17 00 F8 FF E8 FF 26 00 3D 00 26 00 0E 00 1A 00 45 00 54 00 31 00 1F 00 2F 00 30 00 16 00 E2 FF 04 00 51 00 48 00 FF FF DE FF 26 00 5B 00 2E 00 FF FF E1 FF E6 FF F2 FF C2 FF B7 FF E9 FF E9 FF B6 FF AD FF EA FF 28 00 2D 00 26 00 18 00 18 00 2B 00 3B 00 26 00 0A 00 F7 FF D9 FF E7 FF F0 FF 1E 00 49 00 11 00 06 00 51 00 6F 00 3B 00 F1 FF CB FF FA FF FA FF B7 FF 8F FF 7F FF 69 FF 87 FF B4 FF C8 FF B2 FF D6 FF 21 00 4A 00 54 00 7F 00 71 00 27 00 06 00 F5 FF 0D 00 26 00 35 00 24 00 04 00 07 00 10 00 3F 00 41 00 28 00 33 00 68 00 64 00 33 00 1F 00 19 00 1E 00 D2 FF 80 FF 7F FF 82 FF 80 FF 84 FF 9D FF BB FF DE FF D5 FF EA FF EE FF 06 00 26 00 24 00 1B 00 3B 00 1A 00 09 00 11 00 FB FF FD FF 05 00 E2 FF 15 00 4B 00 12 00 DC FF EE FF FC FF CB FF B2 FF F2 FF 10 00 F4 FF C5 FF 11 00 2E 00 F3 FF F0 FF 07 00 29 00 4F 00 49 00 30 00 24 00 2C 00 08 00 1B 00 23 00 04 00 15 00 E5 FF AC FF AD FF D9 FF A2 FF 7C FF B2 FF 09 00 2E 00 33 00 64 00 8C 00 A9 00 9F 00 7F 00 6A 00 4E 00 F9 FF 98 FF 52 FF 21 FF 1C FF 11 FF 12 FF 31 FF 80 FF D2 FF F8 FF 04 00 15 00 15 00 27 00 1E 00 3F 00 6A 00 6D 00 64 00 37 00 33 00 31 00 5E 00 61 00 56 00 15 00 05 00 49 00 38 00 18 00 16 00 F0 FF ED FF C1 FF B4 FF EB FF 03 00 CB FF A7 FF 7A FF 85 FF A5 FF 98 FF A7 FF D0 FF FD FF 1D 00 18 00 1D 00 3C 00 44 00 01 00 E9 FF 02 00 09 00 D5 FF A6 FF 04 00 53 00 34 00 36 00 3D 00 4F 00 6B 00 61 00 56 00 38 00 E6 FF AE FF AD FF A5 FF 82 FF 7D FF B9 FF D7 FF ED FF F0 FF 00 00 26 00 56 00 42 00 19 00 2B 00 5F 00 62 00 2E 00 CF FF DD FF 00 00 D0 FF 99 FF 87 FF C3 FF C6 FF B6 FF F3 FF 47 00 85 00 85 00 7C 00 A0 00 D8 00 9D 00 48 00 19 00 CA FF 7B FF 30 FF 19 FF 1E FF 17 FF FA FE EA FE 35 FF 89 FF BD FF EA FF 36 00 64 00 4E 00 60 00 4C 00 3D 00 26 00 35 00 79 00 A0 00 63 00 3A 00 5B 00 8B 00 5A 00 07 00 07 00 3F 00 2D 00 D7 FF B4 FF E1 FF F3 FF C5 FF 9E FF B8 FF DA FF E9 FF E4 FF CE FF DF FF FF FF EF FF E3 FF D7 FF FF FF 27 00 2B 00 17 00 36 00 40 00 27 00 0D 00 15 00 0C 00 C6 FF AF FF D4 FF F0 FF FC FF FA FF F4 FF 15 00 23 00 39 00 20 00 FF FF E5 FF CD FF B3 FF A7 FF C5 FF 1B 00 20 00 E3 FF EE FF 10 00 29 00 40 00 56 00 88 00 68 00 62 00 54 00 15 00 D8 FF BB FF CC FF C1 FF 71 FF 61 FF CF FF 26 00 22 00 0A 00 18 00 71 00 8F 00 9E 00 00 01 D4 00 AE 00 78 00 33 00 CA FF 52 FF F3 FE 0F FF 00 FF C6 FE E0 FE 5A FF 76 FF 47 FF 95 FF 29 00 59 00 6A 00 92 00 EC 00 DD 00 A6 00 85 00 48 00 3C 00 3E 00 56 00 22 00 F6 FF EC FF 21 00 38 00 13 00 FD FF 00 00 BC FF 71 FF 4C FF 5B FF 85 FF 8F FF 6A FF 93 FF FD FF 1D 00 27 00 31 00 2C 00 1F 00 FD FF F0 FF E6 FF DA FF D4 FF FA FF 27 00 4F 00 67 00 68 00 4E 00 FD FF E6 FF 38 00 6D 00 3D 00 FB FF 12 00 17 00 05 00 E8 FF F5 FF 25 00 E8 FF C5 FF C7 FF F0 FF CF FF AF FF 98 FF B4 FF CF FF D9 FF 08 00 45 00 87 00 86 00 86 00 70 00 05 00 CB FF EE FF 18 00 04 00 AC FF 8C FF C6 FF CB FF A5 FF F7 FF 69 00 A5 00 C5 00 CC 00 D3 00 A0 00 65 00 44 00 14 00 B8 FF 78 FF 59 FF 19 FF CE FE E5 FE 1C FF 30 FF 16 FF 55 FF BB FF FE FF 25 00 63 00 77 00 6D 00 85 00 D8 00 28 01 03 01 AB 00 96 00 8F 00 3E 00 BF FF 94 FF 9B FF B4 FF D5 FF D0 FF ED FF 45 00 33 00 F3 FF 09 00 62 00 80 00 4A 00 B2 FF 34 FF DF FE 9E FE 6D FE 59 FE 41 FF 7D 00 15 01 C6 00 59 00 0D 00 F1 FF 48 00 28 01 A7 01 61 01 E9 00 68 00 D6 FF 49 FF D8 FE 9A FE B0 FE 3F FF 9D FF 8A FF A6 FF 82 00 F2 00 9F 00 4F 00 52 00 5E 00 6D 00 29 00 28 00 20 00 6F FF F6 FE 80 FF 1A 00 75 00 79 00 93 00 A9 00 CD FF CE FE E9 FE BE FF 56 00 1E 00 C5 FF 0B 00 7B 00 66 00 E0 FF 8F FF 01 00 80 00 57 00 0E 00 5F 00 2E 01 7B 01 CC 00 11 00 C0 FF DF FF C7 FF D2 FE 56 FE B9 FE BF FE 2C FE A4 FD BD FD 90 FE 46 FF D2 FF 7B 00 3A 01 18 02 4A 02 2B 02 A2 02 1C 03 00 03 F9 01 49 00 25 FF 39 FF DA FF 8D FF B2 FE D8 FD AC FD CF FD 53 FE 5F FF 4F 00 BD 00 0F 01 5C 01 27 01 AB 00 94 00 72 00 12 00 92 FF BD FE 18 FE 54 FE FD FE 2B FF 42 FF 9B FF 1F 00 B7 00 E5 00 23 01 99 01 0B 02 E3 01 F3 00 0E 00 7E 00 62 01 31 01 9D FF 46 FE FA FD 49 FE C4 FE 3B FF D2 FF 8C 00 4A 00 30 FF 91 FE 26 FF 3F 00 21 01 5F 01 CD 00 DD FF 46 FF 43 FF 9E FF CF FF DB FF C0 FF 70 FF A6 FF 90 00 21 01 37 01 2D 01 DD 00 5C 00 E9 FF C8 FF E7 FF D9 FF 4B FF CB FE A4 FE 3A FF 5A 00 8C 01 1D 02 CD 01 2F 01 19 01 B7 00 B2 FF 46 FF 65 FF F3 FE 63 FE B4 FD AD FD A5 FE 14 FF 75 FE 91 FE 41 00 97 02 79 03 4A 02 57 01 30 02 42 03 C9 02 B5 00 FE FD B9 FD 92 FF 6E 00 5D FE 81 FB E9 FB C5 FF FD 01 1D 00 6A FE 67 00 40 02 C2 00 EF FD F7 FD 3F 01 E7 02 3D 01 18 00 F6 00 F2 01 39 01 EA FF B7 FE CF FD EE FC 8E FD 33 00 BB 02 6C 02 D9 FF FA FE 8C 00 6B 01 29 00 1D FF AD FF 32 01 F5 01 E6 00 86 FE 7B FE 24 00 6E FF B6 FD 3A FF 02 02 66 02 83 00 AC FF A5 01 A0 02 C3 00 05 FF 2C FF 5E 00 AA FF A6 FD 89 FD 80 FE 6D FE E4 FD C4 FE 49 00 25 01 F1 00 B1 00 56 00 BE FF 03 00 21 01 A5 01 D3 00 BD 00 E3 01 E1 01 C2 00 2F FF B8 FD 78 FD 97 FE E1 FE 4A FE C9 FD 81 FE 22 00 8F 01 6A 02 90 02 99 01 E1 FF D6 FE E7 FF 73 01 52 01 1D 00 5F FF 53 FF 7A FF 18 00 0A 01 91 01 7D 01 14 00 02 FE 2D FE 22 00 B1 00 D8 FF 93 FF CB 00 F7 01 FD 00 0C FF 8D FE DD FE AE FE 09 FE E2 FD D1 FE 88 00 66 02 95 02 56 01 F0 FF BA FE 53 FE 37 FE 74 FE 71 FF 24 01 8E 01 EA 00 BE 00 70 01 E4 00 D6 FE A0 FD 88 FE 95 00 CD 02 C1 03 F4 02 B4 00 D4 FE A3 FE 11 FF 73 FE 57 FD 76 FC 54 FC C3 FC 33 FE 7B 00 09 02 83 02 D0 02 6D 02 DF 01 5F 01 D6 00 EC 00 72 00 41 FF B7 FE AE FE EE FE D5 FE 2B FF E1 FF 37 00 16 00 2B 00 D8 00 F5 01 1E 03 CF 02 67 01 F9 00 6C 01 9E 01 A6 00 79 FE 04 FD 2D FC A1 FC 9F FD 83 FE 7B FF C4 FF 5E FF 68 FF 3C 00 BE 00 1D 00 6F FF 4B FF E5 FF FA 00 DA 01 76 02 A2 02 0D 02 FF 00 12 00 C3 FF 39 FF 06 FF AC FE 64 FE 0C FF 98 FF C3 FF 80 FF BC FF A2 FF 94 FE AA FD 8F FE C9 00 8E 01 A8 00 73 FF 06 00 7B 01 A0 01 5E 00 0B 00 B0 00 91 01 7A 01 D6 00 1C 01 DF 01 04 02 94 01 26 00 30 FE 1B FD C5 FD 90 FE BE FE B0 FE AF FE 41 FF 46 00 52 01 69 01 67 01 12 01 8E FF 33 FE BB FE BD 00 76 02 F3 01 38 00 1E FF 79 FE 72 FE 98 FE 36 FF EC FF C8 FF 3E FF 86 00 B1 02 3A 03 AA 01 01 00 62 00 C4 00 47 FF 36 FE 08 FF AB FF 34 FF 82 FE C3 FE E8 FF C4 00 5A 00 FF FF 5B 00 72 00 C1 FF 77 FE D1 FD E2 FE 4F 00 2C 01 5C 01 E7 00 6C 00 4E 00 C4 FF 44 FE B1 FD 7D FE 34 00 15 02 25 03 3C 03 82 02 C1 00 73 FF D6 FF 4C 00 48 00 AD FF 3E FF FA FF 99 00 7E 00 3D 00 AA FF 23 FF CC FE C2 FE 6C FE 08 FF 3A 00 7B 00 D0 FF 03 00 07 01 3E 01 4E 00 55 FF 4B FF 7B FE C2 FC F8 FB AF FD BB 00 7E 02 82 02 3E 02 A2 02 F9 02 2F 02 20 01 90 FF 20 FF 2D FF BD FE E7 FE 67 FF E7 FF CD FF 62 FF B5 FE 31 FE 81 FE FC FF D4 01 48 02 0C 01 D5 FF 6C FF B7 FF F3 FF F8 FF D9 FF 23 FF 5F FE 23 FE 4C FE 0A FF 5A 00 D8 00 E0 00 00 01 AE 01 0A 02 AC 01 88 00 6B FF 4B FF AC FF F4 FF B4 00 82 01 CF 01 C3 00 6C FF A6 FF A0 FF 19 FF D0 FE 45 FF C2 FF 24 00 B3 00 33 01 D3 00 6B FF CF FD 64 FD AB FD 24 FE B0 FE 21 FF 05 00 BD 00 70 01 DF 01 57 02 D5 02 1A 02 97 00 F0 FF F4 00 74 02 E5 02 B1 01 4C 00 DC FF AF FF E1 FD 3C FC E7 FB 74 FC 1D FD B8 FD 9E FE E4 FF 58 01 94 01 8E 01 46 01 94 00 F8 FF 9E 00 74 01 56 02 1A 01 EB FF B6 FF 61 00 2E 00 12 FF 04 FE DC FD C4 FE 5B FF 71 FF ED FF 1B 01 27 02 66 02 EF 01 FB 01 09 02 2D 01 F4 FE 4D FD 5D FD E0 FE E9 FF 71 FF F7 FE DB FF 3F 01 BE 01 59 00 21 FE 05 FD 8D FD 99 FF A0 01 E4 01 2A 01 12 01 71 01 6E 01 02 01 96 FF 8D FE 83 FE 26 FF 5C 00 51 01 E9 00 1E 00 6B FF 3D FF CF FF 45 00 93 FF 79 FE 19 FE 94 FE B2 FF 67 00 33 00 8C 00 27 01 08 01 16 00 2D FF 11 FF F4 FF 39 00 53 00 D3 00 9A 00 82 FF F5 FE CB FF 56 00 C5 FF FC FD AB FD D0 FF 25 02 D3 02 24 02 6E 01 1F 01 39 01 AD 01 82 01 17 00 AD FE 13 FE 8E FE 46 FF E3 FF 68 FF 2C FE 63 FD BC FD 03 FF 75 00 2F 01 28 01 0B 01 4B 01 B7 01 16 02 F7 01 46 01 6F 00 3F FF 21 FE 91 FD 9D FD F1 FD 9E FE F2 FF 13 01 34 01 77 01 59 02 E0 02 1D 02 56 00 25 FF C3 FE AB FE D6 FE 82 FF 6C 00 5D 00 6F FF 5D FE 7C FE AC FF 7C 00 C5 FF 9C FE 30 FF 6C 01 C5 01 39 00 92 FF 56 00 E9 00 C1 FF 58 FE 8F FE 13 00 21 00 76 FF 57 00 BB 01 0C 01 EF FF C6 FF 86 00 DB 00 17 01 AB 01 6B 03 6C 04 35 03 2C 01 B2 FF E4 FE 0A FE 04 FD CF FB 4F FB 7B FB 74 FC F5 FD 9D FF D9 00 C8 01 B2 01 BC 00 AF FF E3 FF 8A 00 F9 00 71 01 63 02 C1 02 3E 02 66 01 BE 00 81 00 A2 00 4C 00 70 FF D4 FE 83 FE F5 FE 46 00 42 01 2F 01 3E 00 67 FF EC FE DF FE D5 FE A7 FE A4 FE 94 FE 56 FF C9 00 A6 01 72 01 62 00 F0 FF 1F 00 2D 00 A2 FF 6E FF 86 FF 3F FF 19 FF 53 FF EA FF B2 00 BE 00 3A 00 D2 FF DE FF 66 00 60 00 00 00 04 00 03 01 3E 02 8F 02 D7 01 BA 00 E3 FF AD FE A2 FD 41 FD 22 FD 92 FD 53 FF 2F 01 00 02 6C 01 93 00 12 00 26 00 AC 00 A2 01 CB 01 64 00 77 FF 0D 00 00 01 D2 00 AD FF B6 FE 86 FE 9F FD E8 FC 2F FD DD FE 30 00 A4 00 D1 00 A3 01 BB 02 31 03 E5 02 1F 02 F4 00 EB FF 0F FF 59 FE 0B FE 2C FE A6 FE A1 FE 03 FE AA FD A1 FE 53 00 2B 01 DB 00 58 00 67 00 4D 01 6B 02 94 02 89 01 1C 00 67 FF B7 FF 99 FF 2A FF 7E FE AB FE 88 FF 67 00 EE 00 EA 00 54 00 03 00 A7 00 BF 00 CB FF 4B FE AF FD 7C FE 9E FF E1 FF FC FF 0B 00 47 00 A2 00 7F 01 BA 01 DD 00 C5 FF EF FF 20 01 B9 01 20 01 01 00 EE FE 29 FE 09 FE 92 FE 16 FF C9 FE 2B FE 48 FE 7C FF DB 00 C3 01 EB 01 C4 01 8B 01 63 01 26 01 D5 00 A1 00 5F 00 5D 00 1B 00 E5 FE 29 FE D0 FD F9 FD BD FE 5C FF 7B FF 26 FF EE FE 82 FF D9 00 6C 01 D2 00 DE FF 51 FF ED FF 37 01 D0 01 5C 01 68 00 73 FF 6E FF 24 00 67 00 BF FF 11 FF D6 FE F6 FE D7 FF 26 01 04 02 B6 01 21 01 A0 00 49 00 EE FF 78 FF EC FE 2C FE D2 FD 2A FE 91 FE 6F FE 6F FE 24 FF 95 00 9C 01 5F 01 DB 00 7F 00 8F 00 29 00 55 FF EA FE 84 FF D4 00 06 02 7D 02 B1 01 F1 00 84 00 33 00 CD FF 22 FF D9 FE E4 FE 62 FF 50 00 A9 00 FA FF E5 FE 3A FE DF FD 6E FD 35 FD A8 FD 0B FF CB 00 79 01 33 01 3F 01 CB 01 C6 01 15 01 D3 00 46 01 63 01 A6 00 DE FF EB FF 04 00 C8 FF 3F FF EF FE 89 FE 30 FE 27 FE 6C FE F3 FE D9 FF B2 00 52 01 31 02 1F 03 47 03 10 02 21 00 E0 FE 81 FE 94 FE 2B FE 53 FE 2A FF C2 FF 85 FF 49 FF 8C FF 49 00 CB 00 A4 00 57 00 CC 00 44 01 45 01 AA 00 CF FF 59 FF E6 FE A3 FE E7 FE A5 FF 39 00 F0 FF 41 FF 20 FF C8 FF D2 00 F5 01 E2 02 D3 02 CA 01 67 00 40 FF 21 FF 34 FF D1 FE F5 FD CA FD 90 FE 90 FF 50 00 83 00 18 00 13 FF 00 FF 64 FF F0 FF 75 00 B5 00 B8 00 E4 00 90 00 F8 FF 9E FF 73 FF AF FF 09 00 06 00 10 00 62 00 E1 00 5F 01 A3 01 77 01 06 01 94 00 17 00 91 FF AC FF 8A FF 25 FF F8 FE 8A FF 04 00 CC FF BA FF C1 FF 8E FF 0A FF D1 FE 57 FF FC FF 6F 00 5B 00 80 00 A6 00 89 00 0D 00 C6 FF D4 FF C0 FF 5B FF 02 FF 78 FF 46 00 9A 00 60 00 F1 FF B5 FF 42 00 FE 00 08 01 92 00 6B 00 6D 00 04 00 C3 FF 0D 00 5A 00 63 FF 14 FE 02 FE 35 FF 2E 00 12 00 96 FF F7 FF B8 00 DB 00 83 00 6C 00 D8 00 2E 01 50 00 82 FE 0C FD C5 FC A3 FD 44 FF 8C 00 FB 00 E9 00 C2 00 6F 00 90 00 52 01 22 02 5B 02 15 02 17 02 47 02 DA 01 33 00 20 FE AD FC 11 FC C6 FB 67 FC E6 FD 05 FF 74 FF BC FF 60 00 44 01 93 01 39 01 BC 00 D8 00 57 01 A2 01 4F 01 8E 00 4A 00 B3 00 41 01 19 01 28 00 5C FF 2B FF 47 FF E9 FE 3F FE 33 FE BD FE 13 00 33 01 43 01 3B 00 18 FF EA FE 59 FF 07 00 6D 00 83 00 28 00 ED FF 27 00 FC 00 EB 01 AE 01 77 00 DE FF 2C 00 A6 00 E4 00 66 00 8E FF CF FE 54 FE A1 FE 75 FF 0D 00 DF FF 51 FF C6 FE B3 FE 05 FF 84 FF C9 00 66 02 13 03 9A 02 7B 01 24 00 08 FF EF FD 65 FD 6E FD 2E FE 7A FF 8B 00 42 01 B2 01 BC 01 3E 01 29 00 95 FF 2B 00 0C 01 57 01 06 01 86 00 11 00 D4 FF 82 FF D6 FE 78 FE 20 FE C6 FD D2 FD BF FE 53 00 41 01 87 01 C8 01 88 02 17 03 C4 02 A9 01 8D 00 E8 FF 3C FF 7B FE 06 FE 59 FE DD FE EF FE E1 FE F0 FE B9 FE 85 FE E0 FE 5D FF 74 FF A3 FF 16 00 B7 00 46 01 89 01 48 01 D8 00 E7 00 90 01 1A 02 38 02 BC 01 D8 00 13 00 93 FF 00 FF 55 FE 81 FE 66 FF 1B 00 20 00 7C FF DE FE CE FE 62 FF 32 00 76 00 16 00 AC FF BB FF EF FF CA FF 9E FF 11 00 08 01 C1 01 31 02 5B 02 28 02 0D 01 11 FF 2F FD 12 FC D1 FB B3 FC 59 FE E6 FF D3 00 3C 01 B1 01 E6 01 94 01 28 01 E6 00 37 01 A7 01 FD 01 B7 01 0E 01 E8 FF D5 FE F5 FD 15 FD CE FC 3E FD 1D FE D6 FE FF FE 21 FF D5 FF F5 00 BE 01 24 02 7C 02 48 02 7F 01 99 00 54 00 66 00 46 00 BC FF 3D FF 29 FF 8A FF BE FF 8E FF 37 FF 38 FF 82 FF 16 00 9A 00 48 01 26 02 4B 02 86 01 74 00 BD FF 51 FF A6 FE DB FD 9B FD 44 FE A1 FE 7F FE 72 FE FD FE 0B 00 D8 00 36 01 57 01 3A 01 A9 00 22 00 26 00 85 00 D4 00 86 00 91 00 50 01 8E 01 7C 00 C9 FE FF FD 49 FE 0C FF 83 FF E1 FF 79 00 0D 01 FE 00 72 00 C0 FF 41 FF 86 FE E3 FD 08 FE 26 FF 84 00 B7 01 4A 02 1D 02 43 01 31 00 8C FF D4 FF 6A 00 9A 00 8B 00 4A 00 CB FF 17 FF 68 FE FC FD BB FD 52 FD 4A FD EA FD 37 FF F0 00 4C 02 60 02 FE 01 2E 02 B0 02 A9 02 93 01 FD FF F1 FE A6 FE F8 FE 73 FF C8 FF 1C 00 6D 00 6B 00 F8 FF 47 FF 9A FE CE FE EB FF BD 00 90 00 29 00 2C 00 76 00 2A 00 8A FF 4E FF 43 FF 52 FF 59 FF 78 FF DF FF 33 00 4F 00 02 00 35 00 36 01 48 02 7F 02 AC 01 8B 00 E5 FF D5 FF D8 FF 59 FF B2 FE 6F FE 9E FE E5 FE E5 FE 74 FE D7 FD E2 FD F0 FE 79 00 E1 01 6A 02 3B 02 BB 01 2F 01 AB 00 B7 FF 7A FE 20 FE B2 FE BF FF 74 00 B7 00 A2 00 81 00 88 00 AC 00 92 00 23 00 AC FF 84 FF B8 FF 79 00 10 01 B9 00 10 00 97 FF 3A FF BA FE 3D FE F5 FD 3D FE F7 FE A7 FF 89 00 A2 01 95 02 E5 02 3D 02 3A 01 4B 00 A7 FF 3F FF 5D FF 84 FF 60 FF 70 FF F3 FF 70 00 54 00 B0 FF 66 FF 48 FF 46 FF BC FF 3C 00 A6 00 03 01 0A 01 B9 00 5D 00 CA FF 44 FF 11 FF F7 FE 04 FF 55 FF DC FF 48 00 49 00 64 00 F5 00 7D 01 68 01 10 01 AB 00 95 00 76 00 E3 FF 29 FF 39 FF F7 FF 60 00 19 00 8F FF 07 FF C2 FE 6F FE 50 FE C6 FE 06 00 7A 01 8B 02 AC 02 19 02 44 01 3B 00 CE FE 63 FD 94 FC FB FC 29 FE 86 FF A1 00 1E 01 07 01 C7 00 D7 00 D5 00 91 00 06 00 DE FF 4C 00 D0 00 FE 00 CE 00 81 00 7B 00 85 00 45 00 A7 FF EF FE 8B FE 19 FF 39 00 1C 01 32 01 A3 00 58 00 FD FF 7D FF 0C FF D9 FE A2 FE 6F FE A6 FE 59 FF 2C 00 B5 00 99 00 4B 00 2C 00 77 00 9D 00 9A 00 99 00 9F 00 77 00 4A 00 24 00 CC FF 4C FF B8 FE 5D FE 92 FE F8 FE 85 FF 1A 00 7E 00 EA 00 71 01 B6 01 B7 01 7F 01 03 01 68 00 D4 FF 4C FF 09 FF 44 FF A3 FF DD FF 75 FF DF FE BF FE E7 FE 4D FF A2 FF C6 FF F5 FF 74 00 F9 00 3F 01 6B 01 AF 01 BA 01 46 01 63 00 53 FF E8 FD F3 FC 16 FD 01 FE AE FE 3F FF 13 00 22 01 E3 01 D8 01 78 01 30 01 0E 01 0C 01 52 01 B3 01 C3 01 84 01 BB 00 93 FF 4B FE 29 FD 60 FC 38 FC 8B FC 64 FD E4 FE 53 00 F2 00 C9 00 7C 00 79 00 9B 00 E0 00 FE 00 08 01 1D 01 5A 01 01 02 63 02 43 02 BD 01 EF 00 08 00 3A FF 74 FE F6 FD D1 FD 50 FE 55 FF F2 FF B6 FF EA FE 9D FE E7 FE 39 FF 6D FF 7B FF 8E FF C0 FF 2E 00 F3 00 E6 01 84 02 6E 02 AD 01 99 00 3D 00 66 00 13 00 DB FE CC FD C5 FD 90 FE 1E FF 67 FF C5 FF 2B 00 5D 00 77 00 A1 00 A9 00 54 00 04 00 8C 00 4F 01 31 01 49 00 9E FF 8C FF 5C FF DB FE 5B FE 75 FE 24 FF E3 FF 94 00 BA 00 82 00 B3 00 00 01 0C 01 FA 00 E2 00 FF 00 26 01 BC 00 0D 00 AD FF 43 FF 7E FE 9B FD 40 FD 8C FD 1C FE AB FE 8A FF 9C 00 9E 01 29 02 36 02 1C 02 F7 01 A2 01 F4 00 0C 00 5F FF FE FE F7 FE 22 FF 71 FF ED FF E4 FF 3C FF 95 FE B7 FE 76 FF 2A 00 04 00 CE FF 27 00 94 00 8D 00 51 00 ED FF DA FF F3 FF 60 00 20 01 AE 01 8C 01 09 01 9F 00 0E 00 6B FF CE FE BA FE 3F FF E6 FF 39 00 03 00 6B FF F2 FE FD FE 57 FF 72 FF 6F FF DA FF 9E 00 3E 01 50 01 F8 00 C2 00 8B 00 C5 00 2E 01 56 01 1E 01 52 00 5C FF 63 FE 70 FD D7 FC CA FC 1E FD D9 FD 2F FF 09 01 6F 02 7F 02 99 01 D6 00 AB 00 C5 00 C7 00 B2 00 DB 00 26 01 4F 01 42 01 CE 00 EE FF 23 FF 8D FE FF FD AF FD F7 FD A4 FE 75 FF A0 00 A5 01 18 02 AF 01 06 01 C5 00 99 00 09 00 31 FF DA FE E6 FE FE FE 47 FF 26 00 09 01 59 01 03 01 83 00 48 00 6A 00 8E 00 7A 00 06 00 66 FF 00 FF BC FE 7E FE 41 FE 33 FE 37 FE 61 FE DE FE 76 FF E5 FF 0F 00 59 00 0F 01 C1 01 A7 01 26 01 39 01 16 02 7A 02 8F 01 84 00 42 00 4E 00 0E 00 D2 FF D5 FF E1 FF 95 FF 0A FF 7E FE 51 FE 7A FE B0 FE D6 FE 37 FF E6 FF 92 00 D1 00 58 00 7A FF 0B FF 39 FF 98 FF F0 FF 4E 00 9F 00 E4 00 43 01 D6 01 39 02 D6 01 F4 00 26 00 A5 FF 32 FF E9 FE F6 FE 27 FF 62 FF 81 FF 74 FF 68 FF 49 FF 7B FF B2 FF 12 00 68 00 D0 00 61 01 C2 01 8E 01 AE 00 BA FF 13 FF 09 FF 53 FF 94 FF 91 FF 89 FF EA FF 68 00 42 00 06 00 0F 00 9C 00 12 01 2D 01 39 01 EA 00 10 00 21 FF 83 FE 22 FE DE FD 17 FE E4 FE D9 FF A2 00 06 01 33 01 53 01 78 01 80 01 C2 01 FF 01 C6 01 08 01 E9 FF 2F FF E4 FE 97 FE FB FD 2D FD 1B FD C1 FD BB FE 89 FF 39 00 8D 00 68 00 51 00 AD 00 85 01 24 02 46 02 60 02 7C 02 10 02 02 01 96 FF BA FE A7 FE 63 FE E5 FD 8B FD D6 FD A5 FE 86 FF 20 00 17 00 F3 FF 40 00 60 00 39 00 30 00 B2 00 53 01 70 01 0C 01 94 00 76 00 54 00 B2 FF B9 FE 51 FE F3 FE E7 FF 71 00 2C 00 D8 FF B1 FF CA FF E4 FF BC FF 59 FF 02 FF FB FE 7B FF 2E 00 F3 00 6C 01 A3 01 D5 01 B5 01 08 01 24 00 78 FF 47 FF 82 FF DE FF DA FF A2 FF 81 FF 80 FF 4F FF E7 FE CB FE FB FE 78 FF 00 00 51 00 42 00 60 00 F8 00 90 01 8A 01 DD 00 3F 00 4D 00 64 00 C5 FF 88 FE C2 FD 33 FE 84 FF BC 00 88 01 ED 01 02 02 CF 01 58 01 7C 00 39 FF 0D FE 88 FD 87 FD F8 FD C1 FE 7E FF DC FF 96 FF F5 FE 88 FE C3 FE 53 FF C0 FF 44 00 55 01 B6 02 88 03 80 03 E8 02 38 02 82 01 D1 00 0A 00 69 FF FB FE B3 FE 79 FE 36 FE FD FD C7 FD AC FD C4 FD 4A FE 08 FF E6 FF 72 00 C1 00 3B 01 C8 01 10 02 CC 01 23 01 49 00 95 FF 4D FF 5F FF 63 FF 4B FF 5A FF 2B 00 69 01 3C 02 1B 02 29 01 E3 FF 09 FF 16 FF 8A FF 87 FF DC FE 1C FE 0D FE C6 FE BC FF 5E 00 5C 00 03 00 D2 FF DC FF 1D 00 48 00 5B 00 B5 00 2F 01 05 01 23 00 86 FF A3 FF 5B 00 E1 00 BA 00 FC FF FE FE B2 FE 12 FF BB FF 56 00 87 00 CB 00 E0 00 6F 00 FF FF FF FF 83 00 F0 00 F0 00 D0 00 8D 00 21 00 96 FF DA FE 15 FE CC FD F4 FD 96 FE 37 FF A0 FF A5 FF 74 FF 19 FF EF FE 2F FF AA FF 0E 00 C1 00 AD 01 4C 02 82 02 4C 02 07 02 AA 01 21 01 B2 00 A3 00 91 00 2E 00 A9 FF 61 FF 71 FF 76 FF 76 FF 3F FF 6C FE 9A FD 6D FD 00 FE AB FE 16 FF CB FF FB 00 E6 01 0F 02 AB 01 35 01 FE 00 B3 00 AB 00 A6 00 59 00 D9 FF 70 FF 54 FF 58 FF 11 FF 91 FE 69 FE A8 FE 2D FF F4 FF DA 00 55 01 4F 01 14 01 DC 00 CE 00 DB 00 E1 00 9D 00 F2 FF 37 FF 9A FE 4B FE 35 FE 6D FE 26 FF 40 00 61 01 D5 01 67 01 7D 00 DA FF 8F FF AB FF C7 FF DF FF 63 00 34 01 93 01 D7 00 5B FF 12 FE 36 FD 3F FD 6A FE F7 FF 1E 01 97 01 89 01 99 01 CB 01 CA 01 3C 01 4D 00 7A FF E2 FE A0 FE AD FE C2 FE 71 FE 21 FE 0D FE A9 FE A3 FF 1C 00 13 00 DC FF D1 FF 90 00 A8 01 8B 02 DE 02 A2 02 32 02 A0 01 F1 00 1C 00 43 FF A1 FE F1 FE BC FF 26 00 05 00 8F FF 4A FF 16 FF BC FE 77 FE 4F FE B8 FE 8B FF 13 00 1C 00 CE FF 8E FF 67 FF 58 FF 4C FF B7 FF AE 00 DA 01 57 02 12 02 BF 01 81 01 2F 01 6D 00 E6 FF E4 FF 10 00 F8 FF 71 FF 8C FE A7 FD 70 FD 0D FE 50 FF 8F 00 87 01 44 02 1B 02 27 01 EF FF 06 FF C9 FE EE FE 87 FF 26 00 3E 00 C5 FF 5C FF 5E FF 8D FF 59 FF 1D FF 6E FF 1A 00 9C 00 A3 00 95 00 B5 00 E5 00 CE 00 9A 00 6F 00 7A 00 26 01 12 02 2A 02 3A 01 34 00 07 00 2D 00 C7 FF DB FE FB FD A2 FD C5 FD 1A FE 83 FE C2 FE 9C FE 79 FE E4 FE B7 FF 28 00 E2 FF 48 FF 50 FF 0E 00 7D 01 17 03 39 04 89 04 20 04 38 03 22 02 CB 00 99 FF BB FE 58 FE 67 FE 84 FE 4B FE C8 FD 59 FD 91 FD 2D FE 79 FE B0 FE 17 FF B5 FF 3E 00 6F 00 A8 00 2C 01 98 01 C3 01 B0 01 8C 01 40 01 54 00 5F FF AB FE 5C FE A2 FE 7B FF A2 00 88 01 C5 01 8F 01 26 01 7B 00 B1 FF 10 FF 08 FF 43 FF A5 FF 0F 00 64 00 05 00 0D FF 4F FE 68 FE DD FE 19 FF 0A FF 2D FF 91 FF 3B 00 FC 00 70 01 7B 01 2A 01 E5 00 A9 00 5B 00 13 00 17 00 A1 00 0E 01 CB 00 3B 00 D5 FF 0F 00 5F 00 35 00 D7 FF 75 FF 6E FF CB FF 44 00 81 00 10 00 18 FF 3D FE 6F FD BF FC 60 FC A3 FC D7 FD C3 FF 82 01 5F 02 73 02 68 02 84 02 97 02 84 02 57 02 4D 02 15 02 7B 01 93 00 80 FF 6F FE E5 FD 1C FE C4 FE 7B FF D0 FF CD FF 96 FF 7A FF 6A FF 46 FF 05 FF DE FE 30 FF EF FF A6 00 E6 00 9F 00 D7 FF 1C FF 1D FF C3 FF 84 00 B5 00 C5 00 28 01 AA 01 AA 01 FD 00 30 00 9A FF 4B FF 37 FF 69 FF D9 FF 50 00 44 00 E3 FF 87 FF 52 FF 3D FF 26 FF 26 FF 47 FF B4 FF 40 00 9E 00 79 00 DF FF 55 FF 3B FF 62 FF 78 FF 67 FF 60 FF A8 FF 6E 00 3C 01 A9 01 BC 01 8A 01 34 01 C9 00 73 00 70 00 8A 00 BC 00 F9 00 20 01 1C 01 AA 00 AE FF BA FE 37 FE EB FD A4 FD 91 FD 10 FE E7 FE 94 FF E9 FF D3 FF 8F FF 55 FF 99 FF 15 00 71 00 91 00 9F 00 15 01 6B 01 79 01 26 01 0F 01 57 01 A0 01 97 01 55 01 F6 00 9A 00 4E 00 02 00 B7 FF 52 FF D1 FE C0 FE 99 FE 36 FE CC FD A6 FD 04 FE 46 FE 76 FE 21 FF 89 00 19 02 FE 02 FC 02 74 02 85 01 B0 00 0F 00 75 FF 3B FF BB FF 8A 00 CB 00 46 00 8A FF 30 FF 4C FF 14 FF 9F FE 55 FE C6 FE D3 FF 9F 00 C3 00 7B 00 60 00 8C 00 8D 00 35 00 A4 FF 22 FF 1D FF 9B FF F3 FF FC FF 22 00 7D 00 CC 00 89 00 0B 00 F5 FF 26 00 A1 00 2C 01 A8 01 F5 01 A2 01 D2 00 DC FF 2D FF 36 FF 8C FF DE FF 1A 00 20 00 55 00 86 00 3B 00 99 FF C1 FE 0E FE C3 FD B9 FD EB FD 2B FE 09 FE F3 FD 5C FE 69 FF B9 00 91 01 B4 01 DA 01 63 02 E8 02 F9 02 BA 02 65 02 D4 01 40 01 05 01 E2 00 A2 00 2B 00 6A FF 88 FE B1 FD 09 FD DA FC 22 FD EA FD FB FE F0 FF 6B 00 4D 00 0F 00 FB FF FC FF B9 FF 32 FF 36 FF FD FF EB 00 76 01 6D 01 0D 01 E9 00 CA 00 8F 00 36 00 BB FF 73 FF A7 FF 32 00 9E 00 91 00 27 00 B1 FF 2B FF F4 FE E7 FE F1 FE 06 FF 79 FF 3A 00 CA 00 E9 00 A1 00 24 00 DA FF B6 FF AB FF A7 FF 7F FF 65 FF A9 FF 13 00 8D 00 8F 00 37 00 3C 00 81 00 99 00 BC 00 1A 01 C6 01 70 02 80 02 EE 01 03 01 03 00 60 FF B3 FE F4 FD 50 FD 02 FD 1C FD 34 FD 36 FD 48 FD 63 FD C0 FD 73 FE A2 FF 52 01 E4 02 9C 03 56 03 A9 02 54 02 23 02 E6 01 F4 01 20 02 C3 01 DB 00 E1 FF 29 FF 86 FE 93 FD F5 FC 57 FD 67 FE 7E FF CB FF 5E FF FE FE 04 FF 57 FF C0 FF DC FF D4 FF F8 FF 79 00 F8 00 EB 00 A9 00 79 00 67 00 0C 00 98 FF 61 FF 7D FF F8 FF 61 00 88 00 7C 00 4F 00 0F 00 C4 FF C4 FF 2C 00 94 00 BD 00 90 00 85 00 CB 00 EA 00 A2 00 AA FF D3 FE 9B FE F6 FE 38 FF 26 FF 09 FF 62 FF 03 00 00 00 48 FF 84 FE 54 FE A0 FE DD FE B1 FF 23 01 6F 02 3D 03 D3 03 10 04 BF 03 B5 02 7B 01 7E 00 B3 FF 12 FF 46 FE 5D FD 90 FC 59 FC 8F FC E3 FC 3F FD 9B FD 0B FE AC FE 7D FF 4E 00 49 01 2A 02 C6 02 0B 03 37 03 51 03 51 03 EA 02 2C 02 2D 01 13 00 75 FF 2B FF 10 FF 2F FF 3D FF 44 FF 6D FF 75 FF 08 FF 41 FE EE FD 12 FE 71 FE C2 FE 02 FF 57 FF E2 FF 76 00 F9 00 F4 00 C4 00 C6 00 CC 00 99 00 68 00 7C 00 CB 00 F4 00 AD 00 2B 00 9D FF 0A FF CC FE A9 FE A2 FE 03 FF CB FF D1 00 CD 01 3D 02 40 02 FC 01 58 01 55 00 89 FF F3 FE 99 FE 76 FE 87 FE D9 FE 9B FE 3F FE 58 FE 75 FE 92 FE C9 FE 01 00 FA 01 27 03 42 03 BB 02 8E 02 CA 02 B2 02 72 02 07 02 75 01 E2 00 D3 FF 99 FE 6E FD 5D FC FE FB 4C FC C4 FC 1B FD 54 FD CE FD BC FE 94 FF 1F 00 73 00 B8 00 5F 01 2A 02 A0 02 A3 02 3A 02 CF 01 C0 01 B5 01 6B 01 CB 00 50 00 4A 00 90 00 F3 00 FD 00 97 00 D0 FF AE FE C1 FD 5B FD 3E FD 48 FD 93 FD 33 FE 0C FF FF FF D5 00 66 01 18 01 56 00 A5 FF A5 FF 15 00 72 00 7F 00 76 00 A7 00 07 01 06 01 8B 00 FB FF 93 FF 79 FF 9A FF DB FF 45 00 88 00 8B 00 63 00 22 00 21 00 66 00 BE 00 FA 00 D1 00 8F 00 7B 00 3A 00 42 FF 14 FE 51 FD 51 FD AD FD 01 FE C2 FE 30 00 8B 01 6F 02 8A 02 3D 02 E8 01 9B 01 6E 01 37 01 C1 00 73 00 52 00 49 00 3A 00 E6 FF 7C FF C9 FE F2 FD 67 FD 2A FD 0F FD 2D FD 95 FD 67 FE 41 FF B3 FF F5 FF 49 00 11 01 F6 01 55 02 1E 02 8A 01 3E 01 62 01 A3 01 E9 01 22 02 52 02 4F 02 DD 01 0D 01 D4 FF 79 FE 66 FD CC FC 64 FC 0B FC 2B FC 1C FD 99 FE FA FF C1 00 E0 00 AB 00 BF 00 02 01 0E 01 EE 00 DA 00 E4 00 06 01 E9 00 5F 00 87 FF CE FE 8E FE 98 FE F1 FE A0 FF A3 00 3F 01 57 01 52 01 67 01 30 01 A9 00 04 00 A9 FF 8F FF D7 FF 0D 00 EE FF 89 FF FE FE 8F FE 94 FE F6 FE EC FE 5B FE 6F FE 52 FF 1C 00 68 00 D6 00 DA 01 D2 02 13 03 81 02 D0 01 97 01 81 01 3A 01 CE 00 68 00 09 00 58 FF 9C FE 2C FE 12 FE 09 FE 16 FE D6 FD 52 FD F8 FC 1E FD B8 FD 2D FE AD FE 84 FF A1 00 CA 01 B8 02 3D 03 46 03 D9 02 31 02 EB 01 3C 02 7C 02 55 02 BC 01 BF 00 BA FF B2 FE 12 FE B8 FD 73 FD 5C FD 5A FD B8 FD 4C FE BE FE 2C FF D8 FF 65 00 7E 00 40 00 39 00 86 00 C9 00 DD 00 D8 00 D5 00 B7 00 45 00 E1 FF D0 FF CA FF C6 FF BE FF 04 00 80 00 CC 00 EC 00 E1 00 D2 00 C3 00 B8 00 91 00 16 00 D0 FF A7 FF 7A FF 1E FF DE FE A9 FE F5 FD 2C FD FE FC CF FD 1E FF 16 00 AC 00 E9 00 2A 01 61 01 3E 01 6A 01 01 02 81 02 7F 02 15 02 04 02 33 02 0C 02 30 01 E5 FF 77 FE 4E FD B3 FC BC FC 06 FD 68 FD 9B FD FA FD 88 FE D4 FE 9D FE 7B FE 2B FF 6D 00 71 01 EF 01 2E 02 88 02 E1 02 C5 02 96 02 C4 02 0A 03 98 02 7B 01 92 00 FA FF 16 FF 9F FD 51 FC F7 FB 8F FC AE FD D6 FE A8 FF 00 00 01 00 DF FF F7 FF 05 00 C0 FF 8D FF 12 00 FD 00 70 01 3B 01 CF 00 54 00 DE FF 4B FF 00 FF 06 FF 4B FF 9D FF D2 FF 18 00 84 00 32 01 CC 01 FC 01 AE 01 E4 00 E2 FF 32 FF CE FE AB FE C7 FE EC FE 30 FF 91 FF 98 FF 3A FF C0 FE 81 FE 26 FF DC FF 04 00 4A 00 BC 00 8C 01 FB 01 AD 01 87 01 B5 01 D6 01 CF 01 7A 01 17 01 A9 00 E8 FF 3D FF D8 FE C1 FE A0 FE 18 FE A0 FD 90 FD AE FD E8 FD 15 FE F7 FD F4 FD 62 FE 42 FF 55 00 1D 01 BE 01 11 02 F5 01 DA 01 E5 01 32 02 B6 02 29 03 59 03 E0 02 EA 01 00 01 13 00 EC FE C0 FD D6 FC 84 FC A0 FC 00 FD B6 FD 8D FE 3C FF C6 FF FC FF FB FF 00 00 03 00 04 00 09 00 33 00 5D 00 88 00 C1 00 03 01 49 01 5F 01 1B 01 6F 00 DE FF DC FF 46 00 B4 00 98 00 5B 00 28 00 60 00 F8 00 11 01 6D 00 8E FF 59 FF 9E FF B8 FF 2F FF 8F FE 54 FE 31 FE FF FD 4F FE 0E FF 27 00 DC 00 1A 01 1A 01 B2 00 4C 00 39 00 72 00 03 01 94 01 02 02 4A 02 5E 02 51 02 A7 01 64 00 52 FF CE FE A5 FE 65 FE 10 FE E1 FD AC FD 4F FD E4 FC BE FC 4E FD 2E FE 25 FF F2 FF C1 00 8E 01 FD 01 F3 01 1B 02 8E 02 06 03 3D 03 4C 03 55 03 FB 02 1B 02 E6 00 9F FF 51 FE 87 FD 74 FD A4 FD B0 FD EF FD 6D FE BA FE D8 FE F2 FE 53 FF C8 FF 0D 00 1C 00 0A 00 0D 00 44 00 97 00 C1 00 8D 00 1F 00 C5 FF AC FF AF FF C3 FF 08 00 80 00 0E 01 7A 01 B3 01 CF 01 B1 01 4D 01 6D 00 61 FF 6A FE 1D FE 92 FE 43 FF B1 FF D0 FF AC FF 84 FF 37 FF CA FE 7F FE 8D FE DD FE 71 FF 17 00 DC 00 6E 01 80 01 58 01 2E 01 44 01 BB 01 0A 02 EB 01 6E 01 FE 00 D4 00 8E 00 0D 00 B2 FF 77 FF 65 FF 54 FF 01 FF 5A FE 8E FD 2A FD E4 FC 9E FC F3 FC F2 FD 32 FF 43 00 0D 01 98 01 D3 01 E3 01 3A 02 BA 02 EC 02 D6 02 B1 02 97 02 51 02 39 01 E8 FF 2C FF F0 FE A4 FE 17 FE E8 FD 7B FE 0B FF 0A FF 94 FE 35 FE 2D FE 83 FE E5 FE 2F FF 61 FF A2 FF 12 00 86 00 F4 00 1F 01 26 01 3A 01 0C 01 94 00 35 00 10 00 3B 00 C7 00 7C 01 CF 01 95 01 F6 00 91 00 3D 00 C0 FF 48 FF 00 FF 0A FF 02 FF E7 FE BB FE A7 FE 7B FE 71 FE CD FE 49 FF C6 FF 0E 00 F3 FF CB FF 9A FF A2 FF FE FF 31 00 6E 00 00 01 AB 01 60 02 A8 02 C0 02 A1 02 09 02 4F 01 94 00 F5 FF 7D FF 17 FF DD FE C4 FE 47 FE 7F FD F2 FC 05 FD 6B FD 95 FD A7 FD 0B FE B2 FE 61 FF 3B 00 24 01 18 02 BC 02 33 03 97 03 E9 03 0F 04 9E 03 87 02 4E 01 06 00 CC FE FB FD A1 FD F9 FD 7E FE D1 FE 14 FF 6B FF AC FF 69 FF ED FE CC FE F3 FE FD FE D6 FE EE FE 70 FF 27 00 B9 00 D3 00 9B 00 4A 00 26 00 F4 FF B1 FF 9B FF C6 FF 4C 00 38 01 22 02 8A 02 F5 01 C4 00 B2 FF 2B FF 0A FF 30 FF 5C FF AF FF 1B 00 1D 00 AC FF 59 FF 50 FF 50 FF 63 FF 82 FF CA FF 18 00 2C 00 52 00 70 00 3D 00 9D FF 05 FF 61 FF 8A 00 4A 01 8F 01 7F 01 7E 01 8E 01 3D 01 16 01 21 01 35 01 F5 00 50 00 97 FF DB FE F7 FD F3 FC 33 FC 1A FC F1 FC 10 FE E8 FE 1C FF 0A FF 21 FF 98 FF 7C 00 A2 01 AA 02 28 03 6B 03 89 03 4E 03 BF 02 D5 01 FE 00 2E 00 8F FF 3A FF 09 FF 1B FF 43 FF 6F FF 72 FF 41 FF E7 FE 6F FE 2C FE 1C FE 23 FE 31 FE 38 FE 7E FE F8 FE C9 FF B5 00 42 01 61 01 2C 01 01 01 04 01 E4 00 FA 00 3C 01 81 01 A3 01 8A 01 73 01 02 01 1C 00 48 FF FD FE 57 FF 8A FF 59 FF 36 FF 81 FF C0 FF 75 FF EB FE 9B FE CE FE 40 FF DB FF 36 00 0E 00 D6 FF D1 FF E9 FF 02 00 C6 FF A3 FF AC FF 1D 00 F8 00 AD 01 2B 02 00 02 92 01 87 01 8D 01 83 01 5E 01 23 01 AB 00 A9 FF 90 FE E0 FD 70 FD EE FC B4 FC 18 FD AE FD 10 FE 11 FE 4E FE EF FE BB FF 99 00 77 01 9B 02 6A 03 90 03 58 03 07 03 A6 02 C4 01 95 00 D8 FF CB FF AE FF 70 FF 3D FF 97 FF 13 00 E9 FF 37 FF AA FE 68 FE 59 FE 51 FE 59 FE 87 FE C9 FE 0F FF 7F FF FE FF 42 00 17 00 B2 FF BF FF 2C 00 CC 00 58 01 E0 01 81 02 E0 02 7F 02 72 01 2C 00 34 FF C9 FE BC FE F2 FE 45 FF 7B FF BE FF F6 FF F4 FF 93 FF 48 FF 4F FF 87 FF A3 FF 93 FF B7 FF 1A 00 54 00 E3 FF 42 FF 11 FF 7B FF FC FF 38 00 15 00 ED FF C3 FF FB FF 79 00 E3 00 8F 01 56 02 25 03 2B 03 4C 02 68 01 9F 00 CF FF 0C FF 5B FE EB FD C3 FD B3 FD A4 FD AB FD BF FD EF FD 2C FE B7 FE 62 FF E7 FF 6D 00 07 01 72 01 73 01 75 01 BD 01 2A 02 25 02 CE 01 98 01 C1 01 EC 01 90 01 D8 00 3E 00 26 00 32 00 8A FF 42 FE 3C FD C2 FC E7 FC 32 FD 90 FD 3A FE 1C FF C2 FF DF FF D4 FF DA FF 02 00 61 00 E4 00 8C 01 33 02 9B 02 C4 02 98 02 05 02 D1 00 78 FF A1 FE 85 FE CE FE FD FE 3E FF 8D FF B7 FF 93 FF 3A FF 41 FF B8 FF 04 00 22 00 44 00 5D 00 1D 00 95 FF 25 FF 21 FF 4D FF 7A FF A0 FF B9 FF E9 FF 46 00 B8 00 DB 00 45 00 A0 FF F8 FF F2 00 B4 01 BB 01 9D 01 8F 01 77 01 0C 01 D0 00 BC 00 4F 00 70 FF CE FE C1 FE 8D FE 11 FE 9F FD 6E FD 90 FD EB FD A9 FE 61 FF 9C FF D2 FF 63 00 1B 01 43 01 EF 00 8A 00 BC 00 52 01 E8 01 55 02 C2 02 1D 03 2E 03 90 02 87 01 76 00 7F FF C6 FE 1F FE B3 FD 72 FD 49 FD 56 FD A9 FD 1D FE 6C FE 87 FE 99 FE C2 FE 0A FF B7 FF CA 00 FA 01 A3 02 A4 02 36 02 E3 01 87 01 E0 00 1F 00 A9 FF A8 FF A3 FF 75 FF 5E FF 76 FF B9 FF CF FF DA FF 01 00 18 00 26 00 29 00 22 00 57 00 66 00 3A 00 01 00 17 00 27 00 F5 FF 93 FF 9B FF F5 FF 15 00 BB FF 70 FF 8C FF B7 FF 89 FF 5A FF B0 FF 48 00 9D 00 73 00 3F 00 77 00 D3 00 37 01 51 01 39 01 14 01 E4 00 80 00 E7 FF 21 FF B1 FE 81 FE 6B FE F0 FD 7E FD A3 FD 4E FE 1B FF 95 FF C0 FF E0 FF 4C 00 07 01 B9 01 60 02 0F 03 61 03 42 03 A6 02 17 02 90 01 B3 00 B3 FF C4 FE 5C FE 63 FE 59 FE 5C FE 41 FE 3A FE 4C FE 36 FE 42 FE 67 FE CE FE 9D FF BF 00 C5 01 1E 02 E8 01 AC 01 5C 01 A1 00 F8 FF DC FF 36 00 6F 00 46 00 04 00 E5 FF EE FF C6 FF 8B FF 5D FF 4F FF 53 FF 5F FF 5D FF 62 FF D1 FF 7C 00 DD 00 8B 00 B9 FF 4A FF 9B FF 54 00 B5 00 86 00 10 00 B6 FF 88 FF 78 FF 8C FF A0 FF D0 FF F2 FF DA FF C5 FF AB FF E1 FF 51 00 C0 00 12 01 2D 01 3D 01 8A 01 E6 01 C5 01 19 01 4C 00 C3 FF 55 FF D2 FE 5E FE 26 FE 03 FE C1 FD 7D FD 68 FD DE FD 9A FE 41 FF A9 FF 36 00 3C 01 2B 02 B1 02 F0 02 0F 03 21 03 E8 02 58 02 99 01 EF 00 26 00 65 FF DC FE 62 FE EB FD 98 FD D2 FD 34 FE E4 FD 8E FD F2 FD 2E FF 5E 00 CD 00 D6 00 FF 00 60 01 78 01 2A 01 85 00 00 00 A0 FF AD FF 21 00 BA 00 06 01 EF 00 99 00 21 00 8F FF 26 FF 42 FF 8A FF A5 FF 9E FF 91 FF B2 FF CA FF AA FF 80 FF B2 FF 69 00 F3 00 DC 00 6D 00 74 00 98 00 52 00 9D FF 5A FF 9D FF D4 FF C8 FF C6 FF D0 FF 83 FF DC FE 91 FE F9 FE C6 FF 92 00 48 01 01 02 7C 02 B6 02 BD 02 81 02 D9 01 BD 00 90 FF 9C FE F9 FD 69 FD 04 FD 15 FD 50 FD 42 FD 59 FD F5 FD EC FE CA FF 7D 00 43 01 BA 01 D4 01 C5 01 EE 01 26 02 04 02 AC 01 4E 01 F9 00 B6 00 3E 00 D7 FF 82 FF EE FE 3A FE BB FD E6 FD 75 FE E7 FE 3A FF 8F FF FD FF 8B 00 E0 00 D7 00 6D 00 EE FF B7 FF F3 FF 4A 00 76 00 77 00 91 00 B5 00 AB 00 3B 00 B4 FF 63 FF 66 FF 70 FF 30 FF E4 FE 0F FF 89 FF B9 FF 7A FF 5B FF C2 FF 4F 00 CD 00 14 01 42 01 3C 01 02 01 B7 00 BC 00 D3 00 74 00 A3 FF 03 FF A8 FE 8D FE 83 FE A5 FE CB FE CC FE 4B FF 38 00 0D 01 7A 01 80 01 C6 01 49 02 79 02 29 02 48 01 81 00 47 00 21 00 D7 FF 3D FF 95 FE 38 FE DE FD 7D FD FA FC 9B FC DA FC BB FD E7 FE 19 00 3F 01 2A 02 C0 02 19 03 62 03 5B 03 B0 02 BD 01 D4 00 1A 00 CD FF B0 FF D3 FF D3 FF 75 FF F9 FE 54 FE CC FD B1 FD 08 FE C7 FE 53 FF BF FF FD FF 06 00 DF FF 9D FF B2 FF 0D 00 7C 00 C2 00 E0 00 1B 01 28 01 EE 00 72 00 1E 00 11 00 FD FF 04 00 46 00 92 00 83 00 CB FF 0A FF CF FE 29 FF A8 FF D4 FF 26 00 D1 00 43 01 12 01 67 00 C9 FF 83 FF 9E FF ED FF FC FF C2 FF 70 FF 56 FF 1D FF 6E FE B1 FD BD FD AB FE 99 FF FF FF 52 00 1C 01 34 02 D9 02 D8 02 A1 02 4D 02 D4 01 46 01 AE 00 1A 00 B2 FF 5D FF DD FE 0B FE 9A FD B9 FD F0 FD E7 FD ED FD 24 FE 51 FE 7B FE 08 FF FF FF 05 01 87 01 8D 01 A3 01 CE 01 C8 01 DD 01 19 02 2B 02 85 01 6C 00 BF FF 7B FF 5D FF 31 FF 0C FF 5A FF CB FF 26 00 1C 00 C9 FF 5A FF BD FE 3F FE 36 FE CA FE A8 FF 4F 00 7B 00 9D 00 EA 00 80 01 AC 01 3A 01 6C 00 A8 FF 25 FF EE FE 4B FF C2 FF F7 FF A6 FF 49 FF 50 FF 9B FF 04 00 7B 00 DB 00 11 01 FB 00 B5 00 7A 00 65 00 50 00 29 00 FF FF F5 FF F0 FF B9 FF 63 FF 25 FF E0 FE 53 FE DD FD 3D FE 67 FF 30 00 47 00 69 00 FA 00 8A 01 B9 01 C0 01 CE 01 AD 01 75 01 6E 01 52 01 F6 00 2C 00 71 FF C6 FE 12 FE 59 FD F0 FC 27 FD C0 FD 4C FE B3 FE 48 FF F4 FF 80 00 CE 00 DF 00 D0 00 E2 00 0B 01 52 01 97 01 E8 01 25 02 E8 01 17 01 0D 00 2B FF F5 FE 28 FF 58 FF 3E FF 4E FF B9 FF F2 FF B6 FF 3E FF 0A FF 07 FF 20 FF 62 FF 9D FF BA FF 0B 00 86 00 FC 00 38 01 18 01 9F 00 3D 00 3E 00 3D 00 D3 FF 37 FF CA FE AB FE D0 FE 30 FF 96 FF 01 00 89 00 0C 01 5A 01 44 01 EB 00 45 00 C1 FF E0 FF 6E 00 B5 00 74 00 FF FF AA FF 5D FF EA FE A4 FE D0 FE 05 FF 14 FF 05 FF 3E FF F2 FF AF 00 2A 01 65 01 70 01 88 01 93 01 8E 01 6B 01 43 01 28 01 F3 00 82 00 E1 FF 66 FF 42 FF 24 FF C4 FE 21 FE 91 FD 6F FD B3 FD 2A FE 8A FE A5 FE D8 FE 4C FF E1 FF 60 00 D9 00 90 01 25 02 6D 02 6E 02 8D 02 92 02 2C 02 70 01 AD 00 03 00 AA FF BA FF F0 FF EB FF 7D FF D2 FE 29 FE BD FD 9A FD F4 FD B2 FE 88 FF 33 00 81 00 B1 00 F3 00 30 01 37 01 C6 00 41 00 20 00 62 00 AE 00 6F 00 A6 FF DE FE A8 FE 19 FF 94 FF CB FF F9 FF 4A 00 91 00 77 00 6C 00 8F 00 CA 00 E2 00 F2 00 FE 00 DC 00 77 00 DA FF 51 FF FC FE B2 FE 81 FE BD FE 54 FF BA FF A8 FF A7 FF 02 00 5E 00 33 00 0B 00 1F 00 64 00 AB 00 08 01 AF 01 4E 02 9B 02 46 02 7A 01 83 00 82 FF A4 FE 47 FE 66 FE 8C FE 83 FE 60 FE 71 FE B3 FE 02 FF 2C FF 11 FF FD FE 4C FF DE FF 78 00 D4 00 16 01 9B 01 3D 02 8C 02 56 02 A0 01 FF 00 B9 00 77 00 30 00 DE FF B0 FF 7E FF 2D FF CD FE 79 FE 12 FE E6 FD 3F FE 05 FF B6 FF 2D 00 AD 00 14 01 14 01 C1 00 71 00 54 00 72 00 7E 00 59 00 0E 00 CA FF 9E FF A3 FF C1 FF E9 FF E1 FF FF FF 4A 00 8B 00 87 00 8C 00 8D 00 7C 00 56 00 8A 00 16 01 34 01 8C 00 8E FF D3 FE 95 FE 7D FE 3A FE 1D FE 88 FE 45 FF F2 FF 83 00 FA 00 07 01 9A 00 64 00 7D 00 82 00 6A 00 95 00 19 01 69 01 58 01 52 01 9B 01 DD 01 7D 01 8B 00 A5 FF 0C FF 77 FE CF FD 7D FD 91 FD D7 FD 19 FE 49 FE 67 FE 70 FE 9E FE 34 FF 08 00 D5 00 85 01 12 02 70 02 8F 02 16 02 46 01 C7 00 11 01 AC 01 DF 01 A3 01 01 01 09 00 0D FF 72 FE 3F FE 26 FE FF FD 09 FE 84 FE 3A FF F4 FF 62 00 82 00 7B 00 6F 00 5A 00 47 00 28 00 F3 FF DC FF E7 FF CF FF C1 FF C0 FF FC FF 60 00 B5 00 9D 00 4C 00 EE FF DD FF C5 FF BC FF DD FF 3E 00 7C 00 5B 00 27 00 18 00 F3 FF 92 FF 37 FF 16 FF 1E FF 35 FF 8F FF FB FF 0D 00 ED FF F8 FF 25 00 F2 FF 78 FF 69 FF 21 00 03 01 9D 01 E8 01 FF 01 C3 01 5F 01 1B 01 C1 00 1F 00 9C FF 6D FF 34 FF 6F FE 8B FD 9D FD 7A FE 58 FF 65 FF 00 FF B5 FE 93 FE A6 FE 08 FF C3 FF 85 00 58 01 FC 01 38 02 13 02 CC 01 63 01 F3 00 99 00 79 00 6D 00 76 00 80 00 45 00 BE FF 3B FF E2 FE 74 FE 01 FE FF FD 93 FE 89 FF 4E 00 77 00 09 00 AA FF D4 FF 42 00 49 00 0A 00 F1 FF 17 00 0B 00 D8 FF A7 FF A2 FF DD FF 24 00 5D 00 80 00 88 00 77 00 2A 00 DC FF C3 FF CE FF 09 00 72 00 86 00 1A 00 A9 FF 55 FF 32 FF 25 FF 3A FF 8A FF DA FF 40 00 83 00 8A 00 7F 00 A1 00 C9 00 6F 00 C1 FF 60 FF 8A FF D6 FF 00 00 51 00 D3 00 44 01 8A 01 B9 01 CC 01 58 01 4C 00 48 FF C2 FE 08 FF 30 FF EF FE 95 FE 81 FE 7D FE 47 FE F2 FD DC FD 2A FE A9 FE 6B FF 53 00 54 01 02 02 14 02 D1 01 B0 01 A6 01 8F 01 94 01 DC 01 ED 01 50 01 4A 00 8D FF 41 FF 0E FF B8 FE 4E FE 2C FE 81 FE 13 FF 92 FF BC FF C1 FF C1 FF A1 FF 5F FF 46 FF 7D FF DA FF 1C 00 35 00 4C 00 77 00 B5 00 E8 00 10 01 12 01 E9 00 99 00 3D 00 D6 FF 55 FF 06 FF 2E FF CB FF 56 00 6E 00 2E 00 ED FF A6 FF 3A FF CE FE F1 FE 7B FF D8 FF 16 00 56 00 86 00 56 00 FA FF CC FF E6 FF 05 00 F2 FF EF FF EA FF 27 00 87 00 26 01 9E 01 C3 01 CD 01 CF 01 94 01 D1 00 B6 FF C1 FE 33 FE 11 FE 32 FE 79 FE B8 FE D3 FE DC FE D1 FE B7 FE 4C FE 32 FE D8 FE FC FF 03 01 A7 01 02 02 24 02 0D 02 DF 01 8E 01 23 01 D5 00 A7 00 A4 00 72 00 27 00 A5 FF F6 FE 7C FE 86 FE E0 FE 13 FF 0C FF 1C FF 89 FF D8 FF E1 FF AC FF 8E FF A5 FF BC FF B2 FF B4 FF E6 FF 40 00 70 00 8A 00 A4 00 B6 00 BF 00 EC 00 2A 01 1F 01 D6 00 77 00 51 00 3B 00 1A 00 01 00 09 00 3F 00 08 00 5D FF AB FE 64 FE 90 FE A1 FE 97 FE 8E FE CE FE 78 FF 65 00 25 01 5F 01 43 01 DC 00 55 00 B9 FF 85 FF C8 FF 3F 00 CB 00 43 01 6F 01 6B 01 8B 01 E9 01 F6 01 66 01 44 00 6C FF 05 FF C6 FE 5B FE EF FD EA FD 2C FE 24 FE 15 FE 4A FE DB FE 39 FF 44 FF A5 FF 99 00 85 01 CE 01 8E 01 5D 01 52 01 7C 01 7A 01 55 01 1E 01 C0 00 8D 00 85 00 84 00 FD FF 2A FF BA FE B5 FE D6 FE F8 FE 56 FF D3 FF 15 00 11 00 E4 FF CA FF C3 FF D0 FF D2 FF 92 FF 77 FF 7C FF A7 FF E8 FF 28 00 89 00 CB 00 97 00 2E 00 1D 00 8C 00 14 01 34 01 EA 00 7A 00 25 00 D2 FF 5A FF DC FE C9 FE 13 FF 5D FF 70 FF 78 FF 94 FF 96 FF 79 FF 95 FF FD FF 51 00 4F 00 49 00 73 00 6F 00 17 00 CA FF EC FF 76 00 14 01 A0 01 F4 01 0A 02 B3 01 2E 01 A9 00 2B 00 A3 FF 02 FF AE FE BD FE 0B FF 25 FF 00 FF C2 FE BA FE BA FE 8C FE 61 FE 93 FE 07 FF C5 FF 87 00 21 01 71 01 76 01 92 01 EB 01 13 02 B9 01 08 01 9B 00 A6 00 8B 00 2E 00 C4 FF 86 FF 5C FF 4D FF 39 FF 1C FF 33 FF 88 FF C1 FF AE FF 70 FF 63 FF 72 FF 64 FF 04 FF D5 FE 58 FF 4A 00 BA 00 6E 00 0B 00 04 00 35 00 7D 00 AF 00 CE 00 C4 00 C6 00 9F 00 98 00 67 00 50 00 6D 00 A6 00 80 00 D5 FF 11 FF A3 FE 93 FE 61 FE 13 FE 1F FE AA FE 71 FF 14 00 99 00 03 01 15 01 BA 00 6C 00 67 00 9E 00 A1 00 51 00 09 00 0D 00 72 00 CE 00 26 01 8B 01 C5 01 DC 01 78 01 CF 00 06 00 47 FF C8 FE 66 FE 1D FE E6 FD D2 FD FA FD 05 FE E3 FD AD FD C0 FD 5E FE 55 FF 70 00 26 01 98 01 F3 01 45 02 45 02 0C 02 E3 01 BC 01 73 01 09 01 A0 00 6C 00 50 00 0B 00 8F FF E2 FE 87 FE AE FE 4F FF 01 00 33 00 13 00 E3 FF 86 FF F4 FE 5D FE 33 FE A1 FE 3A FF 9C FF CD FF FD FF 21 00 43 00 62 00 88 00 C7 00 14 01 55 01 49 01 DA 00 4B 00 F6 FF E6 FF E8 FF 00 00 5D 00 B5 00 98 00 F0 FF 32 FF 0A FF 39 FF 46 FF ED FE 9A FE DD FE 8C FF F9 FF F2 FF E9 FF D7 FF DF FF D4 FF C7 FF D2 FF 16 00 B7 00 71 01 F5 01 3A 02 41 02 5A 02 45 02 E7 01 21 01 1C 00 4E FF B3 FE 4F FE 42 FE 51 FE 44 FE 0D FE D6 FD D4 FD 0A FE 81 FE 11 FF 8F FF 1A 00 79 00 E4 00 3E 01 5C 01 57 01 4A 01 7D 01 A0 01 89 01 2F 01 E2 00 9A 00 30 00 BA FF 71 FF 98 FF E3 FF F3 FF F2 FF 9E FF 41 FF DB FE 8D FE 7F FE 9E FE C4 FE F3 FE 3F FF C6 FF 4A 00 86 00 7B 00 47 00 19 00 42 00 CC 00 2D 01 3A 01 C1 00 54 00 61 00 E2 00 5D 01 75 01 0C 01 86 00 EC FF 73 FF EE FE 81 FE 89 FE EE FE 46 FF 47 FF 40 FF 88 FF E6 FF F5 FF A5 FF 5B FF A4 FF 37 00 83 00 35 00 C7 FF 85 FF 82 FF A9 FF 29 00 02 01 B6 01 2A 02 4A 02 FD 01 A0 01 6E 01 64 01 F8 00 32 00 B6 FF 94 FF 98 FF 50 FF 71 FE 65 FD BA FC B7 FC F1 FC 7D FD 7E FE AE FF 7C 00 AD 00 72 00 39 00 55 00 B5 00 13 01 6B 01 C0 01 FB 01 E7 01 BA 01 7B 01 0F 01 93 00 4F 00 42 00 16 00 D2 FF C9 FF DD FF 7A FF B4 FE 3F FE 74 FE EF FE FD FE ED FE C5 FE BF FE 09 FF 5C FF 9E FF FC FF 6E 00 2A 01 AB 01 CA 01 49 01 BC 00 7F 00 51 00 FC FF C1 FF F2 FF 2E 00 22 00 F4 FF 09 00 25 00 09 00 C5 FF 86 FF 7D FF 5F FF 0C FF F0 FE 49 FF D1 FF 15 00 C7 FF 61 FF 54 FF 81 FF 9B FF D5 FF 13 00 55 00 75 00 E1 00 AF 01 36 02 51 02 1A 02 DA 01 80 01 F9 00 7C 00 3D 00 51 00 35 00 CB FF 39 FF 8A FE 00 FE 7B FD 36 FD 2E FD 74 FD FA FD 8E FE 11 FF 87 FF 2E 00 F0 00 6D 01 80 01 3D 01 20 01 57 01 BA 01 D5 01 8A 01 54 01 56 01 57 01 12 01 8D 00 17 00 CD FF C0 FF AC FF 57 FF DC FE 8A FE 83 FE 86 FE 7B FE 9C FE FD FE 9E FF D7 FF AA FF 76 FF 82 FF C8 FF 07 00 53 00 AA 00 0A 01 48 01 7D 01 A8 01 AF 01 63 01 9C 00 C4 FF 5C FF 53 FF 4E FF 28 FF 21 FF 1D FF 43 FF 8A FF 0D 00 62 00 69 00 29 00 F5 FF F4 FF 06 00 DC FF A2 FF 7A FF 75 FF 5F FF 3B FF 78 FF 3D 00 0C 01 4F 01 39 01 52 01 9B 01 9E 01 5C 01 38 01 0C 01 EE 00 DC 00 D8 00 C6 00 46 00 5A FF 51 FE 9A FD 4F FD 43 FD 61 FD C0 FD 2E FE 72 FE 91 FE E6 FE 9F FF 51 00 B2 00 C1 00 D3 00 3F 01 F7 01 4F 02 33 02 F7 01 EB 01 E0 01 9D 01 31 01 CF 00 6F 00 1C 00 CA FF 75 FF 24 FF D3 FE 73 FE 3B FE 49 FE 7C FE 4E FE 0C FE 2C FE B0 FE 43 FF A7 FF 0B 00 80 00 12 01 A2 01 B7 01 55 01 E8 00 B2 00 BA 00 BD 00 A3 00 7A 00 39 00 1B 00 1D 00 29 00 1E 00 06 00 CD FF 94 FF 4F FF 2F FF 64 FF D0 FF 08 00 BB FF 59 FF 55 FF 67 FF 1F FF D1 FE 12 FF B9 FF 10 00 12 00 36 00 C5 00 62 01 9B 01 9B 01 5B 01 00 01 9C 00 94 00 E5 00 08 01 D8 00 B0 00 C2 00 B7 00 44 00 78 FF 97 FE 0A FE BC FD AE FD F7 FD 52 FE 97 FE 8D FE 78 FE 8B FE D3 FE 46 FF AD FF 3B 00 CD 00 64 01 DE 01 18 02 32 02 31 02 32 02 29 02 B4 01 3A 01 EA 00 DF 00 67 00 69 FF 80 FE 15 FE 17 FE 4C FE B7 FE 03 FF E7 FE 8E FE 64 FE 73 FE 9A FE D3 FE 4E FF 19 00 E5 00 61 01 8C 01 93 01 B6 01 C8 01 8E 01 0F 01 99 00 5B 00 4E 00 42 00 05 00 A0 FF 34 FF F6 FE 1F FF 52 FF 88 FF 80 FF 55 FF 44 FF 3B FF 55 FF 41 FF 1F FF 12 FF 30 FF 96 FF D2 FF 02 00 35 00 5E 00 49 00 3D 00 83 00 D8 00 EE 00 A3 00 78 00 8C 00 D0 00 4B 01 D1 01 07 02 B9 01 EF 00 6B 00 12 00 AF FF 2C FF BE FE B4 FE 9B FE 3E FE CC FD 98 FD AA FD AC FD 93 FD 95 FD 0E FE FE FE 27 00 11 01 97 01 F2 01 31 02 45 02 81 02 BD 02 97 02 26 02 B6 01 5E 01 C9 00 2B 00 EB FF C5 FF 7F FF 06 FF A2 FE 67 FE 49 FE 4B FE 5D FE 7C FE B3 FE 0D FF 8D FF F5 FF 31 00 43 00 44 00 31 00 F8 FF E8 FF 03 00 3D 00 67 00 7C 00 A2 00 E0 00 DF 00 D1 00 DD 00 DF 00 9F 00 50 00 1A 00 ED FF A5 FF 64 FF 21 FF F6 FE 0A FF 1B FF 09 FF EE FE FB FE 44 FF 9A FF F8 FF 6F 00 EC 00 43 01 4F 01 DA 00 15 00 6C FF 19 FF 34 FF B8 FF 73 00 FD 00 1F 01 30 01 84 01 C3 01 87 01 E5 00 66 00 41 00 79 00 BA 00 A4 00 F3 FF C0 FE CD FD 5C FD 48 FD 25 FD FF FC FE FC 76 FD 38 FE 25 FF 0B 00 E6 00 B1 01 4C 02 D4 02 0C 03 01 03 B7 02 4B 02 A8 01 0C 01 9E 00 73 00 71 00 85 00 90 00 37 00 5A FF 5D FE BF FD A2 FD BF FD E0 FD 37 FE B5 FE 47 FF A3 FF F2 FF 4C 00 94 00 C7 00 CE 00 CB 00 BF 00 A8 00 71 00 42 00 FF FF F0 FF 1A 00 62 00 B5 00 A1 00 4C 00 F2 FF BB FF 94 FF 8A FF 8F FF B7 FF EE FF FF FF D5 FF 9D FF AE FF EF FF 31 00 3B 00 4A 00 7B 00 8F 00 44 00 87 FF E8 FE D8 FE 0F FF 58 FF BD FF 40 00 B0 00 90 00 73 00 94 00 DB 00 F9 00 29 01 81 01 F9 01 0D 02 AE 01 30 01 A4 00 F7 FF 0D FF 22 FE 6C FD F8 FC F6 FC 52 FD BC FD EF FD 2B FE C1 FE 90 FF 5B 00 22 01 CF 01 38 02 64 02 6F 02 7B 02 70 02 16 02 72 01 C6 00 54 00 0A 00 CC FF 90 FF 76 FF 47 FF 03 FF EB FE 12 FF 39 FF 30 FF 0F FF FE FE 07 FF 2F FF 4E FF 67 FF 7E FF C8 FF 22 00 72 00 C2 00 F9 00 16 01 09 01 F3 00 DA 00 8E 00 46 00 1E 00 18 00 26 00 14 00 CB FF 66 FF 2D FF 3A FF 62 FF 80 FF A0 FF 9A FF BC FF 3D 00 FE 00 6C 01 4D 01 CC 00 33 00 BC FF 44 FF E0 FE B2 FE B6 FE 34 FF D0 FF 26 00 10 00 DF FF 0D 00 3B 00 56 00 96 00 11 01 AC 01 FA 01 2F 02 30 02 CA 01 3A 01 7D 00 F5 FF 4B FF 93 FE 27 FE E8 FD E4 FD CC FD D2 FD FA FD 17 FE 59 FE C4 FE 60 FF DD FF 12 00 36 00 86 00 08 01 A8 01 44 02 C2 02 CC 02 63 02 93 01 C6 00 49 00 01 00 E7 FF 9D FF 4F FF 12 FF FE FE 24 FF 59 FF 94 FF CB FF DC FF D1 FF AC FF 90 FF 89 FF 93 FF 93 FF 8D FF B1 FF F0 FF 6A 00 C2 00 BE 00 72 00 30 00 2E 00 30 00 0A 00 CA FF 94 FF 90 FF A3 FF B1 FF C3 FF 9D FF A2 FF E2 FF 88 00 E3 00 D2 00 B3 00 95 00 4F 00 D7 FF 7A FF 2D FF 05 FF 14 FF 8C FF 0F 00 4B 00 D5 FF 83 FF 85 FF A3 FF BD FF E4 FF 42 00 B9 00 02 01 3D 01 53 01 0D 01 9C 00 77 00 86 00 4A 00 E9 FF 09 00 8E 00 4E 00 92 FF 50 FF A7 FF 93 FF F8 FE 73 FE 73 FE 6E FE 09 FE 0D FE C6 FE CD FF DA FF B2 FF E5 FF E4 00 DB 01 D2 01 87 01 C1 01 EB 01 7C 01 03 01 AB 00 C7 00 C1 00 28 00 A1 FF 83 FF 8A FF 6F FF 02 FF CB FE B8 FE E2 FE 30 FF 92 FF 27 00 51 00 08 00 B0 FF A5 FF 3A 00 94 00 62 00 FF FF C3 FF 85 FF 56 FF 5B FF 97 FF B1 FF 76 FF AC FF DE FF E6 FF 20 00 80 00 50 01 C2 01 95 01 EF 00 8E 00 9E 00 9A 00 F8 FF 53 FF 5F FF F3 FF 15 00 E1 FF 85 FF 2F FF CE FE 90 FE 84 FE 0B FF C1 FF 52 00 97 00 AB 00 96 00 65 00 1F 00 D9 FF BF FF CC FF ED FF 01 00 5D 00 1B 01 A6 01 A4 01 6F 01 0D 01 C9 00 A3 00 42 00 A6 FF BA FE E3 FD 89 FD C5 FD 4A FE B7 FE 11 FF A3 FF 0D 00 08 00 F5 FF 53 00 8E 00 4E 00 3B 00 B7 00 37 01 36 01 EE 00 DC 00 D1 00 8F 00 4B 00 58 00 8D 00 85 00 22 00 B4 FF 49 FF FC FE E0 FE 29 FF B2 FF 2A 00 46 00 FB FF 8F FF 2A FF FA FE 14 FF 61 FF C0 FF D3 FF B2 FF B1 FF EC FF F3 FF C3 FF 00 00 C1 00 7F 01 A8 01 3D 01 C1 00 4C 00 DA FF 70 FF 5E FF D2 FF 90 00 DD 00 A4 00 9D 00 84 00 21 00 A7 FF 89 FF DB FF DF FF AD FF BC FF 11 00 21 00 E2 FF E1 FF 05 00 C5 FF 2A FF EA FE 33 FF 7E FF 90 FF 98 FF 01 00 92 00 3E 01 B2 01 24 02 1D 02 D4 01 73 01 1C 01 B0 00 08 00 2E FF 80 FE 1F FE 40 FE 8F FE C1 FE 99 FE 70 FE 88 FE BC FE E5 FE 24 FF D5 FF 5B 00 81 00 7C 00 E2 00 4C 01 5D 01 FB 00 C3 00 BD 00 C4 00 8D 00 74 00 90 00 D6 00 76 00 C5 FF 70 FF E1 FF 88 00 87 00 03 00 A2 FF 70 FF 3F FF 19 FF 35 FF A0 FF 9D FF 44 FF 26 FF 53 FF 6F FF 4F FF 7A FF F9 FF 7A 00 C4 00 E6 00 22 01 5D 01 24 01 5E 00 AF FF C6 FF 1F 00 2A 00 3D 00 92 00 AB 00 0B 00 6A FF 98 FF 18 00 63 00 56 00 4F 00 2F 00 B7 FF 17 FF 9C FE 90 FE B9 FE A7 FE 00 FF D9 FF 9F 00 84 00 C6 FF A4 FF F9 FF 3D 00 3D 00 51 00 B9 00 EC 00 F6 00 C8 00 E0 00 2C 01 65 01 80 01 52 01 1A 01 74 00 5C FF 68 FE F7 FD 05 FE F9 FD 90 FD 52 FD 9B FD 3A FE A4 FE 00 FF 8C FF 5A 00 03 01 85 01 EB 01 E9 01 B2 01 7F 01 B8 01 3F 02 70 02 FC 01 4C 01 87 00 F1 FF 70 FF FE FE BF FE B8 FE 00 FF FD FE E5 FE 17 FF 5A FF 35 FF BE FE B0 FE 34 FF A0 FF BF FF D2 FF 19 00 74 00 07 00 5E FF 87 FF 5F 00 D3 00 A8 00 92 00 A8 00 80 00 36 00 3B 00 C3 00 F1 00 DA 00 E7 00 0F 01 F1 00 A2 00 A6 00 91 00 4E 00 C4 FF 0F FF B1 FE 85 FE 35 FE D7 FD A7 FD F0 FD B1 FE 63 FF E4 FF 38 00 81 00 C3 00 AD 00 42 00 2E 00 73 00 C2 00 EB 00 26 01 65 01 82 01 80 01 C3 01 09 02 8E 01 BC 00 36 00 DD FF 75 FF A4 FE F4 FD A5 FD 89 FD 5C FD 83 FD EF FD 6B FE C4 FE F9 FE 46 FF B3 FF 7F 00 54 01 B4 01 BC 01 E9 01 6B 02 B6 02 83 02 2C 02 BE 01 D8 00 D3 FF 09 FF BC FE E1 FE 41 FF 9E FF 9E FF 33 FF DD FE 2A FF 6C FF 55 FF 0E FF 3C FF E6 FF 54 00 36 00 22 00 10 00 C4 FF 8B FF BA FF 83 00 5C 01 7F 01 E0 00 15 00 B6 FF A5 FF BB FF D9 FF F5 FF 6B 00 08 01 56 01 1B 01 58 00 CC FF 9E FF 92 FF 8D FF B0 FF AC FF 75 FF 52 FF 5C FF 63 FF 6C FF 7D FF BD FF DD FF EC FF D4 FF 81 FF 57 FF A2 FF 0E 00 4F 00 99 00 15 01 A7 01 4A 02 D7 02 F0 02 97 02 B2 01 DB 00 3D 00 DD FF 84 FF 06 FF 7B FE 0F FE B6 FD 34 FD 19 FD 56 FD D5 FD 69 FE 1B FF B9 FF FA FF 2C 00 7F 00 14 01 98 01 E1 01 0C 02 27 02 44 02 2B 02 94 01 7F 00 B3 FF 8B FF B0 FF B6 FF A0 FF 85 FF 71 FF 23 FF A8 FE 92 FE FE FE 94 FF DE FF FD FF 1B 00 1A 00 C3 FF 32 FF 1E FF 3E FF 9B FF 16 00 7B 00 B1 00 C9 00 F9 00 19 01 A3 00 1A 00 2B 00 DF 00 3F 01 0C 01 A7 00 6C 00 2C 00 DF FF 85 FF 63 FF 5A FF 53 FF 2F FF 54 FF A3 FF D1 FF 96 FF 3E FF 52 FF B4 FF 07 00 1B 00 09 00 E4 FF 98 FF 6E FF 47 FF 35 FF 93 FF 3A 00 FA 00 80 01 8C 01 3C 01 19 01 5A 01 E0 01 18 02 BE 01 39 01 95 00 FE FF 4B FF A4 FE E8 FD 5A FD FA FC 07 FD 33 FD 86 FD DD FD 41 FE DA FE 9D FF 50 00 08 01 9B 01 D6 01 B3 01 B6 01 DF 01 14 02 1E 02 27 02 03 02 A5 01 3E 01 A8 00 F2 FF 43 FF D1 FE 97 FE 75 FE 94 FE F8 FE 53 FF 6D FF 94 FF B4 FF 7B FF 2D FF 44 FF 66 FF 2F FF E5 FE 14 FF D7 FF 94 00 E8 00 EC 00 DB 00 E6 00 B3 00 73 00 6E 00 A1 00 89 00 01 00 82 FF 85 FF E2 FF 67 00 99 00 9C 00 99 00 8A 00 1C 00 6B FF F3 FE 1C FF 4B FF 21 FF E5 FE BC FE AA FE CB FE 46 FF EE FF 42 00 3D 00 3E 00 76 00 9F 00 5F 00 10 00 4A 00 DF 00 38 01 32 01 27 01 34 01 11 01 DA 00 C6 00 C1 00 5E 00 D5 FF 77 FF 6C FF 43 FF C2 FE 3E FE 19 FE 84 FE EF FE 0C FF F5 FE 0C FF 2D FF 37 FF 69 FF 13 00 DA 00 30 01 43 01 64 01 A0 01 D5 01 D0 01 5F 01 E2 00 B9 00 9B 00 57 00 FC FF B8 FF 6E FF EC FE 8D FE 60 FE 51 FE 58 FE A6 FE F9 FE 47 FF B1 FF 1F 00 76 00 78 00 5E 00 59 00 67 00 8E 00 BA 00 DD 00 14 01 16 01 D0 00 4C 00 E7 FF D5 FF D5 FF B8 FF 53 FF 00 FF 19 FF 92 FF FF FF 1B 00 04 00 EE FF D9 FF D5 FF 9A FF 63 FF 35 FF 40 FF 88 FF D1 FF 2F 00 98 00 BC 00 8B 00 0B 00 D1 FF BC FF B3 FF 9D FF AE FF FE FF 59 00 B3 00 F6 00 55 01 F5 01 6B 02 22 02 58 01 8D 00 DE FF 33 FF B6 FE 8F FE 8A FE 8F FE AD FE D2 FE CD FE 99 FE 3F FE 04 FE 54 FE 13 FF C2 FF 28 00 71 00 25 01 E1 01 13 02 F8 01 01 02 25 02 23 02 96 01 EB 00 83 00 3A 00 D5 FF 5F FF 0E FF DC FE D0 FE E0 FE 33 FF 80 FF 80 FF 6E FF 7F FF 77 FF 85 FF F3 FF 72 00 71 00 04 00 B1 FF BE FF 14 00 77 00 7E 00 40 00 1C 00 51 00 83 00 97 00 7C 00 63 00 21 00 D7 FF E4 FF 33 00 68 00 24 00 99 FF 2F FF 12 FF 01 FF EE FE 0D FF 84 FF F5 FF 33 00 3E 00 4E 00 74 00 9C 00 C4 00 BF 00 96 00 5D 00 21 00 C6 FF 93 FF 99 FF 8D FF B4 FF 09 00 8D 00 E6 00 14 01 29 01 27 01 21 01 09 01 FA 00 C9 00 4E 00 93 FF F6 FE 9F FE 50 FE 04 FE E0 FD E1 FD 25 FE 56 FE 6D FE A4 FE 44 FF F1 FF 8C 00 24 01 84 01 97 01 8D 01 99 01 E7 01 47 02 3F 02 AE 01 FB 00 61 00 F8 FF 85 FF 20 FF FC FE 19 FF 4A FF 8B FF A3 FF 94 FF 5F FF 18 FF DF FE DE FE 1E FF D0 FF AA 00 43 01 67 01 28 01 D5 00 8D 00 56 00 10 00 B6 FF 9E FF A4 FF C3 FF D2 FF EE FF FD FF F5 FF FA FF 1B 00 62 00 7E 00 32 00 BE FF 2D FF 00 FF 42 FF CB FF 4F 00 6E 00 51 00 6E 00 8E 00 67 00 DF FF 72 FF 30 FF F9 FE DD FE 4B FF DC FF FB FF 96 FF 5F FF BE FF 7C 00 26 01 A8 01 26 02 71 02 27 02 5D 01 98 00 0C 00 A8 FF 20 FF 9A FE 61 FE 4F FE 29 FE F7 FD 0F FE 7D FE 20 FF 90 FF E5 FF 24 00 45 00 4B 00 1F 00 08 00 51 00 0B 01 FD 01 BD 02 CB 02 3D 02 AA 01 43 01 B1 00 F8 FF 5F FF FD FE BD FE 9A FE D3 FE 2D FF 4F FF FE FE 03 FF 46 FF 55 FF 40 FF 4D FF 8C FF DF FF 12 00 24 00 2B 00 3D 00 6D 00 A8 00 DE 00 12 01 2B 01 05 01 CF 00 83 00 2F 00 B9 FF 46 FF 34 FF 4C FF 68 FF 84 FF A4 FF C6 FF 75 FF 00 FF F3 FE 84 FF 26 00 5C 00 6C 00 C3 00 0F 01 C5 00 39 00 D4 FF DC FF BC FF 52 FF 0C FF 22 FF 4B FF 37 FF 3B FF B7 FF A2 00 8A 01 11 02 6E 02 8B 02 56 02 D9 01 18 01 7B 00 07 00 C1 FF 53 FF 9D FE ED FD 91 FD 8C FD CF FD FA FD F5 FD E1 FD 0B FE 76 FE F8 FE 9D FF 86 00 9A 01 6F 02 F4 02 3D 03 53 03 F1 02 34 02 52 01 A8 00 06 00 77 FF F4 FE C0 FE D5 FE E6 FE E4 FE D5 FE 01 FF 52 FF AB FF D7 FF E6 FF F7 FF 12 00 32 00 4C 00 49 00 4B 00 40 00 31 00 07 00 F7 FF 22 00 51 00 41 00 44 00 8C 00 C3 00 68 00 B5 FF 0D FF A3 FE 85 FE BD FE 5F FF 21 00 BF 00 F5 00 BF 00 6C 00 6F 00 A8 00 B2 00 77 00 35 00 DF FF 79 FF 1E FF 16 FF 54 FF 86 FF 9C FF 88 FF 76 FF 8F FF D1 FF 24 00 51 00 61 00 90 00 4D 01 5B 02 1F 03 E6 02 EA 01 EC 00 33 00 AE FF 0F FF 66 FE 06 FE 18 FE 5B FE 7E FE 56 FE 1F FE F9 FD F7 FD 34 FE C4 FE A8 FF 6A 00 EA 00 63 01 1B 02 AF 02 DE 02 AE 02 75 02 39 02 C7 01 26 01 64 00 AB FF 25 FF E3 FE E5 FE D7 FE B7 FE BD FE EA FE 09 FF FE FE FE FE 14 FF 43 FF 7B FF C1 FF 2E 00 81 00 C4 00 D5 00 F8 00 2D 01 1F 01 BA 00 37 00 18 00 47 00 42 00 D2 FF 47 FF 25 FF 2E FF 48 FF 6B FF BF FF 43 00 78 00 68 00 90 00 F4 00 19 01 8B 00 08 00 0D 00 45 00 DA FF 20 FF C4 FE 00 FF 30 FF 14 FF 02 FF 14 FF 35 FF 82 FF 07 00 C6 00 6F 01 BD 01 F5 01 03 02 E3 01 AC 01 7B 01 4F 01 D0 00 0B 00 61 FF D2 FE 51 FE 01 FE E8 FD FA FD 01 FE D7 FD C2 FD F7 FD 9B FE 57 FF CC FF 0B 00 7C 00 5A 01 39 02 7A 02 29 02 CD 01 7E 01 55 01 44 01 5A 01 26 01 B7 00 4B 00 2E 00 EB FF 5A FF CB FE 77 FE 6B FE 7C FE D0 FE 4E FF BB FF EE FF 18 00 2C 00 3F 00 4F 00 4A 00 58 00 52 00 36 00 2C 00 2B 00 EE FF AC FF C3 FF FC FF EC FF B1 FF A7 FF 04 00 47 00 69 00 65 00 4B 00 17 00 EA FF F4 FF 39 00 AD 00 BF 00 59 00 01 00 10 00 21 00 BB FF 2A FF 0D FF 37 FF 2F FF C9 FE BC FE 1C FF 63 FF 60 FF A6 FF 9F 00 5A 01 41 01 FF 00 49 01 A2 01 4B 01 B5 00 60 00 5A 00 2D 00 F1 FF B7 FF 91 FF 99 FF A8 FF 48 FF 9D FE E8 FD 83 FD 9E FD 22 FE D9 FE 89 FF 34 00 D8 00 4B 01 B0 01 38 02 81 02 2F 02 64 01 E6 00 C6 00 99 00 6C 00 3D 00 26 00 06 00 CD FF 8C FF 44 FF F9 FE E2 FE F5 FE F4 FE C8 FE CE FE 1A FF 85 FF C4 FF FD FF 65 00 BA 00 DE 00 07 01 F7 00 B2 00 2C 00 B4 FF 97 FF B7 FF C3 FF 9D FF A1 FF D3 FF 17 00 4F 00 4F 00 03 00 AD FF 8C FF B2 FF F7 FF 1D 00 2B 00 26 00 12 00 03 00 44 00 4F 00 C3 FF E0 FE 99 FE C4 FE DD FE 9D FE 98 FE 33 FF 24 00 EA 00 82 01 EE 01 2C 02 35 02 75 02 BA 02 75 02 98 01 8F 00 AA FF 0C FF B8 FE 8F FE 75 FE 59 FE 4E FE 3B FE 17 FE DB FD C1 FD E5 FD 19 FE 82 FE 20 FF E3 FF D8 00 B1 01 2D 02 79 02 81 02 47 02 D9 01 A5 01 AE 01 70 01 E4 00 53 00 0D 00 DA FF 6C FF F5 FE A1 FE C4 FE 31 FF 92 FF 9F FF 96 FF 97 FF 5A FF 07 FF EF FE 3E FF B8 FF E7 FF DC FF 02 00 6A 00 CE 00 B5 00 58 00 49 00 59 00 39 00 05 00 03 00 38 00 50 00 00 00 8E FF 78 FF D6 FF 6F 00 CB 00 C0 00 8A 00 4B 00 00 00 A8 FF 78 FF 76 FF 75 FF 34 FF 1C FF 3D FF 7E FF AA FF 8A FF 68 FF 77 FF CF FF 28 00 80 00 C9 00 08 01 80 01 DE 01 1A 02 04 02 D7 01 89 01 0F 01 A4 00 1D 00 68 FF B5 FE 49 FE 2E FE 10 FE C7 FD A1 FD A6 FD D7 FD 4C FE E5 FE 66 FF 9F FF EF FF 81 00 33 01 AA 01 F2 01 FD 01 F3 01 00 02 00 02 02 02 E4 01 6E 01 C9 00 28 00 F3 FF B4 FF 2D FF 85 FE 47 FE 4F FE 74 FE 7E FE 8C FE CE FE 25 FF 8F FF CA FF D2 FF F4 FF 62 00 E0 00 0C 01 11 01 05 01 CD 00 71 00 18 00 E3 FF C9 FF CB FF CF FF CD FF F1 FF 27 00 35 00 0E 00 CD FF E6 FF 44 00 BA 00 FC 00 D7 00 76 00 17 00 E3 FF A3 FF 37 FF CF FE BE FE 19 FF 56 FF 3C FF 08 FF F6 FE 46 FF AD FF 01 00 72 00 0F 01 D9 01 6F 02 9E 02 52 02 F1 01 9B 01 30 01 A3 00 3D 00 F8 FF 9B FF F7 FE 1D FE 63 FD DB FC BA FC CD FC 31 FD E6 FD CC FE 9D FF 39 00 BC 00 26 01 97 01 DA 01 15 02 4F 02 84 02 97 02 74 02 01 02 3F 01 81 00 21 00 2B 00 2E 00 C7 FF 08 FF 71 FE 5B FE 86 FE 8E FE 83 FE B7 FE FD FE 55 FF B4 FF 04 00 D5 FF 8A FF 70 FF C1 FF 37 00 96 00 CD 00 D4 00 AB 00 4E 00 04 00 F9 FF 33 00 5D 00 50 00 74 00 B7 00 A2 00 33 00 D0 FF F4 FF 62 00 77 00 63 00 47 00 39 00 1A 00 BF FF F8 FE 2A FE 0E FE 90 FE 34 FF 76 FF AF FF DC FF EB FF BC FF B9 FF 2E 00 95 00 B5 00 00 01 85 01 C4 01 85 01 2F 01 F0 00 AE 00 56 00 15 00 FC FF C3 FF 4E FF A4 FE 25 FE DB FD 89 FD 45 FD 85 FD 68 FE 41 FF BC FF 00 00 7E 00 13 01 8E 01 D4 01 F1 01 FD 01 0C 02 03 02 CC 01 5A 01 F6 00 CE 00 7E 00 FC FF AF FF 84 FF 40 FF 01 FF C5 FE 99 FE 4A FE 08 FE 4A FE D6 FE 2F FF 3E FF 5E FF CB FF 4F 00 A1 00 DB 00 0B 01 1D 01 F0 00 6D 00 03 00 06 00 4E 00 78 00 51 00 2E 00 46 00 77 00 6E 00 FE FF 69 FF 2F FF 65 FF A8 FF C3 FF EF FF F6 FF F8 FF 02 00 F9 FF B8 FF 5B FF 33 FF 26 FF FB FE C0 FE CE FE 44 FF 90 FF E6 FF 85 00 7F 01 22 02 42 02 4B 02 45 02 16 02 9D 01 D5 00 1C 00 9E FF 7D FF 6E FF 3C FF EB FE C8 FE C3 FE 74 FE 04 FE BD FD B4 FD A3 FD C7 FD 5D FE 27 FF DD FF 6C 00 23 01 EE 01 61 02 72 02 6E 02 74 02 54 02 04 02 95 01 21 01 A6 00 3B 00 F9 FF 9C FF 44 FF 0D FF F9 FE F5 FE E4 FE C8 FE DD FE EC FE F1 FE E1 FE F8 FE 40 FF 56 FF 69 FF B6 FF 3A 00 A3 00 E1 00 16 01 2D 01 03 01 A1 00 50 00 2C 00 21 00 3A 00 2B 00 E6 FF AF FF BB FF 03 00 1E 00 33 00 4A 00 31 00 D9 FF 9B FF 99 FF 9C FF 6C FF 41 FF 48 FF A3 FF 09 00 34 00 29 00 30 00 07 00 95 FF 3C FF 98 FF 6F 00 03 01 35 01 AD 01 54 02 AC 02 63 02 CF 01 3F 01 B3 00 F9 FF 3D FF A1 FE 44 FE 0D FE EF FD D7 FD D1 FD D1 FD EF FD 22 FE 6C FE D6 FE 3B FF 95 FF 0B 00 C6 00 56 01 AB 01 ED 01 4C 02 89 02 84 02 61 02 2F 02 DA 01 55 01 D5 00 80 00 09 00 6B FF E3 FE AC FE 8F FE 6A FE 51 FE 5F FE 65 FE 4F FE 4E FE 9F FE 21 FF 8A FF D5 FF 3B 00 A0 00 DB 00 CE 00 BD 00 0D 01 64 01 64 01 05 01 C2 00 D0 00 E4 00 A5 00 29 00 D6 FF B6 FF AD FF 93 FF 89 FF D6 FF 25 00 47 00 0D 00 A3 FF 41 FF FE FE F8 FE E0 FE A5 FE 94 FE DE FE 2F FF 7A FF D3 FF 48 00 83 00 79 00 CB 00 75 01 1F 02 7A 02 8A 02 5A 02 05 02 82 01 3A 01 25 01 D5 00 0E 00 44 FF CC FE 49 FE 7B FD 94 FC 3C FC 5E FC A2 FC 20 FD E3 FD B3 FE 64 FF 1C 00 ED 00 BE 01 3C 02 74 02 7C 02 63 02 51 02 34 02 F8 01 D7 01 DE 01 AA 01 34 01 8D 00 D3 FF 11 FF 71 FE 24 FE 32 FE 50 FE 56 FE 5E FE CB FE 49 FF 58 FF 30 FF FD FE F8 FE 1E FF 6C FF D9 FF 30 00 74 00 99 00 BF 00 E3 00 CA 00 99 00 7B 00 95 00 B5 00 87 00 4F 00 5B 00 9D 00 92 00 5E 00 6F 00 C8 00 02 01 A5 00 1D 00 AC FF 35 FF 8F FE 15 FE D9 FD 25 FE AA FE 26 FF 82 FF 6E FF 53 FF 58 FF 98 FF BF FF F0 FF 90 00 70 01 17 02 38 02 40 02 68 02 2D 02 A0 01 FE 00 DF 00 D9 00 58 00 94 FF F4 FE 51 FE 78 FD BF FC 8D FC D3 FC FC FC 28 FD 95 FD 60 FE 60 FF 49 00 14 01 AF 01 0D 02 2F 02 59 02 AC 02 12 03 E7 02 1B 02 76 01 52 01 50 01 F5 00 71 00 2E 00 DE FF 53 FF D5 FE 83 FE 25 FE B5 FD 9B FD 01 FE 9D FE EB FE 08 FF 37 FF A9 FF 03 00 13 00 1A 00 63 00 B9 00 C6 00 A8 00 8B 00 77 00 5D 00 61 00 BA 00 19 01 17 01 A6 00 1E 00 D5 FF EF FF 10 00 EE FF AF FF BE FF F0 FF 11 00 ED FF C1 FF 64 FF E6 FE 45 FE E0 FD 06 FE 68 FE 96 FE BF FE 2B FF C2 FF 29 00 8C 00 37 01 F9 01 6F 02 9C 02 DB 02 17 03 E5 02 42 02 83 01 07 01 A4 00 24 00 A8 FF 30 FF E0 FE 1F FE 14 FD 33 FC E0 FB EF FB 42 FC D1 FC C1 FD EC FE 01 00 AA 00 1D 01 AA 01 33 02 7A 02 9C 02 E5 02 22 03 F8 02 8E 02 04 02 72 01 B1 00 0F 00 E9 FF EB FF BC FF 69 FF 40 FF 19 FF FB FE F0 FE EF FE CA FE 65 FE 12 FE 24 FE 9F FE 29 FF 67 FF 8B FF D7 FF 50 00 9F 00 C6 00 EA 00 D0 00 91 00 42 00 33 00 59 00 72 00 77 00 92 00 DA 00 3F 01 52 01 12 01 88 00 0B 00 CD FF 78 FF FD FE B8 FE EC FE 3B FF 5F FF 67 FF 64 FF 61 FF 4F FF 37 FF 40 FF 44 FF 78 FF A2 FF D6 FF 53 00 3E 01 2F 02 B0 02 C4 02 B8 02 A7 02 56 02 E4 01 74 01 B8 00 E8 FF 4D FF DB FE 73 FE EA FD 70 FD 34 FD 0C FD DE FC 18 FD B5 FD 47 FE BC FE 21 FF C0 FF 6E 00 05 01 74 01 01 02 93 02 E3 02 D4 02 BA 02 BE 02 6D 02 C3 01 20 01 B8 00 2E 00 87 FF 21 FF 29 FF 29 FF EA FE 9A FE 9C FE AD FE 86 FE 54 FE 6D FE E4 FE 44 FF 61 FF 87 FF 00 00 80 00 90 00 94 00 D2 00 35 01 3E 01 04 01 DC 00 A6 00 38 00 D4 FF C5 FF 02 00 28 00 0D 00 DE FF 02 00 86 00 DC 00 BF 00 47 00 CD FF 55 FF EC FE EF FE 53 FF 96 FF 69 FF 48 FF 6B FF 87 FF 54 FF 19 FF 4E FF C6 FF FC FF 4A 00 BC 00 2A 01 3E 01 5C 01 F5 01 98 02 C5 02 8F 02 45 02 BB 01 CB 00 B6 FF B8 FE DF FD 22 FD DC FC FB FC 51 FD 83 FD 9C FD CE FD 41 FE F5 FE 8C FF DB FF 03 00 74 00 3A 01 04 02 80 02 AE 02 D8 02 DF 02 CE 02 7E 02 C5 01 C9 00 EE FF AB FF 99 FF 7D FF 70 FF 96 FF 95 FF 53 FF 02 FF DD FE C1 FE 68 FE 30 FE 5D FE B2 FE D0 FE D4 FE 20 FF DA FF 75 00 D3 00 F9 00 34 01 52 01 54 01 38 01 08 01 E4 00 9E 00 7D 00 65 00 54 00 4F 00 54 00 53 00 42 00 26 00 F9 FF C2 FF 99 FF 87 FF 96 FF 92 FF 71 FF 56 FF 59 FF 62 FF 4B FF DF FE A6 FE C7 FE 20 FF 69 FF 8A FF AA FF EE FF 4E 00 BD 00 48 01 E3 01 4F 02 6A 02 64 02 74 02 45 02 9E 01 C4 00 FA FF 25 FF 1A FE 43 FD E3 FC EE FC F5 FC 39 FD D1 FD 65 FE CB FE FF FE 47 FF E7 FF 9E 00 52 01 BB 01 FF 01 3E 02 6C 02 80 02 8D 02 94 02 44 02 B2 01 12 01 8C 00 12 00 8A FF 1C FF FA FE 09 FF 04 FF D8 FE 7B FE 1D FE 2E FE 8D FE 20 FF 5F FF 46 FF 17 FF 49 FF D5 FF 63 00 D5 00 2C 01 6E 01 66 01 08 01 B7 00 63 00 F8 FF 87 FF 3A FF 62 FF B7 FF 22 00 97 00 E7 00 F7 00 BB 00 6A 00 11 00 DA FF BA FF 93 FF 5A FF FE FE E0 FE F1 FE FB FE 12 FF 49 FF C2 FF 1D 00 0D 00 D0 FF DA FF 19 00 48 00 45 00 6F 00 E1 00 4F 01 A1 01 E4 01 22 02 27 02 CB 01 2D 01 83 00 E6 FF 46 FF A3 FE 45 FE 3E FE 51 FE 27 FE DF FD 9B FD 90 FD EA FD 94 FE 54 FF F8 FF 49 00 5D 00 84 00 CF 00 25 01 5D 01 8C 01 D2 01 F0 01 E2 01 A7 01 61 01 15 01 C1 00 9C 00 74 00 2C 00 BD FF 55 FF FB FE B1 FE 82 FE BA FE EC FE F4 FE D3 FE F0 FE 38 FF 66 FF 56 FF 43 FF 4E FF 8F FF D4 FF 26 00 9A 00 11 01 2A 01 F8 00 AC 00 5D 00 33 00 17 00 23 00 50 00 78 00 77 00 35 00 04 00 0D 00 38 00 4F 00 33 00 13 00 F0 FF C4 FF 52 FF CC FE 9E FE C4 FE 12 FF 5B FF 9A FF FC FF 5E 00 83 00 3D 00 D5 FF A9 FF B4 FF E8 FF 25 00 C1 00 5F 01 C6 01 AA 01 8A 01 70 01 20 01 CB 00 90 00 7D 00 1C 00 64 FF 84 FE CD FD 4D FD 1D FD 13 FD 3D FD 90 FD F6 FD 7D FE 48 FF 18 00 BC 00 06 01 55 01 88 01 B7 01 DF 01 1C 02 36 02 F0 01 96 01 33 01 E7 00 70 00 F6 FF 99 FF 73 FF 81 FF 8A FF 69 FF 2E FF E8 FE E5 FE 29 FF 92 FF C8 FF B9 FF 98 FF A0 FF A0 FF 75 FF 4C FF 55 FF 75 FF AE FF E4 FF 0D 00 26 00 54 00 85 00 E4 00 22 01 28 01 E2 00 85 00 60 00 4A 00 26 00 F4 FF BB FF C2 FF DC FF 0E 00 0F 00 CA FF 6F FF 3A FF 5B FF 5D FF 66 FF 75 FF B9 FF 2D 00 6A 00 74 00 5D 00 4C 00 4F 00 1F 00 F2 FF AC FF 6B FF 52 FF 70 FF EE FF 30 00 59 00 95 00 13 01 96 01 C8 01 AF 01 55 01 07 01 90 00 10 00 62 FF 8D FE F9 FD BD FD C3 FD E5 FD 04 FE 0F FE 5B FE E1 FE 61 FF C9 FF 42 00 EA 00 A2 01 24 02 7D 02 9A 02 38 02 75 01 D1 00 79 00 71 00 71 00 42 00 10 00 CF FF 8E FF 4B FF FA FE D6 FE EA FE 1C FF 58 FF A4 FF E2 FF E9 FF BF FF 85 FF 6C FF 5D FF 3F FF 55 FF A0 FF 18 00 8F 00 BD 00 B2 00 82 00 62 00 7D 00 C0 00 E4 00 CE 00 8A 00 5F 00 42 00 0D 00 E4 FF D2 FF D0 FF 02 00 3B 00 42 00 D5 FF 3E FF E9 FE F8 FE 4B FF 8C FF 8A FF 55 FF 69 FF D5 FF 47 00 56 00 24 00 03 00 EF FF B6 FF 92 FF B5 FF 0E 00 35 00 21 00 45 00 A4 00 EA 00 FC 00 3C 01 83 01 60 01 06 01 9E 00 54 00 F7 FF AE FF 97 FF 8A FF 37 FF BF FE 54 FE 48 FE 6F FE 95 FE BF FE 20 FF A7 FF 22 00 79 00 A1 00 BD 00 D4 00 E2 00 23 01 50 01 63 01 6E 01 76 01 63 01 0E 01 AB 00 8B 00 65 00 07 00 BC FF D4 FF 0F 00 CB FF 2C FF 97 FE 78 FE 83 FE 7C FE 96 FE F1 FE 5C FF 93 FF A2 FF B6 FF ED FF 31 00 81 00 D6 00 F1 00 DA 00 A4 00 85 00 3A 00 E1 FF A4 FF BB FF EF FF 22 00 65 00 90 00 B2 00 A4 00 A6 00 B8 00 88 00 24 00 AC FF 7F FF 9B FF D7 FF CB FF 88 FF 4B FF 1A FF 1E FF 50 FF 7F FF 93 FF AC FF F2 FF 38 00 4C 00 66 00 7C 00 80 00 80 00 82 00 98 00 9F 00 6D 00 3D 00 40 00 9D 00 DF 00 C6 00 6A 00 4F 00 5C 00 49 00 12 00 B1 FF 36 FF D7 FE A0 FE 9F FE 9B FE A8 FE A6 FE E5 FE 52 FF C7 FF 21 00 5B 00 B2 00 05 01 44 01 31 01 DF 00 8D 00 81 00 D8 00 1B 01 F1 00 74 00 1C 00 02 00 F7 FF ED FF D3 FF 9A FF 44 FF 2A FF 43 FF 7B FF 7F FF 44 FF 21 FF 42 FF 69 FF 91 FF C5 FF EF FF 04 00 F8 FF ED FF 08 00 1B 00 2E 00 65 00 BA 00 DF 00 C1 00 8A 00 95 00 B0 00 99 00 49 00 03 00 F6 FF 1D 00 14 00 ED FF CC FF B1 FF 9F FF 8A FF 73 FF 5A FF 57 FF 66 FF 70 FF 69 FF 7E FF B4 FF 0E 00 40 00 43 00 4A 00 5A 00 5F 00 42 00 3E 00 52 00 65 00 46 00 F7 FF F0 FF 22 00 58 00 65 00 7C 00 CF 00 1A 01 2D 01 20 01 02 01 AC 00 EB FF 41 FF D5 FE B6 FE 9E FE 6B FE 5E FE 97 FE FC FE 57 FF BD FF 20 00 33 00 0D 00 03 00 64 00 D0 00 D5 00 B2 00 8F 00 B7 00 EB 00 F6 00 DA 00 C6 00 9F 00 7B 00 58 00 2D 00 D4 FF 73 FF 69 FF A2 FF D3 FF DA FF B2 FF 9F FF 6C FF 2F FF EE FE BB FE A1 FE C9 FE 36 FF CB FF 44 00 8D 00 BC 00 D8 00 FC 00 0C 01 05 01 01 01 E2 00 AE 00 7C 00 51 00 06 00 8C FF 2B FF 1E FF 41 FF 55 FF 67 FF 7A FF 91 FF B6 FF E8 FF 31 00 54 00 2B 00 F7 FF F4 FF 0B 00 E5 FF A6 FF DC FF 42 00 68 00 36 00 01 00 03 00 DF FF 96 FF 91 FF CF FF 02 00 FB FF ED FF 1D 00 7E 00 E0 00 08 01 2E 01 42 01 39 01 09 01 CC 00 9C 00 4F 00 D4 FF 4A FF D3 FE 83 FE 7D FE B8 FE D6 FE 88 FE 12 FE 00 FE 60 FE EE FE 96 FF 42 00 C1 00 1B 01 70 01 F7 01 65 02 66 02 00 02 7F 01 4B 01 1E 01 AE 00 F5 FF 7D FF 4F FF 32 FF 1C FF 1E FF 4D FF 58 FF 39 FF 30 FF 50 FF 6B FF 59 FF 42 FF 5C FF 8D FF AD FF B9 FF C3 FF FC FF 56 00 A3 00 BD 00 B0 00 8B 00 7D 00 77 00 53 00 EF FF 92 FF 94 FF FA FF 65 00 7E 00 61 00 2F 00 06 00 D1 FF C1 FF D2 FF DC FF CD FF AC FF 99 FF AA FF CE FF D4 FF D0 FF C6 FF C3 FF 03 00 68 00 D2 00 CD 00 71 00 27 00 FD FF C9 FF 8E FF A2 FF D3 FF 04 00 45 00 A7 00 E0 00 C5 00 BB 00 D6 00 DA 00 9C 00 8A 00 A6 00 97 00 0E 00 53 FF DD FE A6 FE 74 FE 58 FE 71 FE A9 FE DB FE EC FE 05 FF 2D FF 6F FF C9 FF 79 00 3C 01 AC 01 C2 01 AA 01 91 01 55 01 BA 00 1D 00 D2 FF F2 FF 1A 00 17 00 04 00 01 00 F1 FF BD FF AF FF F3 FF 35 00 2B 00 F7 FF C6 FF AC FF 91 FF 6E FF 76 FF 8A FF 8B FF 85 FF 7C FF 8F FF 82 FF 75 FF 94 FF 0E 00 82 00 C1 00 F4 00 32 01 50 01 00 01 89 00 2D 00 E1 FF AE FF B6 FF E7 FF 29 00 21 00 F2 FF A2 FF 53 FF 14 FF 23 FF 7C FF C8 FF CB FF AC FF BE FF F2 FF 1E 00 21 00 39 00 72 00 D4 00 0F 01 12 01 C3 00 48 00 DE FF B0 FF 9E FF 9D FF B2 FF D9 FF 0F 00 34 00 35 00 20 00 15 00 18 00 28 00 4A 00 5D 00 65 00 36 00 CB FF 5C FF 15 FF 06 FF 00 FF EF FE 00 FF 53 FF A2 FF B2 FF A8 FF ED FF 46 00 7A 00 81 00 A3 00 F7 00 3E 01 5C 01 62 01 3B 01 F9 00 9E 00 53 00 0F 00 CA FF B4 FF BF FF AF FF 80 FF 63 FF 9C FF 05 00 44 00 30 00 E9 FF 75 FF 4F FF 64 FF 7D FF 5C FF 2D FF 2F FF 71 FF BE FF E4 FF 14 00 26 00 46 00 5E 00 78 00 95 00 A3 00 8D 00 58 00 18 00 27 00 72 00 C9 00 DF 00 A3 00 4B 00 F7 FF 9C FF 5A FF 34 FF 15 FF F6 FE F0 FE 32 FF A3 FF 12 00 67 00 CC 00 0F 01 17 01 DC 00 AE 00 7E 00 19 00 7B FF 01 FF EC FE 0A FF 21 FF 3E FF 86 FF E0 FF 14 00 56 00 A6 00 0C 01 64 01 93 01 68 01 0E 01 C7 00 A4 00 63 00 F9 FF 7D FF 09 FF AC FE 67 FE 2C FE 04 FE E9 FD 1D FE 89 FE 17 FF 8A FF FE FF A1 00 43 01 9A 01 B0 01 E1 01 1B 02 FF 01 82 01 FD 00 CB 00 A1 00 40 00 B6 FF 2A FF E5 FE E9 FE 30 FF 68 FF B1 FF E0 FF DD FF 9C FF 64 FF 4D FF 43 FF 1C FF 08 FF 5D FF F3 FF 83 00 AE 00 85 00 5B 00 4A 00 36 00 19 00 EB FF C5 FF A7 FF E6 FF 3D 00 68 00 43 00 3F 00 7E 00 D1 00 EF 00 CC 00 9A 00 5A 00 09 00 BE FF 74 FF 62 FF 8B FF CE FF D9 FF CD FF C8 FF B3 FF 89 FF 5D FF 2E FF 07 FF EC FE 08 FF 58 FF B2 FF F8 FF 45 00 9B 00 D1 00 EE 00 18 01 62 01 B7 01 C3 01 8F 01 3A 01 10 01 E9 00 BC 00 69 00 15 00 9E FF 0C FF 76 FE 0B FE E3 FD C9 FD EB FD 13 FE 4F FE 92 FE EE FE 72 FF F8 FF 7B 00 03 01 9E 01 F5 01 F5 01 B1 01 53 01 0B 01 C9 00 95 00 85 00 7E 00 63 00 2D 00 06 00 E6 FF B8 FF 91 FF 4C FF 20 FF E9 FE BF FE C7 FE D6 FE F7 FE 19 FF 61 FF DE FF 3B 00 5B 00 6B 00 AB 00 DB 00 DD 00 92 00 30 00 01 00 FF FF 04 00 FF FF F6 FF 26 00 71 00 D2 00 24 01 52 01 48 01 05 01 8D 00 27 00 D6 FF B6 FF 9D FF 86 FF 69 FF 4A FF 19 FF DB FE A9 FE 90 FE 8F FE AE FE ED FE 49 FF A3 FF D9 FF 03 00 59 00 EA 00 57 01 9E 01 BE 01 E4 01 E6 01 CC 01 93 01 55 01 DE 00 44 00 B1 FF 71 FF 50 FF 1E FF AC FE 25 FE B6 FD 89 FD B8 FD 02 FE 6C FE E2 FE 7A FF 32 00 B2 00 FB 00 21 01 58 01 81 01 8E 01 62 01 20 01 EA 00 D0 00 DB 00 E3 00 CA 00 B1 00 9F 00 6C 00 1D 00 C3 FF 83 FF 41 FF 30 FF 36 FF 42 FF 23 FF DF FE AE FE C5 FE F4 FE 1B FF 39 FF 73 FF CA FF 0D 00 30 00 50 00 74 00 7D 00 7E 00 94 00 E5 00 43 01 64 01 49 01 11 01 E6 00 B8 00 98 00 66 00 48 00 0F 00 A5 FF 4B FF 0D FF F4 FE E9 FE DC FE E2 FE E7 FE F1 FE 03 FF 2C FF 55 FF 73 FF 71 FF 5E FF 57 FF 99 FF 23 00 A7 00 F0 00 34 01 8E 01 EC 01 08 02 E2 01 B7 01 99 01 8F 01 64 01 0D 01 74 00 9E FF DF FE 6E FE 3D FE F0 FD A6 FD 89 FD C3 FD 18 FE 7B FE DD FE 48 FF D7 FF 8A 00 1F 01 71 01 7A 01 7A 01 48 01 1B 01 39 01 2A 01 24 01 E8 00 BF 00 9E 00 7B 00 26 00 BC FF 89 FF 63 FF 48 FF 6B FF 79 FF 4D FF 23 FF 1E FF 27 FF 57 FF 64 FF 54 FF B1 FF 1A 00 E4 FF 85 FF 71 FF 70 FF 69 FF 97 FF F7 FF 44 00 A4 00 02 01 3B 01 67 01 7F 01 5D 01 27 01 F4 00 96 00 56 00 59 00 4A 00 F2 FF 66 FF FE FE D2 FE CE FE E3 FE 23 FF 46 FF 4C FF 45 FF 2B FF 3A FF 16 FF 0D FF 54 FF C6 FF 2C 00 95 00 F9 00 2D 01 7F 01 B2 01 D1 01 DB 01 B9 01 63 01 02 01 AD 00 56 00 D4 FF 35 FF BB FE 75 FE 54 FE 51 FE 47 FE 5D FE 94 FE C8 FE F6 FE 14 FF 5F FF CF FF 40 00 AE 00 F6 00 1E 01 2F 01 41 01 44 01 2F 01 F1 00 C4 00 9A 00 66 00 54 00 63 00 72 00 65 00 4E 00 17 00 D0 FF 7D FF 4D FF 21 FF FF FE D0 FE 90 FE 79 FE B2 FE 03 FF 55 FF C6 FF 47 00 82 00 64 00 49 00 71 00 A4 00 AD 00 91 00 74 00 60 00 78 00 9F 00 9F 00 85 00 8B 00 A9 00 BC 00 7E 00 13 00 AF FF 71 FF 58 FF 4B FF 47 FF 47 FF 31 FF 26 FF 2F FF 46 FF 60 FF 83 FF 69 FF 59 FF 3E FF 58 FF A7 FF 0B 00 AE 00 87 01 45 02 92 02 65 02 23 02 E9 01 B7 01 54 01 CE 00 15 00 5A FF AF FE 2D FE B1 FD 55 FD 4C FD 93 FD 09 FE 8A FE F3 FE 38 FF 5C FF 9C FF 09 00 6F 00 A6 00 F9 00 83 01 EA 01 E3 01 A5 01 76 01 29 01 B5 00 53 00 24 00 FA FF AD FF 74 FF 61 FF 58 FF 35 FF 3D FF 70 FF AE FF D5 FF C2 FF D5 FF EB FF DF FF 9D FF 70 FF 6F FF 7B FF 73 FF 9F FF D3 FF 15 00 36 00 5B 00 A1 00 CC 00 DB 00 B7 00 A2 00 8A 00 9E 00 BA 00 D8 00 D6 00 9C 00 4A 00 2F 00 0D 00 CB FF 80 FF 66 FF 37 FF E6 FE BC FE 02 FF 69 FF 9B FF 5B FF 38 FF 37 FF AA FF 0E 00 4C 00 58 00 84 00 EA 00 43 01 69 01 73 01 8F 01 7D 01 46 01 ED 00 80 00 09 00 A6 FF 6A FF 3C FF DB FE 76 FE 46 FE 66 FE 8E FE 87 FE 9F FE EE FE 7A FF 06 00 71 00 DD 00 FC 00 F1 00 C5 00 E4 00 5A 01 B1 01 B9 01 60 01 02 01 A1 00 56 00 21 00 06 00 F5 FF DF FF 98 FF 53 FF 28 FF 00 FF D6 FE A9 FE C6 FE 2F FF 88 FF AB FF BF FF E6 FF FD FF 06 00 1A 00 60 00 A9 00 A4 00 81 00 6F 00 90 00 A3 00 5E 00 1A 00 1C 00 2C 00 15 00 F9 FF F4 FF 22 00 50 00 65 00 3F 00 C9 FF 66 FF 76 FF 99 FF AC FF 7F FF 52 FF 41 FF 35 FF 2D FF 32 FF 1E FF 25 FF 5D FF A9 FF 25 00 8A 00 0E 01 94 01 E3 01 F0 01 CF 01 CD 01 CB 01 96 01 17 01 72 00 D6 FF 22 FF 9F FE 3E FE 36 FE 39 FE 1E FE 09 FE 4F FE CA FE 35 FF 75 FF BE FF 1D 00 7D 00 B3 00 C2 00 B7 00 BD 00 FE 00 57 01 A3 01 B0 01 5F 01 F8 00 88 00 15 00 B0 FF 78 FF 76 FF 85 FF 6B FF 3F FF 28 FF 0E FF 0D FF 27 FF 5D FF 7B FF 7B FF 94 FF C8 FF EB FF 09 00 0D 00 0F 00 FD FF 06 00 1E 00 52 00 8B 00 B8 00 A2 00 5E 00 3A 00 49 00 81 00 9F 00 A3 00 A4 00 8E 00 52 00 E1 FF 73 FF 68 FF A9 FF C6 FF 9E FF 60 FF 50 FF 4E FF 3E FF 2B FF 40 FF 34 FF 35 FF 65 FF ED FF 6C 00 AF 00 F6 00 57 01 85 01 88 01 82 01 9A 01 80 01 F3 00 2F 00 9E FF 53 FF 22 FF CB FE 8A FE 9F FE A6 FE 84 FE 67 FE 95 FE D4 FE 0A FF 7A FF 3D 00 C3 00 ED 00 ED 00 03 01 DE 00 A2 00 8D 00 BC 00 BD 00 89 00 86 00 A9 00 DB 00 BF 00 8B 00 78 00 6B 00 35 00 FA FF F4 FF D7 FF 6F FF D5 FE 60 FE 3D FE 12 FE 3D FE C3 FE 73 FF E2 FF 0E 00 40 00 68 00 78 00 86 00 AF 00 EB 00 FB 00 DB 00 A2 00 63 00 25 00 FC FF FC FF 15 00 29 00 43 00 42 00 34 00 EB FF 8A FF 49 FF 41 FF 66 FF 87 FF 9F FF D1 FF F0 FF CA FF 87 FF 82 FF 96 FF 96 FF 91 FF B9 FF 16 00 68 00 AF 00 EB 00 07 01 38 01 7F 01 D4 01 DD 01 76 01 D6 00 52 00 E6 FF 52 FF C3 FE 6C FE 62 FE 6F FE 51 FE 47 FE 65 FE BC FE 19 FF 72 FF CF FF 30 00 59 00 63 00 79 00 94 00 D0 00 13 01 4D 01 5F 01 49 01 33 01 33 01 01 01 9E 00 FD FF 8C FF 53 FF 28 FF 0F FF 20 FF 3C FF 34 FF 39 FF 67 FF B5 FF D8 FF D8 FF D5 FF CE FF CE FF CA FF E9 FF 0E 00 2E 00 37 00 42 00 5E 00 60 00 50 00 31 00 26 00 2A 00 4A 00 59 00 6E 00 7C 00 8C 00 8F 00 5D 00 17 00 F3 FF F2 FF EB FF B9 FF 80 FF 65 FF 4B FF 11 FF 00 FF 11 FF 5C FF 93 FF AB FF B1 FF E0 FF 24 00 67 00 BC 00 26 01 8D 01 A5 01 8F 01 5D 01 FB 00 79 00 FA FF A7 FF 6C FF 1B FF C1 FE 74 FE 56 FE 5E FE 6F FE 9F FE CD FE F3 FE 2F FF A3 FF 36 00 AB 00 FF 00 3C 01 75 01 46 01 F1 00 BB 00 A1 00 99 00 8E 00 9C 00 AA 00 7C 00 4E 00 4B 00 4F 00 40 00 01 00 C3 FF C0 FF B1 FF 6F FF 17 FF E5 FE F8 FE F7 FE F1 FE 1C FF 5D FF 98 FF C4 FF F1 FF E1 FF BB FF C5 FF 1E 00 B9 00 1E 01 4E 01 55 01 25 01 F3 00 C6 00 A1 00 83 00 5B 00 3C 00 42 00 21 00 BE FF 3A FF FD FE 12 FF 3A FF 64 FF 7D FF 93 FF 5F FF 34 FF 5F FF A2 FF D5 FF D2 FF 03 00 46 00 70 00 7B 00 98 00 D1 00 0C 01 3A 01 5D 01 6F 01 76 01 5C 01 19 01 9B 00 18 00 8E FF 03 FF 94 FE 61 FE 72 FE A9 FE C7 FE C6 FE A8 FE A8 FE 0A FF AA FF 30 00 7C 00 A6 00 B8 00 AE 00 B3 00 C9 00 F6 00 05 01 15 01 4D 01 5C 01 0D 01 B3 00 85 00 62 00 FD FF 69 FF 11 FF 00 FF 17 FF 22 FF 3A FF 55 FF 6B FF 62 FF 63 FF 99 FF D6 FF 00 00 21 00 50 00 6B 00 58 00 3E 00 4A 00 47 00 28 00 15 00 3C 00 59 00 4E 00 3F 00 5B 00 88 00 AA 00 9D 00 93 00 98 00 74 00 12 00 B0 FF A4 FF B1 FF 9F FF 47 FF 00 FF F7 FE 06 FF 37 FF 70 FF 89 FF 79 FF 66 FF 99 FF 1B 00 83 00 CF 00 0E 01 85 01 D5 01 ED 01 DD 01 B9 01 47 01 A8 00 2D 00 BB FF 3B FF 9F FE 4A FE 3A FE 49 FE 5C FE 7A FE A8 FE DE FE FC FE 28 FF 9D FF 3A 00 8F 00 A3 00 D1 00 57 01 A0 01 8E 01 4E 01 14 01 CC 00 7E 00 6A 00 76 00 4A 00 0B 00 F5 FF 0B 00 04 00 CC FF 86 FF 5E FF 5C FF 4C FF 4B FF 60 FF 64 FF 30 FF F7 FE 28 FF 78 FF A8 FF B3 FF E7 FF 30 00 5C 00 50 00 4E 00 5F 00 80 00 97 00 7C 00 5B 00 3B 00 2D 00 51 00 77 00 70 00 35 00 17 00 4E 00 66 00 3C 00 FD FF ED FF CE FF 7A FF 21 FF FC FE 20 FF 23 FF FC FE E7 FE 11 FF 61 FF A5 FF D1 FF F4 FF 09 00 19 00 49 00 B9 00 2D 01 9B 01 EB 01 33 02 49 02 02 02 96 01 FD 00 60 00 A2 FF C2 FE 33 FE FC FD ED FD DB FD DF FD 0D FE 66 FE D1 FE 57 FF ED FF 6B 00 AC 00 C7 00 C7 00 DB 00 DF 00 E1 00 F5 00 16 01 34 01 2B 01 EB 00 9A 00 23 00 CF FF A8 FF 99 FF 73 FF 57 FF 44 FF 61 FF 7F FF 84 FF 7B FF 73 FF 8B FF A0 FF A7 FF 98 FF 92 FF A2 FF DE FF 38 00 6A 00 6B 00 45 00 33 00 35 00 3D 00 3D 00 34 00 0D 00 11 00 40 00 88 00 9A 00 8F 00 74 00 67 00 54 00 35 00 47 00 40 00 2F 00 E0 FF AB FF A0 FF 9B FF 65 FF 44 FF 41 FF 7A FF 83 FF 50 FF 2C FF 41 FF 8B FF E4 FF 33 00 8B 00 EE 00 20 01 37 01 69 01 8A 01 74 01 3A 01 EF 00 9F 00 1A 00 9C FF 3C FF DF FE 73 FE 27 FE 21 FE 34 FE 39 FE 3D FE 92 FE 4C FF 07 00 7B 00 CB 00 2D 01 77 01 7A 01 58 01 3A 01 FF 00 9C 00 6C 00 77 00 88 00 61 00 3B 00 4D 00 49 00 01 00 A4 FF 82 FF 8C FF 84 FF 78 FF 73 FF 83 FF 6F FF 41 FF 36 FF 7B FF B6 FF D2 FF EE FF 01 00 EF FF D1 FF F3 FF 3E 00 80 00 98 00 97 00 99 00 92 00 87 00 7A 00 88 00 82 00 43 00 FA FF D8 FF F0 FF 15 00 27 00 20 00 0E 00 F0 FF ED FF CB FF A4 FF 76 FF 5B FF 4D FF 5C FF A4 FF E2 FF DC FF AE FF A2 FF 98 FF AD FF DB FF 24 00 80 00 C2 00 1E 01 89 01 BB 01 94 01 46 01 25 01 15 01 F8 00 AD 00 37 00 B1 FF 12 FF 9B FE 3A FE 0F FE 13 FE 4A FE 94 FE CA FE 07 FF 4D FF A7 FF 25 00 9C 00 F7 00 32 01 5F 01 78 01 76 01 64 01 36 01 D6 00 5D 00 F5 FF D1 FF CD FF CA FF BF FF A2 FF 7F FF 5B FF 61 FF 7F FF A3 FF A9 FF 9F FF A4 FF B5 FF C9 FF CB FF DA FF F6 FF 13 00 21 00 33 00 3A 00 31 00 17 00 05 00 09 00 33 00 57 00 57 00 24 00 FC FF E0 FF DD FF DB FF E0 FF E1 FF FD FF 32 00 74 00 AB 00 BE 00 93 00 55 00 09 00 DB FF 9B FF 44 FF 03 FF FE FE 1B FF 20 FF 3E FF 61 FF 8E FF BC FF 01 00 62 00 B0 00 D5 00 D6 00 BF 00 E9 00 2A 01 41 01 28 01 FE 00 DA 00 A8 00 63 00 10 00 7F FF D3 FE 44 FE 1D FE 36 FE 62 FE 94 FE EB FE 68 FF CB FF 07 00 18 00 16 00 38 00 7F 00 D8 00 F3 00 DD 00 CB 00 CE 00 D1 00 B5 00 96 00 6E 00 36 00 22 00 36 00 26 00 F1 FF A9 FF 92 FF AC FF A7 FF 96 FF 9A FF AD FF D0 FF C7 FF AF FF A5 FF A1 FF 8D FF 9D FF CB FF F4 FF 00 00 31 00 7E 00 97 00 6E 00 35 00 24 00 26 00 2E 00 1B 00 FF FF DE FF B7 FF C0 FF DC FF D4 FF CB FF DA FF 00 00 37 00 44 00 3C 00 17 00 D4 FF 87 FF 35 FF 14 FF 21 FF 37 FF 32 FF 5A FF A5 FF 06 00 44 00 6F 00 AE 00 CF 00 A4 00 68 00 40 00 5D 00 88 00 B5 00 E2 00 EB 00 DC 00 E0 00 DB 00 AA 00 44 00 B1 FF 22 FF AD FE 5B FE 40 FE 58 FE 8F FE B2 FE D2 FE 08 FF 75 FF 02 00 58 00 6C 00 5D 00 72 00 BF 00 DA 00 BD 00 7F 00 58 00 40 00 35 00 3B 00 31 00 0C 00 C6 FF C7 FF 01 00 0F 00 1A 00 15 00 37 00 61 00 6D 00 56 00 1D 00 CF FF 99 FF 6C FF 42 FF 30 FF 2D FF 4B FF A2 FF DF FF FE FF DE FF C4 FF D8 FF 16 00 4C 00 85 00 96 00 A1 00 99 00 88 00 81 00 6A 00 45 00 35 00 43 00 5E 00 65 00 36 00 F0 FF CB FF 99 FF 5E FF 2D FF 22 FF 37 FF 4E FF 64 FF 91 FF B7 FF D2 FF E1 FF 09 00 26 00 2F 00 0C 00 E7 FF C8 FF A2 FF 9D FF C8 FF FC FF 3E 00 82 00 D6 00 30 01 58 01 5C 01 53 01 33 01 EC 00 7A 00 DF FF 47 FF D5 FE 86 FE 5C FE 53 FE 73 FE 9F FE EC FE 33 FF 75 FF 9C FF E1 FF 3A 00 96 00 BD 00 BE 00 B7 00 A3 00 A1 00 99 00 A9 00 B1 00 94 00 61 00 4E 00 50 00 59 00 25 00 EE FF DF FF F9 FF 06 00 20 00 13 00 E0 FF 91 FF 57 FF 44 FF 49 FF 46 FF 46 FF 55 FF 7F FF A2 FF C6 FF F6 FF 3B 00 78 00 9E 00 9F 00 74 00 4F 00 32 00 45 00 56 00 50 00 42 00 30 00 2B 00 0B 00 ED FF DE FF CB FF BF FF 9E FF A4 FF E1 FF 14 00 FF FF C8 FF AC FF BC FF C0 FF D0 FF E8 FF 0C 00 1C 00 25 00 21 00 18 00 DC FF A2 FF 96 FF C1 FF F3 FF 1A 00 49 00 8F 00 D0 00 E9 00 FE 00 2E 01 35 01 0E 01 B3 00 52 00 FF FF A2 FF 35 FF FD FE DB FE BE FE 8F FE 5F FE 6E FE A6 FE EA FE 2A FF 64 FF B4 FF 1D 00 94 00 00 01 3E 01 75 01 93 01 89 01 6B 01 33 01 F3 00 B2 00 61 00 1D 00 FB FF F0 FF F2 FF 0D 00 04 00 DF FF 86 FF 2D FF 11 FF 0C FF 0D FF F9 FE 30 FF 8A FF D9 FF 1A 00 3F 00 52 00 5A 00 46 00 40 00 4F 00 4F 00 39 00 20 00 12 00 2C 00 44 00 4B 00 6D 00 76 00 74 00 6B 00 5D 00 68 00 5D 00 30 00 F2 FF B2 FF 8A FF 80 FF 77 FF 76 FF 7B FF 8E FF 7A FF 6D FF 5D FF 7B FF 9A FF CB FF 12 00 58 00 9D 00 C9 00 CA 00 C1 00 9E 00 93 00 79 00 42 00 13 00 0E 00 27 00 45 00 4B 00 65 00 90 00 A6 00 A3 00 7F 00 49 00 FB FF 9E FF 2E FF C2 FE 75 FE 53 FE 69 FE A4 FE DF FE 1B FF 69 FF D3 FF 36 00 9A 00 00 01 3A 01 49 01 45 01 1F 01 14 01 F9 00 E7 00 D9 00 B7 00 92 00 81 00 51 00 1A 00 C0 FF 69 FF 24 FF FB FE F9 FE 38 FF 75 FF AD FF B3 FF B5 FF AF FF AA FF B9 FF CF FF DD FF D5 FF E9 FF 05 00 FC FF CD FF B7 FF E0 FF 3B 00 9C 00 F7 00 21 01 1E 01 E2 00 9E 00 5A 00 1C 00 E9 FF CE FF E6 FF FF FF 18 00 34 00 2A 00 F7 FF A0 FF 5B FF 37 FF 24 FF 25 FF 42 FF 66 FF 99 FF C6 FF 03 00 4C 00 7A 00 B1 00 E0 00 02 01 F7 00 A8 00 31 00 F9 FF D2 FF AD FF 83 FF 70 FF AE FF F6 FF 35 00 3F 00 2E 00 18 00 F5 FF E0 FF F8 FF 03 00 E5 FF C7 FF B5 FF A6 FF 87 FF 62 FF 54 FF 67 FF 7B FF AA FF C2 FF D6 FF E8 FF F7 FF 30 00 6F 00 C0 00 E4 00 21 01 1E 01 08 01 C6 00 7A 00 74 00 5B 00 52 00 34 00 07 00 D5 FF AD FF D9 FF FB FF EE FF F1 FF E8 FF D8 FF BB FF 89 FF 66 FF 43 FF 39 FF 42 FF 35 FF 57 FF A5 FF 00 00 7C 00 B7 00 08 01 EF 00 A6 00 5D 00 26 00 27 00 1A 00 06 00 ED FF C4 FF B7 FF B9 FF E4 FF F6 FF FC FF 16 00 21 00 28 00 1B 00 F0 FF BF FF 89 FF 6E FF 71 FF 97 FF D9 FF 33 00 A8 00 E2 00 EA 00 BA 00 4A 00 1A 00 FF FF 02 00 F9 FF E1 FF C3 FF 8A FF 7F FF 8A FF C0 FF 01 00 1D 00 2A 00 38 00 5E 00 86 00 7D 00 67 00 53 00 53 00 2D 00 08 00 E1 FF B2 FF 7A FF 62 FF 4F FF 31 FF 0B FF 02 FF 2B FF 5D FF A2 FF 00 00 65 00 B2 00 D0 00 D3 00 D3 00 D8 00 BA 00 9B 00 64 00 22 00 FA FF E9 FF FB FF 04 00 FB FF ED FF C1 FF 9C FF 78 FF 89 FF B7 FF CD FF D1 FF AC FF 9B FF 89 FF 97 FF CA FF 0E 00 5D 00 6E 00 6E 00 67 00 5E 00 45 00 17 00 00 00 FC FF 12 00 39 00 54 00 4E 00 2D 00 15 00 18 00 28 00 28 00 21 00 16 00 22 00 13 00 ED FF CA FF DE FF F2 FF F9 FF F1 FF E7 FF D6 FF B4 FF A1 FF 9E FF A5 FF BB FF FA FF 3C 00 67 00 68 00 5B 00 58 00 59 00 54 00 3A 00 31 00 1A 00 10 00 F7 FF F2 FF F5 FF 00 00 17 00 47 00 67 00 60 00 36 00 FA FF C1 FF 94 FF 7D FF 68 FF 44 FF 1C FF 17 FF 4E FF AC FF F6 FF 03 00 01 00 10 00 36 00 60 00 7B 00 9A 00 B0 00 B1 00 9D 00 71 00 4A 00 19 00 09 00 04 00 F2 FF CF FF AF FF A8 FF 9C FF 91 FF 8A FF 91 FF BD FF E9 FF 0C 00 22 00 1A 00 E9 FF AC FF 6B FF 57 FF 55 FF 81 FF BB FF EA FF 10 00 3D 00 63 00 82 00 77 00 6A 00 49 00 2E 00 24 00 1A 00 1A 00 13 00 FC FF DE FF DA FF F6 FF 18 00 12 00 EA FF B7 FF 95 FF 7A FF 7E FF 8D FF 9C FF BB FF DE FF 13 00 43 00 5D 00 74 00 7B 00 80 00 6D 00 41 00 13 00 F4 FF BA FF 8E FF 80 FF B0 FF E4 FF 0F 00 24 00 24 00 15 00 EE FF D9 FF F2 FF 19 00 3A 00 46 00 44 00 33 00 01 00 C1 FF 8E FF 6E FF 45 FF 20 FF 05 FF 16 FF 39 FF 6B FF 7A FF 8A FF B6 FF 0A 00 6F 00 BD 00 F5 00 02 01 E0 00 A0 00 6A 00 43 00 30 00 3C 00 2F 00 1F 00 15 00 25 00 28 00 2E 00 18 00 0B 00 F1 FF C1 FF 85 FF 5E FF 34 FF 28 FF 2D FF 4B FF 71 FF 98 FF DA FF 21 00 58 00 5E 00 6A 00 71 00 7D 00 67 00 38 00 04 00 E8 FF D5 FF B9 FF AD FF AA FF C5 FF D0 FF D0 FF C6 FF C0 FF E1 FF 03 00 13 00 FD FF E7 FF E6 FF 16 00 3A 00 63 00 61 00 4C 00 10 00 CB FF AA FF 9F FF A5 FF AA FF BF FF D5 FF DB FF DB FF E5 FF 01 00 1D 00 45 00 74 00 AC 00 D8 00 D7 00 AB 00 8F 00 72 00 64 00 41 00 32 00 30 00 22 00 F0 FF A1 FF 40 FF E2 FE 90 FE 6A FE 85 FE BD FE 05 FF 66 FF D3 FF 24 00 6C 00 A3 00 D8 00 FE 00 17 01 11 01 F0 00 B5 00 6D 00 2B 00 FB FF F7 FF F8 FF 06 00 FB FF F6 FF 08 00 15 00 FF FF D5 FF A7 FF 7F FF 62 FF 4D FF 71 FF BE FF 03 00 17 00 FD FF F8 FF 16 00 3F 00 3B 00 29 00 08 00 EB FF D9 FF D7 FF E3 FF 06 00 22 00 43 00 6B 00 83 00 74 00 69 00 67 00 6A 00 42 00 FF FF CB FF C5 FF C1 FF AA FF 9E FF 94 FF AC FF B0 FF BB FF C1 FF BD FF A2 FF 99 FF AA FF DA FF 0C 00 38 00 5F 00 77 00 8C 00 95 00 98 00 85 00 7B 00 4C 00 30 00 31 00 4F 00 76 00 8B 00 72 00 55 00 1B 00 DC FF 9F FF 7D FF 40 FF 0D FF DD FE D6 FE D1 FE FF FE 3F FF 94 FF E3 FF 28 00 73 00 BA 00 EA 00 E5 00 E6 00 EB 00 DC 00 AE 00 79 00 5A 00 61 00 5D 00 4B 00 26 00 0E 00 FD FF E1 FF C8 FF AD FF 97 FF 81 FF 7A FF 86 FF A6 FF C4 FF D5 FF D8 FF D2 FF C1 FF B6 FF BC FF C8 FF DB FF E6 FF EE FF 17 00 1A 00 2B 00 35 00 3D 00 68 00 90 00 B3 00 C3 00 CE 00 AC 00 41 00 0F 00 E3 FF EE FF D9 FF BE FF C8 FF D1 FF B0 FF B1 FF 9F FF 8F FF 76 FF 3F FF 93 FF CE FF DD FF EB FF 3F 00 5E 00 4F 00 4E 00 7F 00 84 00 97 00 72 00 B2 00 BE 00 83 00 37 00 40 00 85 00 41 00 EB FF E4 FF FD FF DC FF 98 FF 5D FF 5A FF 62 FF 2C FF 1C FF 26 FF 84 FF AB FF D4 FF C8 FF A7 FF 17 00 95 00 90 00 63 00 9E 00 A4 00 9B 00 66 00 7C 00 EC 00 E6 00 6D 00 04 00 29 00 56 00 66 00 C3 FF 8F FF C8 FF D9 FF F6 FF D0 FF 81 FF
2、声音播放
关键点有3:第一是接收的数据是byte型,恢复为short型。第二是sounddevice播放声音。第三是播放时候需要做归一化。
# -*- coding:utf-8 -*-
from scipy import signal
import numpy as np
import matplotlib.pyplot  as plt

import matplotlib
myfont = matplotlib.font_manager.FontProperties(fname='C:\Windows\Fonts\simsun.ttc')

filename = r'16khz采样1.txt'
filepath = r'C:\Users\pwplu\Music'

f = open(filepath + '\\' + filename)
if 0:  # 这是ascii保存的数据格式
    line = f.read()
    data = [l.split(' ')[-1] for l in line.split('\n') if l]
    data = [int(x) for x in data]
else: # 这是HEX保存的数据格式
    line = f.read()[:-1]
    print("buffer count", len(line))
    data0 = np.array([int(x, base=16) for x in line.split(' ')])
    data_1 = data0[0:len(data0):2]
    data_2 = data0[1:len(data0):2]
    data3 = data_2 * 256 + data_1
    # data = np.frombuffer(data3, dtype=np.int16)
data = data3.astype(np.int16)

filename2 = filename + "_ascii.TXT"
f=open(filepath + '\\' + filename2, 'w')
np.savetxt(f, data, fmt="%i", newline='\n')

import sounddevice as sd
fs = 16000
src = data
sd.play(1*src/np.max(src), fs, blocking=True)
3、滤波器和FFT频谱
数据源是上一节读取的data。使用高通滤波器滤波,然后对比滤波前后的频谱。
关键点是信号处理,滤波器的带宽选择,需要根据应用场景来实验后定。频谱显示只是为了直观反映处理结果。
在PC上作分析的目的是找到合适的算法,快速验证算法,搭建testbench反复测试,然后使用ST的math库实现信号检测。
fc1 = 6000
fc2 = 0
wn1 = 2.0 * fc1 / fs
b, a = signal.butter(8, wn1, 'highpass')  # 配置滤波器 8 表示滤波器的阶数
filtedData = signal.filtfilt(b, a, data)  # data为要过滤的信号
filter_type = "高通 " + str(fc1) + "hz"

n = len(filtedData) # length of the signal
k = np.arange(n)
T = n/fs
frq = k/T # two sides frequency range
frq1 = frq[range(int(n/2))] # one side frequency range

# calc FFT, raw data and filter data
Y_raw = np.fft.fft(data)/n # fft computing and normalization 归一化
Y1_raw = Y_raw[range(int(n/2))] # fft computing and normalization 归一化
Y_filter = np.fft.fft(filtedData)/n # fft computing and normalization 归一化
Y1_filter = Y_filter[range(int(n/2))]
fig, ax = plt.subplots(4, 1)

ax[0].set_title("滤波-"+ filter_type + " " + filename.replace(".TXT", "") , fontproperties = myfont)
ax[0].plot(k, data, 'R', label = "raw data") # plotting the spectrum
ax[0].set_xlabel('time')
ax[0].set_ylabel('|raw Mag|')
ax[0].legend()
ax[0].legend(loc='upper right')

ax[1].plot(k, filtedData, 'R', label = "filter data") # plotting the spectrum
ax[1].set_xlabel('time')
ax[1].set_ylabel('|filter Mag|')
ax[1].legend()
ax[1].legend(loc='upper right')

Y1_raw = Y1_raw[1:n//2]
ax[2].plot(frq1[1:n//2], abs(Y1_raw),'G', label = "raw fft") # plotting the spectrum
ax[2].set_xlabel('Y1_raw Freq (Hz)')
ax[2].set_ylabel('|raw Y(freq)|')
ax[2].legend()
ax[2].legend(loc='upper right')

Y1_filter = Y1_filter[1:n//2]
ax[3].plot(frq1[1:n//2], abs(Y1_filter),'G', label = "filter fft") # plotting the spectrum
ax[3].set_xlabel('Freq (Hz)')
ax[3].set_ylabel('|filter Y(freq)|')
ax[3].legend()
ax[3].legend(loc='upper right')

plt.legend()
plt.show()
print('finished')
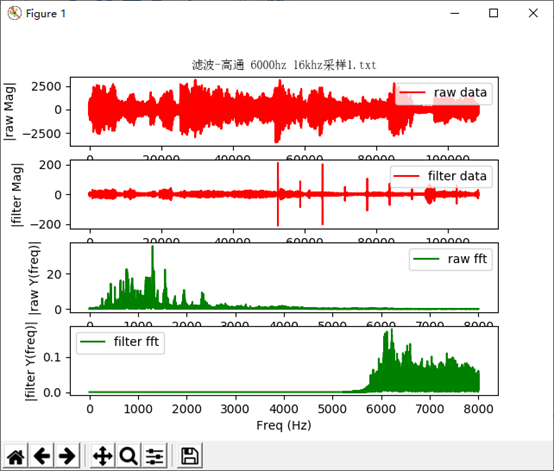
参考文档:
1、Probing PDM: MP45DT02 and STM32F407
https://www.theunterminatedstring.com/probing-pdm/
数字麦克风PDM信号采集与STM32 I2S接口应用--笔记目录:
数字麦克风PDM信号采集与STM32 I2S接口应用(一)
https://www.cnblogs.com/pingwen/p/11298675.html
数字麦克风PDM信号采集与STM32 I2S接口应用(二)
https://www.cnblogs.com/pingwen/p/11301935.html
数字麦克风PDM信号采集与STM32 I2S接口应用(三)
https://www.cnblogs.com/pingwen/p/11794081.html
数字麦克风PDM转PCM与STM32 I2S接口应用----重要文档列表
https://www.cnblogs.com/pingwen/p/11302452.html
数字麦克风PDM信号采集与STM32 I2S接口应用(四)--单片机源码
https://www.cnblogs.com/pingwen/p/13371144.html
尊重原创技术文章,转载请注明。


 浙公网安备 33010602011771号