【Spring 从0开始】IOC容器的Bean管理 - 基于注解 - 创建对象&组件扫描
什么是注解?
注解是代码里的特殊标记,格式:@注解名称(属性名称=属性值, 属性名称2=属性值...)。
可以作用在:类、方法、属性上面。
使用注解的目的:简化 xml 配置,让使用配置更简洁优雅。
一、spring 针对 bean 管理中创建对象提供注解
- @Component
- @Service
- @Controller
- @Repository
这 4 个注解功能是一样的,都可以用来创建 bean 实例。
但是通常实际应用中,为了让开发人员更加清晰当前组件所扮演的角色,一般会让它们各自应用在不同的层。比如 @Service 用在逻辑层、@Service 用在web层等。
示例
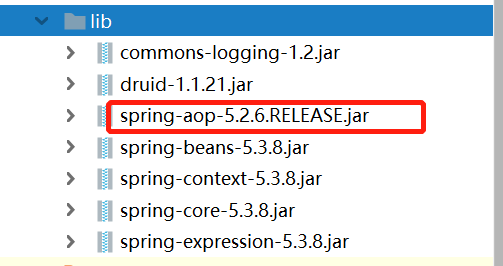
1. 引入依赖
引入 AOP 依赖,可以在这里搜索下载需要的 jar 包。

2. 开启组件扫描
其实就是告诉 spring 你要在什么地方使用注解。通过在 xml 里配置,spring就会到对应位置扫描下面的类:
<?xml version="1.0" encoding="UTF-8"?>
<beans xmlns="http://www.springframework.org/schema/beans"
       xmlns:xsi="http://www.w3.org/2001/XMLSchema-instance"
       xmlns:context="http://www.springframework.org/schema/context"
       xsi:schemaLocation="http://www.springframework.org/schema/beans http://www.springframework.org/schema/beans/spring-beans.xsd
                           http://www.springframework.org/schema/context http://www.springframework.org/schema/context/spring-context.xsd">

    <!--开启组件扫描-->
    <context:component-scan base-package="com.pingguo.spring5.dao"></context:component-scan>
</beans>
现在,我这里有多个包:

- 如果要扫描多个包,可以用逗号
,隔开:
<context:component-scan base-package="com.pingguo.spring5.dao, com.pingguo.spring5.service"></context:component-scan>
- 如果所有下层的包都要扫描,那也可以之间写上层的目录:
<context:component-scan base-package="com.pingguo.spring5"></context:component-scan>
3. 创建类,并添加注解来创建对象
package com.pingguo.spring5.service;

import org.springframework.stereotype.Component;

@Component(value = "userService")
public class UserService {

    public void add() {
        System.out.println("service add() ... ...");
    }
}
现在终于不用去 xml 写 bean 标签了。
- @Component(value = "userService"),这里 value 的值,等同于
<bean id="userService" ...里的 id 。 - @Component(value = "userService"),这里括号里的 value 可以不写,默认就是类名称的首字母小写。比如 类 UserService 就是 userService 。
4. 测试一下
package com.pingguo.spring5.testdemo;

import com.pingguo.spring5.service.UserService;
import org.junit.Test;
import org.springframework.context.ApplicationContext;
import org.springframework.context.support.ClassPathXmlApplicationContext;

public class TestService {

    @Test
    public void testService() {
        ApplicationContext context
                = new ClassPathXmlApplicationContext("bean1.xml");
        UserService userService = context.getBean("userService", UserService.class);
        System.out.println(userService);
        userService.add();

    }
}
运行一下:
com.pingguo.spring5.service.UserService@60611244
service add() ... ...

Process finished with exit code 0
成功。
如果把注解换成其他几个,重新运行测试方法,结果也是一样的。
二、组件扫描的其他过滤条件
在上述的开启扫描配置:
<!--开启组件扫描-->
<context:component-scan base-package="com.pingguo.spring5"></context:component-scan>
意思就是说扫描包路径com.pingguo.spring5下的所有类。
其实这里有个属性 use-default-filters,默认情况下就是等于true,也就是使用默认过滤规则,会去扫描路径下的所有。
那如果use-default-filters="false",就是不使用默认过滤条件,我们可以自己配置过滤。
1. include-filter
在指定的包路径下,只扫描包含了某种注解的类。比如:
<context:component-scan base-package="com.pingguo.spring5" use-default-filters="false">
    <context:include-filter type="annotation" expression="org.springframework.stereotype.Service"/>
</context:component-scan>
这就是说,在路径com.pingguo.spring5下,只扫描Service注解的类。
2. exclude-filter
与上面相反,这里是除了xx之外,都去扫描。
<context:component-scan base-package="com.pingguo.spring5" use-default-filters="false">
    <context:exclude-filter type="annotation" expression="org.springframework.stereotype.Service"/>
</context:component-scan>
做了改动之后,意思也变了。现在是说在路径com.pingguo.spring5下,除了Service注解的类,其他都扫描。
--不要用肉体的勤奋,去掩盖思考的懒惰--


 浙公网安备 33010602011771号