仿vue-cli写一个简易的脚手架
仿vue-cli写一个简易的脚手架
仿vue-cli写一个简易的脚手架
实际生产中搭建一个脚手架或者阅读其他脚手架源码的时候需要了解下面这些工具库
| 名称 | 简介 | 文档 |
| commander | 命令行自定义指令 | 点击查看文档 |
| inquirer | 命令行询问用户问题,记录回答结果 | 点击查看文档 |
| chalk | 控制台输出内容样式美化 | 点击查看文档 |
| ora | 控制台loading 样式 | 点击查看文档 |
| figlet | 控制台打印 logo | 点击查看文档 |
| easy-table | 控制台输出表格 | 点击查看文档 |
| download-git-repo | 下载远程模版 | 点击查看文档 |
| fs-extra | 系统fs模块的扩展,提供了更多便利的 API,并继承了fs模块的 API | 点击查看文档 |
| cross-spawn支 | 持跨平台调用系统上的命令 | 点击查看文档 |
1. 创建项目
参照前面的例子,先创建一个简单的 Node-Cli 结构
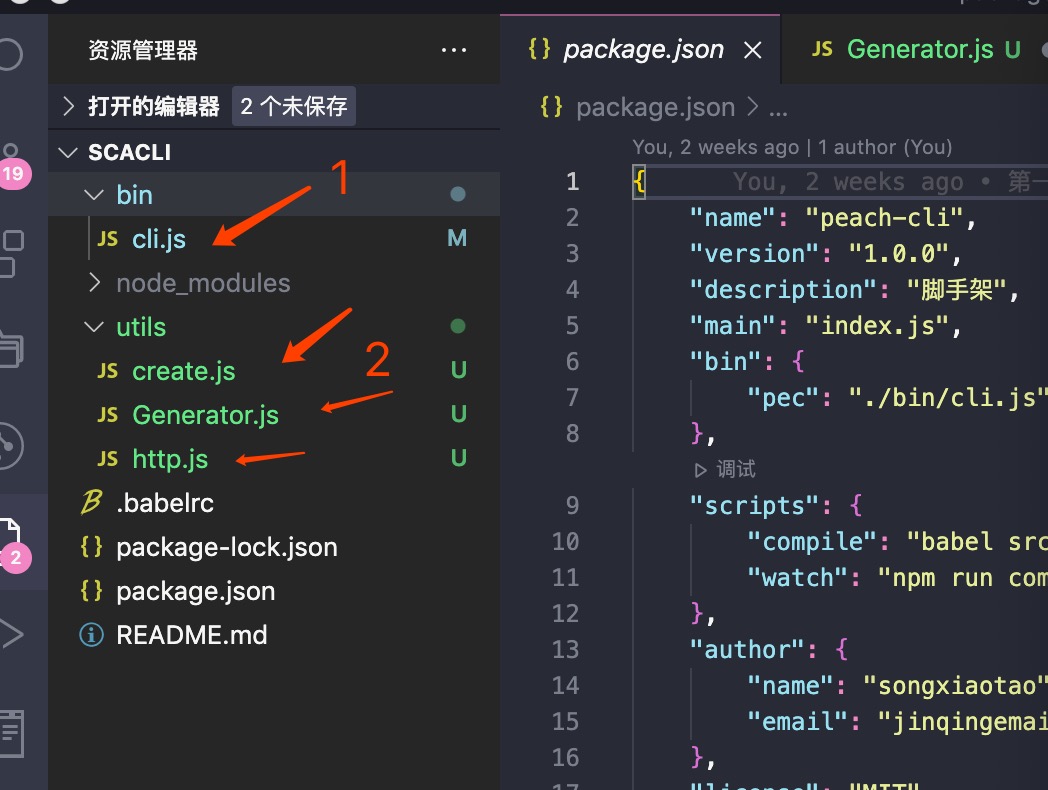
配置脚手架启动文件
{
    "name": "peach-cli",
    "version": "1.0.0",
    "description": "脚手架",
    "main": "index.js",
    "bin": {
        "pec": "./bin/cli.js" //// 配置启动文件路径,pec 为别名
    },
    "scripts": {
        "compile": "babel src -d dist",
        "watch": "npm run compile -- --watch"
    },
    "author": {
        "name": "songxiaotao",
        "email": "jinqingemail@163.com"
    },
    "license": "MIT"

}
为了方便开发调试,使用 npm link 链接到全局

简单编辑一下我们的 bin/cli.js
#! /usr/bin/env node

console.log('~~~~~ peach-cli working ~~~~~')
2. 创建脚手架启动命令
首先我们要借助 commander 依赖去实现这个需求
2.1 安装依赖
$ npm install commander --save
2.2 创建命令
打开 cli.js 进行编辑
console.log('~~~~~ peach-cli working ~~~~~')
const program = require('commander')
const chalk = require('chalk');
var figlet = require('figlet');
program
//定义命令和参数
   .command('create <app-name>')
   .description('create a new project')
   .option('-f, --force', 'overwrite target directory if it exit')
   .action((name, options)=>{
       //
       console.log('name:', name, 'option:', options)
      //  require('../utils/create.js')(name, options)
   })

program
  .version(`v${require('../package.json').version}`)
  .usage('<command> [option]')
//

// 配置 config 命令

program
//定义命令和参数
   .command('config [value]')
   .description('inspect and modify the config')
   .option('-g, --get <path>', 'get value from option')
   .option('-s, --set <path> <value>')
   .option('-d, --delete <path>', 'delete option from config')
   .action((value, options)=>{
       //
      //  console.log(value, options)

})

  program.parse(process.argv)
在命令行输入 pec,检查一下命令是否创建成功

我们可以看到 Commands 下面已经有了 create [options] <app-name>,接着执行一下这个命令

成功拿到命令行输入信息
继续补充
2.3、完善帮助信息
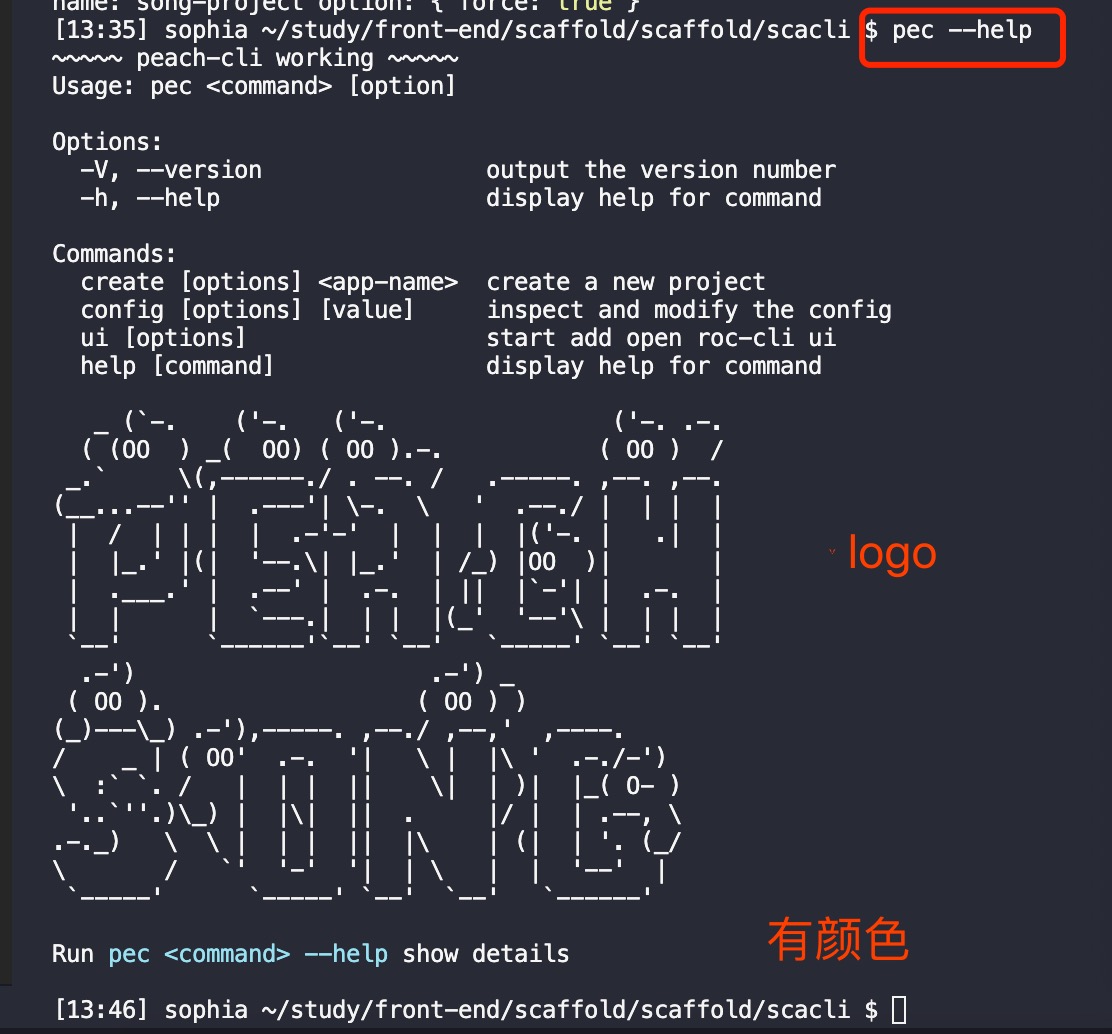
对比 pec --help 打印的结果,结尾处少了一条说明信息,这里我们做补充,重点需要注意说明信息是带有颜色的,这里就需要用到我们工具库里面的 chalk 来处理
// bin/cli.js

program
  // 监听 --help 执行
  .on('--help', () => {
    // 新增说明信息
    console.log(`\r\nRun ${chalk.cyan(`pec <command> --help`)} for detailed usage of given command\r\n`)
  })
2.4 打印个 Logo
如果此时我们想给脚手架整个 Logo,工具库里的 figlet 就是干这个的
program
  .on('--help', () => {
    // 使用 figlet 绘制 Logo
    console.log('\r\n' + figlet.textSync('peach song', {
      font: 'Ghost',
      horizontalLayout: 'default',
      verticalLayout: 'default',
      width: 80,
      whitespaceBreak: true
    }));
    // 新增说明信息
    console.log(`\r\nRun ${chalk.cyan(`pec <command> --help`)} show details\r\n`)
  })

  program.parse(process.argv)
pec --help 打印出来的是个什么样子
完整代码:
#! /usr/bin/env node

const program = require('commander')
const chalk = require('chalk');
var figlet = require('figlet');
program
//定义命令和参数
   .command('create <app-name>')
   .description('create a new project')
   .option('-f, --force', 'overwrite target directory if it exit')
   .action((name, options)=>{
       //
       console.log('name:', name, 'option:', options)

   })

program
  .version(`v${require('../package.json').version}`)
  .usage('<command> [option]')
//

// 配置 config 命令

program
//定义命令和参数
   .command('config [value]')
   .description('inspect and modify the config')
   .option('-g, --get <path>', 'get value from option')
   .option('-s, --set <path> <value>')
   .option('-d, --delete <path>', 'delete option from config')
   .action((value, options)=>{
   //  console.log(value, options)

})
// 配置 UI命令
program
//定义命令和参数
   .command('ui')
   .description('start add open roc-cli ui')
   .option('-p, --port <port>', 'Port used for the UI Server')
   .action((options)=>{

      //  console.log(options)

})

program
  .on('--help', () => {
    // 使用 figlet 绘制 Logo
    console.log('\r\n' + figlet.textSync('peach song', {
      font: 'Ghost',
      horizontalLayout: 'default',
      verticalLayout: 'default',
      width: 80,
      whitespaceBreak: true
    }));
    // 新增说明信息
    console.log(`\r\nRun ${chalk.cyan(`pec <command> --help`)} show details\r\n`)
  })

  program.parse(process.argv)
2.3 执行命令
创建 utils 文件夹并在文件夹下创建 create.js
// utils/create.js

module.exports = async function (name, options) {
  // 验证是否正常取到值
  console.log('~~~ create.js', name, options)
}
在 cli.js 中使用 create.js
// bin/cli.js
...
program
//定义命令和参数
   .command('create <app-name>')
   .description('create a new project')
   .option('-f, --force', 'overwrite target directory if it exit')
   .action((name, options)=>{
     require('../utils/create.js')(name, options)
   })
...
执行一下 pec create song-project,此时在 create.js 正常打印了输入项目名字参数等的信息

3. 询问用户问题获取创建所需信息
3.1、目录是否已经存在
在创建目录的时候,需要思考一个问题:目录是否已经存在?
- 如果存在
- 当
{ force: true }时,直接移除原来的目录,直接创建 - 当
{ force: false }时 询问用户是否需要覆盖
- 当
- 如果不存在,直接创建
这里用到了 fs 的扩展工具 fs-extra,先来安装一下
# fs-extra 是对 fs 模块的扩展,支持 promise
$ npm install fs-extra --save
// lib/create.js

const path = require('path')
const fs = require('fs-extra')

module.exports = async function (name, options) {
  // 执行创建命令

  // 当前命令行选择的目录
  const cwd  = process.cwd();
  // 需要创建的目录地址
  const targetAir  = path.join(cwd, name)

  // 目录是否已经存在?
  if (fs.existsSync(targetAir)) {

    // 是否为强制创建?
    if (options.force) {
      await fs.remove(targetAir)
    } else {
      // TODO:询问用户是否确定要覆盖
    }
  }
}
首选来安装一下 inquirer
$ npm install inquirer --save
然后询问用户是否进行 Overwrite
// utils/create.js

const path = require('path')

// fs-extra 是对 fs 模块的扩展,支持 promise 语法
const fs = require('fs-extra')
const inquirer = require('inquirer')

module.exports = async function (name, options) {
  // 执行创建命令

  // 当前命令行选择的目录
  const cwd  = process.cwd();
  // 需要创建的目录地址
  const targetAir  = path.join(cwd, name)
// 目录是否已经存在?
  if (fs.existsSync(targetAir)) {

    // 是否为强制创建?
    if (options.force) {
      await fs.remove(targetAir)
    } else {

      // 询问用户是否确定要覆盖
      let { action } = await inquirer.prompt([
        {
          name: 'action',
          type: 'list',
          message: 'Target directory already exists Pick an action:',
          choices: [
            {
              name: 'Overwrite',
              value: 'overwrite'
            },{
              name: 'Cancel',
              value: false
            }
          ]
        }
      ])

      if (!action) {
        return;
      } else if (action === 'overwrite') {
        // 移除已存在的目录
        console.log(`\r\nRemoving...`)
        await fs.remove(targetAir)
      }
    }
  }
}
pec create tao-project 自动创建

已经存在,选择覆盖删除已经有的

执行 pec create song-project --f,可以直接看到 song-project 被移除
⚠️注意:为什么这里只做移除? 因为后面获取到模板地址后,下载的时候会直接创建项目目录
3.2 如何获取模版信息
模版远程地址已经上传仓库 github.com/peach-cli-organization

tags信息
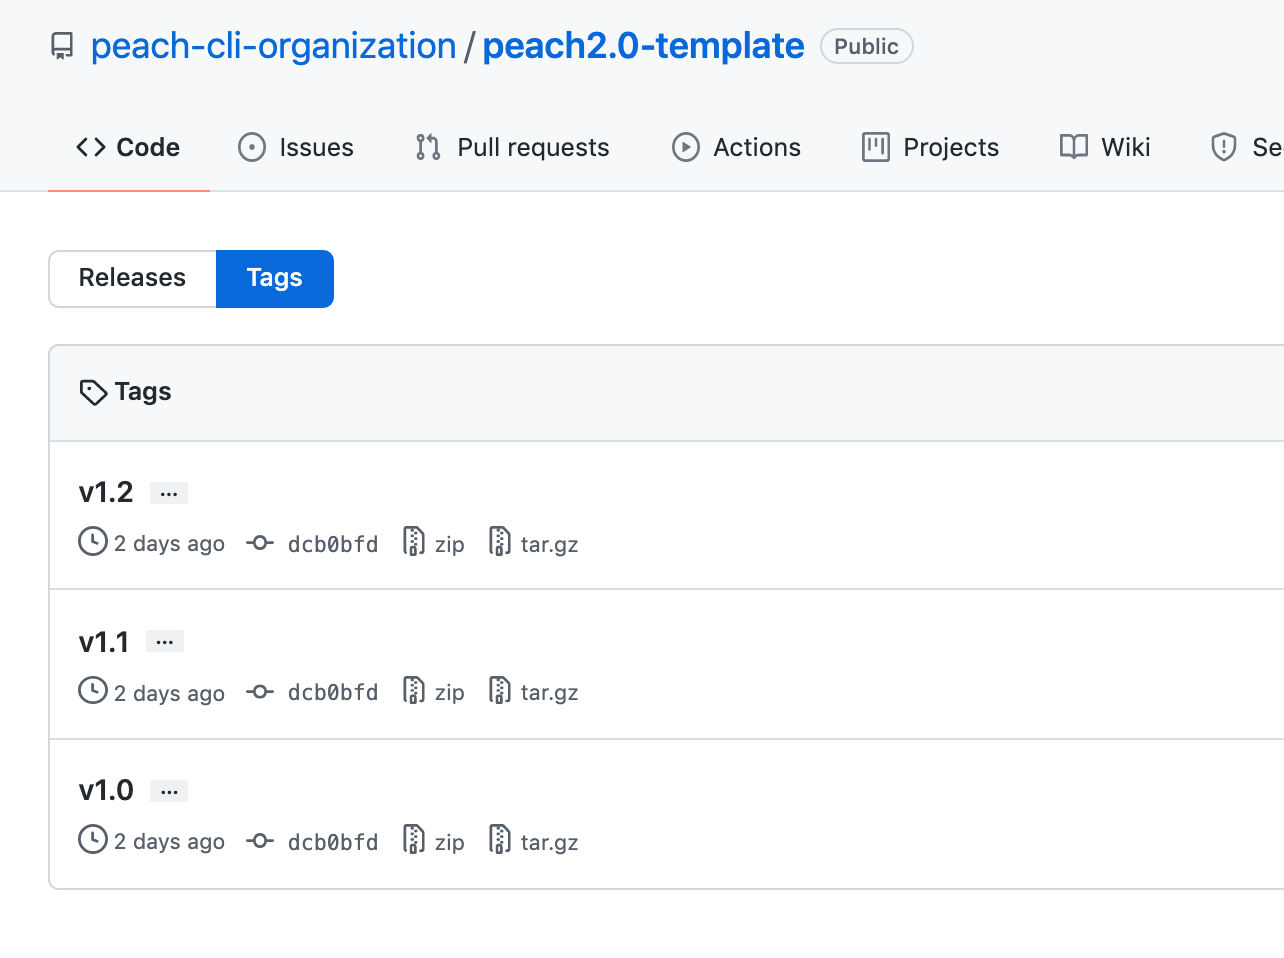
github 提供了:
api.github.com/orgs/peach-cli-organization/repos 接口获取模板信息
api.github.com/repos/peach-cli-organizatio 接口获取版本信息
我们在 utils目录下创建一个 http.js 专门处理模板和版本信息的获取
// utils/http.js
//
const axios = require('axios')
axios.interceptors.response.use(res => {
    // console.log('999res.data--', res.data)
    return res.data;
})
/**
 * 获取模版列表
 * @return Promise
*/
async function getRepoList(){
    return axios.get('https://api.github.com/orgs/peach-cli-organization/repos')
}
/**
 * 获取版本信息
 * @param {string} repo 模版名称
 *
*/
async function getTagList(repo){
    return axios.get(`https://api.github.com/repos/peach-cli-organization/${repo}/tags`)
}

module.exports = {
    getRepoList,
    getTagList
}
3.3、用户选择模板
我们专门新建一个 Generator.js 来处理项目创建逻辑
// utils/Generator.js

class Generator {
  constructor (name, targetDir){
    // 目录名称
    this.name = name;
    // 创建位置
    this.targetDir = targetDir;
  }

  // 核心创建逻辑
  create(){

  }
}

module.exports = Generator;
在 create.js 中引入 Generator 类
//utils/create.js

...
const Generator = require('./Generator')

module.exports = async function (name, options) {
  // 执行创建命令

  // 当前命令行选择的目录
  const cwd  = process.cwd();
  // 需要创建的目录地址
  const targetAir  = path.join(cwd, name)

  // 目录是否已经存在?
  if (fs.existsSync(targetAir)) {
    ...
  }

  // 创建项目
  const generator = new Generator(name, targetAir);

  // 开始创建项目
  generator.create()
}
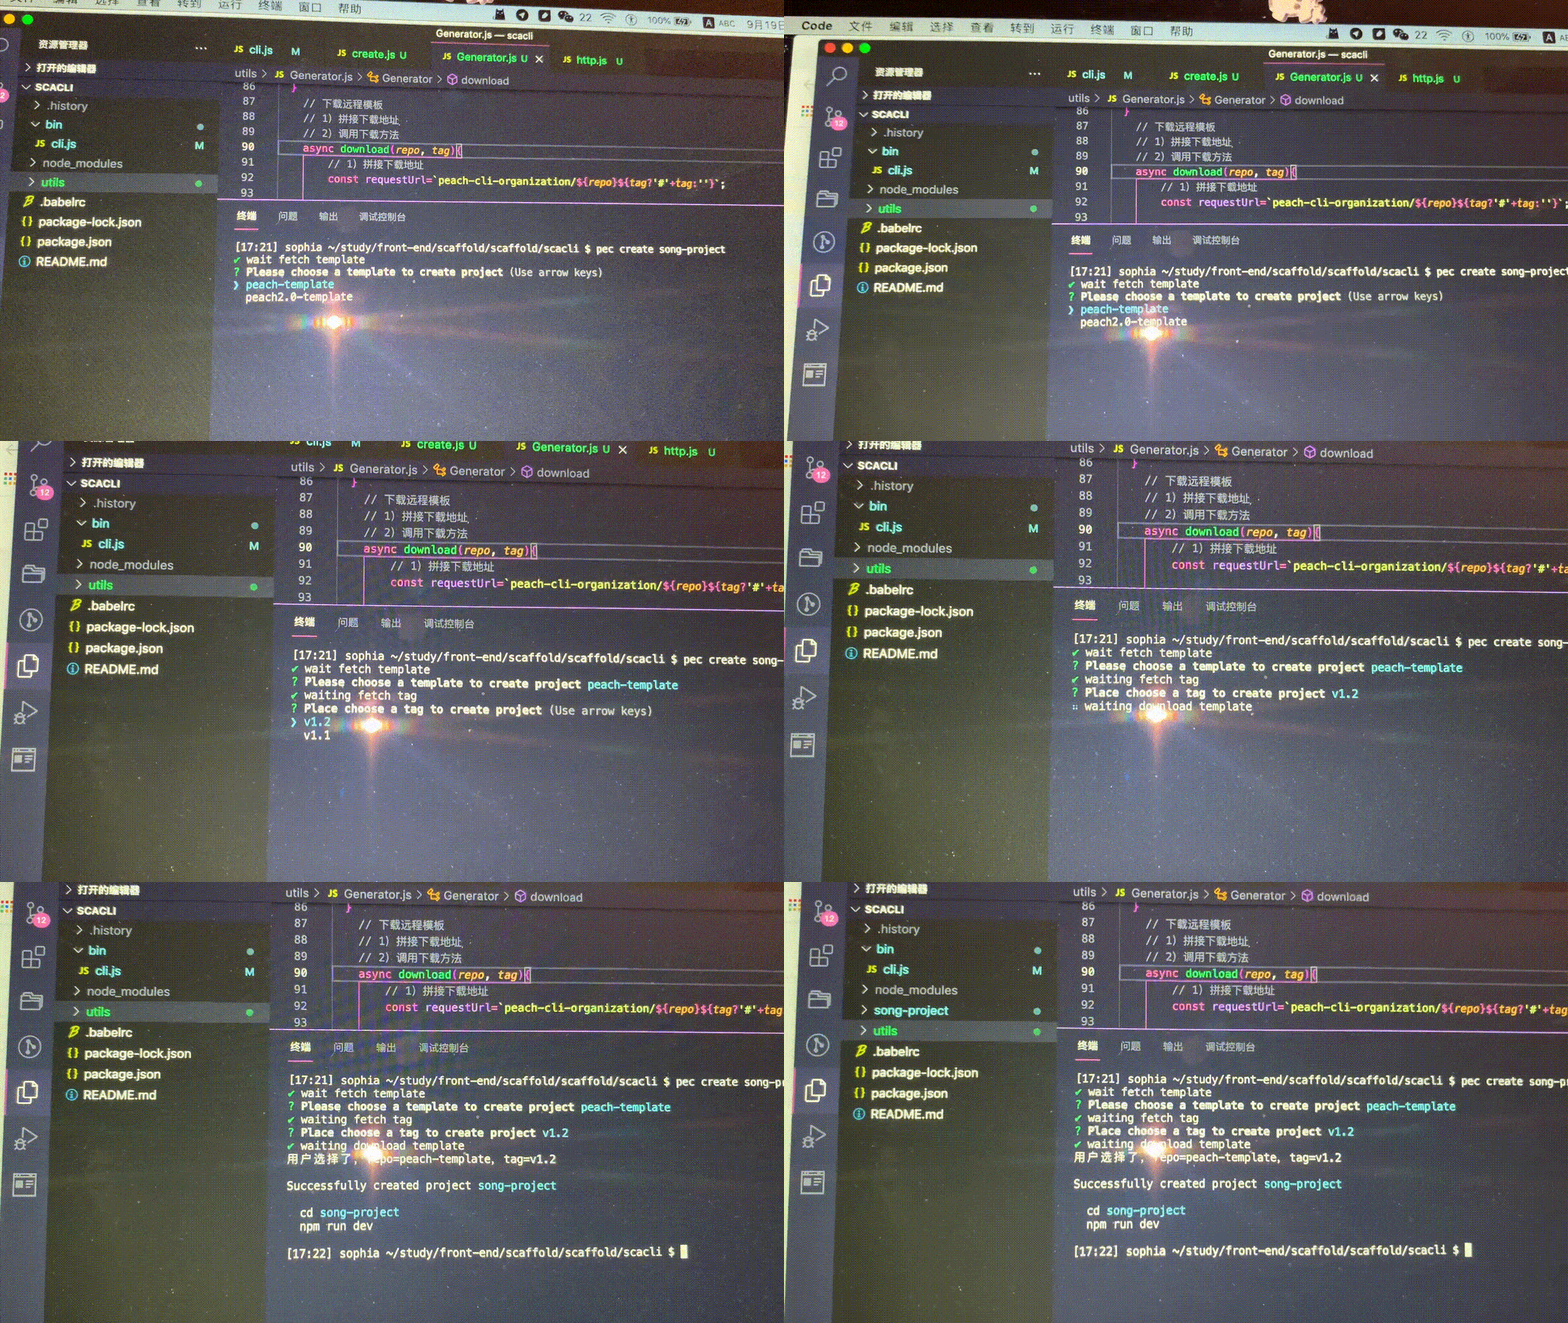
3.4、下载远程模板
下载远程模版需要使用 download-git-repo 工具包,实际上它也在我们上面列的工具菜单上,但是在使用它的时候,需要注意一个问题,就是它是不支持 promise的,所以我们这里需要使用 使用 util 模块中的 promisify 方法对其进行 promise 化
$ npm install download-git-repo --save
接着来写询问用户选择模版都逻辑
// utils/Generator.js
const { getRepoList, getTagList } = require('./http')
const ora = require('ora')
const inquirer = require('inquirer');
const util = require('util')
const path = require('path')
const downloadGitRepo = require('download-git-repo');
const chalk = require('chalk');

//开始添加动画

async function wrapLoading(fn, message, ...args){
    // 使用 ora 初始化,传入提示信息 message
    const spinner = ora(message);
    // 开始加载动画
    spinner.start();
    try{
        // 执行传入方法 fn
        const result = await fn(...args);
        //  状态修改为成功
        spinner.succeed();
        return result;
    } catch(error){
        // 状态修为失败
       spinner.fail('Request fail, refetch ....', error)

    }

}

class Generator{
    constructor(name, targetDir){
        // 目录名称
        this.name = name;
        // // 创建位置
        this.targetDir = targetDir;
        // 对 download-git-repo 进行 promise 化改造
        this.downloadGitRepo = util.promisify(downloadGitRepo)
    }
    // 获取用户选择的模板
    // 1)从远程拉取模板数据
    // 2)用户选择自己新下载的模板名称
    // 3)return 用户选择的名称
    async getRepo(){
        //
        const repoList = await wrapLoading(getRepoList, 'wait fetch template')
        if(!repoList) return;
        const repos = repoList.map(item => item.name)

        const { repo } = await inquirer.prompt({
           name: 'repo',
           type: 'list',
           choices: repos,
           message: 'Please choose a template to create project'
        })
        //
        return repo
    }
   // 获取用户选择的版本
  // 1)基于 repo 结果,远程拉取对应的 tag 列表
  // 2)用户选择自己需要下载的 tag
  // 3)return 用户选择的 tag

  async getTag(repo) {
    // 1)基于 repo 结果,远程拉取对应的 tag 列表
    const tags = await wrapLoading(getTagList, 'waiting fetch tag', repo);
    if (!tags) return;

    // 过滤我们需要的 tag 名称
    const tagsList = tags.map(item => item.name);

    // 2)用户选择自己需要下载的 tag
    const { tag } = await inquirer.prompt({
      name: 'tag',
      type: 'list',
      choices: tagsList,
      message: 'Place choose a tag to create project'
    })

    // 3)return 用户选择的 tag
    return tag
  }
    // 下载远程模板
    // 1)拼接下载地址
    // 2)调用下载方法
    async download(repo, tag){
        // 1)拼接下载地址
        const requestUrl=`peach-cli-organization/${repo}${tag?'#'+tag:''}`;

        // // 2)调用下载方法
        await wrapLoading(
            this.downloadGitRepo, //
            'waiting download template', //
            requestUrl, //
            path.resolve(process.cwd(), this.targetDir) //
        )

    }

    // 核心创建逻辑
    async create(){
       const repo = await this.getRepo()
        // 2) 获取 tag 名称
        const tag = await this.getTag(repo)
            // 3)下载模板到模板目录
        await this.download(repo, tag)
        // console.log('create-----getloadRes', getloadRes)
        console.log('用户选择了,repo=' + repo + ',tag='+ tag)
        // 4)模板使用提示
        console.log(`\r\nSuccessfully created project ${chalk.cyan(this.name)}`)
        console.log(`\r\n  cd ${chalk.cyan(this.name)}`)
        console.log('  npm run dev\r\n')

    }
}

module.exports = Generator;
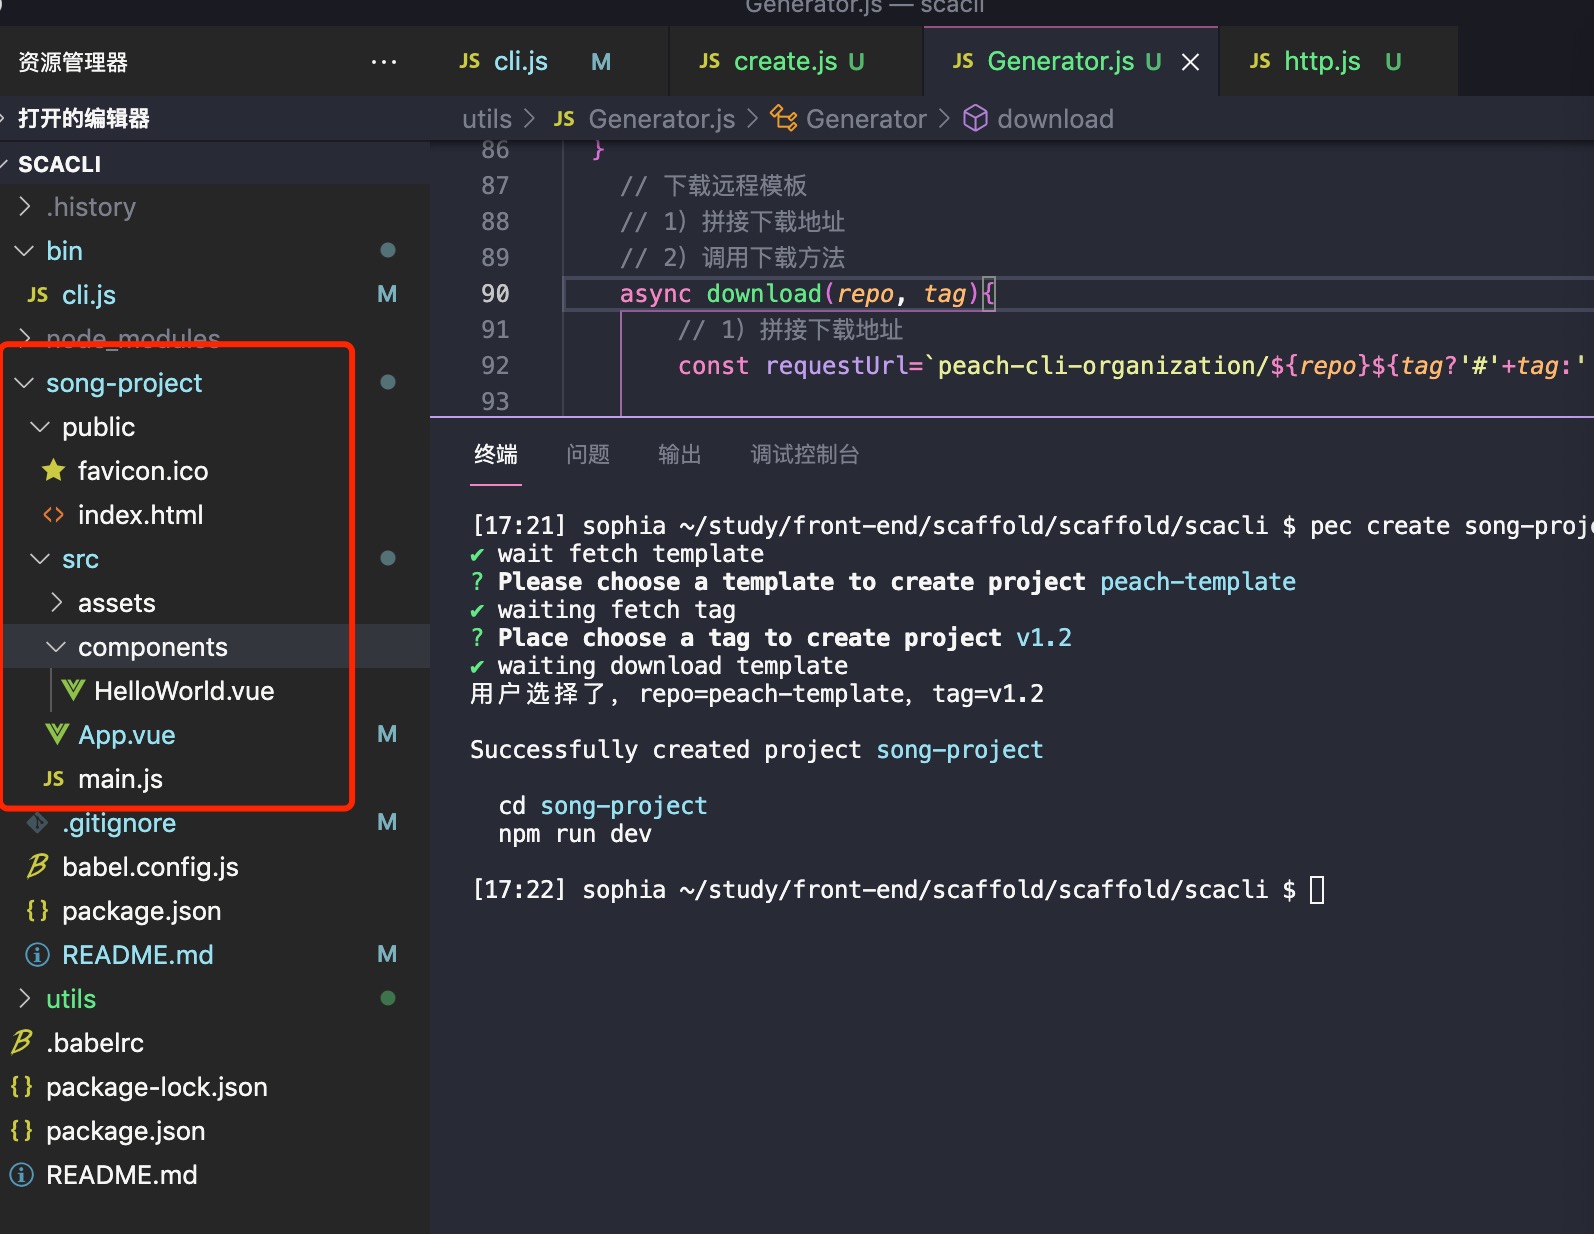
4、npm发布
创建或验证<username>
首先执行下npm adduser,
输入相应的
Username、
Password、
Email: (this IS public)
·······Logged in as 您的Username on https://registry.npmjs.org/.
如果on后面不是https://registry.npmjs.org/,而是其他的镜像,比如我们大家常见的淘宝镜像
······ http://registry.npm.taobao.org/
那么首先替换成原来的,替换成原来执行如下命令:
·······npm config set registry https://registry.npmjs.org/
最后,替换完毕再执行npm adduser、npm publish
邮箱记得验证否则报错:
403 Forbidden - PUT https://registry.npmjs.org/peach-cli - You do not have permission to publish "peach-cli". Are you logged in as the correct user?
package 的包也不能重复
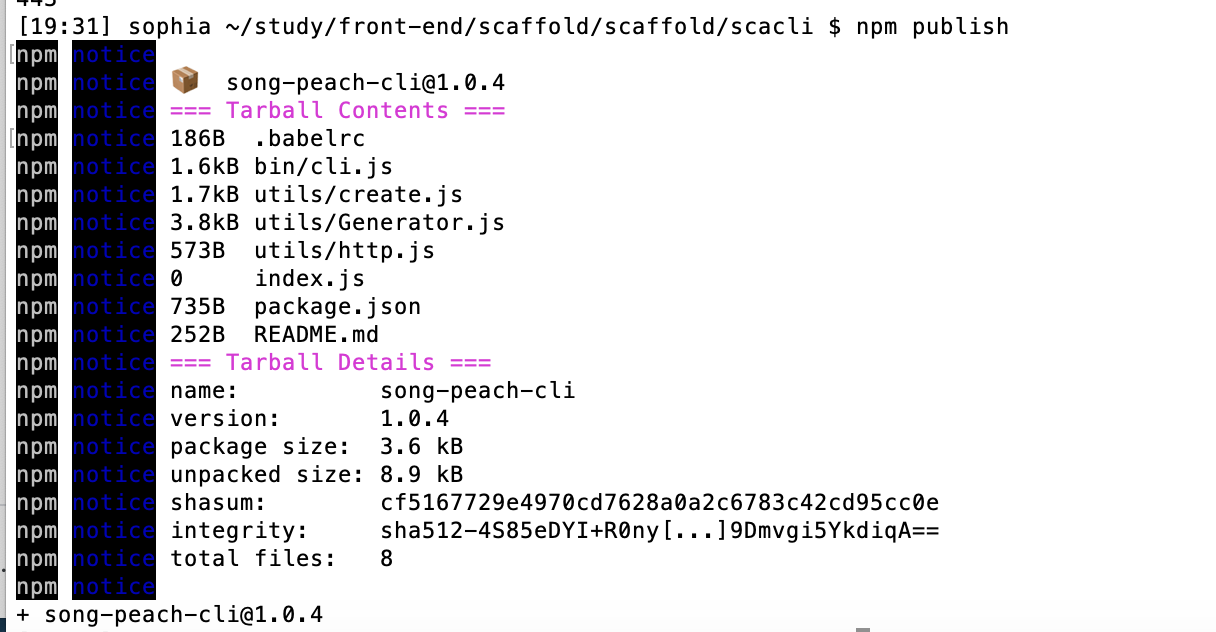
发布
验证
打开npmjs官网

测试
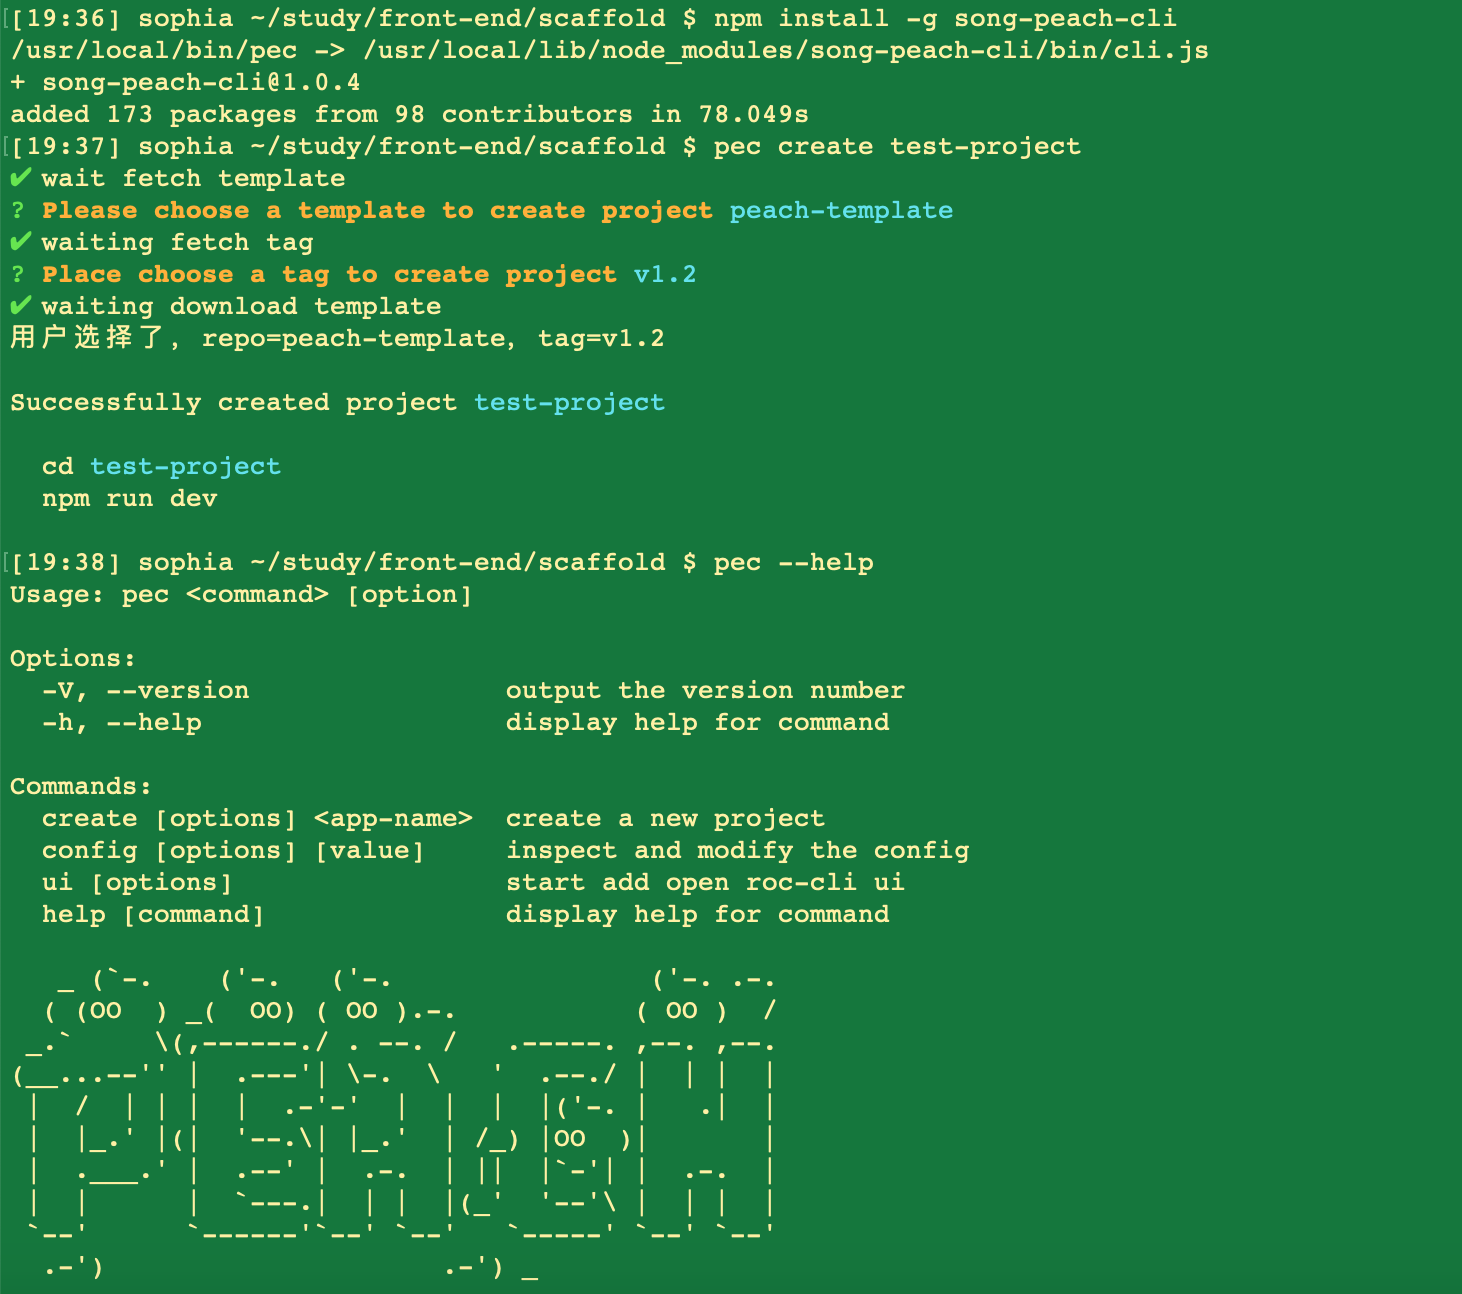
终于可以成功了哈
注意:关于模版下载相关知识点:
1、接口模版的和tag的接口
【手把手撸一个脚手架】第三步, 获取 github 项目信息
2、打tag以及上传远程地址


