CSS Grid 制作表格并合并单元格
一、概述
1.1、Grid是什么?
网格布局(Grid)是最强大的 CSS 布局方案。
它将网页划分成一个个网格,可以任意组合不同的网格,做出各种各样的布局。以前,只能通过复杂的 CSS 框架达到的效果,现在浏览器内置了。
2.2、Grid和Flex的区别?
Grid 布局与 Flex 布局有一定的相似性,都可以指定容器内部多个项目的位置。但是,它们也存在重大区别。
Flex 布局是轴线布局,只能指定"项目"针对轴线的位置,可以看作是一维布局。Grid 布局则是将容器划分成"行"和"列",产生单元格,然后指定"项目所在"的单元格,可以看作是二维布局。Grid 布局远比 Flex 布局强大。
Flex 布局是轴线布局,只能指定"项目"针对轴线的位置,可以看作是一维布局。Grid 布局则是将容器划分成"行"和"列",产生单元格,然后指定"项目所在"的单元格,可以看作是二维布局。Grid 布局远比 Flex 布局强大。
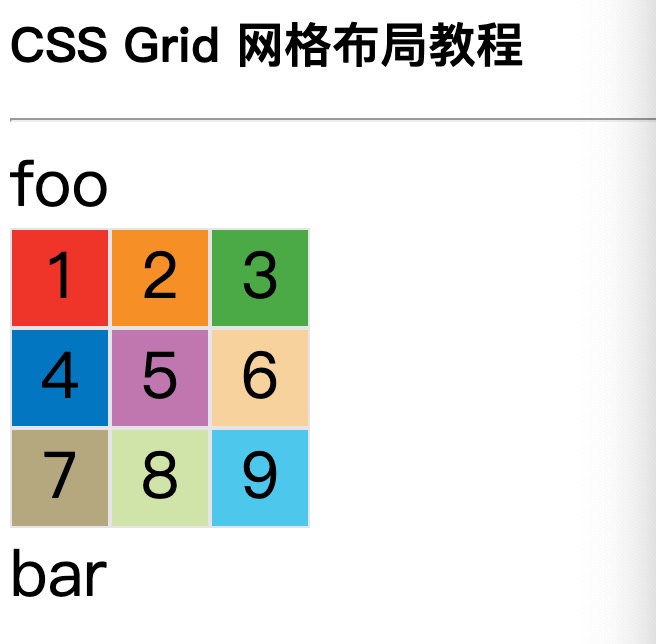
span {
font-size: 2em;
}

#container{
  display: grid;
  grid-template-columns: 50px 50px 50px;
  grid-template-rows: 50px 50px 50px;
}

.item {
  font-size: 2em;
  text-align: center;
  border: 1px solid #e5e4e9;
}

.item-1 {
  background-color: #ef342a;
}

.item-2 {
  background-color: #f68f26;
}

.item-3 {
  background-color: #4ba946;
}

.item-4 {
  background-color: #0376c2;
}

.item-5 {
  background-color: #c077af;
}

.item-6 {
  background-color: #f8d29d;
}

.item-7 {
  background-color: #b5a87f;
}

.item-8 {
  background-color: #d0e4a9;
}

.item-9 {
  background-color: #4dc7ec;
}
 <h2>CSS Grid 网格布局教程</h2>
    <hr>
    <span>foo</span>
    <div id="container">
      <div class="item item-1">1</div>
      <div class="item item-2">2</div>
      <div class="item item-3">3</div>
      <div class="item item-4">4</div>
      <div class="item item-5">5</div>
      <div class="item item-6">6</div>
      <div class="item item-7">7</div>
      <div class="item item-8">8</div>
      <div class="item item-9">9</div>
    </div>
    <span>bar</span>

grid-auto-flow 属性
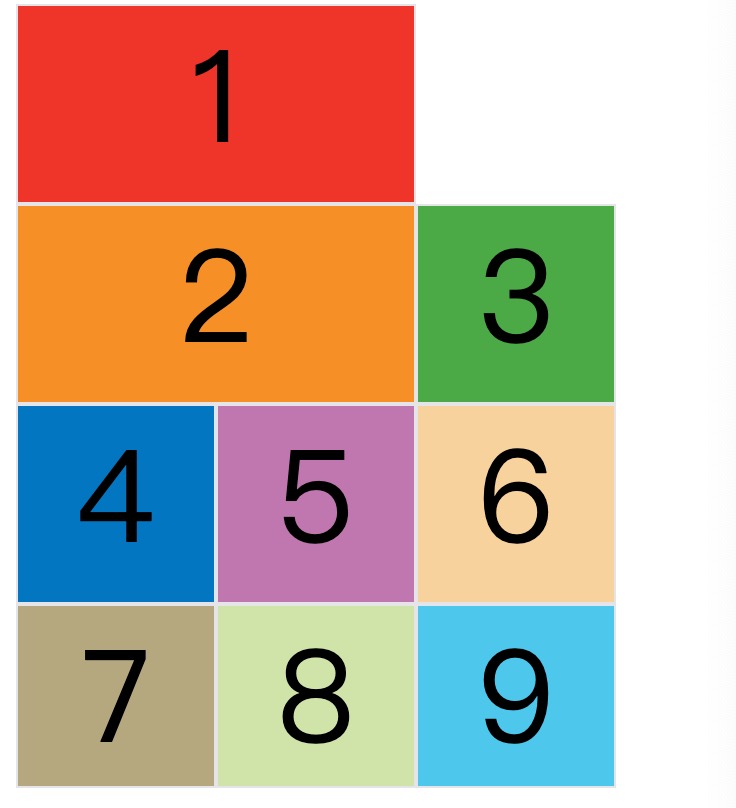
划分网格以后,容器的子元素会按照顺序,自动放置在每一个网格。默认的放置顺序是"先行后列",即先填满第一行,再开始放入第二行,即下图数字的顺序。
grid-auto-flow: row情况下,会产生下面这样的布局。
#container{
  display: grid;
  grid-template-columns: 100px 100px 100px;
  grid-template-rows: 100px 100px 100px;
  grid-auto-flow: row;
}

.item {
  font-size: 4em;
  text-align: center;
  border: 1px solid #e5e4e9;
}

.item-1 {
  background-color: #ef342a;
  grid-column-start: 1;
  grid-column-end: 3;
}

.item-2 {
  background-color: #f68f26;
  grid-column-start: 1;
  grid-column-end: 3;
}

.item-3 {
  background-color: #4ba946;
}

.item-4 {
  background-color: #0376c2;
}

.item-5 {
  background-color: #c077af;
}

.item-6 {
  background-color: #f8d29d;
}

.item-7 {
  background-color: #b5a87f;
}

.item-8 {
  background-color: #d0e4a9;
}

.item-9 {
  background-color: #4dc7ec;
}
<div id="container">
  <div class="item item-1">1</div>
  <div class="item item-2">2</div>
  <div class="item item-3">3</div>
  <div class="item item-4">4</div>
  <div class="item item-5">5</div>
  <div class="item item-6">6</div>
  <div class="item item-7">7</div>
  <div class="item item-8">8</div>
  <div class="item item-9">9</div>
</div>

二、项目实例:
2.1、实际案例应用
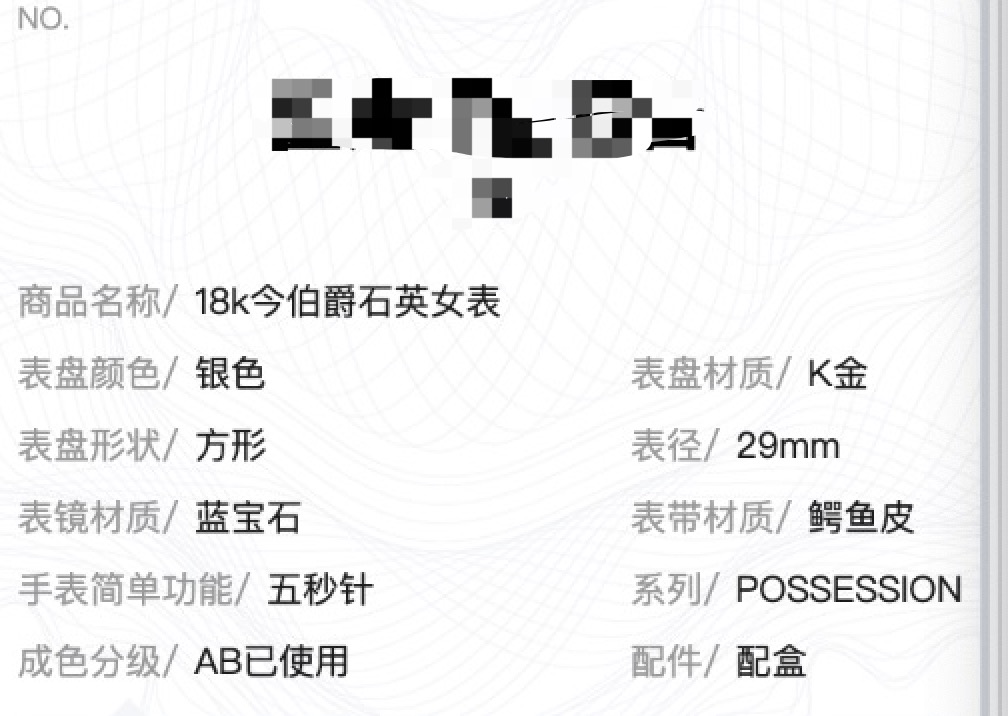
实现如下设计图

父组件
 constructor (props) {
    super(props)
    this.state = {
      infoList:[
        {name:'商品名称', value: '18k今伯爵石英女表' },{name:'表盘颜色', value: '银色' },
        {name:'表盘材质', value: 'K金' },{name:'表盘形状', value: '方形' },
        {name:'表径', value: '29mm' },{name:'表镜材质', value: '蓝宝石' },
        {name:'表带材质', value: '鳄鱼皮' },{name:'手表简单功能', value: '五秒针' },
        {name:'系列', value: 'POSSESSION' },{name:'成色分级', value: 'AB已使用' },
        {name:'配件', value: '配盒' },
      ]

    }
  }
render () {
  const { infoList } = this.state
  return (
      <View className='mj-evaluate'>
        <View  className='mj-evaluate-bg'>
          <View className='mj-evaluate-bg-number'>NO.{resultData.orderNo}</View>
          <View className='mj-evaluate-bg-title'>
            <Text className='mj-evaluate-bg-title-main'>鉴定评估报告</Text>
            <Text className='mj-evaluate-bg-title-sub'>({resultData.categoryName})</Text>
          </View>
         <ProductInfo dataList={infoList}></ProductInfo>
        </View>
      </View>
    )
  }
子组件:
import Taro, { Component } from '@tarojs/taro'
import { View, Text } from '@tarojs/components'
import './index.scss'

class ProductInfo extends Component {


  render () {
    const { dataList } = this.props
   return (
        <View className='mj-evaluate'>
            <View className='mj-evaluate-bg-info'>
                {
                   dataList&&dataList.map((item) => {
                   return (
                    <Text className='mj-evaluate-bg-info-desc' key={item.id}>
                        <Text className='mj-evaluate-bg-info-desc-title'>{item.name}/</Text>
                        <Text className='mj-evaluate-bg-info-desc-text'>{item.value}</Text>
                    </Text>)

                  })
                }
            </View>

        </View>
    )
  }
}

export default ProductInfo
index.scss
.mj-evaluate-bg-info{
    margin-top: 30px;
    display: grid;
    grid-row-gap: 15px;
    grid-column-gap: 15px;
    grid-template-columns: 1fr auto;
    grid-template-rows: 1fr 1fr;
    grid-auto-flow: row;
    &-desc{
        font-size: 24px;
        color: #1a1a1a;

        &-title{
            font-size: 24px;
            color: #999;
        }
        &-text{
            font-size: 24px;
            margin-left: 10px;
            color: #1a1a1a;

        }
    }
    &-desc:nth-of-type(1){
        grid-column-start: 1;
        grid-column-end: 3;
    }
    &-desc:nth-of-type(2){

    }

    &-desc:nth-child(odd){
        color: #999;

    }
    &-desc:nth-child(even){
        color: #1a1a1a;
    }

}
附grid链接:
阮一峰 CSS Grid 网格布局教程:http://www.ruanyifeng.com/blog/2019/03/grid-layout-tutorial.html


