L16-Vue-项目-黑马头条-L04-{ 用户 }
九、用户页面
该模块作为学生作业,不讲解,仅供源码参考。
创建组件并配置路由
1、创建 views/user/index.vue
<template>
  <div class="user-container">用户页面</div>
</template>

<script>
export default {
  name: 'UserPage',
  components: {},
  props: {},
  data () {
    return {}
  },
  computed: {},
  watch: {},
  created () {},
  mounted () {},
  methods: {}
}
</script>

<style scoped></style>
2、配置到根路由
{
  path: '/user/:userId',
  name: 'user',
  component: () => import('@/views/user')
}
最后访问 /user/用户ID 测试。
页面布局
<template>
  <div class="user-container">
    <!-- 导航栏 -->
    <van-nav-bar
      class="page-nav-bar"
      left-arrow
      title="用户名"
      @click-left="$router.back()"
    ></van-nav-bar>
    <!-- /导航栏 -->

    <div class="user-info">
      <div class="base-info">
        <van-image
          class="avatar"
          round
          fit="cover"
          src="https://img.yzcdn.cn/vant/cat.jpeg"
        />
        <div class="right-area">
          <div class="stats-wrap">
            <div class="stats-item">
              <span class="count">66</span>
              <span class="text">发布</span>
            </div>
            <div class="stats-item">
              <span class="count">88</span>
              <span class="text">关注</span>
            </div>
            <div class="stats-item">
              <span class="count">28</span>
              <span class="text">粉丝</span>
            </div>
            <div class="stats-item">
              <span class="count">160</span>
              <span class="text">获赞</span>
            </div>
          </div>
          <van-button class="follow-btn">关注</van-button>
        </div>
      </div>
      <div class="label-info">
        <div class="bio-wrap">
          <span class="label">简介:</span>
          <span class="text">这是用户简介</span>
        </div>
      </div>
    </div>
  </div>
</template>

<script>
export default {
  name: 'UserIndex',
  components: {},
  props: {
    userId: {
      type: [Number, String, Object],
      required: true
    }
  },
  data () {
    return {}
  },
  computed: {},
  watch: {},
  created () {},
  mounted () {},
  methods: {}
}
</script>

<style scoped lang="less">
.user-container {
  .user-info {
    background-color: #fff;
    padding: 25px 32px;
    .base-info {
      display: flex;
      margin-bottom: 25px;
      .avatar {
        width: 155px;
        height: 155px;
        margin-right: 62px;
      }
    }
    .label-info {
      font-size: 25px;
      .bio-wrap {
        .label {
          color: #646263;
        }
        .text {
          color: #212121;
        }
      }
    }
  }
  .right-area {
    flex: 1;
    display: flex;
    flex-direction: column;
    justify-content: space-evenly;
    .stats-wrap {
      display: flex;
      justify-content: space-between;
      .stats-item {
        display: flex;
        flex-direction: column;
        justify-content: center;
        align-items: center;
        .count {
          font-size: 26px;
          color: #0d0a10;
        }
        .text {
          font-size: 21px;
          color: #9c9b9d;
        }
      }
    }
    .follow-btn {
      width: 289px;
      height: 55px;
      line-height: 55px;
      background-color: #6bb5ff;
      color: #fff;
      border: none;
    }
  }
}
</style>
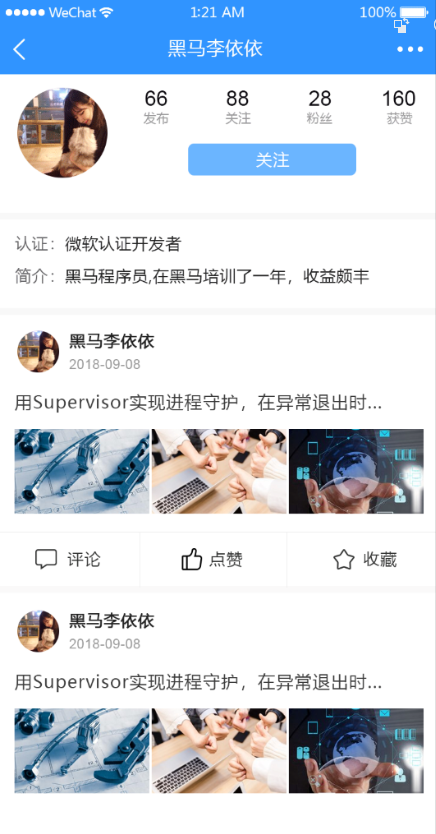
<template>
  <div class="user-container">
    <!-- 导航栏 -->
    <van-nav-bar title="黑马头条号" left-arrow />
    <!-- /导航栏 -->

    <!-- 用户信息 -->
    <div class="user-info-container">
      <div class="row1">
        <van-image
          class="col1"
          fit="cover"
          round
          src="https://img.yzcdn.cn/vant/cat.jpeg"
        />
        <div class="col2">
          <div class="row1">
            <div class="item">
              <div class="count">123</div>
              <div class="text">发布</div>
            </div>
            <div class="item">
              <div class="count">123</div>
              <div class="text">关注</div>
            </div>
            <div class="item">
              <div class="count">123</div>
              <div class="text">粉丝</div>
            </div>
            <div class="item">
              <div class="count">123</div>
              <div class="text">获赞</div>
            </div>
          </div>
          <div class="action">
            <van-button
              type="primary"
              size="small"
            >私信</van-button>
            <van-button
              type="default"
              size="small"
            >编辑资料</van-button>
          </div>
        </div>
      </div>
      <div class="intro-wrap">
        <div>
          <span>认证:</span>
          <span>用户的认证信息</span>
        </div>
        <div>
          <span>简介:</span>
          <span>用户的简介信息</span>
        </div>
      </div>
    </div>
    <!-- /用户信息 -->

    <!-- 文章列表 -->
    <!-- /文章列表 -->
  </div>
</template>

<script>
export default {
  name: 'UserPage',
  components: {},
  props: {},
  data () {
    return {}
  },
  computed: {},
  watch: {},
  created () {},
  mounted () {},
  methods: {}
}
</script>

<style scoped lang="less">
.user-container {
  font-size: 14px;
  .user-info-container {
    padding: 12px;
    background-color: #fff;
    margin-bottom: 10px;
    >.row1 {
      display: flex;
      justify-content: space-between;
      align-items: center;
      margin-bottom: 10px;
      .item {
        text-align: center;
        .text {
          font-size: 12px;
        }
      }
      >.col1 {
        width: 80px;
        height: 80px;
      }
      >.col2 {
        display: flex;
        flex-direction: column;
        justify-content: space-evenly;
        width: 70%;
        height: 80px;
        padding: 0 12px;
        >.row1 {
          display: flex;
          justify-content: space-between;
        }
        .action {
          display: flex;
          justify-content: space-between;
          .van-button {
            width: 45%;
          }
        }
      }
    }
  }
}
</style>
展示用户信息
步骤:
- 封装数据接口
- 请求获取数据
- 模板绑定
1、在 api/user.js 中添加获取指定用户信息的数据接口
// 获取指定用户信息
export const getUserById = userId => {
  return request({
    method: 'GET',
    url: `/app/v1_0/users/${userId}`
  })
}
2、在用户页面中请求获取数据
+ import { getUserById } from '@/api/user'

export default {
  name: 'UserPage',
  components: {},
  props: {},
  data () {
    return {
+      user: {} // 用户信息
    }
  },
  computed: {},
  watch: {},
  created () {
+    this.loadUser()
  },
  mounted () {},
  methods: {
+++    async loadUser () {
      try {
        const { data } = await getUserById(this.$route.params.userId)
        this.user = data.data
      } catch (err) {
        console.log(err)
        this.$toast('获取用户数据失败')
      }
    }
  }
}
3、模板绑定
用户关注
展示用户文章列表
列表组件
<van-list
  v-model="loading"
  :finished="finished"
  finished-text="没有更多了"
  @load="onLoad"
>
  <van-cell
    v-for="item in list"
    :key="item"
    :title="item"
  />
</van-list>
export default {
  data() {
    return {
      list: [],
      loading: false,
      finished: false
    };
  },

  methods: {
    onLoad() {
      // 异步更新数据
      setTimeout(() => {
        for (let i = 0; i < 10; i++) {
          this.list.push(this.list.length + 1);
        }
        // 加载状态结束
        this.loading = false;

        // 数据全部加载完成
        if (this.list.length >= 40) {
          this.finished = true;
        }
      }, 500);
    }
  }
}
分析列表组件使用
List 的运行机制是什么?
List 会监听浏览器的滚动事件并计算列表的位置,当列表底部与可视区域的距离小于offset时,List 会触发一次 load 事件。
为什么 List 初始化后会立即触发 load 事件?
List 初始化后会触发一次 load 事件,用于加载第一屏的数据,这个特性可以通过`immediate-check`属性关闭。
为什么会连续触发 load 事件?
如果一次请求加载的数据条数较少,导致列表内容无法铺满当前屏幕,List 会继续触发 load 事件,直到内容铺满屏幕或数据全部加载完成。因此你需要调整每次获取的数据条数,理想情况下每次请求获取的数据条数应能够填满一屏高度。
loading 和 finished 分别是什么含义?
List有以下三种状态,理解这些状态有助于你正确地使用List组件:
- 非加载中,
loading为false,此时会根据列表滚动位置判断是否触发load事件(列表内容不足一屏幕时,会直接触发)- 加载中,
loading为true,表示正在发送异步请求,此时不会触发load事件- 加载完成,
finished为true,此时不会触发load事件在每次请求完毕后,需要手动将
loading设置为false,表示本次 load 加载结束
使用 float 布局后一直触发加载?
若 List 的内容使用了 float 布局,可以在容器上添加van-clearfix类名来清除浮动,使得 List 能正确判断元素位置
展示文章列表
1、封装获取用户文章列表的数据接口
/**
 * 获取指定用户的文章列表
 */
export const getArticlesByUser = (userId, params) => {
  return request({
    method: 'GET',
    url: `/app/v1_0/users/${userId}/articles`,
    params
  })
}
2、在用户页面中请求获取数据
import { getUserById } from '@/api/user'
+ import { getArticlesByUser } from '@/api/article'

export default {
  name: 'UserPage',
  components: {},
  props: {},
  data () {
    return {
      user: {}, // 用户信息
      list: [], // 列表数据
      loading: false, // 控制上拉加载更多的 loading
      finished: false, // 控制是否加载结束了
+      page: 1 // 获取下一页数据的页码
    }
  },
  computed: {},
  watch: {},
  created () {
    this.loadUser()
  },
  mounted () {},
  methods: {
    async loadUser () {
      try {
        const { data } = await getUserById(this.$route.params.userId)
        this.user = data.data
      } catch (err) {
        console.log(err)
        this.$toast('获取用户数据失败')
      }
    },

+++    async onLoad () {
      // 1. 请求获取数据
      const { data } = await getArticlesByUser(this.$route.params.userId, {
        page: this.page, // 可选的,默认是第 1 页
        per_page: 20 // 可选的,默认每页 10 条
      })

      // 2. 把数据添加到列表中
      // list []
      // data.data.results []
      // ...[1, 2, 3] 会把数组给展开,所谓的展开就是一个一个的拿出来
      const { results } = data.data
      this.list.push(...results)

      // 3. 加载状态结束
      this.loading = false

      // 4. 判断数据是否全部加载完毕
      if (results.length) {
        this.page++ // 更新获取下一页数据的页码
      } else {
        this.finished = true // 没有数据了,不需要加载更多了
      }
    }
  }
}
十、用户关注 & 粉丝
该模块作为学生作业,不讲解,仅供源码参考。
十一、我的收藏/历史
该模块作为学生作业,不讲解,仅供源码参考。
十二、编辑用户资料
创建组件并配置路由
1、创建 views/user/index.vue
<template>
  <div>
    <van-nav-bar title="个人信息" left-arrow right-text="保存" />
    <van-cell-group>
      <van-cell title="头像" is-link>
        <van-image
          round
          width="30"
          height="30"
          fit="cover"
          src="http://toutiao.meiduo.site/FgSTA3msGyxp5-Oufnm5c0kjVgW7"
        />
      </van-cell>
      <van-cell title="昵称" value="abc" is-link />
      <van-cell title="性别" value="男" is-link />
      <van-cell title="生日" value="2019-9-27" is-link />
    </van-cell-group>
  </div>
</template>

<script>
  export default {
    name: "UserIndex"
  };
</script>
2、将该页面配置到根路由
{
  name: 'user-profile',
  path: '/user/profile',
  component: () => import('@/views/user-profile')
}
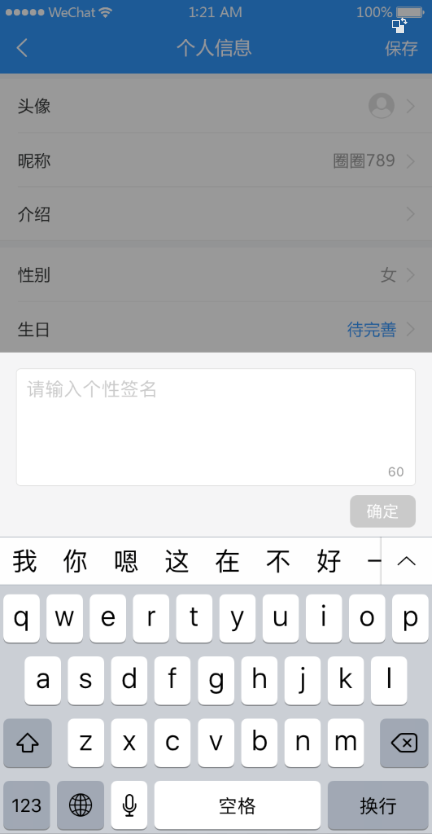
页面布局
<template>
  <div class="user-profile">
    <!-- 导航栏 -->
    <van-nav-bar
      class="page-nav-bar"
      title="个人信息"
      left-arrow
      @click-left="$router.back()"
    />
    <!-- /导航栏 -->

    <!-- 个人信息 -->
    <van-cell class="avatar-cell" title="头像" is-link center>
      <van-image
        class="avatar"
        round
        fit="cover"
        src="https://img.yzcdn.cn/vant/cat.jpeg"
      />
    </van-cell>
    <van-cell title="昵称" value="内容" is-link />
    <van-cell title="性别" value="内容" is-link />
    <van-cell title="生日" value="内容" is-link />
    <!-- /个人信息 -->
  </div>
</template>

<script>
export default {
  name: 'UserProfile',
  components: {},
  props: {},
  data () {
    return {}
  },
  computed: {},
  watch: {},
  created () {},
  mounted () {},
  methods: {}
}
</script>

<style scoped lang="less">
.user-profile {
  .avatar-cell {
    .van-cell__value {
      display: flex;
      flex-direction: row-reverse;
    }
    .avatar {
      width: 60px;
      height: 60px;
    }
  }
}
</style>
展示用户信息
思路:
- 找到数据接口
- 封装请求方法
- 请求获取数据
- 模板绑定
1、在 api/user.js 中添加封装数据接口
2、在 views/user/index.vue 组件中请求获取数据
3、模板绑定
修改昵称
一、准备弹出层
二、封装组件
三、页面布局
四、基本功能处理
五、更新完成
修改性别
修改生日
修改头像
图片上传预览
方式一:结合服务器的图片上传预览

方式二:纯客户端实现上传图片预览
// 获取文文件对象
const file = fileInput.files[0]

// 设置图片的 src
img.src = window.URL.createObjectURL(file)
客户端上传预览示例:
<!DOCTYPE html>
<html lang="en">
<head>
  <meta charset="UTF-8">
  <title>客户端图片上传预览示例</title>
  <style>
    .img-wrap {
      width: 200px;
      height: 200px;
      border: 1px solid #ccc;
    }

    img {
      max-width: 100%;
    }
  </style>
</head>
<body>
  <h1>客户端图片上传预览示例</h1>
  <div class="img-wrap">
    <img src="" alt="" id="img">
  </div>
  <br>
  <input type="file" id="file" onchange="onFileChange()">
  <script>
    const img = document.querySelector('#img')
    const file = document.querySelector('#file')

    function onFileChange() {
      // 得到 file-input 的文件对象
      const fileObj = file.files[0]
      const data = window.URL.createObjectURL(fileObj)
      img.src = data
    }
  </script>
</body>
</html>
接下来就是在项目中使用纯客户端的方式处理用户头像上传预览。
在 views/user/index.vue 组件中:
<template>
  <div>
    <van-nav-bar title="个人信息" left-arrow right-text="保存" />
    <van-cell-group>
      +
      <van-cell title="头像" is-link @click="onChangePhoto">
        <van-image round width="30" height="30" :src="user.photo" />
      </van-cell>
      <van-cell title="昵称" :value="user.name" is-link />
      <van-cell title="性别" :value="user.gender === 0 ? '男' : '女'" is-link />
      <van-cell title="生日" :value="user.birthday" is-link />
    </van-cell-group>

    <!--
      表单元素的 hidden 表示隐藏这个表单元素
     -->
    + <input type="file" hidden ref="file" @change="onFileChange" />
  </div>
</template>

<script>
  import { getProfile } from '@/api/user'

  export default {
    name: 'UserIndex',
    data () {
      return {
        user: {}
      }
    },

    created () {
      this.loadUserProfile()
    },

    methods: {
      async loadUserProfile () {
        const { data } = await getProfile()
        this.user = data.data
      },

  +    onChangePhoto () {
        this.$refs.file.click()
      },

  +    onFileChange () {
        this.user.photo = window.URL.createObjectURL(this.$refs.file.files[0])
      }
    }
  }
</script>
头像裁切
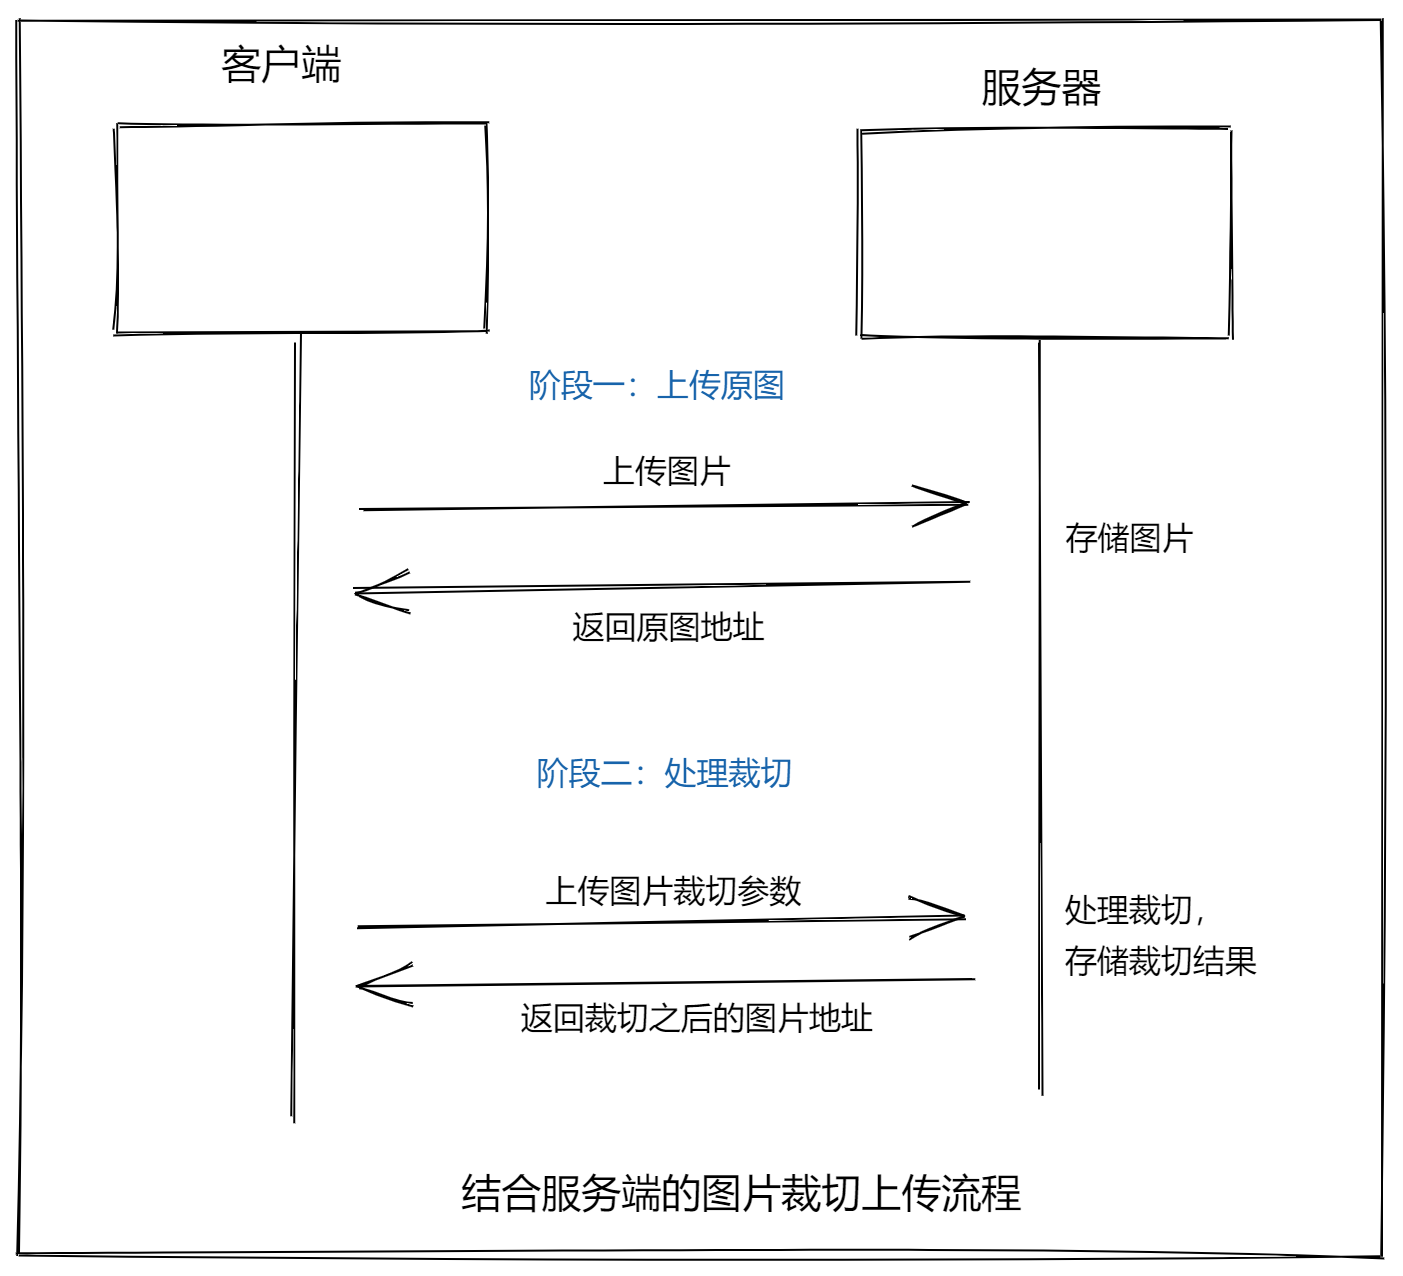
方案一:结合服务端的图片裁切上传流程
方案二:纯客户端的图片裁切上传流程
viewMode: 1,
dragMode: 'move',
aspectRatio: 1,
autoCropArea: 1,
cropBoxMovable: false,
cropBoxResizable: false,
background: false,
movable: true
保存更新
如果是基于服务端的裁切,则使用:getData 方法,该方法得到裁切的区域参数。
如果是纯客户端的图片裁切,则使用:getCroppedCanvas 方法,该方法得到裁切之后的图片对象(类似于URL.createObjectURL 方法得到的文件对象)。
步骤:
- 封装接口
- 请求提交
- 更新视图
1、在 api/user.js 中添加封装数据接口
/**
 * 1、接口重用
 * 2、接口维护
 * 实际开发过程中,接口经常容易变化,
 * 你能记住你在哪里请求了这个接口吗?很难记住
 * 怎么办呢?
 *  我们单独的把接口请求的代码封装起来,统一的放到一起。
 * 放到哪里呢?
 *  我们放到项目的 api 目录中,
 *  根据接口的种类进行归类管理
 *  例如用户相关的接口放到 user.js 中
 *      文章相关的接口放到 article.js 中
 * 如何封装呢?
 *  一个函数,接收参数,返回请求结果就可以了。
 * 用户接口相关请求模块
 */
import request from '@/utils/request'

/**
* 登录
*/
export function login (user) {
  return request({
    // method 用来指定请求方法,这是 axios 的固定 API,不能瞎写
    method: 'POST',
    // url 用来指定请求路径
    url: '/app/v1_0/authorizations',
    // data 是 axios 请求要求的字段名,用来传递请求体数据的
    data: user
  })
}

/**
 * 关注用户
 */
export function followUser (userId) {
  return request({
    method: 'POST',
    url: '/app/v1_0/user/followings',
    data: {
      target: userId // 用户id
    }
  })
}

/**
 * 取消关注用户
 */
export function unFollowUser (userId) {
  return request({
    method: 'DELETE',
    url: '/app/v1_0/user/followings/' + userId
  })
}

/**
 * 获取用户自己信息
 */
export function getSelf (userId) {
  return request({
    method: 'GET',
    url: '/app/v1_0/user'
  })
}

/**
 * 获取用户个人资料
 */
export function getProfile (userId) {
  return request({
    method: 'GET',
    url: '/app/v1_0/user/profile'
  })
}

/**
 * 更新用户头像
 */
+ export function updateUserPhoto (data) {
  return request({
    method: 'PATCH',
    url: '/app/v1_0/user/photo',
    data
  })
}
2、在 views/user/index.vue 组件中保存提交
<template>
  <div>
    <van-nav-bar
      title="个人信息"
      left-arrow
      right-text="保存"
      +
      @click-right="onSave"
    />
    <van-cell-group>
      <van-cell title="头像" is-link @click="onChangePhoto">
        <van-image round width="30" height="30" :src="user.photo" />
      </van-cell>
      <van-cell title="昵称" :value="user.name" is-link />
      <van-cell title="性别" :value="user.gender === 0 ? '男' : '女'" is-link />
      <van-cell title="生日" :value="user.birthday" is-link />
    </van-cell-group>

    <!--
      表单元素的 hidden 表示隐藏这个表单元素
     -->
    <input type="file" hidden ref="file" @change="onFileChange" />
  </div>
</template>

<script>
  + import { getProfile, updateUserPhoto } from '@/api/user'

  export default {
    name: 'UserIndex',
    data () {
      return {
        user: {}
      }
    },

    created () {
      this.loadUserProfile()
    },

    methods: {
      async loadUserProfile () {
        const { data } = await getProfile()
        this.user = data.data
      },

      onChangePhoto () {
        this.$refs.file.click()
      },

      onFileChange () {
        const fileObj = this.$refs.file.files[0]
        if (fileObj) {
          this.user.photo = window.URL.createObjectURL(fileObj)
        }
      },

  +    async onSave () {
        // 如果 Content-Type 要求是	application/json	,则 data 传普通对象 {}
        // 如果 Content-Type 要求是	multipart/form-data	,则 data 传 FormData 对象
        // 纵观所有数据接口,你会发现大多数的接口都要求 Content-Type 要求是	application/json
        // 一般只有涉及到文件上传的数据接口才要求Content-Type 要求是	multipart/form-data
        // 这个时候传递一个 FormData 对象
        this.$toast.loading({
          duration: 0, // 持续展示 toast
          forbidClick: true, // 禁用背景点击
          loadingType: 'spinner',
          message: '保存中'
        })

        try {
          const formData = new FormData()
          // formData.append('名字', 数据)
          formData.append('photo', this.$refs.file.files[0])
          await updateUserPhoto(formData)
          this.$toast.success('保存成功')
        } catch (err) {
          console.log(err)
          this.$toast.fail('保存失败')
        }
      }
    }
  }
</script>

 浙公网安备 33010602011771号