Hadoop 集群的三种方式
1,Local(Standalone) Mode 单机模式
  $ mkdir input
  $ cp etc/hadoop/*.xml input
  $ bin/hadoop jar share/hadoop/mapreduce/hadoop-mapreduce-examples-2.9.2.jar grep input output 'dfs[a-z.]+'
  $ cat output/*

  解析$ bin/hadoop jar share/hadoop/mapreduce/hadoop-mapreduce-examples-2.9.2.jar grep input output 'dfs[a-z.]+'
  input 夹下面的文件 :capacity-scheduler.xml  core-site.xml  hadoop-policy.xml  hdfs-site.xml  httpfs-site.xml  yarn-site.xml

  bin/hadoop    hadoop 命令
  jar           这个命令在jar包里面
  share/hadoop/mapreduce/hadoop-mapreduce-examples-2.9.2.jar  具体位置
  grep          grep 函数
  input         grep 函数的目标文件夹
  output        grep 函数结果的输出文件夹
  'dfs[a-z.]+'  grep 函数的匹配正则条件

  直译:将input文件下面的文件中包含 'dfs[a-z.]+' 的字符串给输出到output 文件夹中
  输出结果:part-r-00000  _SUCCESS
  cat part-r-00000:1 dfsadmin
  在hadoop-policy.xml 存在此字符串
2,Pseudo-Distributed Operation 伪分布式
在 etc/hadoop/core.site.xml 添加以下属性
<configuration>
    <property>
        <name>fs.defaultFS</name>
        <value>hdfs://hella-hadoop.chris.com:8020</value>   hella-hadoop.chris.com是主机名,已经和ip相互映射
    </property>

还需要覆盖默认的设定,mkdir -p data/tmp
    <property>
        <name>hadoop.tmp.dir</name>
        <value>/opt/modules/hadoop-2.5.0/data/tmp</value>   hella-hadoop.chris.com是主机名,已经和ip相互映射
    </property>

 垃圾箱设置删除文件保留时间(分钟)
    <property>
        <name>fs.trash.interval</name>
        <value>10080</value>
    </property>

</configuration>

etc/hadoop/hdfs-site.xml: 伪分布式1个备份
<configuration>
    <property>
        <name>dfs.replication</name>
        <value>1</value>
    </property>
配置从节点
    <property>
        <name>dfs.namenode.secondary.http-address</name>
        <value>主机名:50090</value>
    </property>
</configuration>
格式化元数据,进入到安装目录下
bin/hdfs namenode -format
启动namenode,所有的命令都在sbin下,通过ls sbin/ 可以查看
sbin/hadoop-daemon.sh start namenode hadoop 的守护线程启动(主数据)
sbin/hadoop-daemon.sh start datanode 启动datanode(从数据)
nameNode都有个web网页,端口50070
创建hdfs 文件夹,创建在用户名下面
bin/hdfs dfs -mkdir -p /user/chris
查看文件夹
bin/hdfs dfs -ls -R / 回调查询
本地新建文件夹mkdir wcinput mkdir wcoutput vi wc.input创建wc.input文件,并写入内容
hdfs文件系统新建文件夹
bin/hdfs dfs -mkdir -p /user/chris/mapreduce/wordcount/input
本地文件上传hdfs文件系统
bin/hdfs dfs -put wcinput/wc.input /user/chris/mapreduce/wordcount/input/
在hdfs文件系统上使用mapreduce
$ bin/hadoop jar share/hadoop/mapreduce/hadoop-mapreduce-examples-2.9.2.jar wordcount /user/chris/mapreduce/wordcount/input /user/chris/mapreduce/wordcount/output
红色代表:读取路径
蓝色代表:输出路径
所以mapreduce的结果已经写到了hdfs的输出文件里面去了
Yarn on a Single Node
/opt/modules/hadoop-2.5.0/etc/hadoop/yarn-site.xml 在hadoop的安装路径下
<configuration>
   <property>
     <name>yarn.resourcemanager.hostname</name>
  <value>hella-hadoop.chris.com</value>
   </property>
   <property>
     <name>yarn.nodemanager.aux-services</name>
  <value>mapreduce_shuffle</value>
   </property>
</configuration>
yarn 的配置已经完成
在同一目录下slave文件上添加主机名或者主机ip,默认是localhost
yarn-env.sh 和 mapred-env.sh把JAVA_HOME 更改下,防止出错
export JAVA_HOME=/home/chris/software/jdk1.8.0_201
将mapred-site.xml.template 重命名为mapred-site.xml,同时添加以下配置
<configuration>
    <property>
        <name>mapreduce.framework.name</name>
        <value>yarn</name>
    </property>
</configuration>
先将/user/chris/mapreduce/wordcount/output/删除
再次执行$ bin/hadoop jar share/hadoop/mapreduce/hadoop-mapreduce-examples-2.9.2.jar wordcount /user/chris/mapreduce/wordcount/input /user/chris/mapreduce/wordcount/output
伪分布式执行完毕,mapreduce 执行在了yarn 上
3,完全分布式
基于伪分布式,配置好一台机器后,分发至其它机器
step1: 配置ip 和 hostname 映射
vi /etc/hosts
192.168.178.110 hella-hadoop.chris.com hella-hadoop
192.168.178.111 hella-hadoop02.chris.com hella-hadoop02
192.168.178.112 hella-hadoop03.chris.com hella-hadoop03
同时在window以下路径也得设置
C:\Windows\System32\drivers\etc\hosts
192.168.178.110 hella-hadoop.chris.com hella-hadoop
192.168.178.111 hella-hadoop02.chris.com hella-hadoop02
192.168.178.112 hella-hadoop03.chris.com hella-hadoop03
具体可参考linux ip hostname 映射
https://www.cnblogs.com/pickKnow/p/10701914.html
step2:部署(假设三台机器)
不同机器配置不同的节点
部署:


        hella-hadoop        hella-hadoop02         hella-hadoop03
HDFS:
        NameNode
        DataNode            DataNode               DataNode
                                                   SecondaryNameNode
YARN:
                            ResourceManager
        NodeManager            NodeManager            NodeManager

MapReduce:
          JobHistoryServer

配置:
     * hdfs
           hadoop-env.sh
           core.site.xml
           hdfs-site.xml
           slaves
     *yarn
           yarn-env.sh
           yarn-site.xml
           slaves
     *mapreduce
           mapred-env.sh
           mapred-site.xml
step3:修改配置文件
core.xml

<configuration>
    <property>
        <name>fs.defaultFS</name>
        <value>hdfs://hella-hadoop.chris.com:8020</value>
    </property>
    <property>
        <name>hadoop.tmp.dir</name>
        <value>/opt/app/hadoop-2.5.0/data/tmp</value>
    </property>
    <property>
        <name>fs.trash.interval</name>
        <value>10080</value>
    </property>

</configuration>
hdfs-site.xml
<configuration>
    <property>
        <name>dfs.namenode.secondary.http-address</name>
        <value>hella-hadoop03.chris.com:50090</value>
    </property>
</configuration>
slaves

hella-hadoop.chris.com
hella-hadoop02.chris.com
hella-hadoop03.chris.com
yarn-site.xml

<configuration>
   <property>
     <name>yarn.resourcemanager.hostname</name>
     <value>hella-hadoop02.chris.com</value>
   </property>
   <property>
     <name>yarn.nodemanager.aux-services</name>
     <value>mapreduce_shuffle</value>
   </property>
   <!--NodeManager Resouce -->
   <property>
     <name>yarn.nodemanager.resource.memory-mb</name>
     <value>4096</value>
   </property>
   <property>
     <name>yarn.nodemanager.resource.cpu-vcores</name>
     <value>4</value>
   </property>


   <property>
     <name>yarn.log-aggregation-enable</name>
     <value>true</value>
   </property>
   <property>
     <name>yarn.log-aggregation-retain-seconds</name>
     <value>640800</value>
   </property>

</configuration>
mapred-site.xml

<configuration>
    <property>
        <name>mapreduce.framework.name</name>
        <value>yarn</value>
    </property>
    <property>
        <name>mapreduce.jobhistory.address</name>
        <value>hella-hadoop.chris.com:10020</value>
    </property>

    <property>
      <name>mapreduce.jobhistory.webapp.address</name>
      <value>hella-hadoop.chris.com:19888</value>
    </property>
</configuration
step4:集群的配置路径在各个机器上要一样,用户名一样
step5: 分发hadoop 安装包至各个机器节点
scp -p 源节点 目标节点
使用scp 命令需要配置ssh 无密钥登陆,博文如下:
https://www.cnblogs.com/pickKnow/p/10734642.html
step6:启动并且test mapreduce
可能会有问题No route to Host 的Error,查看hostname 以及 ip 配置,或者是防火墙有没有关闭
防火墙关闭,打开,状态查询,请参考以下博文:
https://www.cnblogs.com/pickKnow/p/10670882.html
4,完全分布式+ HA
HA全称:HDFS High Availability Using the Quorum Journal Manager 即 HDFS高可用性通过配置分布式日志管理
HDFS集群中存在单点故障(SPOF),对于只有一个NameNode 的集群,若是NameNode 出现故障,则整个集群无法使用,知道NameNode 重新启动。
HDFS HA 功能则通过配置Active/StandBy 两个NameNodes 实现在集群中对NameNode 的热备来解决上述问题,如果出现故障,如机器崩溃或机器需要升级维护,这时可以通过此种方式将NameNode很快的切换到另一台机器.
在以上的分布式配置如下:假设有三台机器
配置要点:
* share edits
JournalNode
*NameNode
Active,Standby
*Client
proxy
*fence
隔离,同一时刻只能仅有一个NameNode对外提供服务
规划集群:
hella-hadoop.chris.com hella-hadoop02.chris.com hella-hadoop03.chris.com
NameNode NameNode
JournalNode JournalNode JournalNode
DateNode DateNode DateNode
因为NameNode有两个,一个备份,所以就不需要secondarynamenode了
配置:
core-site.xml
    <property>
      <name>fs.defaultFS</name>
      <value>hdfs://ns1</value>
    </property>
hdfs-site.xml
<!-- 代表一个nameservice -->
    <property>
      <name>dfs.nameservices</name>
      <value>ns1</value>
    </property>

    <!-- ns1 有两个namenode -->
    <property>
      <name>dfs.ha.namenodes.ns1</name>
      <value>nn1,nn2</value>
     </property>

     <!-- 分别配置namenode的地址 -->
     <property>
       <name>dfs.namenode.rpc-address.ns1.nn1</name>
       <value>hella-hadoop.chris.com:8020</value>
     </property>
     <property>
       <name>dfs.namenode.rpc-address.ns1.nn2</name>
       <value>hella-hadoop02.chris.com:8020</value>
      </property>

       <!-- 分别配置namenode web 端地址 -->
      <property>
          <name>dfs.namenode.http-address.ns1.nn1</name>
          <value>hella-hadoop.chris.com:50070</value>
      </property>
      <property>
        <name>dfs.namenode.http-address.ns1.nn2</name>
        <value>hella-hadoop02.chris.com:50070</value>
      </property>

         <!-- NameNode Shared Edits Address 即 journal node 地址 -->
    <property>
      <name>dfs.namenode.shared.edits.dir</name>
      <value>qjournal://hella-hadoop.chris.com:8485;hella-hadoop02.chris.com:8485;hella-hadoop03.chris.com:8485/ns1</value>
     </property>
      <!-- journal node 目录-->
     <property>
      <name>dfs.journalnode.edits.dir</name>
      <value>/opt/app/hadoop-2.5.0/data/dfs/jn</value>
     </property>


      <!-- HDFS 代理客户端 -->
    <property>
      <name>dfs.client.failover.proxy.provider.ns1</name>
      <value>org.apache.hadoop.hdfs.server.namenode.ha.ConfiguredFailoverProxyProvider</value>
    </property>

      <!-- fence 隔离 只允许一个namenode 激活 -->
      <!-- 如果使用fence ssh 隔离,要求机器namenode 的机器能够相互无密钥登陆-->
    <property>
      <name>dfs.ha.fencing.methods</name>
      <value>sshfence</value>
    </property>
    <property>
      <name>dfs.ha.fencing.ssh.private-key-files</name>
      <value>/home/chris/.ssh/id_rsa</value>
    </property>
配置完毕,分发到其他的两台机器,开始启动
step1:在各个JournalNode 节点桑,输入以下命令启动journalnode 服务
$sbin/hadoop-daemon.sh start journalnode
step2:在【nn1】上,对其进行格式化,并启动:
$bin/hdfs namenode-format
$sbin/hadoop-daemon.sh start namenode
step3:在【nn2】上,同步nn1的元数据信息:
$bin/hdfs namenode-bootstrapStandby
step4:启动【nn2】
$sbin/hadoop-daemon.sh start namenode
step5:将【nn1】切换为Active
$bin/hdfs haadmin-transitionToActive nn1
step6:在【nn1】上,启动所有的datanode
$sbin/hadoop-daemon.sh start datanode
4,完全分布式+ HA + zookeeper
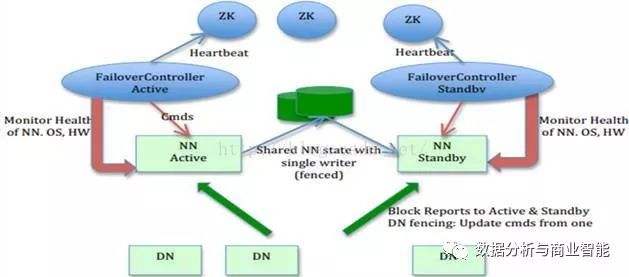
只配置HA,只是手动的故障转移,要想做到自动的故障转移,需要通过zookeeper 对集群的服务进行一个监控
zookeeper的作用:
* 启动以后两个namenode 都是standby
zookeeper 选举一个为Active
*监控
ZKFC:zookeeper failover controller
集群的守护进程更新如下:
hella-hadoop.chris.com hella-hadoop02.chris.com hella-hadoop03.chris.com
NameNode NameNode
ZKFC ZKFC
JournalNode JournalNode JournalNode
DateNode DateNode DateNode
ZKFC用来监控namenode

开始配置:
core-site.xml
<!--zookeeper集群配置-->
    <property>
       <name>ha.zookeeper.quorum</name>
      <value>hella-hadoop.chris.com:2181,hella-hadoop02.chris.com:2181,hella-hadoop03.chris.com:2181</value>
    </property>
hdfs-site.xml
<!-- failover 故障自动转移,依靠zookeeper 集群,zookeeper 配置在core -->
     <property>
      <name>dfs.ha.automatic-failover.enabled</name>
      <value>true</value>
     </property>
配置完毕,开始启动并且验证:
step1:关闭所有的HDFS 服务 sbin/stop-dfs.sh
step2: 启动Zookeeper集群 bin/zkServer.sh start
step3: 初始化HA 在Zookeeper中的状态 bin/hdfs zkfc -formatZK
step4:启动HDFS服务sbin/start-dfs.sh
stepc5:在各个NameNode 节点上启动DFSZK Failover Controller,先在那台机器启动,那台机器的NameNode就是Active NameNode
sbin/hadoop-daemon.sh start zkfc
验证:
jps 查看进程,可以将Active的进程kill, kill -9 pid
可以通过50070端口号在网页上直接查看,也可以通过命令查看namenode 是否实现故障自动转移,本来是standby 的namenode 转化为active


 浙公网安备 33010602011771号