
LeNet, AlexNet, VGG-16, GoogLeNet, ResNet的网络结构及代码
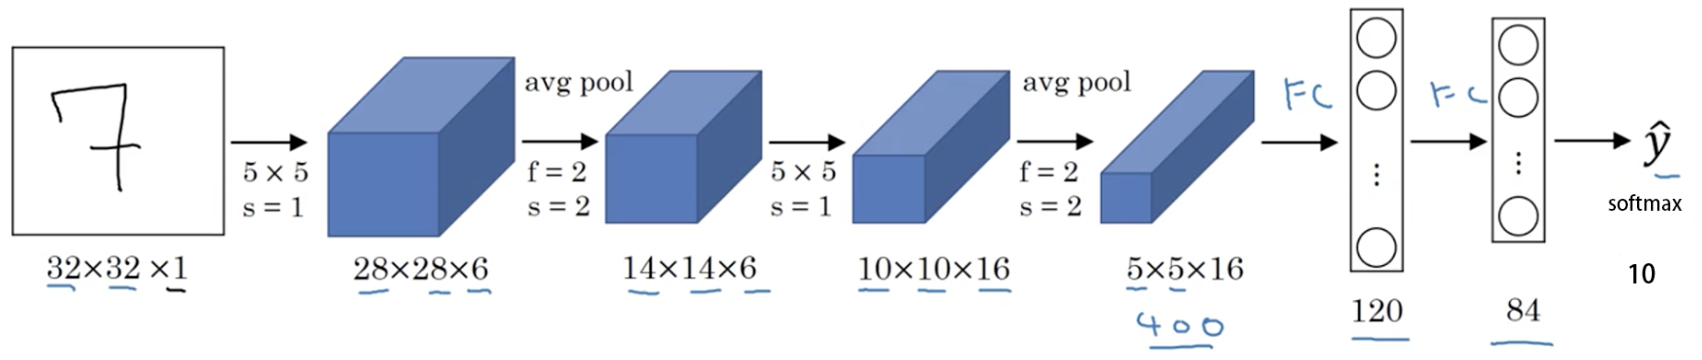
1. LeNet
class LeNet(nn.Module):
    def __init__(self):
        super(LeNet, self).__init__()  # 1, 32, 32

        layer1 = nn.Sequential()
        layer1.add_module('conv1', nn.Conv2d(1, 6, 5, 0))   # 6, 28, 28
        layer1.add_module('pool1', nn.MaxPool2d(2, 2))      # 6, 14, 14
        self.layer1 = layer1

        layer2 = nn.Sequential()
        layer2.add_module('conv2', nn.Conv2d(6, 16, 5, 0))  # 16, 10, 10
        layer2.add_module('pool2', nn.MaxPool2d(2, 2))      # 16, 5, 5
        self.layer2 = layer2

        layer3 = nn.Sequential()
        layer3.add_module('fc1', nn.Linear(400, 120))
        layer3.add_module('fc2', nn.Linear(120, 84))
        layer3.add_module('fc3', nn.Linear(84, 10))
        self.layer3 = layer3

    def forward(self, x):
        x = self.layer1(x)
        x = self.layer2(x)
        x = x.view(x.size(0), -1)
        out = self.layer3(x)
        return out
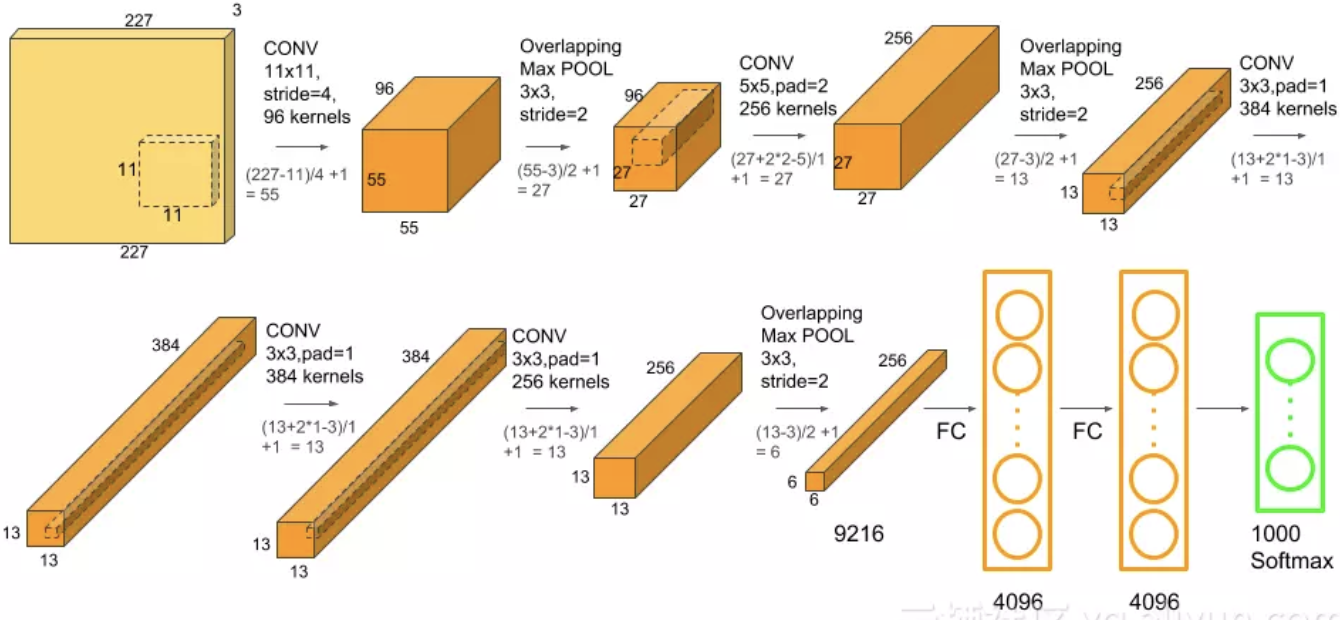
2. AlexNet
2012年,Alex等人提出的AlexNet网络在ImageNet大赛上以远超第二名的成绩夺冠。AlexNet的特点:
- 更深的网络结构
- 使用层叠的卷积层,即卷积层+卷积层+池化层来提取图像的特征
- 使用Dropout抑制过拟合
- 使用数据增强Data Augmentation抑制过拟合
- 使用Relu替换之前的sigmoid的作为激活函数
class AlexNet(nn.Module):
    def __init__(self):
        super(AlexNet, self).__init__()  # 224, 224, 3

        self.features = nn.Sequential(
            nn.Conv2d(3, 96, 11, 4, padding=2),     # 55, 55, 96
            nn.ReLU(True),
            nn.MaxPool2d(3, 2),                     # 27, 27, 96
            nn.Conv2d(96, 256, 5, 1, padding=2),    # 27, 27, 256
            nn.ReLU(True),
            nn.MaxPool2d(3, 2),                     # 13, 13, 256
            nn.Conv2d(256, 384, 3, 1, padding=1),   # 13, 13, 384
            nn.ReLU(True),
            nn.Conv2d(384, 384, 3, 1, padding=1),
            nn.ReLU(True),
            nn.Conv2d(384, 256, 3, 1, padding=0),   # 13, 13, 256
            nn.ReLU(True),
            nn.MaxPool2d(3, 2),                     # 6, 6, 256
        )

        self.classifier = nn.Sequential(
            nn.Dropout(),
            nn.Linear(6*6*256, 4096),
            nn.ReLU(True),
            nn.Dropout(),
            nn.Linear(4096, 4096),
            nn.ReLU(True),
            nn.Linear(4096, 1000),
        )

    def forward(self, x):
        x = self.features(x)
        x = x.view(x.size(0), -1)
        out = self.classifier(x)
        return out
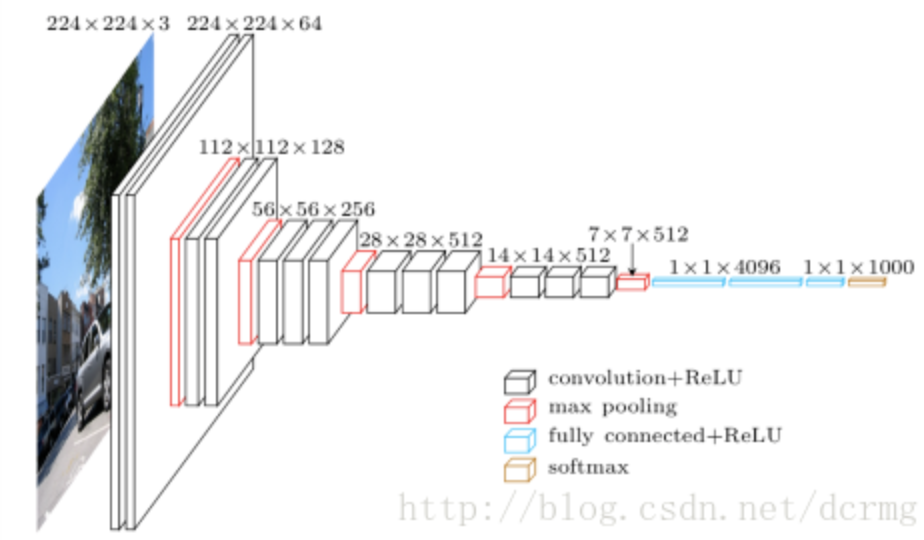
3. VGGNet
VGGNet获得了2014年ImageNet比赛的亚军和定位项目的冠军,VGG16包含13个卷积层和3个全连接层,VGG19包含16个卷积层和3个全连接层。VGG网络的结构非常一致,从头到尾全部使用的是3x3的卷积和2x2的max pooling。下面是VGG16的代码。
class VGGNet(nn.Module):
    def __init__(self):
        super(VGGNet, self).__init__()              # 224, 224, 3

        self.features = nn.Sequential(
            nn.Conv2d(3, 64, 3, 1, padding=1),      # 224, 224, 64
            nn.ReLU(True),
            nn.Conv2d(64, 64, 3, 1, padding=1),     # 224, 224, 64
            nn.ReLU(True),
            nn.MaxPool2d(2, 2),                     # 112, 112, 64
            nn.Conv2d(64, 128, 3, 1, padding=1),    # 112, 112, 128
            nn.ReLU(True),
            nn.Conv2d(128, 128, 3, 1, padding=1),   # 112, 112, 128
            nn.ReLU(True),
            nn.MaxPool2d(2, 2),                     # 56, 56, 128
            nn.Conv2d(128, 256, 3, 1, padding=1),   # 56, 56, 256
            nn.ReLU(True),
            nn.Conv2d(256, 256, 3, 1, padding=1),   # 56, 56, 256
            nn.ReLU(True),
            nn.Conv2d(256, 256, 3, 1, padding=1),   # 56, 56, 256
            nn.ReLU(True),
            nn.MaxPool2d(2, 2),                     # 28, 28, 256
            nn.ReLU(True),
            nn.Conv2d(256, 512, 3, 1, padding=1),   # 28, 28, 512
            nn.ReLU(True),
            nn.Conv2d(512, 512, 3, 1, padding=1),   # 28, 28, 512
            nn.ReLU(True),
            nn.Conv2d(512, 512, 3, 1, padding=1),   # 28, 28, 512
            nn.ReLU(True),
            nn.MaxPool2d(2, 2),                     # 14, 14, 512
            nn.Conv2d(512, 512, 3, 1, padding=1),   # 14, 14, 512
            nn.ReLU(True),
            nn.Conv2d(512, 512, 3, 1, padding=1),   # 14, 14, 512
            nn.ReLU(True),
            nn.Conv2d(512, 512, 3, 1, padding=1),   # 14, 14, 512
            nn.ReLU(True),
            nn.MaxPool2d(2, 2),                     # 7, 7, 512
        )

        self.classifier = nn.Sequential(
            nn.Linear(7*7*512, 4096),
            nn.ReLU(True),
            nn.Dropout(),
            nn.Linear(4096, 4096),
            nn.ReLU(True),
            nn.Dropout(),
            nn.Linear(4096, 1000),
        )

        self._initlize_weights()

    def forward(self, x):
        x = self.features(x)
        x = x.view(x.size(0), -1)
        out = self.classifier(x)
        return out
4. GoogleNet
GoogleNet提出Inception模块设计,原始Inception模块的基本结构如下图(a),但是该模块的参数量很大,计算量也很大,为此,Google团队提出如下图(b)的Inception结构。
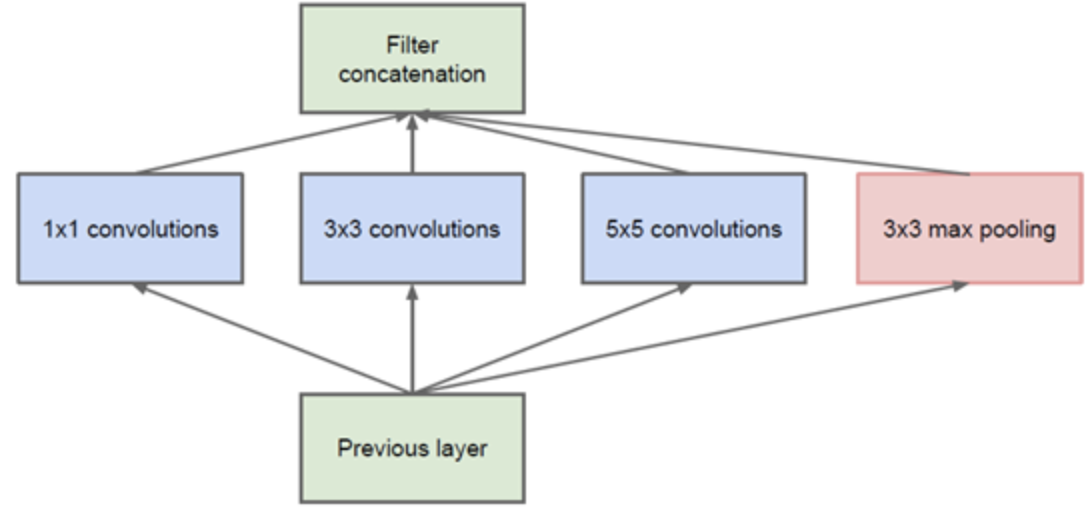 (a)
(a)
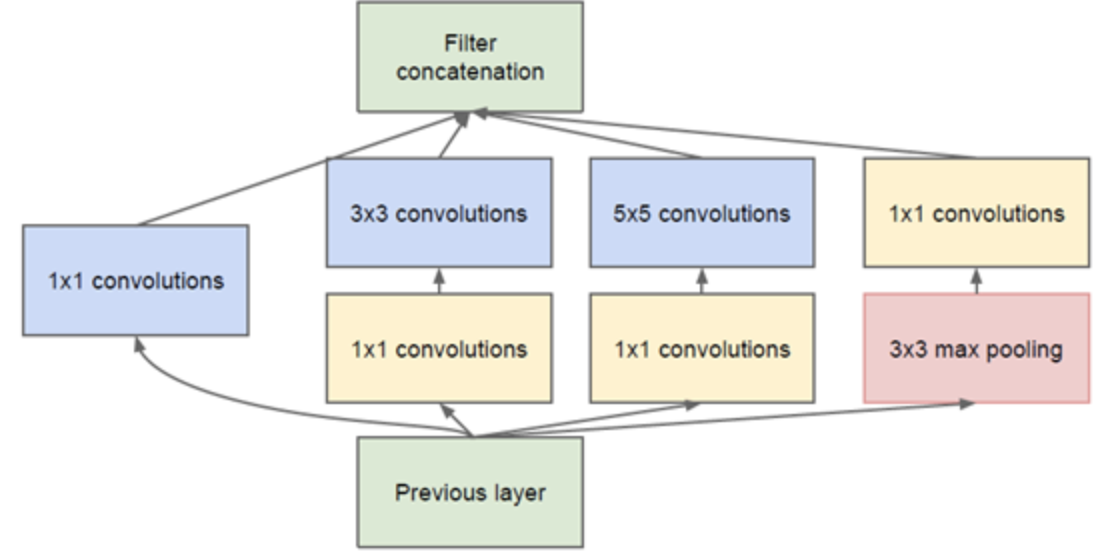
(b)

下图摘自:Inception网络模型
1x1的卷积核有什么用呢?[5]
1x1卷积的主要目的是为了减少维度,还用于修正线性激活(ReLU)。比如,上一层的输出为100x100x128,经过具有256个通道的5x5卷积层之后(stride=1,pad=2),输出数据为100x100x256,其中,卷积层的参数为128x5x5x256= 819200。而假如上一层输出先经过具有32个通道的1x1卷积层,再经过具有256个输出的5x5卷积层,那么输出数据仍为为100x100x256,但卷积参数量已经减少为128x1x1x32 + 32x5x5x256= 204800,大约减少了4倍。
GoogLeNet结构:

GoogLeNet网络结构明细表解析如下:[5]
0、输入
原始输入图像为224x224x3,且都进行了零均值化的预处理操作(图像每个像素减去均值)。
1、第一层(卷积层)
使用7x7的卷积核(滑动步长2,padding为3),64通道,输出为112x112x64,卷积后进行ReLU操作
经过3x3的max pooling(步长为2),输出为((112 - 3+1)/2)+1=56,即56x56x64,再进行ReLU操作
2、第二层(卷积层)
使用3x3的卷积核(滑动步长为1,padding为1),192通道,输出为56x56x192,卷积后进行ReLU操作
经过3x3的max pooling(步长为2),输出为((56 - 3+1)/2)+1=28,即28x28x192,再进行ReLU操作
3a、第三层(Inception 3a层)
分为四个分支,采用不同尺度的卷积核来进行处理
(1)64个1x1的卷积核,然后RuLU,输出28x28x64
(2)96个1x1的卷积核,作为3x3卷积核之前的降维,变成28x28x96,然后进行ReLU计算,再进行128个3x3的卷积(padding为1),输出28x28x128
(3)16个1x1的卷积核,作为5x5卷积核之前的降维,变成28x28x16,进行ReLU计算后,再进行32个5x5的卷积(padding为2),输出28x28x32
(4)pool层,使用3x3的核(padding为1),输出28x28x192,然后进行32个1x1的卷积,输出28x28x32。
将四个结果进行连接,对这四部分输出结果的第三维并联,即64+128+32+32=256,最终输出28x28x256
3b、第三层(Inception 3b层)
(1)128个1x1的卷积核,然后RuLU,输出28x28x128
(2)128个1x1的卷积核,作为3x3卷积核之前的降维,变成28x28x128,进行ReLU,再进行192个3x3的卷积(padding为1),输出28x28x192
(3)32个1x1的卷积核,作为5x5卷积核之前的降维,变成28x28x32,进行ReLU计算后,再进行96个5x5的卷积(padding为2),输出28x28x96
(4)pool层,使用3x3的核(padding为1),输出28x28x256,然后进行64个1x1的卷积,输出28x28x64。
将四个结果进行连接,对这四部分输出结果的第三维并联,即128+192+96+64=480,最终输出输出为28x28x480
第四层(4a,4b,4c,4d,4e)、第五层(5a,5b)……,与3a、3b类似
以上是基于Inception version 1的,关于Inception version 2、3、4的详情可参考 大话CNN经典模型:GoogLeNet(从Inception v1到v4的演进) 或者GoogLeNet团队的论文。其中Inception version 2有一个基本结构是这样的,用两个3*3卷积代替5*5卷积:
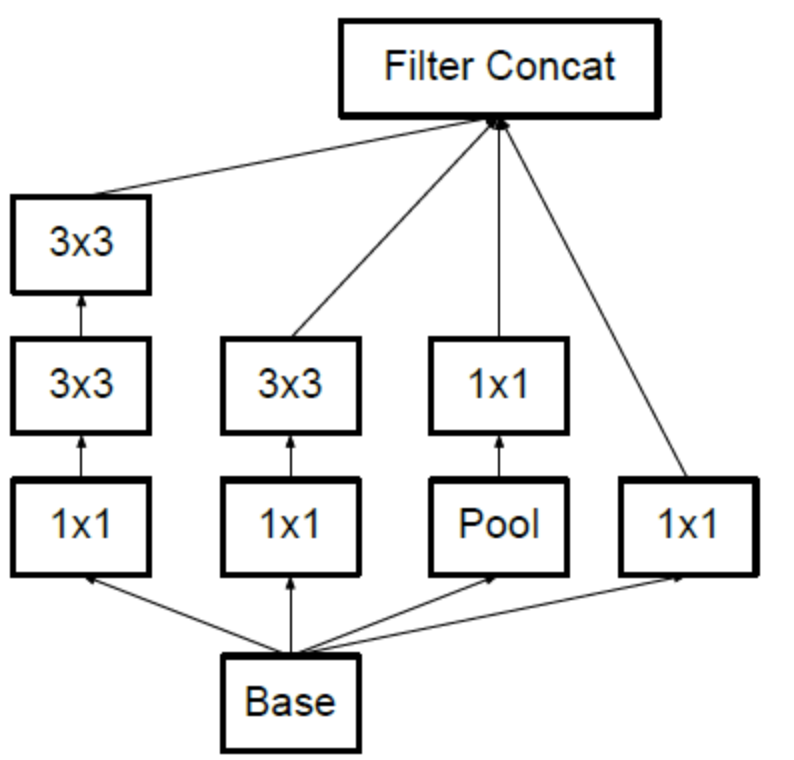
基于上图的Inception构建GoogLeNet的代码如下[6]:
import torch
import torch.nn as nn
import torch.nn.functional as F

#basic block: conv+bn+relu
class BasicConv2d(nn.Module):
    def __init__(self,  in_channels, out_channels, **kwargs):
        super(BasicConv2d, self).__init__()
        self.conv = nn.Conv2d(in_channels, out_channels, **kwargs)
        self.bn = nn.BatchNorm2d(out_channels)
    def forward(self, x):
        x = self.conv(x)
        x = self.bn(x)
        return F.relu(x)

#inception module
class Inception(nn.Module):
    def __init__(self, in_planes, n1x1, n3x3red, n3x3, n5x5red, n5x5, pool_planes):
        super(Inception, self).__init__()
        # 1x1 conv branch
        self.b1 = BasicConv2d(in_planes, n1x1, kernel_size=1)
        # 1x1 conv -> 3x3 conv branch
        self.b2_1x1 = BasicConv2d(in_planes, n3x3red, kernel_size=1)
        self.b2_3x3 = BasicConv2d(n3x3red, n3x3, kernel_size=3, padding=1)
        # 1x1 conv -> 3x3 conv -> 3x3 conv branch
        self.b3_1x1 = BasicConv2d(in_planes, n5x5red, kernel_size=1)
        self.b3_3x3_a = BasicConv2d(n5x5red, n5x5, kernel_size=3, padding=1)
        self.b3_3x3_b = BasicConv2d(n5x5, n5x5, kernel_size=3, padding=1)
        # 3x3 pool -> 1x1 conv branch
        self.b4_pool = nn.MaxPool2d(3, stride=1, padding=1)
        self.b4_1x1 = BasicConv2d(in_planes, pool_planes, kernel_size=1)

    def forward(self, x):
        y1 = self.b1(x)
        y2 = self.b2_1x1(x)
        y2 = self.b2_3x3(y2)
        y3 = self.b3_3x3_b(self.b3_3x3_a(self.b3_1x1(x)))
        y4 = self.b4_1x1(self.b4_pool(x))

        return torch.cat([y1, y2, y3, y4], 1)

class GoogLeNet(nn.Module):
    def __init__(self):
        super(GoogLeNet, self).__init__()
        self.pre_layers = BasicConv2d(3, 192,
                                      kernel_size=3, padding=1)

        self.a3 = Inception(192,  64,  96, 128, 16, 32, 32)
        self.b3 = Inception(256, 128, 128, 192, 32, 96, 64)

        self.maxpool = nn.MaxPool2d(3, stride=2, padding=1)

        self.a4 = Inception(480, 192,  96, 208, 16,  48,  64)
        self.b4 = Inception(512, 160, 112, 224, 24,  64,  64)
        self.c4 = Inception(512, 128, 128, 256, 24,  64,  64)
        self.d4 = Inception(512, 112, 144, 288, 32,  64,  64)
        self.e4 = Inception(528, 256, 160, 320, 32, 128, 128)

        self.a5 = Inception(832, 256, 160, 320, 32, 128, 128)
        self.b5 = Inception(832, 384, 192, 384, 48, 128, 128)

        self.avgpool = nn.AvgPool2d(8, stride=1)
        self.linear = nn.Linear(1024, 10)

    def forward(self, x):
        out = self.pre_layers(x)
        out = self.a3(out)
        out = self.b3(out)
        out = self.maxpool(out)
        out = self.a4(out)
        out = self.b4(out)
        out = self.c4(out)
        out = self.d4(out)
        out = self.e4(out)
        out = self.maxpool(out)
        out = self.a5(out)
        out = self.b5(out)
        out = self.avgpool(out)
        out = out.view(out.size(0), -1)
        out = self.linear(out)
        return out

def test():
    net = GoogLeNet()
    x = torch.randn(1, 3, 32, 32)
    y = net(x)
    print(y.shape)

test()
5. ResNet
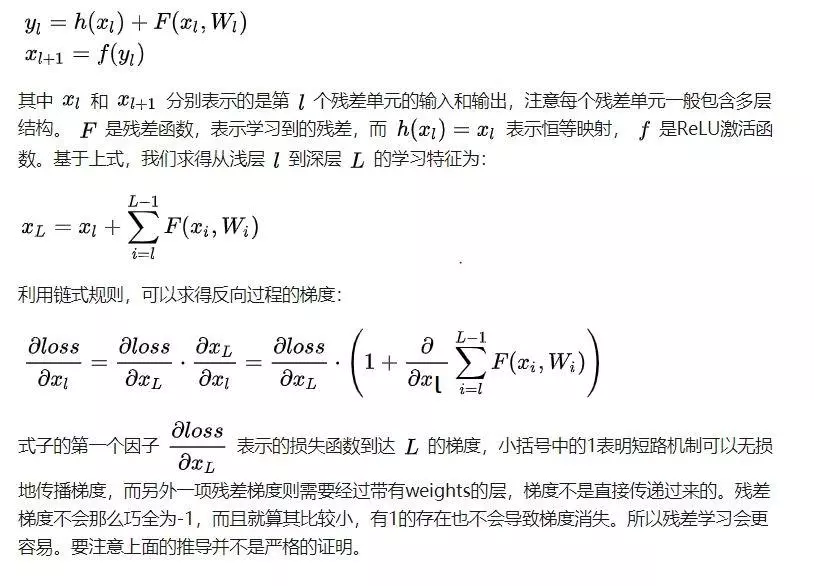
ResNet在2015年被提出,在ImageNet比赛classification任务上获得第一名。ResNet提出残差模块,如下图所示,假设某神经网络的输入是x,期望输出是H(x), 如果直接把输入x传到输出作为初始结果,那么此时需要学习的目标是F(x)=H(x)-x,也就是只需要学习残差。

残差学习为什么更容易[7]
各个ResNet网络结构
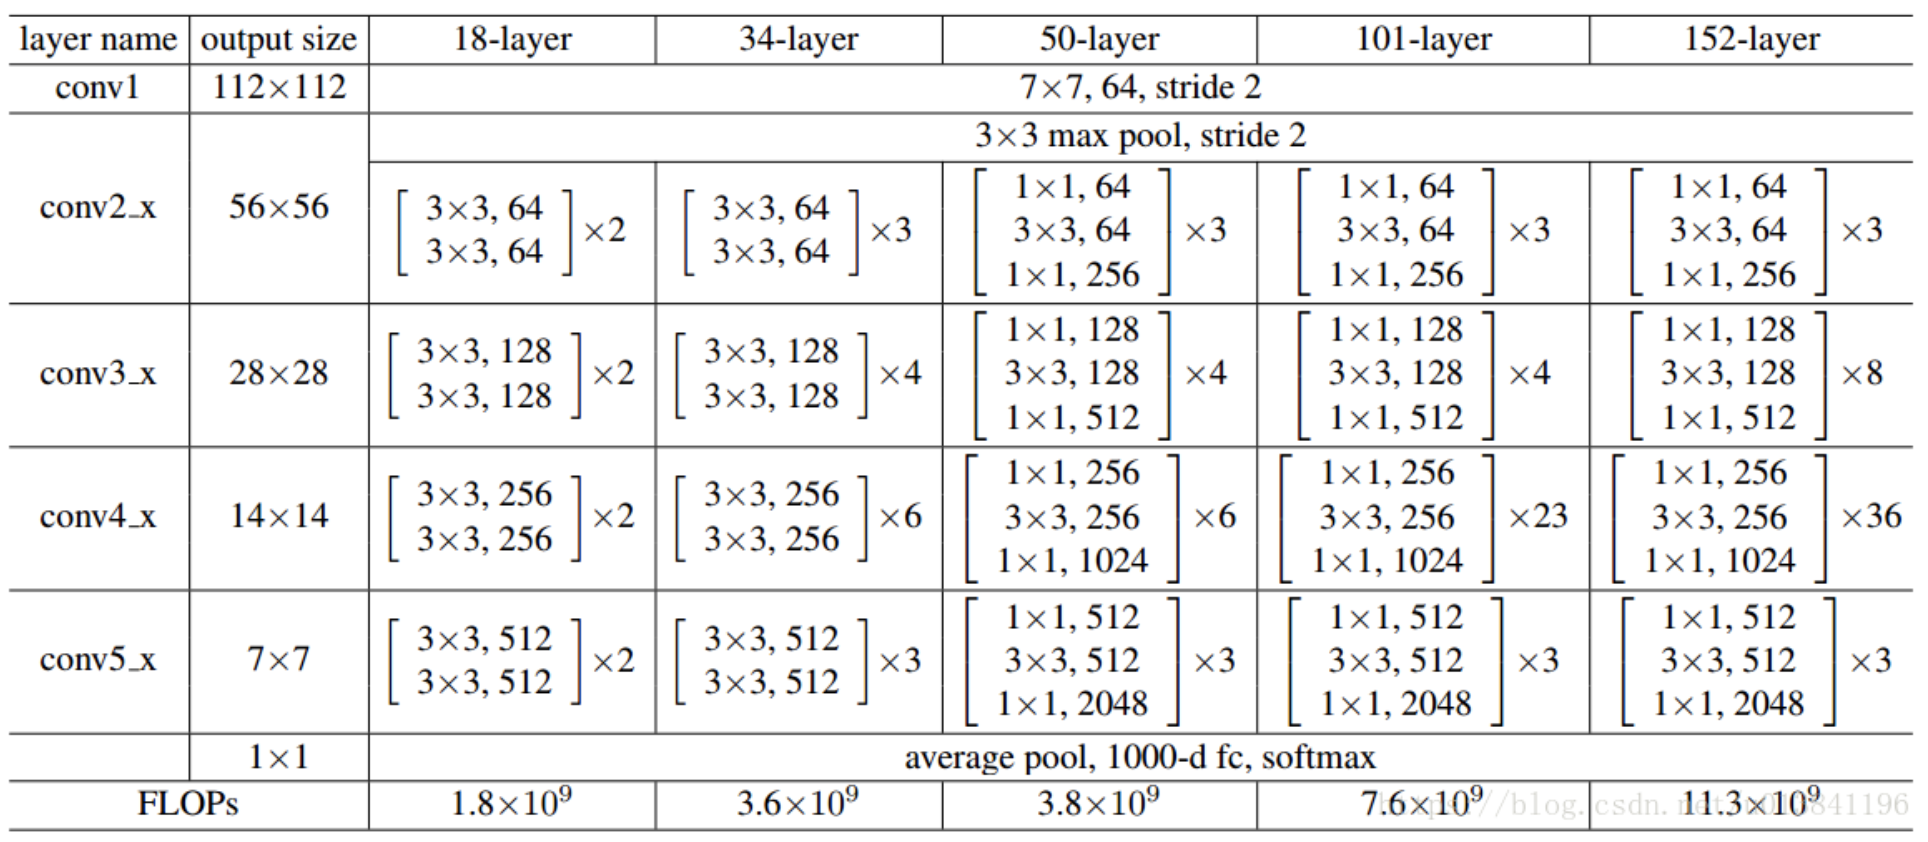
ResNet18和ResNet50的详细结构[8]
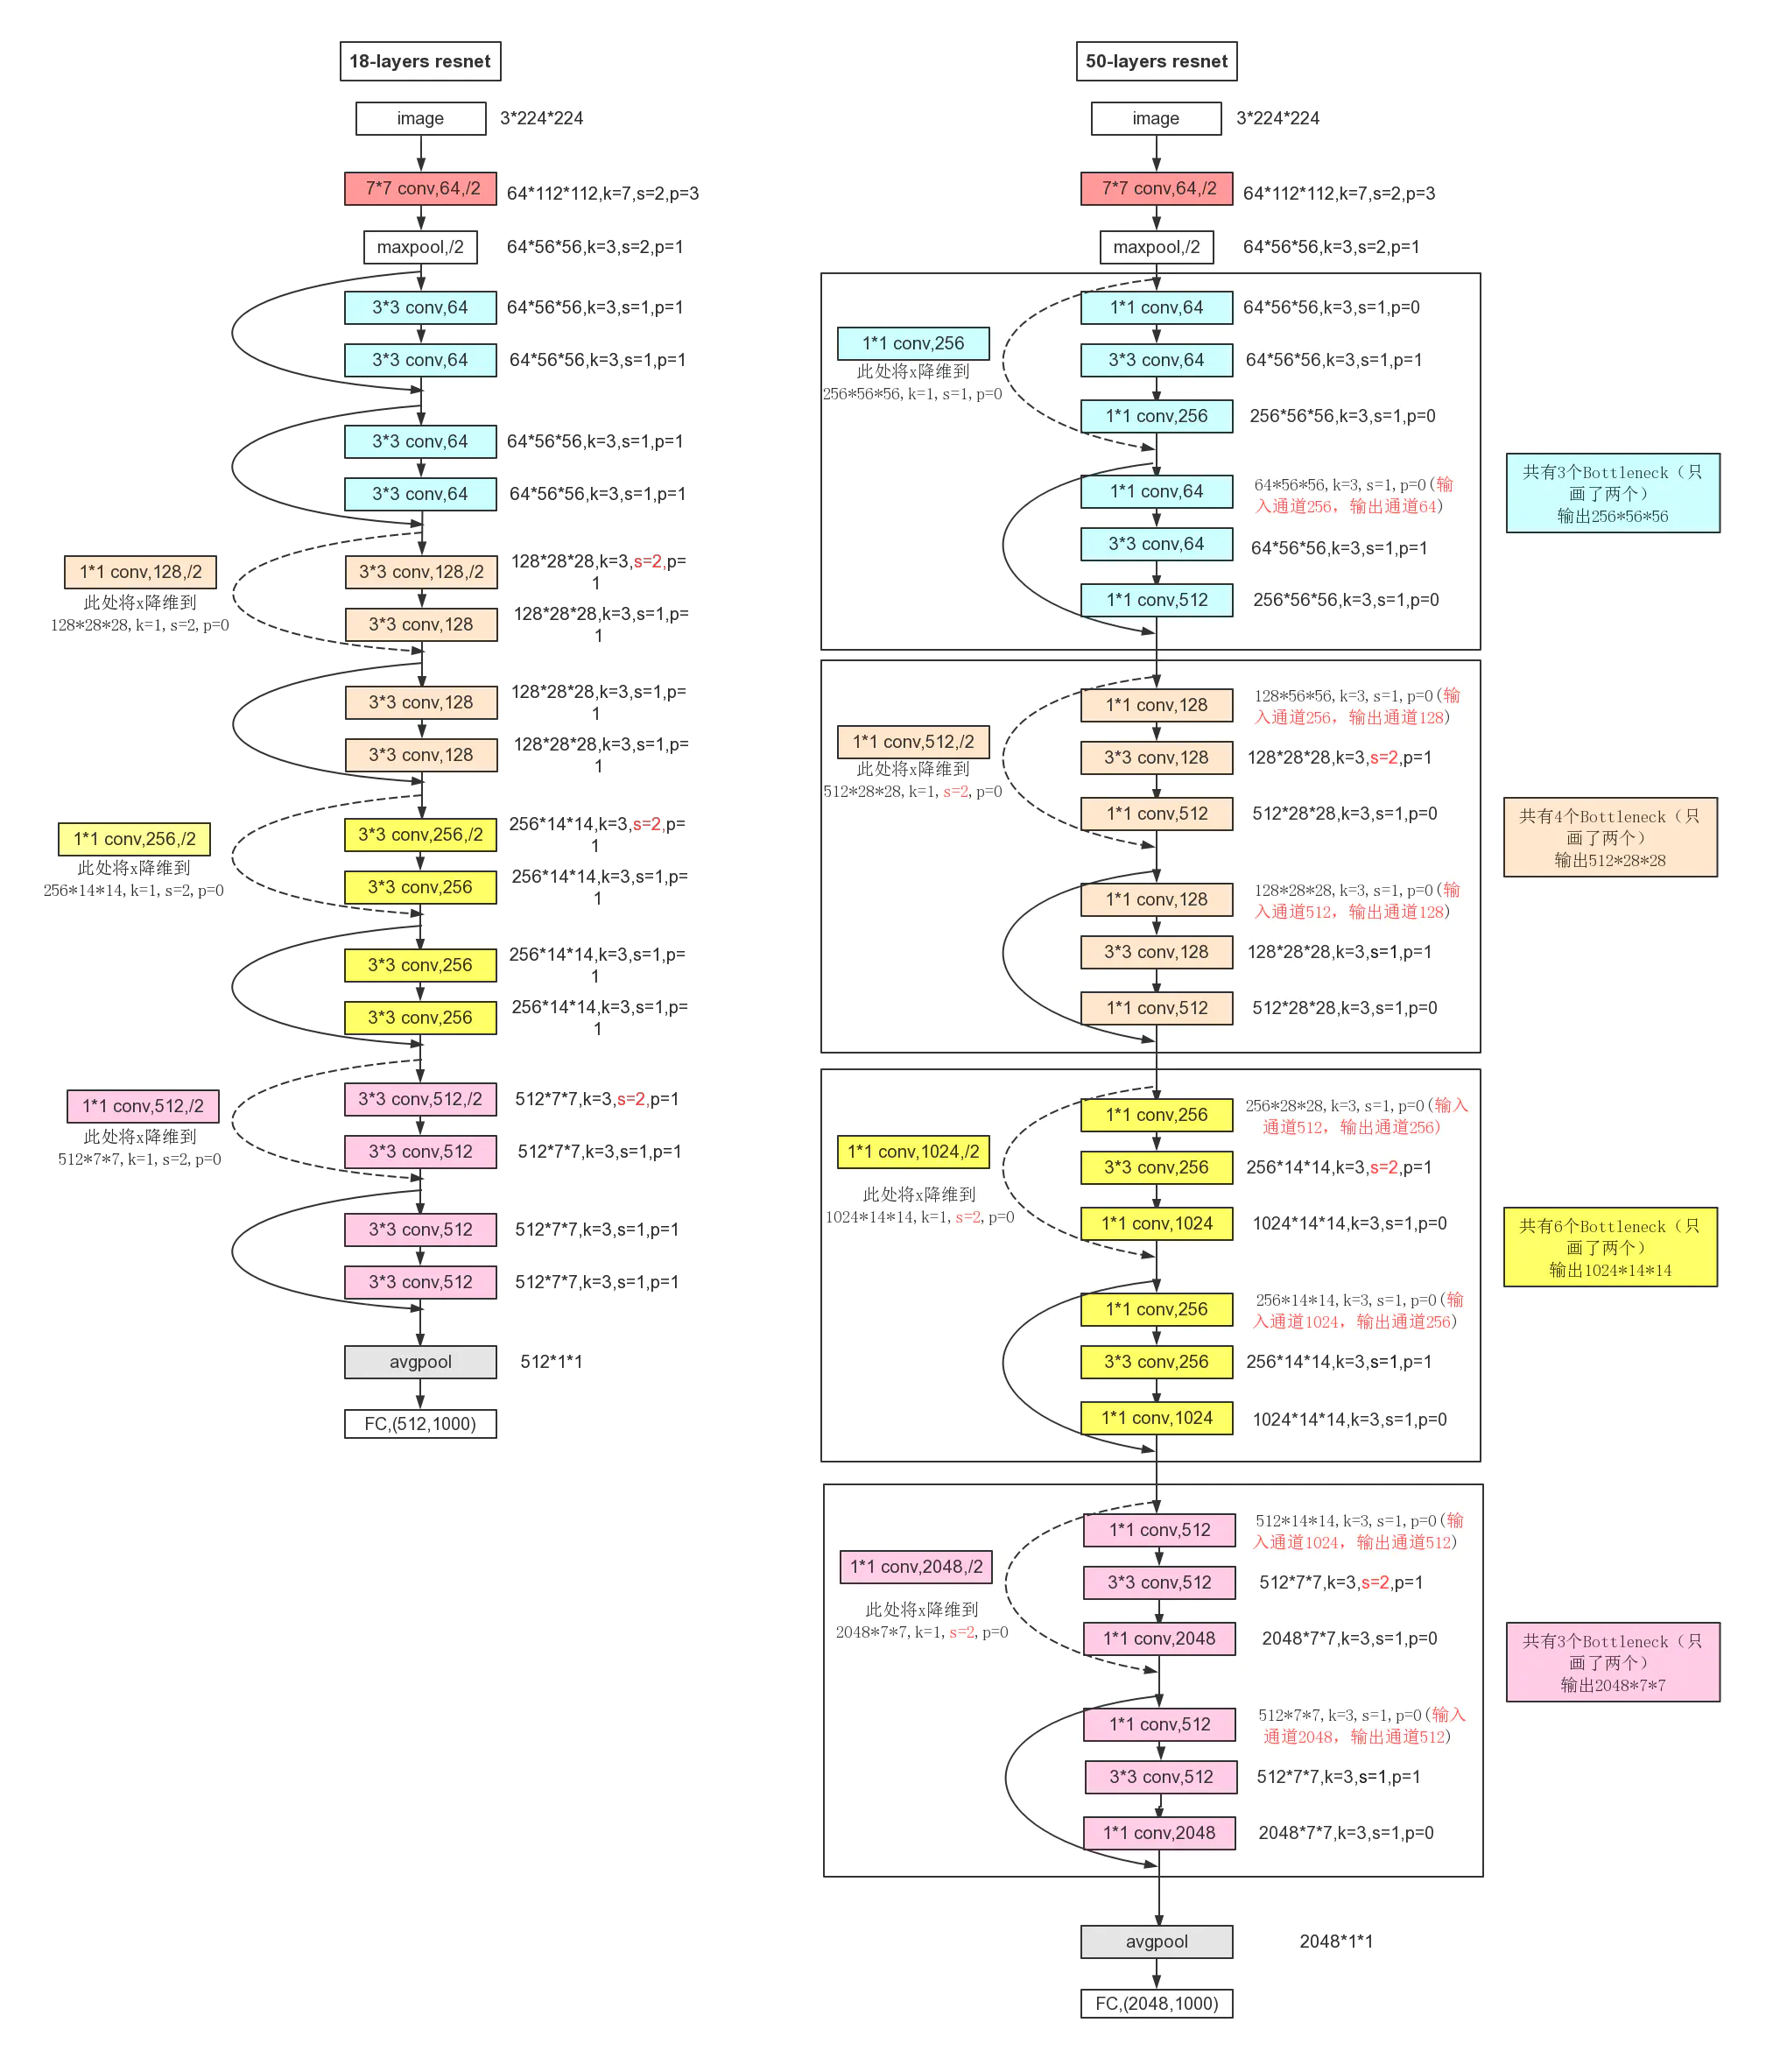
ResNet的PyTorch代码实现和解释: 解读PyTorch对ResNet的官方实现
参考文献:
[1]. 经典卷积神经网络结构——LeNet-5、AlexNet、VGG-16
[2]. 初探Alexnet网络结构
[3]. VGGNet网络结构
[4]. VGGNet
[5]. 大话CNN经典模型:GoogLeNet(从Inception v1到v4的演进)
[6]. inception v2 代码实现
[7]. Resnet结构及代码解析
[8]. resnet18 50网络结构以及pytorch实现代码
[9]. ResNet中的BasicBlock与bottleneck

 浙公网安备 33010602011771号