
第一题、安装和配置ansible
注:所有操作都是在控制节点上操作的;如果在其他配置信息中说明了做了免密登录,但是实际操作时没有发现免密登录,需联系考官
1)考试时,先查看是否提供了ansibe的软件仓库,如果没有提供,需要手动创建(会在其他配置信息中给出仓库的url)
$sudo yum-config-manager --add repo=http://content.example.com/rhel8.0/x86_64/ucfupdates/
$cd /etc/yum.repo
$ sudo vim content.example.com_rhel8.0_x86_64_ucfupdates_.repo
[content.example.com_rhel8.0_x86_64_ucfupdates_]
name=created by dnf config-manager from http://content.example.com/rhel8.0/x86_64/ucfupdates/
baseurl=http://content.example.com/rhel8.0/x86_64/ucfupdates/
enabled=1
gpgcheck=0
$ yum repolist
2)安装ansible
$ sudo yum -y install ansible
$ansible --version
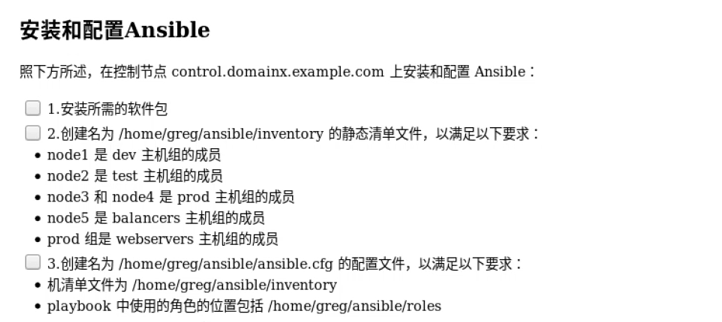
3)创建inventory文件
$kdir ansible
$cd ansible
$vim inventory
node1
node2
node3
node4
node5

[dev]
node1

[test]
node2

[prod]
node3
node4

[balancers]
node5

[webservers:children]
prod
4)检查
$ansible -i inventory dev --list-hosts
$ansible -i inventory test --list-hosts
$ansible -i inventory prod --list-hosts
$ansible -i inventory balancers --list-hosts
$ansible -i inventory webservices --list-hosts
5)创建ansible配置文件(remote-user是普通用户)
$cd ansible
$vim ansible.cfg
[defaults]
inventory = /home/greg/ansible/inventory
remote_user = greg
ask_pass = false
roles_path = /home/greg/ansible/roles

[privilege_escalation]
become = yes
become_method = sudo
become_user = root
become_ask_pass = false
注:首先要确保被管理节点上做了免密登录,即
$ssh root@node1
#vim /etcsydoers
greg ALL=(ALL) NOPASSWD: ALL
6)检测提权是否成功
$ansible all -a "id" #看到root表示提权成功
7)创建ansible配置文件(remote-user是root用户)
注:root用户没有做免密登录
$cd ansible
$vi ansible.cfg
[defaults]
inventory = /home/greg/ansible/inventory
remote_user = root
roles_path = /home/greg/ansible/roles
$cd ansible
$mkdir group_vars
$vim all
ansible_ssh_pass: redhat      #设置变量,被管理主机root密码为redhat
$vim ansible/inventory
node1
node2
node3
node4
node5

[dev]
node1

[test]
node2

[prod]
node3
node4

[balancers]
node5

[webservers:children]
prod
[all:vars]
ansible_ssh_pass = redhat
第二题、创建和运行ansible的临时命令
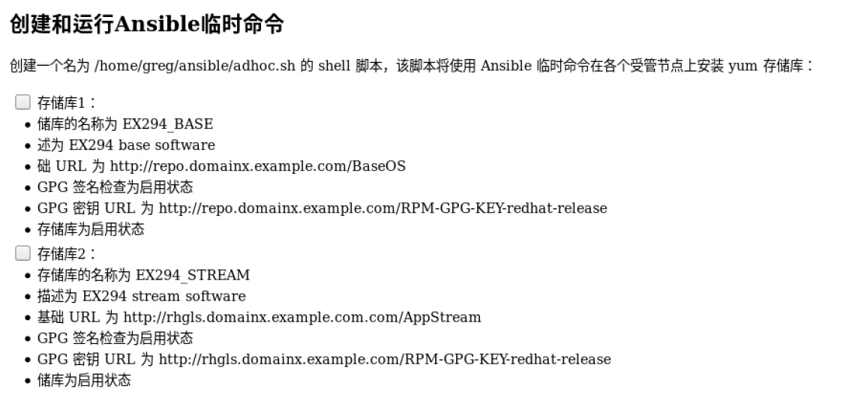
说明:本题为使用yum_repository的模块,设置软件仓库
1)查看yum_repository模块的写法
$ansible-doc yum_repository
2)编辑脚本
$cd ansible
$vim adhoc.sh
#!/bin/bash
ansible all -m yum_repository -a 'name="EX294_BASE" description="EX294 base software" baseurl="http://repo.domainx.example.com/BaseOS" gpgcheck=yes gpgkey="http://repo.domainx.example.com/RPM-GPG-KEY-redhat-release"'
ansible all -m yum_repository -a 'name="EX294_STREAM" description="EX294 stream software" baseurl="http://repo.domainx.example.com/AppStream" gpgcheck=yes gpgkey="http://repo.domainx.example.com/RPM-GPG-KEY-redhat-release"'
3)脚本执行
$chmod +x adhoc.sh
$ansible all -a "yum repolist"     #执行脚本前查看软件仓库
$./adhoc.sh
$ansible all -a "yum repolist"     #
第三题、安装软件包
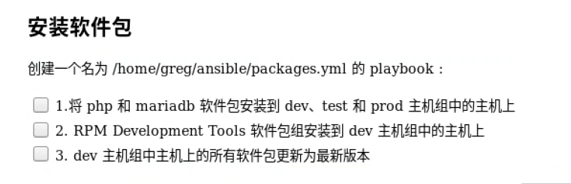
1)编辑
$cd ansible
$vim packages.yml
---
- name: install pkg
  hosts: dev,test,prod
  tasks:
    - name: use yum install
      yum:
        name:
          - php
          - mariadb
        state: latest
- name: install pkg
  hosts: dev
  tasks:
    - name: use yum module
      yum:
        name: "@RPM Development Tools"
        state: latest
    - name: use yum module
      yum:
        name: "*"
        state: latest
2)检查
$ansible-playbook packages.yml
$ansible dev,test,prod  -m shell -a 'rpm -qa|grep php'
$ansible dev,test,prod  -m shell -a 'rpm -qa|grep mariadb'
$ansible dev,test,prod  -m shell -a 'yum group list'
四、使用RHEL系统角色
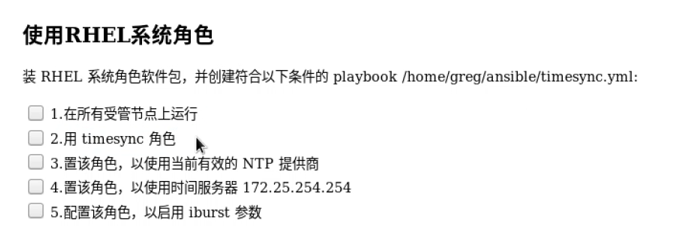
1)安装role软件包
$yum list |grep role
$sudo yum install -y rhel-system-roles
2)修改ansible配置文件(在roles_path中添加role的路径)
$cd ansible
$cat ansible.cfg
[defaults]
inventory = /home/greg/ansible/inventory
remote_user = greg
ask_pass = false
roles_path = /home/greg/ansible/roles:/usr/share/ansible/roles

[privilege_escalation]
become = yes
become_method = sudo
become_user = root
become_ask_pass = false
3)查看roles
$ansible-galaxy list
4)编辑playbook
$cat timesync.yml
---
- name: use system role
  hosts: all
  vars:
    timesync_ntp_servers:
            - hostname: 172.25.254.254
              iburst: yes
  roles:
    - rhel-system-roles.timesync
5)运行playbook并检查
$ansible all -a 'chronyc sources'
$ansible-playbook timesync.yml
$ansible all -a 'chronyc sources'
$ansible all -m shell -a "grep -i iburst /etc/chrony.conf"
补充题、编辑selinux.yml
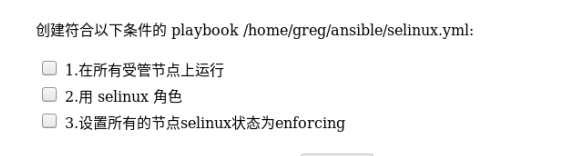
$cd ansible
$vim selinux.yml
---
- name: set selinux
  hosts: all
  vars:
    selinux_policy: targeted
    selinux_state: enforcing
  roles:
    - rhel-system-roles.selinux
五、使用Ansible Galaxy安装角色
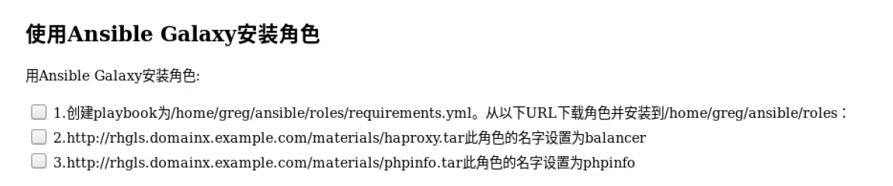
1)编辑playbook
$cd ansible
$vim requirements.yml
- src:  http://rhgls.domainx.example.com/materials/haproxy.tar
  name: balancer
- src: http://rhgls.domainx.example.com/materials/phpinfo.tar
  name: phpinfo
2)运行playbook并检查
$ansible-galaxy list
$ls roles
$ansible-galaxy install -r ./requirements.yml
$ansible-galaxy list
$ls roles
3)文件拷贝
cp /home/greg/ansible/requirements.yml /home/greg/ansible/roles/requirements.yml
六、创建一个web role
1)创建名为apache的role
$cd ansible
$cd role
$ansible-galaxy init apache
$ls
$cd ..
$ansible-galaxy list
2)创建index.html.j2文件
$vim roles/apache/templates/index.html.j2
Welcome to {{ ansible_fqdn }} on {{ ansible_default_ipv4.address }}
3)编辑playbook文件
$vim roles/apache/tasks/main.yml
- name: install pkg
  yum:
    name: httpd
    state: latest
- name: set httpd service
  service:
    name: httpd
    state: started
    enabled: yes
- name: set firewalld service
  service:
    name: firewalld
    state: started
    enabled: yes
- name: set firewalld to allow http traffic
  firewalld:
    service: http
    immediate: yes
    permanent: yes
    state: enabled
- name: set web content
  template:
    src: index.html.j2
    dest: /var/www/html/index.html
4)编辑apache.yml
$cd ansible
$vim apache.yml
---
- name: use apache role
  hosts: webservers
  roles:
    - apache
5)运行apache.yml
$ansible-playbook apache.yml
6)测试
$curl node3
$curl node4
七、从Ansible Gagaly使用角色

1)编辑roles.yml
$cd ansible
vim roles.yml
---
- name: use phpinfo role
  hosts: webservers
  roles:
    - phpinfo
- name: use haproxy role
  hosts: balancers
  roles:
    - balancer
  tasks:
    - firewalld:
            service: http
            immediate: yes
            permanent: yes
            state: enabled
2)运行roles.yml
$ansible-playbook roles.yml
3)检查
$curl node5
$curl node5
$curl node3.domainx.example.com/hello.php
$curl node4.domainx.example.com/hello.php
八、创建和使用逻辑卷

1)查看各节点卷组大小
$ansible all -a "vgs"
2)创建playbook
$cd ansible
$vim lv.yml
---
- name: all
  hosts: all
  tasks:
    - block:
        - lvol:
            vg: research
            lv: data
            size: 1500
        - filesystem:
            dev: /dev/research/data
            fstype: ext4
      rescue:
        - debug:
            msg: "Could not create logical volume of that size"
          when: ansible_lvm.vgs.research is defined
        - lvol:
            vg: research
            lv: data
            size: 800
          when: ansible_lvm.vgs.research is defined
        - filesystem:
            dev: /dev/research/data
            fstype: ext4
          when: ansible_lvm.vgs.research is defined
        - debug:
           msg: "Volume group does not exist"
          when: ansible_lvm.vgs.research is undefined
3)执行playbook并检查
$ansible all -a "lvs"
$ansible-playbook lv.yml
$ansible all -a "lvs"
九、生成主机文件
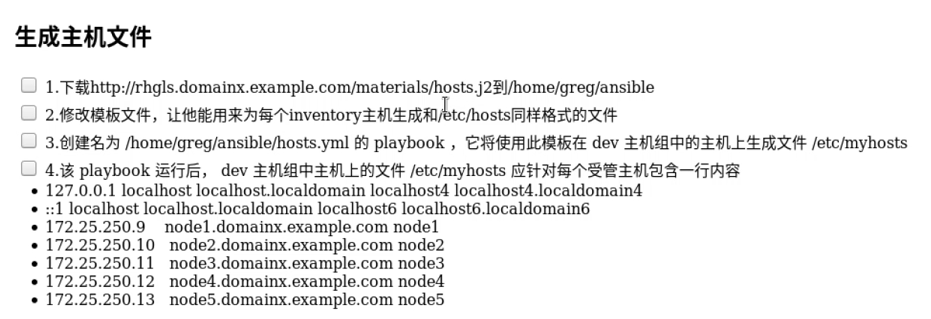
1)编写j2模板
$cd ansible
vim hosts.j2
127.0.0.1 localhost localhost.localdomain localhost4 localhost4.localdomain4
::1 localhost localhost.localdomain localhost6 localhost6.localdomain6
{% for host in groups.all %}
{{ hostvars[host].ansible_default_ipv4.address }} {{ hostvars[host].ansible_fqdn }} {{ hostvars[host]['ansible_hostname'] }}
{% endfor %}
2)编写playbook
$cd ansible
$vim hosts.yml
---
- name: create a host file
  hosts: all
  tasks:
    - name: template a host file
      template:
          src: hosts.j2
          dest: /etc/myhosts
      when: '"dev" in group_names'
3)执行playbook并检查
$ansible-playbook hosts.yml
$ansible all -a 'cat /etc/myhosts'
十、修改文件内容
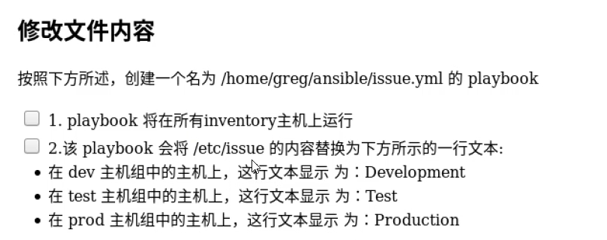
1)编辑playbook
$cd ansible
$vim issue.yml
---
- name: modify file content
  hosts: all
  tasks:
    - copy:
        content: Development
        dest: /etc/issue
      when: '"dev" in group_names'
    - copy:
        content: Test
        dest: /etc/issue
      when: '"test" in group_names'
    - copy:
        content: Production
        dest: /etc/issue
      when: '"prod" in group_names'
2)运行并检查
$ansible-playbook issue.yml
$ansible all -a "cat /etc/issue"
十一、创建web内容目录
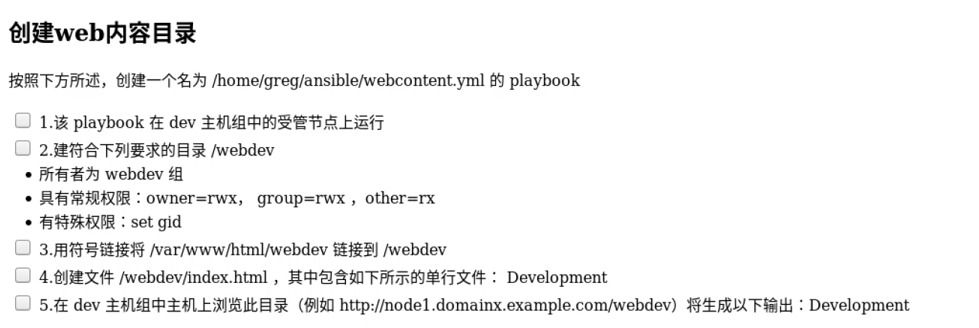
1)编写playbook
$cd ansible
$vim webcontent.yml
---
- name: set web content
  hosts: dev
  tasks:
    - name: yum install httpd
      yum:
        name: httpd
        state: latest
    - name: create directory
      file:
        path: /webdev
        state: directory
        group: webdev
        mode: "2775"
        setype: "httpd_sys_content_t"
    - name: create link file
      file:
        src: /webdev
        dest: /var/www/html/webdev
        state: link
    - name: set content
      copy:
        content: Development
        dest: /webdev/index.html
        setype: "httpd_sys_content_t"
    - name: set http service
      service:
        name: httpd
        state: started
        enabled: yes
    - name: set firwalld open
      service:
        name: firewalld
        state: started
        enabled: yes
    - name: set firewalld
      firewalld:
        service: http
        immediate: yes
        permanent: yes
        state: enabled
2)运行playbook并检查
$ansible-playbook webcontent.yml
curl http://node1.doaminx.example.com/webdev/
十二、生成硬件报告

1)编辑playbook
$cd ansible
$vim hwreport.yml
---
- name: create a hwreport
  hosts: all
  vars:
    hardware:
      - ww: HOST
        yy: "{{ ansible_hostname }}"
      - ww: MEMORY
        yy: "{{ ansible_memtotal_mb }}"
      - ww: BIOS
        yy: "{{ ansible_bios_version }}"
      - ww: DISK_SIZE_VDA
        yy: "{{ ansible_devices.vda.size | default('NONE') }}"
      - ww: DISK_SIZE_VDB
        yy: "{{ ansible_devices.vdb.size | default('NONE') }}"
  tasks:
    - get_url:
        url: http://rhgls.domainx.example.com/materials/hwreport.empty
        dest: /root/hwreport.txt
    - lineinfile:
        path: /root/hwreport.txt
        line: "{{  item.ww }}={{ item.yy }}"
        regexp: '^{{  item.ww }}='
      loop: "{{ hardware }}"
十三、使用Ansible Vault
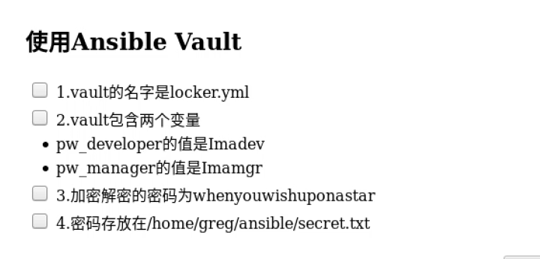
1)创建加密密码
$cd ansible
$vim secret.txt
whenyouwishuponastar
echo whenyouwishuponastar >>secret.txt
2)编辑yml文件
$vim locker.yml
pw_developer: Imadev
pw_manager: Imamgr
3)加密
$ansible-vault encrypt --vault-id=./secret.txt locker.yml
4)测试
$ansible-vault view --vault-id=./secret.txt locker.yml
十四、创建批量添加用户role
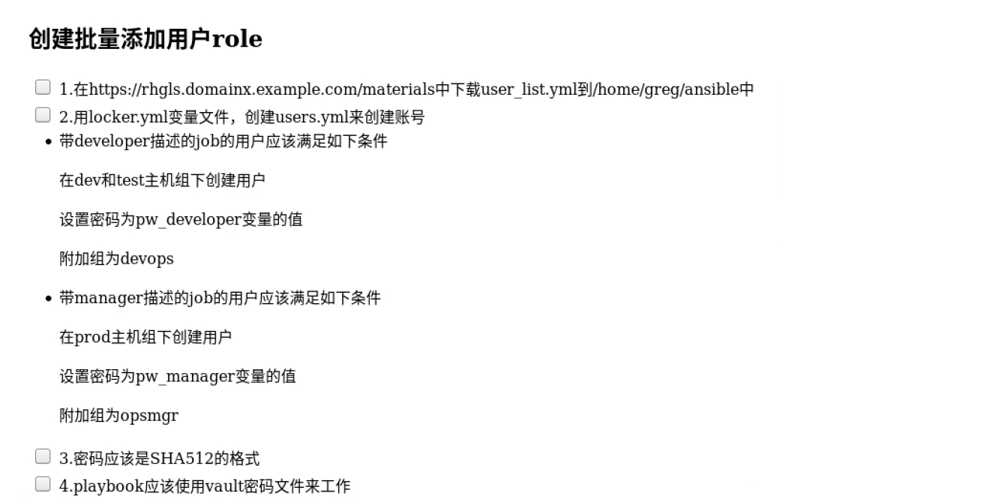
1)编辑playbook
$cd ansible
$vim users.yml
---
- name: create user on dev and test
  hosts: dev,test
  vars_files:
    - locker.yml
    - user_list.yml
  tasks:
    - group:
        name: devops
        state: present
    - user:
        name: "{{ item.name }}"
        groups: devops
        password: "{{ pw_developer | password_hash('sha512','mysecretsalt') }}"
        expires: "{{ item.password_expire_MAX }}"
      loop: "{{ users }}"
      when: item.job == "developer"
- name: create user on prod
  hosts: prod
  vars_files:
      - locker.yml
      - user_list.yml
  tasks:
      - group:
          name: opsmgr
          state: present
      - user:
          name: "{{ item.name }}"
          password: "{{ pw_manager | password_hash('sha512','mysecretsalt') }}"
          groups: opsmgr
          uid: 6666
          expires: "{{ item.password_expire_MAX }}"
        loop: "{{ users }}"
        when: item.job == 'manager'
2)执行playbook
$ansible-playbook --vault-id=./secret.txt users.yml
十五、重新设置Ansible Vault密码
1)下载文件
$ wget http://rhgls.domainx.example.com/materials/salaries.yml
2)重新设置密码
$ ansible-vault rekey salaries.yml
Vault password: insecure4sure
New Vault password: bbe2de98389b
3)新密码查看
$ansible-vault view salaries.yml
十六、创建定时任务

$cd ansible
$ vim cron.yml
---
- name: cron
  hosts: all
  tasks:
    - user:
        name: natasha
        state: present
    - cron:
        user: natasha
        job: 'Logger "EX294 in progress"'
        minute: "*/2"


【推荐】国内首个AI IDE,深度理解中文开发场景,立即下载体验Trae
【推荐】编程新体验,更懂你的AI,立即体验豆包MarsCode编程助手
【推荐】抖音旗下AI助手豆包,你的智能百科全书,全免费不限次数
【推荐】轻量又高性能的 SSH 工具 IShell:AI 加持,快人一步
· TypeScript + Deepseek 打造卜卦网站:技术与玄学的结合
· Manus的开源复刻OpenManus初探
· AI 智能体引爆开源社区「GitHub 热点速览」
· 从HTTP原因短语缺失研究HTTP/2和HTTP/3的设计差异
· 三行代码完成国际化适配,妙~啊~