day04
1网页源码查看器
httpurlconnection类:用于发送或接收数据
ScrollView 只能有一个亲孩子(但可以有很多孙子辈)
package com.phone.weblook;import java.io.InputStream;import java.net.HttpURLConnection;import java.net.URL;import android.app.Activity;import android.os.Bundle;import android.os.StrictMode;import android.view.View;import android.widget.EditText;import android.widget.TextView;public class MainActivity extends Activity {private EditText et_path;private TextView tv_result;@Overrideprotected void onCreate(Bundle savedInstanceState) {super.onCreate(savedInstanceState);setContentView(R.layout.activity_main);et_path = (EditText) findViewById(R.id.et_path);tv_result = (TextView) findViewById(R.id.tv_result);}//[2]点击按钮进行查看 指定路径的源码public void click(View v){try {//[2.1]获取源码路径String path = et_path.getText().toString().trim();//[2.2]创建URL 对象指定我们要访问的网址(路径)URL url = new URL(path);//[2.3]拿到httpurlconnection对象 用于发送或者接受数据HttpURLConnection conn = (HttpURLConnection) url.openConnection();//[2.4]设置发送get请求//get要求大写,默认为get请求conn.setRequestMethod("GET");//[2.5]设置请求超时时间conn.setConnectTimeout(5000);//[2.6]获取服务器返回的状态码int code = conn.getResponseCode();//[2.7]如果code == 200 说明请求成功if(code == 200){//[2.8]获取服务器返回的数据 是以流的形式返回的// 由于把流转换成字符串是一个非常常见的操作 所以抽出一个工具类InputStream in = conn.getInputStream();//[2.9]使用我们定义的工具类把in转换成StringString content = StreamTools.readStream(in);//[2.9]把流里面的数据展示到textview上tv_result.setText(content);}} catch (Exception e) {e.printStackTrace();}}}
<LinearLayout xmlns:android="http://schemas.android.com/apk/res/android"xmlns:tools="http://schemas.android.com/tools"android:layout_width="match_parent"android:layout_height="match_parent"android:orientation="vertical"tools:context="com.phone.weblook.MainActivity" ><EditTextandroid:id="@+id/et_path"android:layout_width="match_parent"android:layout_height="wrap_content"android:hint="请输入查看网址" /><Buttonandroid:layout_width="wrap_content"android:layout_height="wrap_content"android:onClick="click"android:text="查看" /><ScrollViewandroid:layout_width="match_parent"android:layout_height="wrap_content" ><TextViewandroid:id="@+id/tv_result"android:layout_width="match_parent"android:layout_height="match_parent" /></ScrollView></LinearLayout>
2消息机制的写法(***)
[1]ANR Application not response 应用无响应 主线程(UI线程)
[2]如果在主线程中进行了耗时的操作(比如连接网络 拷贝大的数据)
[3]避免ANR 可以把耗时的操作 放到子线程中 自己再创建一个线程
[4]在4.0之后谷歌强制要求连接网络不能再主线程进行访问
09-11 10:32:32.932: W/System.err(10733): android.os.NetworkOnMainThreadException
[5]只有主线程(UI线程)才可以更新UI
[6]消息机制
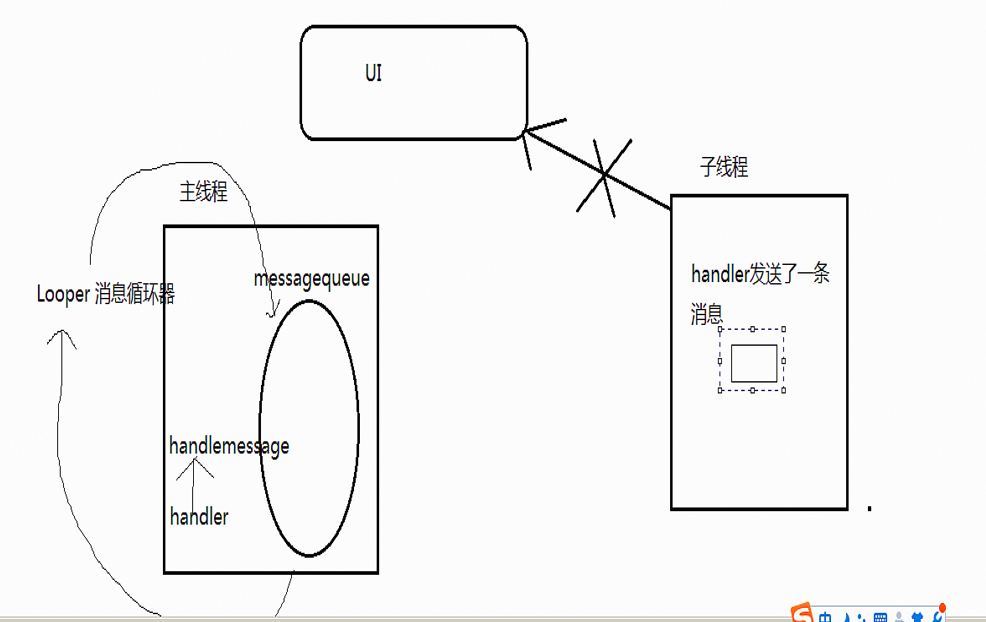
3handler原理(子线程传送数据给主线程)
handler使用步骤
[1]在主线程定义一个Handler
private Handler handler = new Handler(){};
[2]使用handler会重写handler里面的handleMessage方法
private Handler handler = new Handler(){public void handleMessage(android.os.Message msg){};};
[3]拿着我们在主线程创建的handler去子线程发消息
//[2.9.0]创建message对象Message msg = new Message();//发一条消息 消息里把数据放到了msg里handleMessage方法就会执行msg.obj = content;//[2.9.1]拿着我们创建的hangler(助手)告诉系统 说我要更新UIhandler.sendMessage(msg);
[4]handleMessage方法就会执行 在这个方法里去更新UI
private Handler handler = new Handler(){public void handleMessage(android.os.Message msg){//所以就可以在主线程里面更新Ui了String content = (String) msg.obj;tv_result.setText(content);};};
handler的作用是用来发消息和处理消息的
Looper的作用是去消息队列里面取消息
Looper是在主线一创建Looper就有了

规则:不管什么版本的手机,只要做耗时的操作(比如连接网络 比如拷贝大的数据 等等)就自己开一个子线程,获取数据后想要更新UI 就使用handler就可以了
4图片查看器
[1]把流信息转换成bitmap对象
[2]bitmapFactory。decodeStream(inputStream in)
[3]最后要加上网络访问权限
5runOnUiThread写法
[1]如果仅仅就是更新UI 那么就用runOnUIThread这个API就可以
[2]有的时候可以通过Handler发送消息 携带数据 这时候必须的用handler
6常见消息Api
handler
postDelayed方法延迟运行run函数
new Handler().postDelayed(new Runnable() {@Overridepublic void run() {Toast.makeText(getApplicationContext(), "ououououou", 0).show();}}, 5000);
定时器Timer
timer = new Timer();task = new TimerTask() {@Overridepublic void run() {runOnUiThread(new Runnable() {@Overridepublic void run() {Toast.makeText(getApplicationContext(), "ououououou", Toast.LENGTH_LONG).show();}});// System.out.println("asdfsdf");}};//5秒后执行// timer.schedule(task, 5000);//3秒后每隔一秒执行timer.schedule(task, 3000, 1000);
7新闻客户端
[1]UI效果是公司里面美工去画的
[2]应用的传输数据 定义接口
[3]关于xml的数据 是服务器开发人员通过一定的技术手段返回的 对应Android开发人员 我们要会解析就OK,把我们关心的数据取出来 展示到Android中控件上
8开源项目smartimageview介绍
[1]把com包 源码包拷贝到当前工程
[2]在使用SmartImageView类的时候 在布局里面定义的时候 一定是这个类的完整包名 + 类名
9 smartimageview原理介绍
10今日总结
[1]网页源码查看器(掌握)
httpurlconnection
服务器是以流的形式把数据返回
[2]消息机制(掌握)
handler 当我想在子线程更新UI的时候需要使用到handler
[3]图片查看器
bitmapFactory 里面的方法都是静态方法 可以把一个流转换成bitmap
[4]runOnUiThread()必须会
[5]新闻客户端(包含前三天大多数知识点)
listview 开子线程去取数据 handler xml解析 baseAdapter
[6]smartImageView(掌握)
[7]自定义smartimageview(了解)
只言片语任我说,提笔句句无需忖。落笔不知寄何人,唯有邀友共斟酌。


