
Android实例剖析笔记(六)
上一篇文章介绍了我对Snake这个示例程序进行的一些简单修改,从这一篇开始真正开始详细分析Snake的具体实现。
本文首先分析Snake的界面Layout实现,并通过一个实验来说明项目中使用的FrameLayout和RelativeLayout这两种布局的效果,其次还介绍了一个用于UI优化的工具---hierarchyviewer。
Android Layout机制
1, FrameLayout
先来看官方文档的定义:FrameLayout是最简单的一个布局对象。它被定制为你屏幕上的一个空白备用区域,之后你可以在其中填充一个单一对象 — 比如,一张你要发布的图片。所有的子元素将会固定在屏幕的左上角;你不能为FrameLayout中的一个子元素指定一个位置。后一个子元素将会直接在前一个子元素之上进行覆盖填充,把它们部份或全部挡住(除非后一个子元素是透明的)。
有点绕口而且难理解,下面还是通过一个实例来理解吧。我们仿照Snake项目中使用的界面一样,建立一个简单的FrameLayout,其中包含两个Views元素:ImageView和TextView,而后面的TextView还包含在一个RelativeLayout中。

android:layout_width="fill_parent"
android:layout_height="fill_parent">
<ImageView
android:layout_width="fill_parent"
android:layout_height="fill_parent"
android:scaleType="center" android:src="@drawable/img0"/>
<RelativeLayout
android:layout_width="fill_parent"
android:layout_height="fill_parent" >
<TextView
android:text="Hello Android"
android:visibility="visible"
android:layout_width="wrap_content"
android:layout_height="wrap_content"
android:layout_centerInParent="true"
android:gravity="center_horizontal"
android:textColor="#ffffffff"
android:textSize="24sp"/>
</RelativeLayout>
</FrameLayout>
效果如下图所示:

2,UI优化
Android的tools目录下提供了许多实用工具,这里介绍其中一个用于查看当前UI结构视图的工具hierarchyviewer。
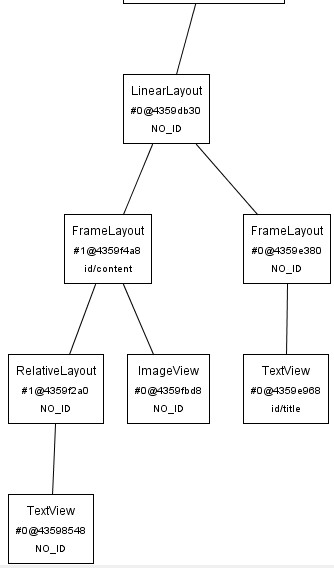
打开tools/hierarchyviewer.bat后,查看上面这个示例的UI结构图可得:

我们可以很明显的看到由红色线框所包含的结构出现了两个framelayout节点,很明显这两个完全意义相同的节点造成了资源浪费(这里可以提醒大家在开发工程中可以习惯性的通过hierarchyViewer查看当前UI资源的分配情况),那么如何才能解决这种问题呢(就当前例子是如何去掉多余的frameLayout节点)?这时候就要用到<merge />标签来处理类似的问题了。我们将上边xml代码中的framLayout替换成merge:
<ImageView
android:layout_width="fill_parent"
android:layout_height="fill_parent"
android:scaleType="center" android:src="@drawable/img0"/>
<RelativeLayout
android:layout_width="fill_parent"
android:layout_height="fill_parent" >
<TextView
android:text="Hello Android"
android:visibility="visible"
android:layout_width="wrap_content"
android:layout_height="wrap_content"
android:layout_centerInParent="true"
android:gravity="center_horizontal"
android:textColor="#ffffffff"
android:textSize="24sp"/>
</RelativeLayout>
</merge >
运行程序后在Emulator中显示的效果是一样的,可是通过hierarchyviewer查看的UI结构是有变化的,当初多余的FrameLayout节点被合并在一起了,或者可以理解为将merge标签中的子集直接加到Activity的FrameLayout跟节点下(这里需要提醒大家注意:所有的Activity视图的根节点都是frameLayout)。如果你所创建的Layout并不是用framLayout作为根节点(而是应用LinerLayout等定义root标签),就不能应用上边的例子通过merge来优化UI结构。
3,RelativeLayout
RelativeLayout允许子元素指定他们相对于其它元素或父元素的位置(通过ID指定)。因此,你可以以右对齐,或上下,或置于屏幕中央的形式来排列两个元素。元素按顺序排列,因此如果第一个元素在屏幕的中央,那么相对于这个元素的其它元素将以屏幕中央的相对位置来排列。如果使用XML来指定这个layout,在你定义它之前,被关联的元素必须定义。
解释起来也比较麻烦,不过我做个对比实验可以明白它的用处了,试着把上面例子里的RelativeLayout节点去掉看看,效果如下图所示,可以看到由于FrameLayout的原因,都在左上角靠拢了,而使用了RelativeLayout,则可以让TextView相对于屏幕居中。

4,Snake的界面分析
有了上述Layout的基础知识,我们再来看Snake的布局文件就很好理解了,就是一个SnakeView和一个TextView,启动后,后者会覆盖在前者上面。
android:layout_width="fill_parent"
android:layout_height="fill_parent">
<com.example.android.snake.SnakeView
android:id="@+id/snake"
android:layout_width="fill_parent"
android:layout_height="fill_parent"
tileSize="24"
/>
<RelativeLayout
android:layout_width="fill_parent"
android:layout_height="fill_parent" >
<TextView
android:id="@+id/text"
android:text="@string/snake_layout_text_text"
android:visibility="visible"
android:layout_width="wrap_content"
android:layout_height="wrap_content"
android:layout_centerInParent="true"
android:gravity="center_horizontal"
android:textColor="#ff8888ff"
android:textSize="24sp"/>
</RelativeLayout>
</FrameLayout>
也就是这样的效果:
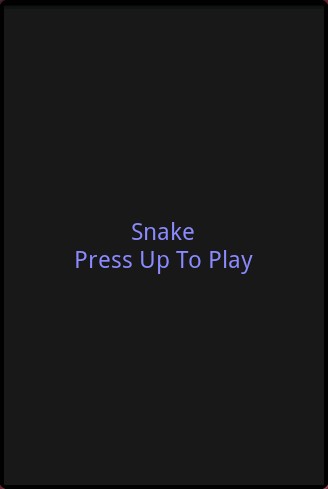
那么相应的代码是如何实现这个效果的呢?
SnakeView有一个私有变量存放覆盖其上的TextView:
在Snake这个activity的onCreate方法中,首先将Layout文件中的SnakeView和TextView关联起来:
mSnakeView = (SnakeView) findViewById(R.id.snake);
mSnakeView.setTextView((TextView) findViewById(R.id.text));
然后设置SnakeView的状态为Ready
这一句代码会调用下述函数:
{
int oldMode = mMode;
mMode = newMode;
if (newMode == RUNNING & oldMode != RUNNING)
{//游戏进入“运行”状态,则隐藏文字信息
mStatusText.setVisibility(View.INVISIBLE);
update();
return;
}
//根据新状态,设置待显示的文字信息
Resources res = getContext().getResources();
CharSequence str = "";
if (newMode == PAUSE)
{//新状态为“暂停”
str = res.getText(R.string.mode_pause);
}
if (newMode == READY)
{//新状态为“准备开始”
str = res.getText(R.string.mode_ready);
}
if (newMode == LOSE)
{//新状态为“游戏失败”
str = res.getString(R.string.mode_lose_prefix) + mScore
+ res.getString(R.string.mode_lose_suffix);
}
//设置文字信息并显示
mStatusText.setText(str);
mStatusText.setVisibility(View.VISIBLE);
}
在mStatusText.setVisibility(View.VISIBLE);这一句后就显示出上面这个游戏起始画面了。
作者:洞庭散人
出处:http://phinecos.cnblogs.com/

posted on 2009-08-28 19:02 Phinecos(洞庭散人) 阅读(9067) 评论(0) 编辑 收藏 举报


【推荐】国内首个AI IDE,深度理解中文开发场景,立即下载体验Trae
【推荐】编程新体验,更懂你的AI,立即体验豆包MarsCode编程助手
【推荐】抖音旗下AI助手豆包,你的智能百科全书,全免费不限次数
【推荐】轻量又高性能的 SSH 工具 IShell:AI 加持,快人一步
· 如何编写易于单元测试的代码
· 10年+ .NET Coder 心语,封装的思维:从隐藏、稳定开始理解其本质意义
· .NET Core 中如何实现缓存的预热?
· 从 HTTP 原因短语缺失研究 HTTP/2 和 HTTP/3 的设计差异
· AI与.NET技术实操系列:向量存储与相似性搜索在 .NET 中的实现
· 周边上新:园子的第一款马克杯温暖上架
· Open-Sora 2.0 重磅开源!
· .NET周刊【3月第1期 2025-03-02】
· 分享 3 个 .NET 开源的文件压缩处理库,助力快速实现文件压缩解压功能!
· [AI/GPT/综述] AI Agent的设计模式综述
2007-08-28 OpenGL入门笔记(十七)
2007-08-28 OpenGL入门笔记(十六)
2006-08-28 操作系统复习笔记(四)