thinkphp框架
Thinkphp
注意:
每次修改配置文件时,需要先把runtime下的temp下的文件删除掉然后再刷新才能生效
概要
1、完整形式
http://servername/index.php/模块/控制器/方法操作/键值对
2、模块下的类库文件命名空就按统一为:app\模块名,如
app\index\controller\Index
3、基本目录结构
www WEB部署目录(fleastrTest)
├─application 应用目录
│ ├─common 公共模块目录(可以更改)
│ ├─module_name 模块目录
│ │ ├─common.php 模块函数文件
│ │ ├─controller 控制器目录
│ │ ├─model 模型目录
│ │ ├─view 视图目录
│ │ ├─config 配置目录
│ │ └─ … 更多类库目录
│ │
│ ├─command.php 命令行定义文件
│ ├─common.php 公共函数文件
│ └─tags.php 应用行为扩展定义文件
│
├─config 应用配置目录
│ ├─module_name 模块配置目录
│ │ ├─database.php 数据库配置
│ │ ├─cache 缓存配置
│ │ └─ …
│ │
│ ├─app.php 应用配置
│ ├─cache.php 缓存配置
│ ├─cookie.php Cookie配置
│ ├─database.php 数据库配置
│ ├─log.php 日志配置
│ ├─session.php Session配置
│ ├─template.php 模板引擎配置
│ └─trace.php Trace配置
│
├─route 路由定义目录
│ ├─route.php 路由定义
│ └─… 更多
│
├─public WEB目录(对外访问目录)
│ ├─index.php 入口文件
│ ├─router.php 快速测试文件
│ └─.htaccess 用于apache的重写
│
├─thinkphp 框架系统目录
│ ├─lang 语言文件目录
│ ├─library 框架类库目录
│ │ ├─think Think类库包目录
│ │ └─traits 系统Trait目录
│ │
│ ├─tpl 系统模板目录
│ ├─base.php 基础定义文件
│ ├─convention.php 框架惯例配置文件
│ ├─helper.php 助手函数文件
│ └─logo.png 框架LOGO文件
│
├─extend 扩展类库目录
├─runtime 应用的运行时目录(可写,可定制)
├─vendor 第三方类库目录(Composer依赖库)
├─build.php 自动生成定义文件(参考)
├─composer.json composer 定义文件
├─LICENSE.txt 授权说明文件
├─README.md README 文件
├─think 命令行入口文件
控制器
initialize()
如果继承了基类控制器,那么可以定义控制器的初始化方法:initialize()
initialize()方法会在调用控制器方法之前执行
class Index extends Controller
{
    //初始化
    protected function initialize()
    {
        parent::initialize(); // TODO: Change the autogenerated stub
        echo 'init';//不能使用return
    }
    public function index()
    {
        return '第一模块的东西';
    }
当调用index方法时,会先调用initialize()方法

$beforeActionList
当继承Controller类后可以设置一个$beforeActionList属性来创建前置方法
所谓前置,是指无论当调用类中什么方法时,都会先调用数组中的方法。
<?php
class Before extends Controller
{
    protected $beforeActionList = [
        'first',    //数组中写方法名
    ];
    protected function first()
    {
        echo '1<br>';
    }
    public function  one()
    {
        return 'one';
    }
}
?>

其中还有 两种语法
<?php
   class Before extends Controller
{
    protected $beforeActionList = [
        'first',
        'second' => ['except'=>'one'],//调用one方法时不调用second前置
        'third' => ['only'=>'one,two'],//third前置只能通过调用one和two方法来触发
    ];
    protected function first()
    {
        echo '1<br>';
    }
    protected  function  second()
    {
        return '2<br>';
    }
    protected function  third()
    {
        return '3<br>';
    }

    public function  one()
    {
        return 'one';
    }

    public  function two()
    {
        return 'two';
    }
?>
跳转和重定向
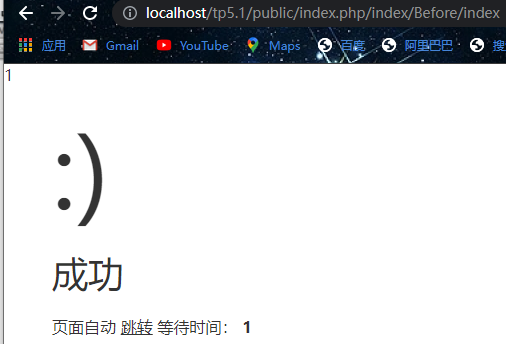
Controller类提供了两个跳转的方法:success(msg,url)和error(msg)
<?php
class Before extends Controller
{
     protected $wind = true;
     public  function  index()
     {
        if ($this->wind) {
            $this->success('成功','../');
        } else {
            $this->error('失败');
        }

        return 'index';
    }
}
?>
空方法拦截
    public function _empty($name){
        return '此方法不存在:'.$name;
    }
空控制器拦截
class Error
{
    public function index(Request $r)//控制器拦截有固定参数reque和方法controller
    {
        return '此控制器不存在:'.$r->controller();
    }
}
数据库与模型
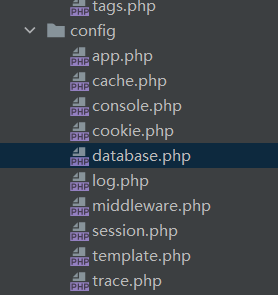
首先进入config目录下的database.php进行相关配置
输出数据库中的内容:
不使用Model
<?php

namespace app\index\controller;
use think\Controller;
use think\Db;

class DataTest extends Controller
{
    public function index(){
        return 'index';
    }

    public function getNoModelData()
    {
        //$data = Db::table('tp_user')->select();//不使用在database.php中配置的前缀
        $data = Db::name('user')->select();//使用在database.php中配置的前缀
        return json($data);//需要转换为json形式输出
    }
}
?>

使用Model
use app\index\model\User;//根据自己的目录修改
public function getModelData()
{
    $data = User::select();
    return json($data);
}
最终的结果是一样的,但是使用Modle会更简便一些
使用Model需要现在和controller目录同级的目录下创建一个model目录
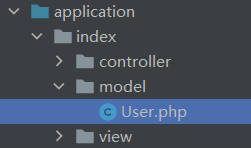
其中User.php的内容为
<?php
namespace app\model;


use think\Model;

class User extends Model
{

}
在配置文件app.php中
'app_trace' => false,//改为true可查看原生sql语句
前提是要先去掉json输出
 public function getModelData()
    {
        $data = User::select();
        //return json($data);
    }
之后在访问刚才那个页面右下角就会出现这个东西

打开之后点击SQL即可查看

基本查询
只查询一条数据,使用find()
$data = Db::name('user')->find();

获取sql语句
$data = Db::name('user')->find();
return Db::getLastSql();

指定查询
$data = Db::name('user')->where('age',14)->find();
没有查询到任何值,返回NULL
findOrFail()同样是查询一条数据,在没有数据时返回一个异常
findOrEmpty()同样是查询一条数据,在没有数据时返回一个空数组
获取多列数据,使用select()
$data = Db::name('user')->select();
多列数据在没有数据时返回一个空数组
使用selectOrFail()返回异常
使用提供的助手函数db
$data = \db('user')->select();
通过value()方法,查询指定字段的值(单个)
$data = Db::name('user')->value('name');

colunm(),查询指定列的值(多个),没有数据则返回空数组
id,指定id作为列值的索引
$data = Db::name('user')->column('name','id');
链式查询
用find()和select()来结束查询
当同一个对象实例第二次查询后,会保留第一次查询的值,所以使用removeOption()来清除上一次查询保留的值
class DataTest extends Controller
{
    public function index(){
        $user = Db::name('user');
        $data1 = $user->where('age',14)->order('id','desc')->find();//desc是倒序的意思
        $data2 = $user->removeOption('where')->removeOption('order')->select();
        return Db::getLastSql();
        //return json($data);
    }
}

增删改
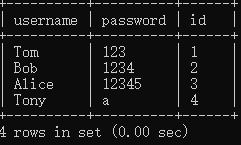
增
insert()
public function insert()
    {
        $data = [
            'username'  =>  'Tony',
            'password'  =>  'a',
            'id'        =>  '4',
        ];

        //$insert = Db::name('user')->insert($data);
        $insert = Db::name('user')->data($data)->insert();//可使用data,效果和上面一样
        return Db::getLastInsID();//获得ID
        return $insert;//如果新增成功,会返回1
    }
批量新增
public function insertAll()
    {
        $dataAll = [
            [
                'username'  =>  'Tony',
                'password'  =>  'a',
                'id'        =>  '4',
            ],
            [
                'username'  =>  'Tony2',
                'password'  =>  'a',
                'id'        =>  '4',
            ]
        ];

        Db::name('user')->insertAll($dataAll);
    }
改
public function update()
    {
       $data = [
           'username' => 'Dam'
       ];
       Db::name('user')->where('id',3)->update($data);
    }
如果表中包含主键,可以换种写法
public function update()
    {
       $data = [
           'username' => 'Dam'
           'id'       => 3
       ];
       Db::name('user')->update($data);
    }
inc,dec,增值减值
Db::name('user')->inc('price',3)->update($data);//第一个值是字段名,第二个值是键长,如price字段若不指定键长,则默认为1,执行一次操作,price的值就增加一,dec则相反,减1
exp()
可以 在字段中使用mysql函数
Db::name('user')->exp('username','UPPER(...)'->update($data);
raw()
public function update()
    {
       $data = [
           'username' => Db::raw('UPPER(username)'),
           'price' => Db::raw('price - 3'),
           'id'  =>  6
       ];
       Db::name('user')->update($data);
    }
setField()
更新一个字段值
Db::name('user')->where('id',3)->setField('username','Sam');
setInc()和setDec()
增减一个字段值
Db::name('user')->where('id',3)->setInc('price');
删
根据主键直接删除
删除一条
Db::name('user')->deldete(2);
删除多条
Db::name('user')->deldete([1,2,3]);
where()
Db::name('user')->where('id',3)->deldete();
删除所有数据
Db::name('user')->deldete(true);
比较查询
Db::name('user')->where('id','=/>/</>=/<=',3)->find();
区间查询
like()
$result = Db::name('user')->where('email','like','la%')->select();//查询email字段中开头是la的数据
$result = Db::name('user')->where('email','like',['la%','da%'],'or')->select();//查询email字段中开头是la或者da的数据
快捷方式
whereLike()和whereNolike()
$result = Db::name('user')->whereLike('email','la%')->select();
$result = Db::name('user')->whereNolike('email','la%')->select();
between,in和null和like是一样的
链式方法
关联数组查询
 public function index()
    {
        $result = Db::name('user')->where([
            'password'   =>   123,
            'price'      =>   100
        ])->select();
        return json($result);
    }
索引数组查询
public function index()
    {
        $result = Db::name('user')->where([
            ['password'   =>   123],
            ['price'      =>   100]
        ])->select();
        return json($result);
    }
变量传递
$map[] = ['password'   =>   123];
$map[] = ['price'      =>   100];
$result = Db::name('user')->where($map)->select();
field()
指定要查询的字段
Db::name('user')->field('id,username,password')->select();
Db::name('user')->field(['id,username,password'])->select();
给指定的字段设置别名
Db::name('user')->field('id,username as name')->select();
Db::name('user')->field('id','username' => 'name')->select();
给字段设置mysql函数
Db::name('user')->field('id,SUM(price)')->select();
结合details可以屏蔽掉想要不显示的字段
Db::name('user')->field('details,username',true)->select();//将会不显示username的内容
模型
设置主键
protected $pk = 'uid';//设置主键,只能写$pk,这是固定的
设置其他表
protected $table = 'tp_one';//$table也是固定的
初始化init()必须设置为静态方法,会在调用其他方法之前调用此方法
 protected static function init()
    {
        echo '初始化';
    }
数据增删
使用实例化方式添加一条数据
实例化方式,以下两种均可以
$user = new UserModel();
$user = new \app\index\model\User;
新增数据save()
public function insert()
    {
        $user = new UserModel();

        $user->username     =   'xi';
        $user->password     =   '123';
        $user->price        =   '19';

        $user->save();

    }
也可以直接中括号
public function insert()
    {
        $user = new UserModel();


        $user->save([
              $user->username     =   'xi';
              $user->password     =   '123';
              $user->price        =   '19';
        ]);

    }
批量新增saveAll()
$user = new UserModel();
$dataAll = [
    [
              $user->username     =   'xi';
              $user->password     =   '123';
              $user->price        =   '19';
    ],
    [
              $user->username     =   'xii';
              $user->password     =   '1234';
              $user->price        =   '18';
    ]
];
$user->saveAll($dataAll);
删除
delete()
//使用delete之前要先写出要删除的信息
$user->delete();
destroy()
UserModel::destroy(3);
UserModel::destroy('1,2,3');//批量删除
条件删除
UserModel::where('id','>',3)->delete();
闭包删除
UserModel::destroy(function ($query){
    $query->where('id','>',2);
});
修改查询
get()
通过get()方法获取
public function updata()
    {
        $user = UserModel::get(1);
        $user->username    =  'Amy';
        $user->password    =  '123456';
        echo $user->save();
    }
where()和find()
只能找一条最近的数据
$user = UserModel::where('username','Tom')->find();
$user->username  =  'Amy';
echo $user->save();
force()
强制更新
echo $user->force()->save();
Db::raw
执行sql函数的方式
$user->price = Db::raw('price+1');
inc/dec
增减数据
$user->price = ['inc',1];
save([],[])
通过两个数组参数的方式更新数据
$user = new UserModel();
$user->save([
'username'    =>    ‘Amy',
'password'    =>    '123456'
],['id=>3'])//改id=3的数据
saveAll()
批量修改
$list = [
    ['id'=>1,'usrname'=>'Amy'],
    ['id'=>1,'usrname'=>'Jack']
];//第一条必须是主键
update()
1、
UserModel::where('id',1)->update([
    'username'     =>   'Amy',
]);
2、
UserModel::update([
    'id'           =>   1,
    'username'     =>   'Amy',
]);
isUpdate
强制修改
$user->isUpdata(true)->save();
强制新增
$user->isUpdata(false)->save();
all()
实现IN模式的多数据获取
$user = UserModel::all('1,2,3')
获取某个字段
UserModel::where('id',1)->value('username');
模型获取器
只能对单字段进行操作
public function getStatusAttr($a)//get和Attr是固定的,中间的Status是字段名,也是固定的
    {
        $myGet = [1=>'正常',2=>'错误'];
        return $myGet[$a];
    }
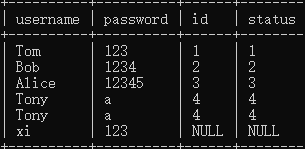

对多字段进行操作
public function getNothingAttr($value,$data)
    {
        $myGet = [1=>'正常',2=>'错误'];
        return [$data['status']];
    }
getData()
获取原始值
public function index()
    {
        $user = UserModel::get(1);
        return $user->getData('status');//获取原始值
    }

模板引擎和视图渲染
自动定位
class See extends Controller
{
public function index()
    {
        //自动定位
        //return $this->fetch();
        return $this->fetch('edit');
    }
}
http://localhost/tp5.1/public/index.php/index/see

        //多模块时,指定模块下的模板
        return $this->fetch('admin@public/edit');

如果不继承Controller类,那么可以调用view()助手函数
return view('edit');
赋值和过滤
赋值
assign()
class See extends Controller
{
    public function index()
    {
        $this->assign('name','Tom');
        return $this->fetch('index');
    }

}
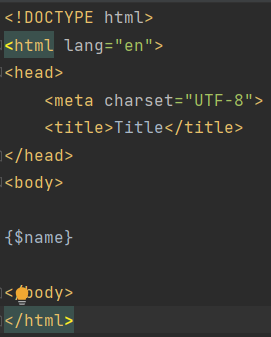
得到:

通过数组,多个变量赋值
$this->assign([
            'username'    =>   'Amy',  //{$username}
            'password'    =>   '123'   //{$password}
        ]);
display()
可以不通过模板直接解析变量
public function testDisplay()
    {
        $content = '{$username}.{$password}';
        return $this->display($content,[
            'username'    =>   'Amy',
            'password'    =>   '123'
        ]);
    }
使用View::share(),可以在系统任意位置做全局变量赋值
\think\facade\View:;share('key','value') //支持数组
过滤
filter()
//将所有传入进来的数据中的1转化为换行符
$this->filter(function ($content){
            return str_replace('1','<br/>',$content);
        });
全局执行
inittialize()
public function initialize()
    {
        $this->filter(function ($content) {
            return str_replace('1', '<br/>', $content);
        });
    }
变量输出
当程序运行的时候,会在runtime/temp目录下生成编译文件(可删除)
如果传递的值是数组
$data['username']  = 'Tom';
$data['password']  = '123';
$this->assign('user',$data)
模板调用
{$user.username}.{$user.password} //或{$user['password']}
如果传递的值是对象
$obj = new \stdclass \\声明一个空对象
$obj->username = 'Tom';
$this->assign('obj',$obj);
调用
{$obj->username}.{$obj->password}
如果输出的变量没有值,可以直接设置默认值
default
{$user.username|default='没有此用户'}
使用$Think.xxx.yyy方式,可以输出系统的变量
{$Think.get.key}
在模板直接输出常量
//获取系统版本
{$Think.const.PHP_VERSION}
=
{$Think.PHP_VERSION}
模板中的函数与运算符
函数
md5加密
$this->assign('password','123456');
{$password|md5}//竖线后面跟函数名
系统默认会在编译时采用htmlentities过滤函数以防止XSS跨站脚本攻击

如果某个字符,你不需要转义的话,可以单独使用raw处理
{$user['username']|raw}
多个函数操作,从左到右依次执行
{$password|md5|upper}
也可以直接使用php的语法模式
{:sustr(strtoupper(md5($password)),0,3)}
运算符
{$number + $number}
模板标签
循环标签(暂时先不看)
foreach
比较标签
{eq}..{/eq},{neq}..{notequal}
比较两个值是否相同,相同/不相同则输出包含内容
public function compare()
    {
        $this->assign('username','Tom');
        return $this->fetch('compare');
    }


<body>

{eq name='username' value='Tom'}
    是Tom
{/eq}


</body>

还可以合并起来
{eq name='username' value='Tom'}
    是Tom
{else/}
    不是Tom
{/eq}
其他的比较标签
{gt}(>)、{egt}(>=)、{lt}(<)、{elt}(<=)、{heq}(===)、{nheq}(!==)
所有标签都可以统一为{compare}标签使用,增加一个type方法指定即可
{compare name='username' value='Tom' type='eq'}
是Tom
{/compare}
定义标签
定义变量
{assign}
{assign name='var' value='123'}
{$var}
定义常量
{define}
{defin name='PI' value='3.141'}
{$Think.const.PI}
也可采用{php}
{php}
     echo 'lala'
{/php}
条件标签(暂时先不看)
模板的加载包含输出
包含
{include}
创建三个html5文件
header.html
<!DOCTYPE html>
<html lang="en">
<head>
    <meta charset="UTF-8">
    <title>Title</title>
</head>
<body>
头部  <br>
nav.html
导航
footer.html
<br>尾部
</body>
</html>
index.html
{include file='public/header,public/nav'}
主体
{include file='public/footer'}
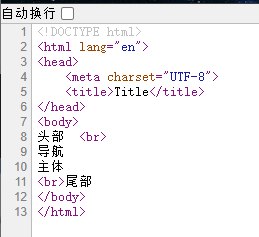
调用
public function index()
    {
        $this->assign('title','模板');
        return $this->fetch('index');
    }


//index.html
{include file='public/header,public/nav'  abc='$title'}
主体
{include file='public/footer'}

//header.html
<title>[abc]</title>//用[]调用
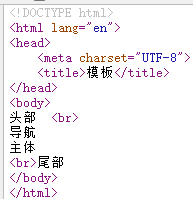
输出替换
引入css,js
//css
<link href="/tp5.1/public/static/css/basic.css" rel="stylesheet" type="text/css" />

//js
<script type="application/javascript" src="/tp5.1/public/static/js/basic.js"></script>
为了更简便,可以在config下的template.php中添加如下代码
'tpl_replace_string' => [
        '__CSS__' => '/tp5.1/public/static/css',
        '__JS__' => '/tp5.1/public/static/js',
    ]
之后便可以通过这样来访问了
<link href="__CSS__/basic.css" rel="stylesheet" type="text/css" />
<script type="application/javascript" src="__JS__/basic.js"></script>
由于更改的是配置文件刷新,每次都要删除编译文件才能生效
加载
传统方式采用link和script来调用css和js文件
但是thinkphp提供了另一种方式
{load}
{load href='__CSS__/basic.css'}
{load href='__JS__/basic.js'}

//还可以连在一起写
{load href='__CSS__/basic.css,__JS__/basic.js'}

//甚至还可以
{css href='__CSS__/basic.css'}
{js href='__JS__/basic.js'}
模板布局和继承
布局
...
继承
...
模板注释
对于在HTML页面中的标签,用HTML注释是无效的,需要使用模板定义的注释:
{//$name}
{/*$name*/}
{/*
多行注释
*/}
注释和{之间不能有空格,否则无法实现注释隐藏
路由
简单来说就是简化路径,在route目录下的route.php中,添加如下代码
\think\facade\Route::get('details/:id','Address/details');
//前面那个details可以随便写,如写成abc也行

//后面的Address/details中,Address表示指向的类,details表示指向的方法

//如果后面只写一个参数,那么默认是方法,这样details就默认是方法
\think\facade\Route::get('details/:id','details');
就可以直接访问了
http://localhost/tp5.1/public/index.php/details/5

请求方式有很多种
也可以使用rule
\think\facade\Route::get('details/:id','Address/details');
=
\think\facade\Route::rule('details/:id','Address/details','GET');
强制路由
要先在config目录下的app.php中进行配置,默认是关闭的
访问任何没有配置的页面都会报错
在route.php种进行页面的配置
路由规则表达式
//静态路由
Route::get('ad','address/index');
//动静态结合路由
Route::get('details/:id','address/details');
//多参数动静态结合
Route::get('search/:id/:uid','address/search');
//全动态,不相知是否search固定
Route::get(':search/:id/:uid','address/search');
//包含可选参数
Route::get('find/:id/[:content]','address/find');
//可选就是可以只写一个参数,像这样
http://localhost/tp5.1/public/index.php/find/5

//规则完全匹配
Route::get('find/:id/:uid$','address/search');//最后加个$即可
http://localhost/tp5.1/public/index.php/search/5/4/3
//像这样后面多加了一个/3就是错误的
url()
\think\facade\Route::get('url','address/url')->name('det');//取别名

public function url()
    {
        return url('det',['id'=>10]);
    }
变量规则
pattern()
对具体的变量进行单独的规则设置
//对name进行单独限制
\think\facade\Route::get('details/:id','Address/details')
                    ->name('det')
                    ->pattern('id','\d+');
通过数组进行多个值的限制
//对id和uid进行限制
\think\facade\Route::get('find/:id/[:content]','address/find')
    ->parent([
        'id'   =>  '\d+',
        'uid'  =>  '\d+'
    ]);
在Route.php中设置全局变量规则:
Route::pattern([
    'id'   =>  '\d+',
    'uid'  =>  '\d+'
])
模糊匹配
动态组合的拼装,地址和参数如果都是模糊动态的,可使用如下方法
\think\facade\Route::get('det/:id','Hello_:name/det')
    ->parent('id','\d+');
HelloWorld.php
 public function det($id)
    {
        return 'det的id:'.$id;
    }

闭包支持
支持我们可以直接通过URL直接执行,而不需要通过控制器和方法
Route::get('think', function () {
    return 'hello,ThinkPHP5!';
});
调用
//正常调用
\think\facade\Route::get('details/:id','Address/details');
http://localhost/tp5.1/public/index.php/index/group.address/details/id/5
//group与address之间用.连接


//另外方式调用
\think\facade\Route::get('details/:id','group.Address/details');
http://localhost/tp5.1/public/index.php/details/5
隐式传参
在url是看不见的,更加安全
\think\facade\Route::get('details/:id','Address/details?flag=1');

public function details($id)
    {
        echo $this->request->param('flag');
        return 'details调用的id:'.$id;
    }

可直接调用普通方法及其静态方法
普通方法
\think\facade\Route::rule('details/:id','app\index\controller\Address@details');

public function details($id)
    {
        return 'details调用的id:'.$id;
    }
静态方法
\think\facade\Route::rule('stat/:id','app\index\controller\Address@stat');

public static function stat($id)
    {
        return 'stat调用的id:'.$id;
    }
重定向
//第一种写法
\think\facade\Route::get('details/:id','http://www.liyanhui.com/details/:id')->status(302);

//第二种写法
\think\facade\Route::redirect('details/:id','http://www.liyanhui.com/details/:id',302);
对模板进行传值
Route::view('see/:name','See/other',['password']=>'123456');
路由缓存
清理缓存
//在cmd中进入/tp.5.1
php think clear --route
路由参数
在设置路由的时候,可以设置第三个数组参数
ext()
ext的作用是检测URL后缀,
//这里的意思就是后缀必须是html
\think\facade\Route::get('details/:name/:id','address/details',[ext=>'html']);


//也可以写成如下形式:
\think\facade\Route::get('details/:name/:id','address/details')->ext('html');
https()
https的作用就是检测是否为https请求,可结合ext使用
\think\facade\Route::get('details/:name/:id','address/details',[ext=>'html','https'=>true]);

\think\facade\Route::get('details/:name/:id','address/details')->ext('html')->https();
全局统一配置后缀,在app.php中
url_html_suffix
denyExt()
禁止某些后缀的使用
Route::get('details/:id','address/details')->denyExt('gif|jpg|png')
filter()
设置额外参数
Route::get('details/:id','address/details')->filter('id',10)
就必须这样访问才对
/details/5?id=10
model()
绑定到模型
option()
进行全局路由配置,可多次使用
\think\facade\Route::get('details/:id','group.Address/details');
\think\facade\Route::option('ext','html')->option('https',true);
快捷路由
\think\facade\Route::controller('short','Short');
//用什么方式请求就返回给你什么方式
shrot.php
class Short extends  Controller
{
    public function getInfo()
    {
        return 'getInfo';
    }
如
http://localhost/tp5.1/public/index.php/short/info

路由收集
group()
Collect.php
class Collect extends Controller
{
    public function read($id)
    {
        return 'id:'.$id;
    }

    public function who($name)
    {
        return 'name:'.$name;
    }

}
\think\facade\Route::group('col',[
    ':id'      =>    'Collect/read',
    ':name'    =>    'Collect/who'
])->ext('html')->pattern(['id'=>'.........','name'=>'.......']);
    //设置规则,不然匹配时会出错

append(),request()
可以额外添加一个参数,用request请求获取
\think\facade\Route::group('col',[
    ':id'      =>    'Collect/read',
    ':name'    =>    'Collect/who'
])->append(['flag'=>1]);
 public function read($id)
    {
        echo $this->request->param('flag');
        return 'id:'.$id;
    }

注解路由
注意:语句结尾不需要分号,路由规则结束后,需要有一个空行,否则不能执行规则
 /**
     * @param $id
     * @return string
     * @route('col/:id','get')
     * ->ext('html')
     * ->pattern(['id'=>'\d+'])
     *  就是这个空行
     */
跨域请求
当不同域名之间进行跨域请求时,由于浏览器的安全限制,会被拦截,所以通过
allowCrossDomain()
来解除这个限制
\think\facade\Route::group('col','Collect/read')->allowCrossDomain();
//使用后即可实现跨域请求
路由绑定
bind()
//绑定路由到index模块
Route::bind('index');   ...../user/read/id/5
//绑定路由到User控制器
Route::bind('index/User');      ...../read/id/5
//绑定路由到read操作
Route::bind('index/User/read');  ..../id/5
资源路由
在cmd中进入/tp5.1后键入
php think make:controller 路径/Blog

生成的Blog.php
<?php

namespace app\controller\..\index\controller;

use think\Controller;
use think\Request;

class Blog extends Controller
{
    /**
     * 显示资源列表
     *
     * @return \think\Response
     */
    public function index()
    {
        //
    }

    /**
     * 显示创建资源表单页.
     *
     * @return \think\Response
     */
    public function create()
    {
        //
    }

    /**
     * 保存新建的资源
     *
     * @param  \think\Request  $request
     * @return \think\Response
     */
    public function save(Request $request)
    {
        //
    }

    /**
     * 显示指定的资源
     *
     * @param  int  $id
     * @return \think\Response
     */
    public function read($id)
    {
        //
    }

    /**
     * 显示编辑资源表单页.
     *
     * @param  int  $id
     * @return \think\Response
     */
    public function edit($id)
    {
        //
    }

    /**
     * 保存更新的资源
     *
     * @param  \think\Request  $request
     * @param  int  $id
     * @return \think\Response
     */
    public function update(Request $request, $id)
    {
        //
    }

    /**
     * 删除指定资源
     *
     * @param  int  $id
     * @return \think\Response
     */
    public function delete($id)
    {
        //
    }
}
创建资源路由
\think\facade\Route::resource('blog','Blog');
资源路由注册成功后,会自动提供以下七种方法:
GET请求:index(blog),create(blog/create),read(blog/:id),edit(blog/:id/edit)

POST请求:save(blog)

PUT方式模式下:update(blog/:id)

DELETE方式模式下:delete(blog/:id)

    http://localhost/........./blog/      (index)
    http://localhost/........./blog/5     (read)
    http://localhost/........./blog/5/edit (edit)
参考https://www.bilibili.com/video/BV17J411K7Zd?p=42
only(),except()
限定/排除系统提供的资源方法是否能进行访问
->only(['index','save'])
    //只有index和save可以访问

->except(['read','delete'])
    //只有read和delete不能访问
rest()
更改默认的方法
\think\facade\Route::rest('create',['GET,'/:id/invent','invent']);

//批量更改
\think\facade\Route::rest([
   'save'     =>  ['POST','','safe'],
   'delete'   =>  ['DELETE','/:id','des']
]);

第一个参数:请求方式
第二个参数:地址
第三个参数:操作
嵌套资源路由
\think\facade\Route::resource('blog','Blog');
\think\facade\Route::resource('blog。Comment','comment');

//访问:
http://localhost/....../blog/100/comment/20
域名路由
首先要在C:\WINDOWS\System32\drivers\etc中找到hosts文件
在后面添加自创的域名
new.qwe.com 映射二级域名
a.new.qwe.com 映射三级域名
如果像限定在new.qwe.com这个域名下才有效,采用闭包形式
domain()
\think\facade\Route::domain('new',function(){
     \think\facade\Route::get('edit/:id','Collect/edit');
});

//domain()第一个参数表示二级域名的名称
还指出多个二级域名,使用相同的路由规则
\think\facade\Route::domain(['new','blog','live'],function(){
     \think\facade\Route::get('edit/:id','Collect/edit');
});
域名设置还支持绑定指定的模块,如admin模块
\think\facade\Route::domain('new','admin');
三级域名
\think\facade\Route::domain(['*.new','blog','live'],function(){
     \think\facade\Route::get('edit/:id','Collect/edit');
});
路由的URL生成
public function idnex()
{
    return Url::build('Blog/read',id=5&uid=6);
}

//Url::build('地址表达式',['参数'],['URL后缀'],['域名'])
//url('地址表达式',['参数'],['URL后缀'],['域名'])
请求对象和信息
第一种:继承基类
public function index()
    {
        return $this->request->param('name');
    }
使用方法
localhost/....../rely?name=lee
第二种:不继承基类
自己进行依赖注入这个对象
class Rely
{
    public function index(Request $request)
    {
        return $request->param('name');
    }
}
第三种
use think\Request;
class Rely
{
    protected $request;
    public function __construct(Request $request)
    {
        $this->request =  $request;
    }

    public function index()
    {
        return $this->request->param('name');
    }
请求变量
has()
检测全局变量是否已经设置
dump(Request::has('id','get'));

http://localhost/tp5.1/public/index.php/index/rely
//返回false

http://localhost/tp5.1/public/index.php/index/rely?id=10
//返回true

//注意:这里的变量时区分大小写的,写成ID则无法返回结果
param()
能自动识别GET、POST等的当前请求
//获取请求为name的值,过滤
dump(Request::param('name'));
//以数组的形式获取所有请求的变量,过滤
dump(Request::param());
//获取所有请求的变量,不包含上传变量,不过滤
dump(Request::param(false));
//获取所有请求的变量,包含上传变量,过滤
dump(Request::param(true));
过滤条件要在app.php中设置
使用依赖注入的方式,可以将变量作为对象的属性进行调用;
public function read(Request $request)
    {
        return $request->name;
    }
only()
获取指定的变量,也可以设置默认值
dump(Request::only('id,name'));
=
dump(Request::only(['id,name']));
将参数强制转换类型
/s(字符串)、/d(整形)、/b(布尔)、/a(数组)、/f(浮点)

Request::param('id/d');
请求类型和HTTP头信息
method()
获取请求类型
return Request::method();
伪造类型_method
<input type='hidden' name='_method' value='PUT'>
获取原始类型
return Request::method(true);
AJAX/PJAX伪装
?_ajax=1和?_pjax=1
使用method无法判断是否为ajax/pjax,必须使用isAjia()和isPjax()
HTTP头信息
header()
dump(Request::header());

//可以指定返回什么头信息
dump(Request::header('host'));
响应重定向和文件下载
响应
return
默认输出html的格式
response()
可设置第二参数、状态码,或者调用code()方法
return response($data,201);
return response($data)->code(202);
json()
还能设置header()头文件信息
return json($data)->code(202)->header(['...=>...'])
重定向
redirect(),需要return来执行
return redirect('http://www.baidu.com');
站内重定向
必须要用顶级域名,不然会出错
return redirect('edit/5');

return redirect('/address/details/id/5')
文件下载
download()
//图片写两个参数
return download('1.jpg','lalala')//第二个参数是自己取的名字

//文本写三个参数
return download('路径','取的名字',true)
容器和依赖注入
依赖注入
允许通过类的方法传递对象的能力,并且限制了对象的类型,而且传递的对象背后的那个类被自动绑定并且实例化了。
基本模板
One.php
<?php

namespace app\index\model;

class One
{
    public $name='Mr.Tom';
}
Inject.php
<?php

namespace app\index\controller;

use app\index\model\One;

class Inject
{
    protected $one;

    public function __construct(One $one)
    {
        $this->one = $one;
    }

    public function index()
    {
        return $this->one->name;
    }

}
容器
依赖注入的类同意由容器管理,大多数情况下是自动绑定和自动实例化的,
如果像手动绑定和实例化,就要使用bind()和app()
class Inject
{
    public function index()
    {
        bind('one','app\index\model\One');
        return app('one')->name;
    }
}
Facade(门面设计模式)
钩子和行为
在tags.php进行绑定操作即可
    'app_init'     => [
          'app\behavior\Test',
    ],
自定义钩子
https://www.bilibili.com/video/BV17J411K7Zd?p=52
中间件
前置中简件
主要用于拦截和过滤HTTP请求,并进行相应的处理
通过命令行模式,生成一个中间件文件和文件夹
php think make:middleware Check
class Check
{
    //handle是不能改变的
    public function handle(Request $request, \Closure $next)
    {
         if($request->param('name') == 'index'){
            return redirect('/');   //重定向
         }

        return $next($request);//固定格式
    }
}
后置中间件
请求完毕之后再进行验证,比如写入日志
 public function handle(Request $request, \Closure $next)
 {
     $response = $next($request);

     return $response;
 }
验证器
命令行生成文件
php think make:validate index/User
验证规则
User.php
<?php

namespace app\index\validate;

use think\Validate;

class User extends Validate
{
    /**
     * 定义验证规则
     * 格式:'字段名'	=>	['规则1','规则2'...]
     *
     * @var array
     */
	protected $rule = [
        'name'     =>   'require|max:10',//规则一:不能为空,规则二:不能大于10
        'grades'   =>   'number|between:1,100'
    ];

    /**
     * 定义错误信息
     * 格式:'字段名.规则名'	=>	'错误信息'
     *
     * @var array
     */
    protected $message = [
        'name.require'    =>    '用户名不得为空',
        'name.max'        =>    '姓名不得大于10位'
    ];
}
class Verify
{
    protected $batchValidate  //在头部设置这个,当有多个错误时,都能回显出来,若不设置,就只能回显一个错误

    //开启异常
    protected $failException = true;

    public function index()
    {
          $data = [
              'name'    =>    '',
              'grades'  =>     40,
          ];

          $validate = new \app\index\validate\User();

          if (!$validate->check($data));
              dump($validate->getError());
    }

}

//返回'name'不能为空


//这样写也是一样的
$this->validate([
     'name'    =>    'Tom',
     'grades'  =>    40,
],\app\index\validate\User::class);

if($result !==true){
    dump($result);
}
可以在User.php中自定义规则
需要在上面的rule中调用才能生效
//自定义规则
protected function checkName($value,$rule)//第一个参数是上传的值,第二个参数是规则
{
    return $rule != $value ? true : '不能使用Tom';
    //不相等则返回True,相等则返回不能使用Tom
}


//调用
/**
     * 定义验证规则
     * 格式:'字段名'	=>	['规则1','规则2'...]
     *
     * @var array
     */
	protected $rule = [
        'name'     =>   'require|max:10|chekname:Tom',//在这里调用
        'grades'   =>   'number|between:1,100'
    ];
独立验证,不使用User.php
支持自定义方式,但不支持属性方式和多规则方式
默认返回一条错误信息,若要批量返回所有错误,必须使用batch()
$data = [
              'name'    =>    '',
              'grades'  =>     40,
          ];

$validate = new Validate()
$validate->rule([
       'name','require|max:10',
)];

//批量返回
if (!$validate->batch()->check($data));
              dump($validate->getError());


 //甚至可以这样设置规则
      $validate = new Validate()
      $validate->rule('name',Validate::isRequire()->max(10));
错误信息
如果要在控制器使用独立验证规则,可以在控制器设置错误信息
protected $message = [
        'name.require'    =>    '用户名不得为空',
        'name.max'        =>    '姓名不得大于10位'
    ];
在属性定义错误信息
protected $rule = [
     'name|姓名'   =>   'max:10',
];
场景验证
User.php中添加
protected $scene = [
        'insert'      =>      ['name','price'],
        'edit'        =>      ['name'],
    ];//edit就只会对name进行验证
再加上一个scene
$validate = new \app\index\validate\User();

          if (!$validate->scene('edit')->batch()->check($data));
              dump($validate->getError());
路由验证
还是有两种方法
一种还是在User.php中写规则,在路由中绑定
\think\facade\Route::get('read/:id','Verify/read')->validate(\app\index\validate\User::class);


//还可以在后面加上场景验证
\think\facade\Route::get('read/:id','Verify/read')
    ->validate(\app\index\validate\User::class,'edit');
还有一种就是用独立验证的方式,直接在路由中写
\think\facade\Route::get('read/:id','Verify/read')
    ->validate([
        'id'    =>   'nmuber|between:1,10',
        'email' =>   'email'
        ],'edit',[
        'id.number'   =>   '必须为数字',
        'id.between'  =>   '必须在1-10之间',
        'email'       =>   '格式不对'
    ]
    ],true);

//总共四个参数
//第一个参数是验证规则
//第二个参数是指定什么
//第三个参数是设置错误信息
//第四个参数位true则可以批量显示错误
验证静态调用
使用facade模式进行调用验证
引入facade中的Validate时,回合think\Validate冲突,所以引入一个就行了
//验证邮箱是否合法
dump(Validate::isEmaile('....'));
//验证是否为空
dump(Validate::isRequre(''));
//验证是否为数字
dump(Validate::isNumber('1'));
验证结果只会返回True或者False
支持多规则验证
chekRule()
dump(Validate::checkRule(10,'number|between:1,10'));
表单令牌
随机🐎,保障安全
参考https://www.bilibili.com/video/BV17J411K7Zd?p=60&spm_id_from=pageDriver
Session
Session.php
return [
    'id'             => '',
    // SESSION_ID的提交变量,解决flash上传跨域
    'var_session_id' => '',
    // SESSION 前缀
    'prefix'         => 'think',
    // 驱动方式 支持redis memcache memcached
    'type'           => '',
    // 是否自动开启 SESSION
    'auto_start'     => true,
];
在这里声明会将Session.php中的内容覆盖
public function sess()
{
      Session::init([
            'prefix'         => 'think',
            'auto_start'     => true,
]);
}
使用set()和get()来设置Session的存取
Session::set('user','Tom');
echo Session::get('user');
dump(Request::session);
echo $_SESSION['think']['user'];
dump($_SESSION);
has()
判断当前作用域session是否赋值,第二个参数可以指定作用域
Session::has('user','tp');
//赋值成功返回1 or true
delete()
删除,默认删除当前作用域的值,第二个参数可以指定作用域
Session::delete('user','tp');
作用完之后空壳还存在

clear()
清理掉当前的作用域,清理完之后就没有了
Session::clear('user','tp');
prefix()
指定作用域
Session::prefix('tp');
Session::set('user','Tom');
pull()
取出当前的值,并删除掉这个session
即先进行get,在进行delete
echo Session::pull(user);
flash()
设置闪存数据,只请求一次有效,在请求就会失效
Session::flash('user','Tom')
flush()
清理掉闪存的数据
Cookie
Cookie::set('user','Tom',[
    'prefix'    =>   'tp_'
    'expire'    =>   '3600'
]);
forever()
保存十年
Cookie::forever('user','Tom');
has()
判断是否赋值,第二个参数可以设置前缀
Cookie::has('user','tp_');
//赋值成功返回1 or true
delete()
删除,第二个参数可以设置前缀
Cookie::delete('user','tp');
clear()
清空Cookie,必须指定前缀
Session::clear('user','tp');
分页功能
上传功能
要实现上传,必须要上传表单
<!DOCTYPE html>
<html lang="en">
<head>
    <meta charset="UTF-8">
    <title>Title</title>
</head>
<body>

<form action="http://localhost/tp5.1/public/index.php/index/upload" method="post" enctype="multipart/form-data">
    <input type="file" name="lala">
    <input type="submit" id="button" value="确定">
</form>

</body>
</html>
单一文件
用以下方式接收并使用move()保存到uploads文件夹中并且进行一些判断
  public function index()
    {
        $file = Request::file('lala');
        $info = $file->move('../application/index/uploads');
        if($info){
            echo $info->getExtension();//获取后缀名
            echo '<br/>';
            echo $info->getSaveName();//获取文件名
        } else {
            echo $file->getError();
        }
    }
多个文件
表单
<form action="http://localhost/tp5.1/public/index.php/index/upload/uploads" method="post" enctype="multipart/form-data">
    <input type="file" name="image[]">
    <input type="file" name="image[]">
    <input type="file" name="image[]">
    <input type="submit" id="button" value="确定">
</form>
接收
利用foreach循环
public function uploads()
    {
        $files = Request::file('image');
        foreach ($files as $file){
            $info = $file->move('../application/index/uploads');
            if($info){
                echo $info->getExtension();//获取后缀名
                echo '<br/>';
                echo $info->getSaveName();//获取文件名
             } else {
                echo $file->getError();
             }
        }
    }
上传的文件,可通过validate()方法进行验证
$info = $file->validate([
    'size'  =>   102400,
    'ext'   =>   'jpg,png,gif'
])->move('../application/index/uploads');
生成的规则还支持另外两种方式,md5和sha1,或者自己写函数
$file->rule('md5')->move('../application/index/uploads');
$file->rule('sha1')->move('../application/index/uploads');
$file->rule('rand')->move('../application/index/uploads');
缓存功能
验证码功能
命令行安装验证码功能
composer require topthink/think-captcha=2.0.*
成功后会生成
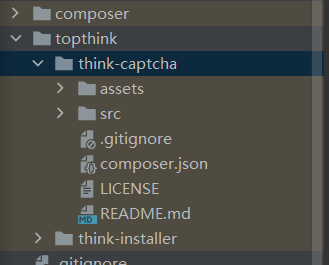
在模版内添加验证码的显示代码
<div>{:captcha_img()}</div>
或者
<div><img src="{:captcha_src()}" alt="captcha" /></div>
上面两种的最终效果是一样的。
最终表单
<!DOCTYPE html>
<html lang="en">
<head>
    <meta charset="UTF-8">
    <title>验证码验证</title>
</head>
<body>

<div>{:captcha_img()}</div>
<form action="../../../../public/index.php/index/code" method="post">
    <input type="text" name="code">
    <input type="submit" value="提交">
</form>


</body>
</html>
制作验证码登录
第一种:
public function index()
    {
        $data = [
            'code' => Request::post('code'),
        ];

        $flag = $this->validate($data,[
            'code|验证码' => 'require|captcha'
        ]);

        dump($flag);
    }
第二种:
public function show()
    {
        $captcha = new Captcha();
        return $captcha->entry();
    }

    public function check()
    {
        $captcha = new Captcha();
        dump($captcha->check(Request::post('code')));
    }
<form action="../../../../public/index.php/index/code/check" method="post">
设置验证码的各种属性
$config = [
      //字体大小
      'fontSize'  =>  30,
      //验证码位数
      'length'    =>  3
];
$captcha = new Captcha($config);
图像处理功能
命令行引入
composer require topthink/think-image
数据库与模型事件
模型事件
| 事件 | 描述 | 快捷方法 |
|---|---|---|
| before_insert | 新增前 | beforeInsert |
| after_insert | 新增后 | afterInsert |
| before_update | 更新前 | beforeUpdate |
| after_update | 更新后 | afterUpdate |
| before_write | 写入前 | beforeWrite |
| after_write | 写入后 | afterWrite |
| before_delete | 删除前 | beforeDelete |
| after_delete | 删除后 | afterDelete |
| before_restore | 恢复前(V5.1.13+) |
beforeRestore |
| after_restore | 恢复后(V5.1.13+) |
afterRestore |
使用方法
<?php

namespace app\index\model;

use think\Model;

class User extends Model
{
    public static function init()
    {
        self::event('before_insert', function ($user) {
            if (1 != $user->status) {
                return false;
            }
        });
    }
}
关联模型
User模型端,需要关联Profile
class User extends Model
{
    public function profile()
    {
       //hasOne表示一对一关联,参数一表示附表,参数二表示外键
       return $this->hasOne('profile','user_id');
    }
}
$user = UserModel::get(2);
return $user->profile;
小制作
后台登陆验证制作
app/admin/view/Login/login.html
登陆页面
<!Doctype html>
<html>
<head>
    <meta charset="UTF-8">
    <title>后台登录</title>
    <link href="../../../../../tp5.1/public/static/css/ye.css" rel="stylesheet" type="text/css" />
</head>
<body>
<div class="admin_login_wrap">
    <h1>后台管理</h1>
    <div class="admin_login_border">
        <div class="admin_input">
            <form action="" method="post">
                <ul class="admin_items">
                    <li>
                        <label for="user">用户名:</label>
                        <input type="text" name="username" value="" id="user" size="15" class="admin_input_style" />
                    </li>
                    <li>
                        <label for="pwd">密码:</label>
                        <input type="password" name="password" value="" id="pwd" size="15" class="admin_input_style" />
                    </li>
                    <li>
                        <div>{:captcha_img()}</div>
                        <input type="text" name="code">
                    </li>
                    <li>
                        <input type="submit" tabindex="3" value="提交" class="btn btn-primary" />
                    </li>
                </ul>
            </form>
        </div>
    </div>
</div>
</body>
</html>
app/admin/model/Login.php
验证
<?php
namespace app\admin\model;
use think\captcha\Captcha;
use think\Controller;
//use think\Model;
use think\facade\Request;

class Login extends Controller
{
    public function login($username,$password){

        $captcha = new Captcha();
        if($captcha->check(Request::post('code'))==true){
            $admin= \think\Db::name('admin')->where('username','=',$username)->find();
            if($admin){
                if($admin['password']==$password){
                    \think\facade\Session::set('id',$admin['id']);
                    \think\facade\Session::set('username',$admin['username']);
                    return 1;
                }else{
                    return 2;
                }

            }else{
                return 3;
            }
        }
        else {
            return 4;
        }
    }
}
app/admin/controller/Login.php
跳转
<?php
namespace app\admin\controller;
use think\Controller;
use app\admin\model\Login as Log;
class Login extends Controller
{
    public function index()
    {
        if(request()->isPost()){
            $login=new Log;
            $status=$login->login(input('username'),input('password'));
            if($status==1){
                return $this->success('登录成功,正在跳转!','Index/index');
            }elseif($status==2){
                return $this->error('密码错误!');
            }elseif($status==3){
                return $this->error('用户不存在!');
            }
            else{
                return $this->error('验证码错误!');
            }
        }
        return $this->fetch('login');
    }

    public function logout(){
        session(null);
        return $this->success('退出成功!',url('index'));
    }


}
app/config/captcha.php
验证码属性设置
<?php
return [
    'imageH'   =>  40,
    'imageW'   =>  150,
    'fontSize' =>  15
];
头像上传
app/public/test/test.html
上传表单(由于本人前端功底实在不佳,只能先写成这样了)
<!DOCTYPE html>
<html lang="en">
<head>
    <meta charset="UTF-8">
    <title>Title</title>
</head>
<body>

<form action="http://localhost/tp5.1/public/index.php/index/upload" method="post" enctype="multipart/form-data">
    <table>
        <tr>
            <td height="124">当前头像:</td>
            <td>

                <img  width="111" height="120" src="../../../tp5.1/public/static/css/R.png"/>
            </td>
        </tr>
        <tr>
            <td height="21">上传新头像:</td>
            <td><input type="file" name="lala"/>
                <input type="submit" value="上传"/></td>
        </tr>
        <tr>
            <td colspan="2">支持jpg.gif格式的,100k以内</td>
        </tr>
    </table></form>


</body>
</html>
app/index/controller/Upload.php
<?php

namespace app\index\controller;

use think\facade\Request;

class Upload
{
    public function index()
    {
        $file = Request::file('lala');
        $info = $file->validate([
            'size'  =>   102400,
            'ext'   =>   'jpg,gif'
        ])->move('../application/index/uploads');
        if($info){
            echo $info->getExtension();//获取后缀名
            echo '<br/>';
            echo $info->getSaveName();//获取文件名
        } else {
            echo $file->getError();
        }

        dump($info);

    }
}
评论功能
直接用的畅言


