

用nexus3.x 官方镜像搭建maven私有镜像仓库
1.获取nexus3镜像
docker pull sonatype/nexus3
2.创建启动nexus3容器
docker run -dit -p 8081:8081 --name nexus -v /home/nexus-data:/var/nexus-data --restart=always sonatype/nexus3
参数说明
-
- -dit:在容器中打开一个伪终端进行交互操作,并在后台运行
- -v:把宿主机的/root/nexus-data目录挂载到容器/var/nexus-data目录,来实现数据的持久化
- -p:映射端口,访问宿主机的8081端口就访问到nexus容器的服务了
- --restart=always:这是重启的策略,假如这个容器异常退出会自动重启容器
- --name nexus:创建容器命名为nexus,你可以随便命名
- sonatype/nexus3:pull下来的镜像
3.访问nexus
在浏览器输入:http://ip:8081即可看到以下页面:(ip为远程主机的ip地址)
用初始密码admin/admin123登录,发现报出:Your admin user password is located in /nexus-data/admin.password on the server.
意思是admin用户密码在/nexus-data/admin.password 文件中,那么接下来我就需要找到这个文件问题就解决了。
进入nexus容器
docker exec -it nexus3 /bin/bash
bash-4.4$ cd nexus-data/
bash-4.4$ ls
admin.password blobs cache db elasticsearch etc generated-bundles instances javaprefs karaf.pid keystores lock log orient port restore-from-backup tmp
bash-4.4$ cat admin.password
拿着上图这个初始密码,点击右上方的Sign in进行登录
nexus私服简介
可以看到默认情况下Nexus会帮我们创建了几个仓库,仔细观察红色框住的地方,里面有几种仓库的类型,解释如下:
- proxy 远程仓库的代理,比如说nexus配置了一个central repository的proxy,当用户向这个proxy请求一个artifact的时候,会现在本地查找,如果找不到,则会从远程仓库下载,然后返回给用户。
- hosted 宿主仓库,用户可以把自己的一些仓库deploy到这个仓库中
- group 仓库组,是nexus特有的概念,目的是将多个仓库整合,对用户暴露统一的地址,这样就不需要配置多个仓库地址。
下面我们仔细看一下里面的一些仓库,点击maven-central仓库:
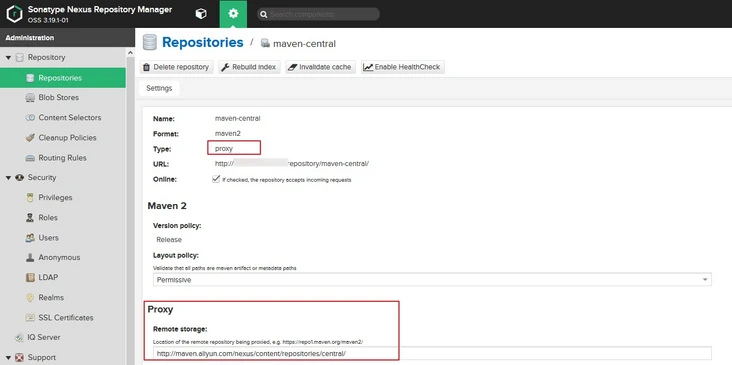
可以看到是一个proxy类型的仓库,默认代理的远程仓库地址是https://repo1.maven.org/maven2/,这里把它改为阿里云http://maven.aliyun.com/nexus...
进入maven-public查看
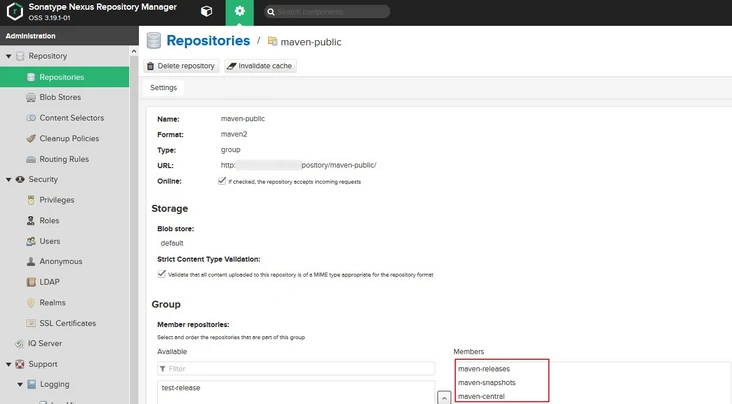
可以看到这是一个group类型的仓库,里面包含了maven-releases/maven-snapshots/maven-central仓库,意思是我们只需要在本地添加这个仓库,则可以依赖到上述3个仓库中的库了。
实现本地上传代码库
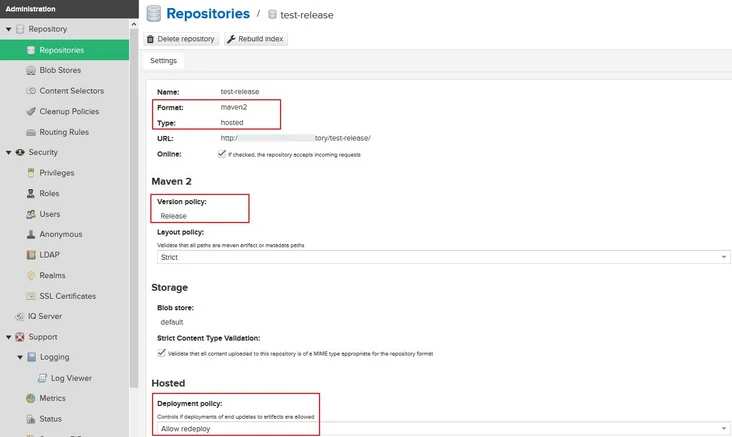
1.创建一个新的仓库(也可以选用已经存在的仓库)
创建仓库,点击Create repository,然后选择maven2(hosted)然后输入仓库名称(test-release)。在version policy中选择这个仓库的类型,这里选择release,在Deployment policy中选择Allow redeploy(这个很重要)
2.修改本地D:Program Files (x86)apache-maven-3.2.3conf目录下的settings.xml
<servers> <!-- server | Specifies the authentication information to use when connecting to a particular server, identified by | a unique name within the system (referred to by the 'id' attribute below). | | NOTE: You should either specify username/password OR privateKey/passphrase, since these pairings are | used together. | <server> <id>deploymentRepo</id> <username>repouser</username> <password>repopwd</password> </server> --> <!-- Another sample, using keys to authenticate. <server> <id>siteServer</id> <privateKey>/path/to/private/key</privateKey> <passphrase>optional; leave empty if not used.</passphrase> </server> --> <!-- 指定私库的账号密码 --> <server> <id>releases</id> <username>admin</username> <password>123456</password> </server> </servers>
3.用IDEA搭建springboot项目,pom.xml文件内容为
<?xml version="1.0" encoding="UTF-8"?> <project xmlns="http://maven.apache.org/POM/4.0.0" xmlns:xsi="http://www.w3.org/2001/XMLSchema-instance" xsi:schemaLocation="http://maven.apache.org/POM/4.0.0 https://maven.apache.org/xsd/maven-4.0.0.xsd"> <modelVersion>4.0.0</modelVersion> <parent> <groupId>org.springframework.boot</groupId> <artifactId>spring-boot-starter-parent</artifactId> <version>2.1.9.RELEASE</version> <relativePath/> <!-- lookup parent from repository --> </parent> <groupId>com.example</groupId> <artifactId>docker</artifactId> <name>docker</name> <description>Demo project for Spring Boot</description> <!--注意限定版本一定为RELEASE,因为上传的对应仓库的存储类型为RELEASE--> <version>1.0-RELEASE</version> <properties> <java.version>1.8</java.version> </properties> <dependencies> <dependency> <groupId>org.springframework.boot</groupId> <artifactId>spring-boot-starter-web</artifactId> </dependency> <dependency> <groupId>org.springframework.boot</groupId> <artifactId>spring-boot-starter-test</artifactId> <scope>test</scope> </dependency> </dependencies> <!--指定仓库地址--> <distributionManagement> <repository> <!--此名称要和settings.xml中设置的ID一致--> <id>releases</id> <url>http://139.9.40.41:8081/repository/test-release/</url> </repository> </distributionManagement> <build> <plugins> <!--发布代码Jar插件--> <plugin> <groupId>org.apache.maven.plugins</groupId> <artifactId>maven-deploy-plugin</artifactId> <version>2.7</version> </plugin> <!--发布源码插件--> <plugin> <groupId>org.apache.maven.plugins</groupId> <artifactId>maven-source-plugin</artifactId> <version>2.2.1</version> <executions> <execution> <phase>package</phase> <goals> <goal>jar</goal> </goals> </execution> </executions> </plugin> </plugins> </build> </project>
打开终端,输入mvn deploy,若报出mvn不是内部命令,可参考
https://blog.csdn.net/sz15732...,最后用管理职身份再次运行IDEA。
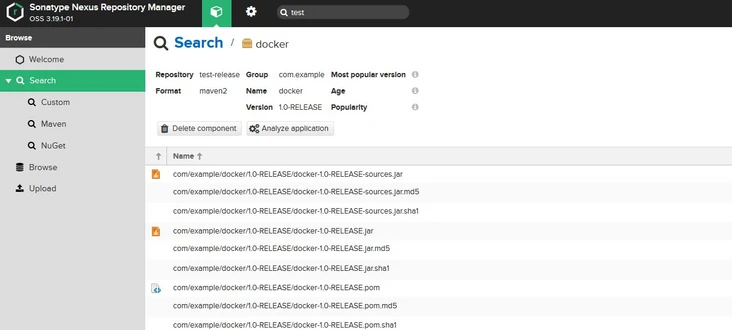
上传成功,回到Nexus的网页中查看结果
引用依赖
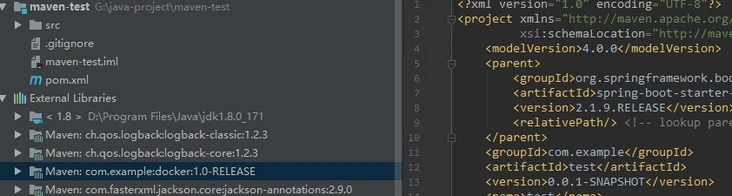
用IDEA新建一个springboot工程,pom.xml使用依赖
<?xml version="1.0" encoding="UTF-8"?> <project xmlns="http://maven.apache.org/POM/4.0.0" xmlns:xsi="http://www.w3.org/2001/XMLSchema-instance" xsi:schemaLocation="http://maven.apache.org/POM/4.0.0 https://maven.apache.org/xsd/maven-4.0.0.xsd"> <modelVersion>4.0.0</modelVersion> <parent> <groupId>org.springframework.boot</groupId> <artifactId>spring-boot-starter-parent</artifactId> <version>2.1.9.RELEASE</version> <relativePath/> <!-- lookup parent from repository --> </parent> <groupId>com.example</groupId> <artifactId>test</artifactId> <version>0.0.1-SNAPSHOT</version> <name>test</name> <description>Demo project for Spring Boot</description> <properties> <java.version>1.8</java.version> </properties> <dependencies> <dependency> <groupId>org.springframework.boot</groupId> <artifactId>spring-boot-starter-web</artifactId> </dependency> <dependency> <groupId>org.springframework.boot</groupId> <artifactId>spring-boot-starter-test</artifactId> <scope>test</scope> </dependency> <dependency> <groupId>com.example</groupId> <artifactId>docker</artifactId> <version>1.0-RELEASE</version> </dependency> </dependencies> <repositories> <repository> <id>releases</id> <url>http://139.9.40.41:8081/repository/test-release/</url> </repository> </repositories> <build> <plugins> <plugin> <groupId>org.springframework.boot</groupId> <artifactId>spring-boot-maven-plugin</artifactId> </plugin> </plugins> </build> </project>
最后发现jar依赖成功
参考文献:https://segmentfault.com/a/1190000020708330


【推荐】国内首个AI IDE,深度理解中文开发场景,立即下载体验Trae
【推荐】编程新体验,更懂你的AI,立即体验豆包MarsCode编程助手
【推荐】抖音旗下AI助手豆包,你的智能百科全书,全免费不限次数
【推荐】轻量又高性能的 SSH 工具 IShell:AI 加持,快人一步
· 基于Microsoft.Extensions.AI核心库实现RAG应用
· Linux系列:如何用heaptrack跟踪.NET程序的非托管内存泄露
· 开发者必知的日志记录最佳实践
· SQL Server 2025 AI相关能力初探
· Linux系列:如何用 C#调用 C方法造成内存泄露
· Manus爆火,是硬核还是营销?
· 终于写完轮子一部分:tcp代理 了,记录一下
· 震惊!C++程序真的从main开始吗?99%的程序员都答错了
· 别再用vector<bool>了!Google高级工程师:这可能是STL最大的设计失误
· 单元测试从入门到精通