微信小程序 “万利商城”实战之十七:订单查询功能的编码实现(完结篇)
用户在“我的”页面查看不同状态的订单会跳转到订单列表页面,不同的订单状态会传递不同的参数,
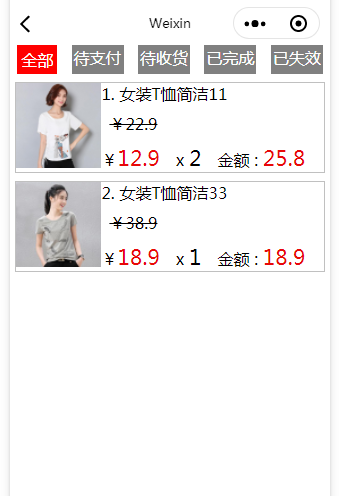
订单列表页根据接收的参数到服务端抓取不同的数据显示给用户,先看页面呈现:
orderList.wxml代码如下:
1 <view class="container"> 2 3 <view class="orderState1"> 4 <text class="{{stateNo==1?'bgred':'bgwhite'}}">全部</text> 5 <text class="{{stateNo==2?'bgred':'bgwhite'}}">待支付</text> 6 <text class="{{stateNo==3?'bgred':'bgwhite'}}">待收货</text> 7 <text class="{{stateNo==4?'bgred':'bgwhite'}}">已完成</text> 8 <text class="{{stateNo==5?'bgred':'bgwhite'}}">已失效</text> 9 </view> 10 11 12 <view class="list1" wx:for="{{productList}}" wx:key="produceId"> 13 14 <view> 15 <image class="image1" src="{{item.imageUrl}}"></image> 16 </view> 17 18 <view class="detail1"> 19 <text>{{index+1}}. {{item.productName}}</text> 20 <text class="oriPrice1">¥{{item.originalPrice}}</text> 21 22 <view class="priceInfo1"> 23 <text>¥</text> 24 <text class="price1">{{item.price}}</text> 25 <text decode="true"> </text> 26 <text decode="true">x </text> 27 <text class="qty1">{{item.productQty}}</text> 28 <text decode="true"> </text> 29 <text decode="true">金额 : </text> 30 <text class="price1">{{item.price*item.productQty}}</text> 31 </view> 32 </view> 33 34 </view> 35 36 37 </view>
orderList.wxss代码如下 :
 1 .orderState1{
 2   width: 100%;
 3   display:flex;
 4   flex-direction: row;
 5   flex-wrap: nowrap;
 6   justify-content: space-around;
 7 }
 8 .bgred{
 9   background-color: red;
10   color:white;
11   padding:10rpx 10rpx;
12 }
13 .bgwhite{
14   background-color: gray;
15   color:white;
16   padding:5rpx 5rpx;
17 }
18
19 .image1
20 {
21   width:200rpx;
22   height:200rpx;
23 }
24
25
26 .list1
27 {
28   border:solid 3rpx #c0c0c0;
29   width: 96%;
30   display:flex;
31   flex-direction: row;
32   flex-wrap: wrap;
33   margin-top: 20rpx;
34   align-content:space-around
35 }
36
37 .detail1
38 {
39   display:flex;
40   flex-direction: column;
41   flex-wrap: wrap;
42   justify-content: space-between;
43 }
44
45
46
47 .priceInfo1
48 {
49   display: flex;
50   flex-direction: row;
51   flex-wrap: nowrap;
52   align-items: baseline;
53 }
54 .price1{
55   color: #E80808;
56   font-size: 16pt;
57 }
58 .oriPrice1
59 {
60  text-decoration:line-through;
61  margin-left: 20rpx;
62 }
63 .qty1{
64   font-size: 16pt;
65 }
不同订单状态进来时上部的导航菜单应该有不同的显示便于用户查看,
所以在每个状态项上用三目运算符?:来根据传递的参数用不同的wxss来显示。
最后来看orderList.js文件的编码:
 1   data: {
 2     productList: [],
 3     stateNo:1
 4   },
 5
 6
 7   initProductList:function()
 8   {
 9     var _this=this;
10     wx.request({
11       url: 'http://www.tm.com/webapi/orders',
12       data:{'orderState':this.data.stateNo},
13       method:'GET',
14       success:function(res){
15         //var products=res.data;
16         var products=[
17           {'productId':111,'productName':'女装T恤简洁11','price':12.9,'originalPrice':22.9,'imageUrl':'../../images/product11.jpg',
18           'inShoppingCart':0,'productQty':2},
19           {'productId':133,'productName':'女装T恤简洁33','price':18.9,'originalPrice':38.9,'imageUrl':'../../images/product33.jpg',
20           'inShoppingCart':0,'productQty':1}
21         ];
22         _this.setData({productList:products});
23       }
24     })
25   },
26
27
28   /**
29    * 生命周期函数--监听页面加载
30    */
31   onLoad: function (options) {
32     this.setData({stateNo:options.orderState});
33     this.initProductList();
34   },
orderList.js页面加载的时候首先执行onLoad()函数,
在此函数中先调用setData()设置变量stateNo的值供页面其他地方调用,
上一个页面传递进来的值用options.orderState的形式来接收,且一定要放在onLoad()函数中。
初始化订单数据的时候要用data:{'orderState':this.data.stateNo},传递订单状态参数到服务器端,
服务器端接收到orderState这个参数后去数据库查询相应的订单信息给小程序来显示。
注:这里的订单列表为了聚焦订单自身的业务逻辑没有做分页的处理,
分页的处理方式可以参考前面的章节,原理是一样的。
至此,我们整个微信小程序“万利商城”实战演练就完结了,后面还会介绍一些微信小程序的小技巧。

 浙公网安备 33010602011771号