微信小程序 “万利商城”实战之十: 商品列表页加入购物车功能的实现
加入购物车功能的基本实现是这样的:
用户点击“加入购物车” , 小程序将该商品信息发送到服务器记录下来,
同时页面上“加入购物车”的按钮变成一个输入框,用户可以增加/减少商品数量,
当用户点“购物车” Tabbar时,切换到shoppingcart/shoppingcart.wxml页面,
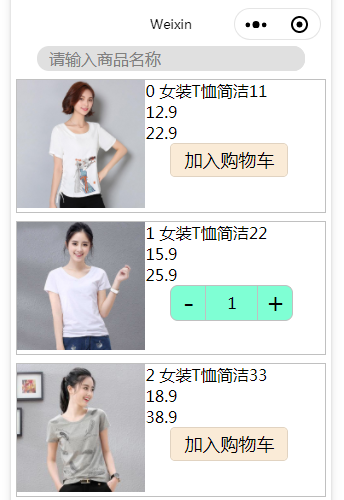
此页面显示购物车中的商品列表,页面效果如下 :
接下来我们就来编码完成加入购物车的功能。
先在index.wxml中加入如下的代码 ,见红色部分:
 1 <view class="detail1">
 2     <text>{{index}} {{item.productName}}</text>
 3     <text>{{item.price}}</text>
 4     <text>{{item.originalPrice}}</text>
 5
 6     <view class="qtyinfo1" wx:if="{{item.inShoppingCart==0}}">
 7       <button class="button1" data-productid="{{item.productId}}" data-index="{{index}}" bindtap="addToShoppingCart">加入购物车</button>
 8     </view>
 9     <view class="qtyinfo1" wx:else>
10       <text class="minus1" data-productid="{{item.productId}}" data-index="{{index}}" bindtap="tapMinus">-</text>
11       <input class="qty1" type="text" data-productid="{{item.productId}}" data-index="{{index}}" value="{{item.productQty}}" />
12       <text class="plus1" data-productid="{{item.productId}}" data-index="{{index}}" bindtap="tapPlus">+</text>
13     </view>
14
15   </view>
1 . 首先要在productList这个json数组中加入2个字段 “inShoppingCart”和"productQty" ,
“inShoppingCart”用来记录当前商品是否已经被加入了购物车,"productQty"用来记录用户购买的数量。
代码如下:
 1 var products=[
 2           {'productId':111,'productName':'女装T恤简洁11','price':12.9,'originalPrice':22.9,'imageUrl':'../../images/product11.jpg',
 3           'inShoppingCart':0,'productQty':1},
 4           {'productId':122,'productName':'女装T恤简洁22','price':15.9,'originalPrice':25.9,'imageUrl':'../../images/product22.jpg',
 5           'inShoppingCart':1,'productQty':1},
 6           {'productId':133,'productName':'女装T恤简洁33','price':18.9,'originalPrice':38.9,'imageUrl':'../../images/product33.jpg',
 7           'inShoppingCart':0,'productQty':1},
 8           {'productId':144,'productName':'女装T恤简洁44','price':18.9,'originalPrice':38.9,'imageUrl':'../../images/product44.jpg',
 9           'inShoppingCart':0,'productQty':1}
10         ];
2 . 当用户点“加入购物车”按钮时候要将按钮隐藏起来,变成可以加减商品数量的控件,所以在index.wxml中需要做一个判断,
微信小程序在标签中加判断用wx:if这个属性,可以搭配wx:else来使用,这里我们用wx:if="{{item.inShoppingCart==0}}"
做判断。
3 . <button class="button1" data-productid="{{item.productId}}" data-index="{{index}}"
bindtap="addToShoppingCart">加入购物车</button>是一个按钮控件,
上面定义了一个点击函数addToShoppingCart,需要在index.js中完成相关逻辑,
data-productid="{{item.productId}}" 是将当前商品的productId值传给addToShoppingCart 函数,
小程序的传值非常简单,任意定义一个变量(这里是productId),在变量前面加上data- 作为属性,后面放值就可以了。
然后在addToShoppingCart 函数中就可以用下面的方式取值来用:
4 . <view class="qtyinfo1" wx:else></view>用来显示一个输入框和加/减数量的按钮,让用户可以增减商品数量。
5 . bindtap="tapMinus" 和 bindtap="tapPlus" 定义了2个方法tapMinus和tapPlus,
分别对应增加数量和减少数量的操作,我们要在index.js中实现这个逻辑。
data-productid="{{item.productId}}" data-index="{{index}}"是传递给函数的值。
index.wxss中定义的样式如下 :
 1 .button1   /*加入购物车按钮样式,height和line-height设置成一样让文字垂直居中对齐*/ 2 {
 3   height: 80rpx;
 4   line-height: 80rpx;
 5   background-color: antiquewhite;
 6 }
 7 .qtyinfo1    /*加减数量区块的样式及标签布局方式*/
 8 {
 9   display: flex;
10   flex-direction: row;
11   flex-wrap: nowrap;
12   margin-left: 60rpx;
13 }
14 .plus1{      /*加数量的样式*/
15   width: 80rpx;
16   height: 80rpx;
17   line-height: 80rpx;
18   border:solid 4rpx #c0c0c0;
19   border-left: 0;
20   background-color: aquamarine;
21   font-size: 20pt;
22   text-align: center;
23   border-top-right-radius: 20rpx;   /*右上边框设置成圆角*/
24   border-bottom-right-radius: 20rpx;  /*右下边框设置成圆角*/
25 }
26 .qty1{
27   width: 120rpx;
28   height: 80rpx;
29   line-height: 80rpx;
30   border:solid 4rpx #c0c0c0;
31   background-color: aquamarine;
32   text-align: center;
33 }
34 .minus1{
35   width: 80rpx;
36   height: 80rpx;
37   line-height: 80rpx;
38   border:solid 4rpx #c0c0c0;
39   border-right:0;
40   background-color: aquamarine;
41   font-size: 20pt;
42   text-align: center;
43   border-top-left-radius: 20rpx;   /*左上边框设置成圆角*/
44   border-bottom-left-radius: 20rpx;   /*左下边框设置成圆角*/
45 }
index.js中给对应的事件编码 :
 1   addToShoppingCart: function (options) {
 2     let productId = options.currentTarget.dataset.productid;
 3     let index = options.currentTarget.dataset.index;
 4
 5     this.saveShoppingCart(1, index, productId, 1);
 6   },
 7
 8   tapMinus: function (options) {
 9     let productId = options.currentTarget.dataset.productid;
10     let index = options.currentTarget.dataset.index;
11
12     let qty = this.data.productList[index].productQty
13     let newQty = qty-1;
14     if(newQty<1)
15     {
16       wx.showToast({title: '数量不能小于1!' });
17       return false;
18     }
19
20     this.saveShoppingCart(2, index, productId, newQty);
21   },
22   tapPlus: function (options) {
23     let productId = options.currentTarget.dataset.productid;
24     let index = options.currentTarget.dataset.index;
25
26     let qty = this.data.productList[index].productQty
27     let newQty = qty+1;
28     if(newQty>99)
29     {
30       wx.showToast({title: '数量不能大于99!'});
31       return false;
32     }
33
34     this.saveShoppingCart(3, index, productId, newQty);
35   },
36
37   saveShoppingCart: function (operationType, productIndex, productId, productQty) {
38     var _this=this;
39     wx.request({
40       url: 'http://www.tm.com/webapi/shoppingcart',
41       data:{
42         'operationType':operationType,
43         'productIndex':productIndex,
44         'productId':productId,
45         'productQty':productQty
46       },
47       method:'GET',
48       success:function(res){
49
50         _this.setData({['productList['+productIndex+'].productQty']:productQty});
51         wx.showToast({title: 'Success'});
52         if (operationType=1)
53         {
54           _this.setData({['productList['+productIndex+'].inShoppingCart']:1});
55         }
56       }
57     })
58   },
不论是添加商品到购物车,还是增减购物车中商品数量,都需要将商品信息(包括商品名称、价格、数量)保存到服务器,
本质上都是对数据库中商品的数量做的修改,所以我们定义了一个公共的函数
saveShoppingCart: function (operationType, productIndex, productId, productQty) { } 来执行数据库操作,各个函数说明如下:
加入购物车:
1 addToShoppingCart: function (options) {
2     let productId = options.currentTarget.dataset.productid;  //获取index.wxml中 传递过来的productId值,注意名称与data-productId一致
3     let index = options.currentTarget.dataset.index;  //获取index.wxml中 传递过来的index值
4     //将当前商品的索引值 、productId值、数量传递到函数中(加入购物车可以理解为商品数量是0+1),然后更新到服务器上处理。
5     this.saveShoppingCart(1, index, productId, 1);
6   },
减少商品数量:
 1 tapMinus: function (options) {
 2     let productId = options.currentTarget.dataset.productid;  //获取index.wxml中 传递过来的productId值,注意名称与data-productId一致
 3     let index = options.currentTarget.dataset.index;  //获取index.wxml中 传递过来的index值
 4
 5     let qty = this.data.productList[index].productQty;  //抓取当前数量
 6     let newQty = qty-1; //数量-1
 7     if(newQty<1)  //数量小于1时给出提示并终止后面的操作
 8     {
 9       wx.showToast({title: '数量不能小于1!' });
10       return false;
11     }
12     //将当前商品的索引值 、productId值、数量传递到函数中,然后更新到服务器上处理。
13     this.saveShoppingCart(2, index, productId, newQty);
14   },
增加商品数量 :
 1 tapPlus: function (options) {
 2     let productId = options.currentTarget.dataset.productid;  //获取index.wxml中 传递过来的productId值,注意名称与data-productId一致
 3     let index = options.currentTarget.dataset.index;  //获取index.wxml中 传递过来的index值
 4
 5     let qty = this.data.productList[index].productQty;  //抓取当前数量
 6     let newQty = qty+1;  //数量+1
 7     if(newQty>99)  //数量大于99时给出提示并终止后面的操作
 8     {
 9       wx.showToast({title: '数量不能大于99!'});
10       return false;
11     }
12     //将当前商品的索引值 、productId值、数量传递到函数中,然后更新到服务器上处理。
13     this.saveShoppingCart(3, index, productId, newQty);
14   },
更新服务器 :
 1 saveShoppingCart: function (operationType, productIndex, productId, productQty) {
 2     var _this=this;
 3     wx.request({
 4       url: 'http://www.tm.com/webapi/shoppingcart',
 5       data:{  //将服务器需要的数据都传递过去,实际项目可以根据需要加其他的参数
 6         'operationType':operationType,
 7         'productIndex':productIndex,
 8         'productId':productId,
 9         'productQty':productQty
10       },
11       method:'GET',
12       success:function(res){
13         //服务器更新成功就用setData()函数将数量设置到该商品的输入框中, 只有调用此函数页面的值才会变化,
14         _this.setData({['productList['+productIndex+'].productQty']:productQty});
15         wx.showToast({title: 'Success'});
16         if (operationType=1)
17         {//点加入购物车的按钮时需要用setData()函数更新inShoppingCart的值,按钮就会变成加减和输入框,让用户知道购买了此商品并可以去修改数量
18           _this.setData({['productList['+productIndex+'].inShoppingCart']:1});
19         }
20       }
21     })
22   },
至此,添加商品到购物车的功能就完成了, 在服务器端需要设计一个购物车表 ,基本结构如下 :
| 字段 | 说明 |
| product_id | 商品编号 |
| product_qty | 购买数量 |
| shoppingcart_key | 购物车编号,多个商品加入购物车的时候这个值是相同的 |
| add_time | 创建时间 |
| add_user | 创建人 |
服务器端的代码在介绍后端开发的时候单独讲,这里略过。

 浙公网安备 33010602011771号