resin app server安装总结
之前一直用的tomcat,这次项目中用到resin服务器,百度和google到的资料都很有限,而且其中有很多不完善的地方,安装过程中走了一些弯路。
以下记录了自己成功安装的步骤,补充了红色字体部分,仅供参考。
下载地址
Windows安装
- Install JDK 6 or later.
- Check that the environment variable JAVA_HOME is set to the JDK location, e.g. c:\java\jdk1.6.0_14
- Unzip resin-4.0.x.zip
- Define the environment variable RESIN_HOME to the location of Resin, for example c:\resin-4.0.x;并在环境变量path添加“%RESIN_HOME%\bin”,具体如下:
path: ......%RESIN_HOME%\bin
- Execute resin.exe
- or run java -jar lib/resin.jar start
- Browse to http://localhost:8080
与eclipse集成
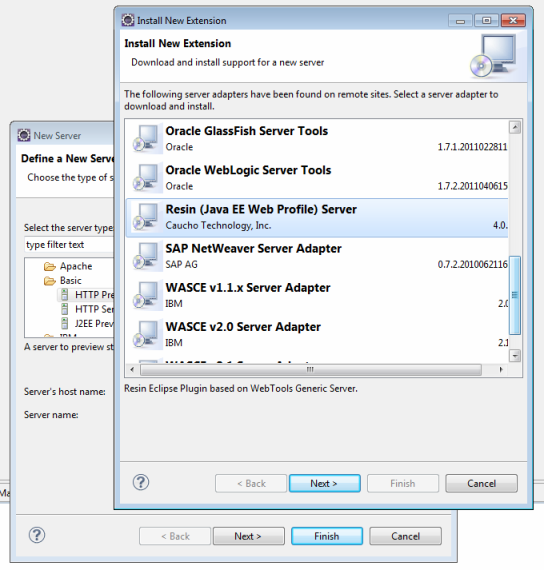
The Resin Eclipse plugin supports Helios (Eclipse 3.6) and above. Indigo (Eclipse 3.7) and above already comes with the Resin plugin registered. To download the Resin plugin, go to the 'New Server' dialog and click on 'Download additional server adapters'. In the 'Install New Extension' dialog, you'll see Resin as an option.

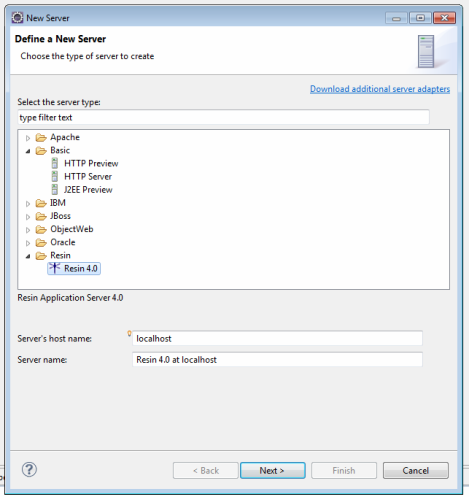
Once the plugin is installed, you'll see Resin 4.0 as an option in the 'New Server' dialog. When you select Resin, the wizard will take you through the steps to create a server instance in Eclipse.

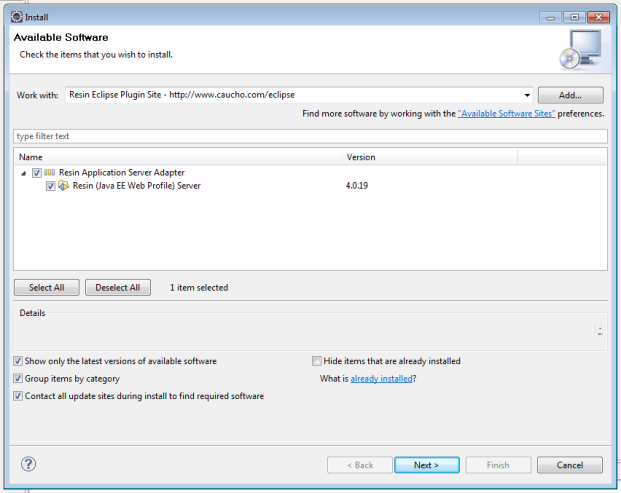
If you're using Helios, you will need to install the Resin plugin yourself directly from the Resin Eclipse plugin website (http://www.caucho.com/eclipse/). You can do this by registering the plugin website as an Available Software Site in Eclipse. Once you've done that, you'll be able to install the plugin manually.

Using the Eclipse Plugin
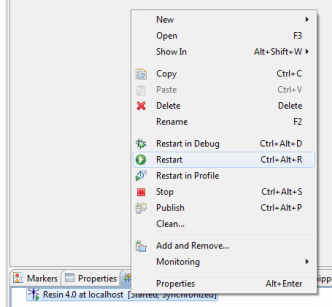
The Resin plugin supports all of the common server operations supported by WTP. You can start a server, stop a server, restart a server, debug on the server (including debugging remote servers), profile a server, add/remove projects to the server, clean the server, deploy/redeploy applications and so on. These operations are accessed either by right-clicking the server instance or right-clicking a project associated with a Resin server. If you are an experienced Eclipse user you should feel right at home.

按照以下步骤操作:
成功时如下图


