低代码 系列 —— 可视化编辑器2
其他章节请看:
可视化编辑器2
在第一篇中我们搭建了可视化编辑器的框架,完成了物料区和组件区的拖拽;本篇继续完善编辑器的功能,例如:撤销和重做、置顶和置底、删除、右键菜单、快捷键。
撤销和重做
需求:给物料区和编辑区添加撤销和重做功能
例如:
- 从物料区依次拖拽组件到编辑区,点击
撤销能回回到上一步,点击重做又可以恢复 - 在编辑区中拖动元素,点击撤销也能回到上一次位置
菜单区增加撤销和重做按钮样式
需求:菜单区增加撤销和重做按钮样式
效果如下图所示:

抽离菜单区到新模块 Menus.js。核心代码如下:
// 菜单区
// spug\src\pages\lowcodeeditor\Menus.js
...

class Menus extends React.Component {
    render() {
        return (
            <div style={{ textAlign: 'center' }}>
                <Space>
                    <Button type="primary" icon={<UndoOutlined />} onClick={() => console.log('撤销')}>撤销</Button>
                    <Button type="primary" icon={<RedoOutlined />} onClick={() => console.log('重做')}>重做</Button>
                </Space>
            </div>
        )
    }
}
在 index.js 中引入 Menus 模块:
// spug\src\pages\lowcodeeditor\index.js
import Menus from './Menus'

...
<Header className={styles.editorMenuBox}>
    <Menus/>
</Header>
撤销和重做的基本思路
撤销和重做顾名思义,请看下图(from 云音乐技术团队):
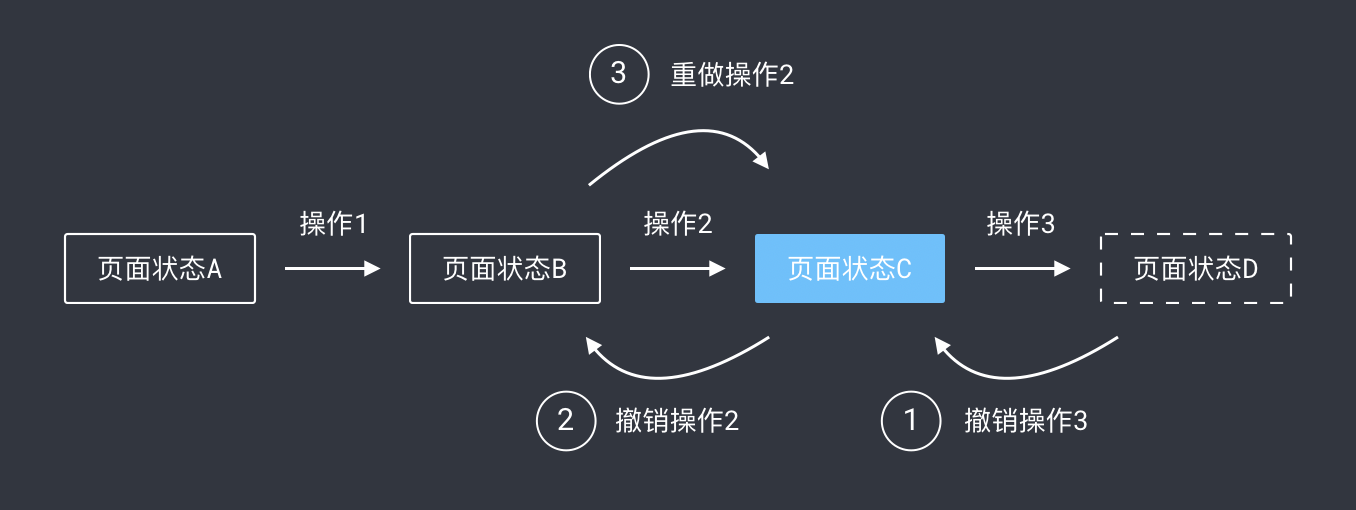
有一个点需要注意:笔者打开 win7 下的 ppt,依次做如下操作:
- 拖一个圆形,再拖一个圆形,再拖入一个圆形,目前有三个圆
- 按一次
ctrl+z撤销,目前只有两个圆圈,在拖入一个矩形
此刻效果如下图所示:
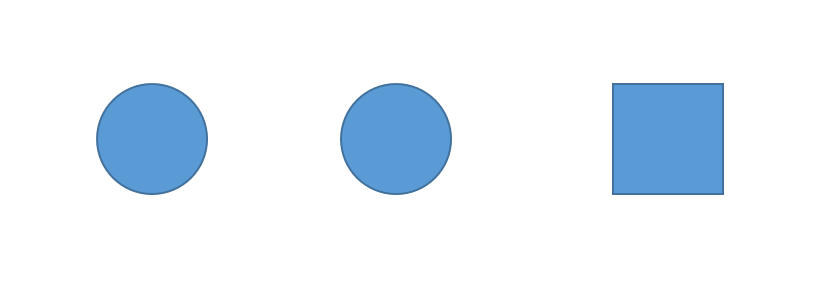
-
按一次撤销,显示两个圆
-
在按一次撤销,只有一个圆,而非 3 个圆(
注意)。
整个过程如下图所示:从左到右有 5 种页面状态
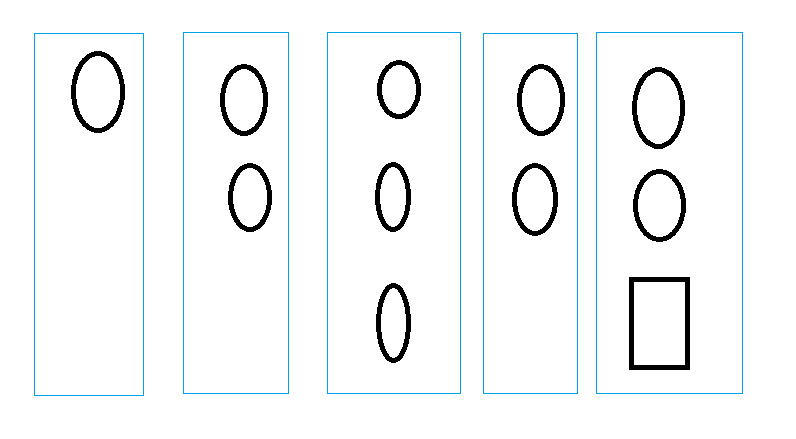
第3种页面状态为什么在撤回中丢失?
或许设计就是这样规定的:当页面处在某个历史状态下,在进行某些操作,就会产生一个新的状态分支,之前的历史状态则被丢弃。就像这样(from 云音乐技术团队):

既然每个操作后对应一个新的页面状态,而我们使用的react也是数据驱动的,那么就使用快照的思路,也就是把每个页面的数据保存一份,比如你好回到上一个状态,直接从历史数据中找到上一步数据,页面则会自动便过去。
开始编码前,我们先过一下数据结构和基本方法。
基本数据结构如下:
snapshotState = {
    current: -1, // 索引
    timeline: [], // 存放快照数据
    limit: 20, // 默认只能回退或撤销最近20次。防止存储的数据量过大
    commands: {}, // 命令和执行功能的映射 undo: () => {} redo: () => {}
}
commands 中存放的是命令(或操作)比如撤销、拖拽。比如注册撤销一个命令:
// 撤销
store.registerCommand({
    name: 'undo',
    keyboard: 'ctrl+z',
    execute() { // {1}
        return {
            // 从快照中取出当前页面状态,调用对应的 undo 方法即可完成撤销
            execute() { // {1}
                console.log('撤销')
                const {current, timeline} = store.snapshotState
                // 无路可退则返回
                if(current == -1){
                    return;
                }

                let item = timeline[current]
                if(item){
                    item.undo()
                    store.snapshotState.current--
                }
            }
        }
    }
})
当我们执行 commands 中执行该命令时,则会执行 execute()(行{1}),从快照历史中取出当前快照,执行对应的 undo() 方法完成撤销。 undo() 非常简单,就像这样:
store.registerCommand({
    name: 'drag',
    pushTimeline: 'true',
    execute() {
        let before = _.cloneDeep(store.snapshotState.before)
        let after = _.cloneDeep(store.json)
        return {
            redo() {
                store.json = after
            },
            // 撤销
            undo() {
                store.json = before
            }
        }
    }
})
撤销和重做基本实现
我们把状态相关的数据集中存在 store.js 中:
// spug\src\pages\lowcodeeditor\store.js

import _ from 'lodash'

class Store {

  // 快照。用于撤销、重做
  @observable snapshotState = {
    // 记录之前的页面状态,用于撤销
    before: null,
    current: -1, // 索引
    timeline: [], // 存放快照数据
    limit: 20, // 默认只能回退或撤销最近20次。防止存储的数据量过大
    commands: {}, // 命令和执行功能的映射 undo: () => {} redo: () => {}
    commandArray: [], // 存放所有命令
  }

  // 注册命令。将命令存入 commandArray,并在建立命令名和对应的动作,比如 execute(执行), redo(重做), undo(撤销)
  registerCommand = (command) => {

    const { commandArray, commands } = this.snapshotState
    // 记录命令
    commandArray.push(command)

    // 用函数包裹有利于传递参数
    commands[command.name] = () => {
      // 每个操作可以有多个动作。比如拖拽有撤销和重做
      // 每个命令有个默认
      const { execute, redo, undo } = command.execute()
      execute && execute()

      // 无需存入历史。例如撤销或重做,只需要移动 current 指针。如果是拖拽,由于改变了页面状态,则需存入历史
      if (!command.pushTimeline) {
        return
      }
      let {snapshotState: state} = this
      let { timeline, current, limit } = state
      // 新分支
      state.timeline = timeline.slice(0, current + 1)
      state.timeline.push({ redo, undo })
      // 只保留最近 limit 次操作记录
      state.timeline = state.timeline.slice(-limit);
      state.current = state.timeline.length - 1;
    }
  }

  // 保存快照。例如拖拽之前、移动以前触发
  snapshotStart = () => {
    this.snapshotState.before = _.cloneDeep(this.json)
  }

  // 保存快照。例如拖拽结束、移动之后触发
  snapshotEnd = () => {
    this.snapshotState.commands.drag()
  }
}

export default new Store()
在抽离的菜单组件中初始化命令,即注册撤销、重做、拖拽三个命令。
// 菜单区
// spug\src\pages\lowcodeeditor\Menus.js

import _ from 'lodash'

@observer
class Menus extends React.Component {
    componentDidMount() {
        // 初始化
        this.registerCommand()
    }
    // 注册命令。有命令的名字、命令的快捷键、命令的多个功能
    registerCommand = () => {
        // 重做命令。
        // store.registerCommand - 将命令存入 commandArray,并在建立命令名和对应的动作,比如 execute(执行), redo(重做), undo(撤销)
        store.registerCommand({
            // 命令的名字
            name: 'redo',
            // 命令的快捷键
            keyboard: 'ctrl+y',
            // 命令执行入口。多层封装用于传递参数给里面的方法
            execute() {
                return {
                    // 从快照中取出下一个页面状态,调用对应的 redo 方法即可完成重做
                    execute() {
                        console.log('重做')
                        const {current, timeline} = store.snapshotState
                        let item = timeline[current + 1]
                        // 可以撤回
                        if(item?.redo){
                            item.redo()
                            store.snapshotState.current++
                        }
                    }
                }
            }
        })

        // 撤销
        store.registerCommand({
            name: 'undo',
            keyboard: 'ctrl+z',
            execute() {
                return {
                    // 从快照中取出当前页面状态,调用对应的 undo 方法即可完成撤销
                    execute() {
                        console.log('撤销')
                        const {current, timeline} = store.snapshotState
                        // 无路可退则返回
                        if(current == -1){
                            return;
                        }

                        let item = timeline[current]
                        if(item){
                            item.undo()
                            store.snapshotState.current--
                        }
                    }
                }
            }
        })

        store.registerCommand({
            name: 'drag',
            // 标记是否存入快照(timelime)中。例如拖拽动作改变了页面状态,需要往快照中插入
            pushTimeline: 'true',
            execute() {
                // 深拷贝页面状态数据
                let before = _.cloneDeep(store.snapshotState.before)
                let after = _.cloneDeep(store.json)
                // 重做和撤销直接替换数据即可。
                return {
                    redo() {
                        store.json = after
                    },
                    // 撤销
                    undo() {
                        store.json = before
                    }
                }
            }
        })
    }
    render() {
        return (
            <div style={{ textAlign: 'center' }}>
                <Space>
                    <Button type="primary" icon={<UndoOutlined />} onClick={() => store.snapshotState.commands.undo()}>撤销</Button>
                    <Button type="primary" icon={<RedoOutlined />} onClick={() => store.snapshotState.commands.redo()}>重做</Button>
                </Space>
            </div>
        )
    }
}

export default Menus
在拖拽前触发 snapshotStart() 记录此刻页面状态,并在拖拽后触发 snapshotEnd() 将现在页面的数据存入历史,用于撤销和重做。请看代码:
// 物料区(即组件区)
// spug\src\pages\lowcodeeditor\Material.js
@observer
class Material extends React.Component {
    // 记录拖动的元素
    dragstartHander = (e, target) => {
        ...
        // 打快照。用于记录此刻页面的数据,用于之后的撤销
        store.snapshotStart()
    }
// spug\src\pages\lowcodeeditor\Container.js
@observer
class Container extends React.Component {
  dropHander = e => {
    // 打快照。将现在页面的数据存入历史,用于撤销和重做。
    store.snapshotEnd()
  }
笔者测试如下:
- 依次从物料区拖拽三个组件到编辑区
- 点击
撤销、撤销、撤销编辑区依次剩2个组件、1个组件、0个组件 - 在点击
重做、重做、重做,编辑区依次显示1个组件、2个组件、3个组件
编辑区增加撤销和重做
上面我们完成了物料区拖拽组件到编辑区的撤销和重做,如果将组件从编辑区中移动,点击撤销是不能回到上一次的位置。
需求:编辑区移动某组件到3个不同的地方,点击撤回能依次回到之前的位置,重做也类似。
思路:选中元素时打快照,mouseup时如果移动过则打快照
全部变动如下:
// spug\src\pages\lowcodeeditor\ComponentBlock.js
mouseDownHandler = (e, target, index) => {
    // 快照
    store.snapshotStart()
}
// spug\src\pages\lowcodeeditor\Container.js
mouseMoveHander = e => {
    // 选中元素后,再移动才有效
    if (!store.startCoordinate) {
        return
    }
    // 标记:选中编辑区的组件后并移动
    store.isMoved = true

}
// mouseup 后辅助线不在显示
mouseUpHander = e => {
    if(store.isMoved){
        store.isMoved = false
        store.snapshotEnd()
    }
    store.startCoordinate = null
}
// spug\src\pages\lowcodeeditor\store.js
@observable snapshotState = {
    // 编辑区选中组件拖动后则置为 true
    isMoved: false,
}
撤销和重做支持快捷键
需求:按 ctrl+z 撤销,按 ctrl+y 重做。
每次操作都得存放一次数据,即打一次快照
实现如下:
// 菜单区
// spug\src\pages\lowcodeeditor\Menus.js

@observer
class Menus extends React.Component {
    componentDidMount() {
        // 初始化
        this.registerCommand()

        // 所有按键均会触发keydown事件
        window.addEventListener('keydown', this.onKeydown)
    }

    // 卸载事件
    componentWillUnmount() {
        window.removeEventListener('keydown', this.onKeydown)
    }

    // 取出快捷键对应的命令并执行命令
    onKeydown = (e) => {
        console.log('down')
        // KeyboardEvent.ctrlKey 只读属性返回一个 Boolean 值,表示事件触发时 control 键是 (true) 否 (false) 按下。
        // code 返回一个值,该值不会被键盘布局或修饰键的状态改变。当您想要根据输入设备上的物理位置处理键而不是与这些键相关联的字符时,此属性非常有用
        const {ctrlKey, code} = e
        const keyCodes ={
            KeyZ: 'z',
            KeyY: 'y',
        }
        // 未匹配则直接退出
        if(!keyCodes[code]){
            return
        }
        // 生成快捷键,例如 ctrl+z
        let keyStr = []
        if(ctrlKey){
            keyStr.push('ctrl')
        }
        keyStr.push(keyCodes[code])
        keyStr = keyStr.join('+')

        // 取出快捷键对应的命令
        let command = store.snapshotState.commandArray.find(item => item.keyboard === keyStr);
        // 执行该命令
        command = store.snapshotState.commands[command.name]
        command && command()
    }
    ...
}

export default Menus
json 导入导出
编辑器最终需要将生成的 json 配置文件导出出去,对应的也应该支持导入,因为做了一半下班了,得保存下次接着用。
我们可以分析下 amis 的可视化编辑器,它将导出和导入合并成一个模块(即代码)。就像这样:
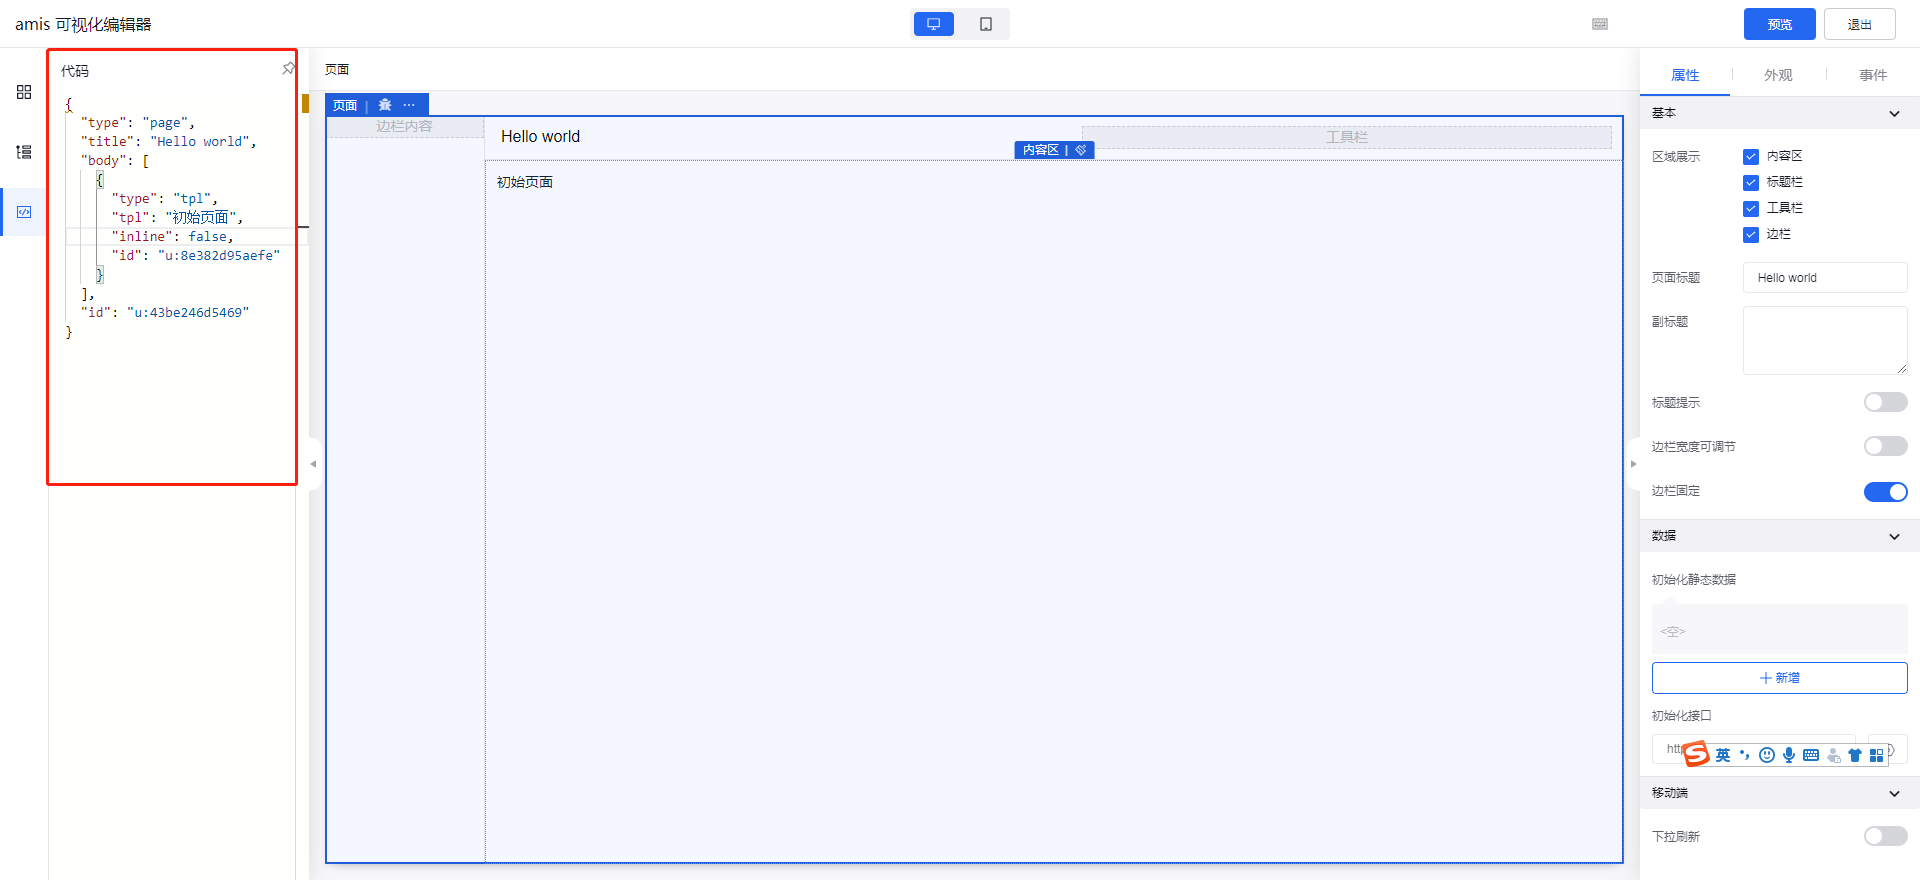
如果要导出数据,直接复制即可。而且更改配置数据,编辑区的组件也会同步,而且支持撤回,导入也隐形的包含了。
我们要做到上面这点也不难,就是将现在的配置数据 json 放入一个面板中,给面板增加键盘事件,最主要的是注册 input 事件,当 textarea 的 value 被修改时触发从而放入历史快照中,导入的粘贴也得放入历史快照,按 ctrl + z 时撤回。
难点是配置文件错误提示,比如某组件的配置属性是 type,而用户改成 type2,这个可以通过验证每个组件支持的属性解决,但如果 json 中缺少一个逗号,这时应该像 amise 编辑器一样友好(给出错误提示):
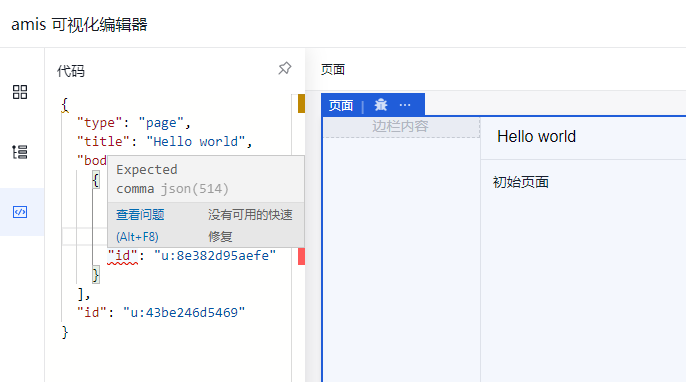
如果需求可以由自己决定,那么可以做得简单点:
- 导出,直接弹框显示配置文件(多余的属性,比如给程序内部用的剔除)给用户看即可,无需撤回和保持编辑区组件的同步
- 导入,通常是一开始就做这个动作。如果希望中途导入,那么就在保存前后打快照,也很容易实现撤销
置顶和置底
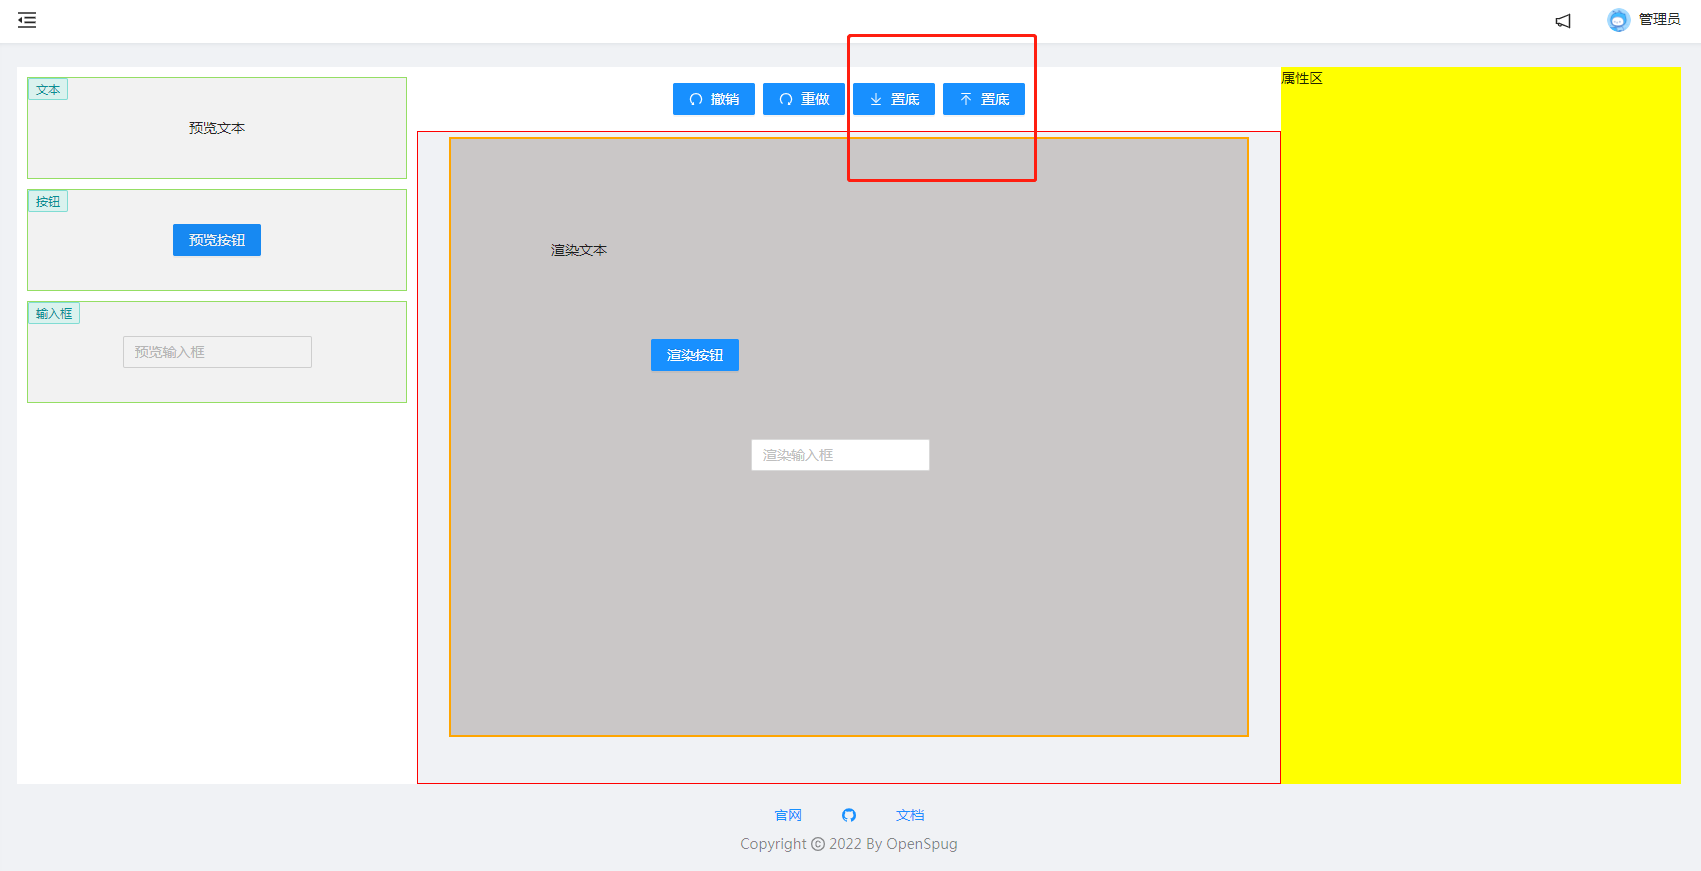
需求:将选中的组件置顶或置底,支持同时操作多个。
首先在菜单区增加两个按钮。
效果如下图所示:
// spug\src\pages\lowcodeeditor\Menus.js
...
import { ReactComponent as BottomSvg } from './images/set-bottom.svg'
import { ReactComponent as TopSvg } from './images/set-top.svg'

...
render() {
    return (
        <div style={{ textAlign: 'center' }}>
            <Space>
                <Button type="primary" icon={<UndoOutlined />} onClick={() => store.snapshotState.commands.undo()}>撤销</Button>
                <Button type="primary" icon={<RedoOutlined />} onClick={() => store.snapshotState.commands.redo()}>重做</Button>
                <Button type="primary" onClick={() => console.log('置底')}><Icon component={BottomSvg} />置底</Button>
                <Button type="primary" onClick={() => console.log('置底')}><Icon component={TopSvg} />置底</Button>
            </Space>
        </div>
    )
}
注:按钮引入自定义图标,最初笔者放入 icon 属性中 <Button type="primary" icon={<BottomSvg />} >置底</Button> 结果图片非常大,样式遭到破坏,根据 antd 官网,将其写在 Icon 组件中即可。
接着增加置顶和置顶的命令。思路是:
- 点击置顶,去到所有组件中最大的 zindex,然后将当前选中组件的 zindex 设置为
maxZIndex + 1 - 点击置底,如果最小 zindex 小于1,则不能将当前选中组件的 zindex 设置为
minZIndex - 1,因为若为负数(比如 -1),组件会到编辑器下面去,直接看不见了。
实现如下:
// 菜单区
// spug\src\pages\lowcodeeditor\Menus.js
@observer
class Menus extends React.Component {
    ...
    registerCommand = () => {
        // 置顶
        store.registerCommand({
            name: 'setTop',
            pushTimeline: 'true',
            execute() {
                // 深拷贝页面状态数据
                let before = _.cloneDeep(store.json)
                // 取得最大的zindex,然后将选中的组件的 zindex 设置为最大的 zindex + 1
                // 注:未处理 z-index 超出极限的场景
                let maxZIndex = Math.max(...store.json.components.map(item => item.zIndex))

                // 这种写法也可以:
                // let maxZIndex = store.json.components.reduce((pre, elem) => Math.max(pre, elem.zIndex), -Infinity)

                store.focusComponents.forEach( item => item.zIndex = maxZIndex + 1)

                let after = _.cloneDeep(store.json)
                // 重做和撤销直接替换数据即可。
                return {
                    redo() {
                        store.json = after
                    },
                    // 撤销
                    undo() {
                        store.json = before
                    }
                }
            }
        })

        // 置底
        store.registerCommand({
            name: 'setBottom',
            pushTimeline: 'true',
            execute() {
                // 深拷贝页面状态数据
                let before = _.cloneDeep(store.json)
                let minZIndex = Math.min(...store.json.components.map(item => item.zIndex))

                // 如果最小值小于 1,最小值置为0,其他未选中的的元素都增加1
                // 注:不能简单的拿到最最小值减1,因为若为负数(比如 -1),组件会到编辑器下面去,直接看不见了。
                if(minZIndex < 1){
                    store.focusComponents.forEach( item => item.zIndex = 0)
                    store.unFocusComponents.forEach( item => item.zIndex++ )
                }else {
                    store.focusComponents.forEach( item => item.zIndex = minZIndex - 1)
                }

                let after = _.cloneDeep(store.json)
                // 重做和撤销直接替换数据即可。
                return {
                    redo() {
                        store.json = after
                    },
                    // 撤销
                    undo() {
                        store.json = before
                    }
                }
            }
        })
    }
    render() {
        return (
            <div style={{ textAlign: 'center' }}>
                <Space>
                    ...
                    <Button type="primary" onClick={() => store.snapshotState.commands.setTop()}>...置顶</Button>
                    <Button type="primary" onClick={() => store.snapshotState.commands.setBottom()}>...置底</Button>
                </Space>
            </div>
        )
    }
}
export default Menus
Tip:给置顶和置底增加快捷键笔者就不实现了,和撤销快捷键类似,非常简单。
删除
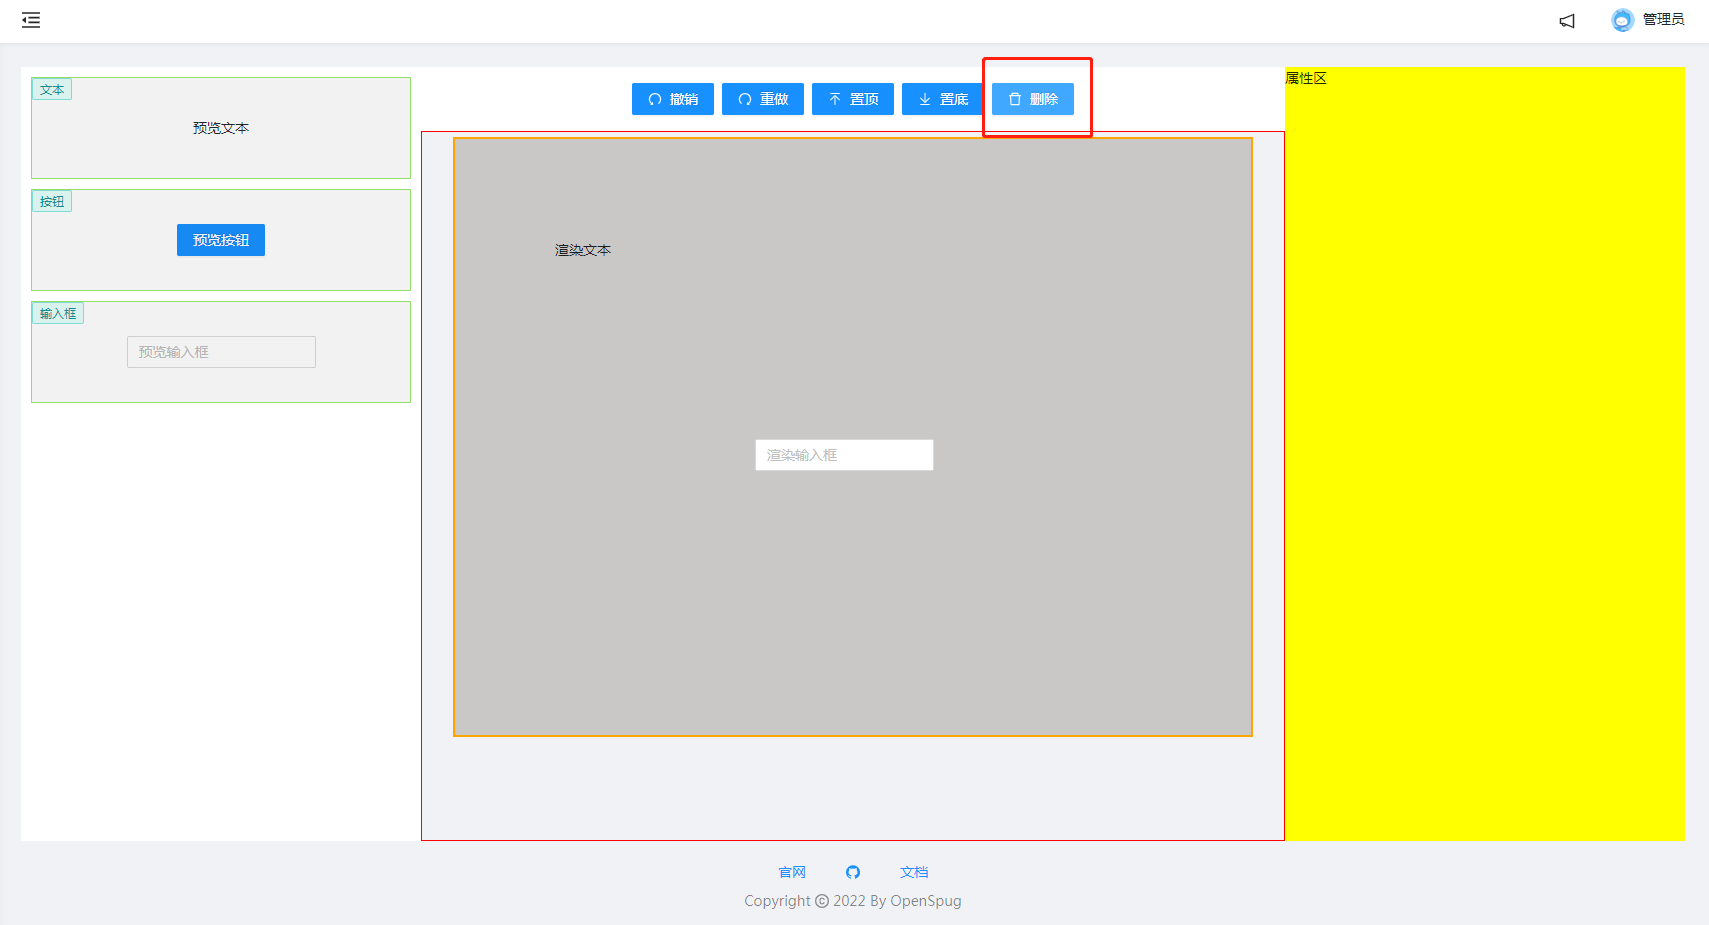
需求:删除编辑区中选中的元素,例如删除编辑区中的按钮。
效果如下图所示:
实现如下:
// 菜单区
// spug\src\pages\lowcodeeditor\Menus.js

class Menus extends React.Component {
    registerCommand = () => {
        // 删除
        store.registerCommand({
            name: 'delete',
            pushTimeline: 'true',
            execute() {
                // 深拷贝页面状态数据
                let before = _.cloneDeep(store.json)
                // 未选中的就是要保留的
                store.json.components = store.unFocusComponents

                let after = _.cloneDeep(store.json)
                // 重做和撤销直接替换数据即可。
                return {
                    redo() {
                        store.json = after
                    },
                    // 撤销
                    undo() {
                        store.json = before
                    }
                }
            }
        })
    }
    render() {
        return (
            <div style={{ textAlign: 'center' }}>
                <Space>
                    ...
                    <Button type="primary" icon={<DeleteOutlined />} onClick={() => store.snapshotState.commands.delete()}>删除</Button>
                </Space>
            </div>
        )
    }
}
Tip:比如选中元素后,按 Delete 键删除,笔者可自行添加快捷键即可。
预览
简单的预览,可以在此基础上不让用户拖动,而且组件(例如输入框)可以输入。
做得更好一些是生成用户最终使用的样式
再好一些是不仅生成用户使用时一样的样式,而且在预览页可以正常使用该功能。
右键菜单
需求:对编辑器中的组件右键出现菜单,能更方便触发置顶、置底、删除等功能。
效果如下:
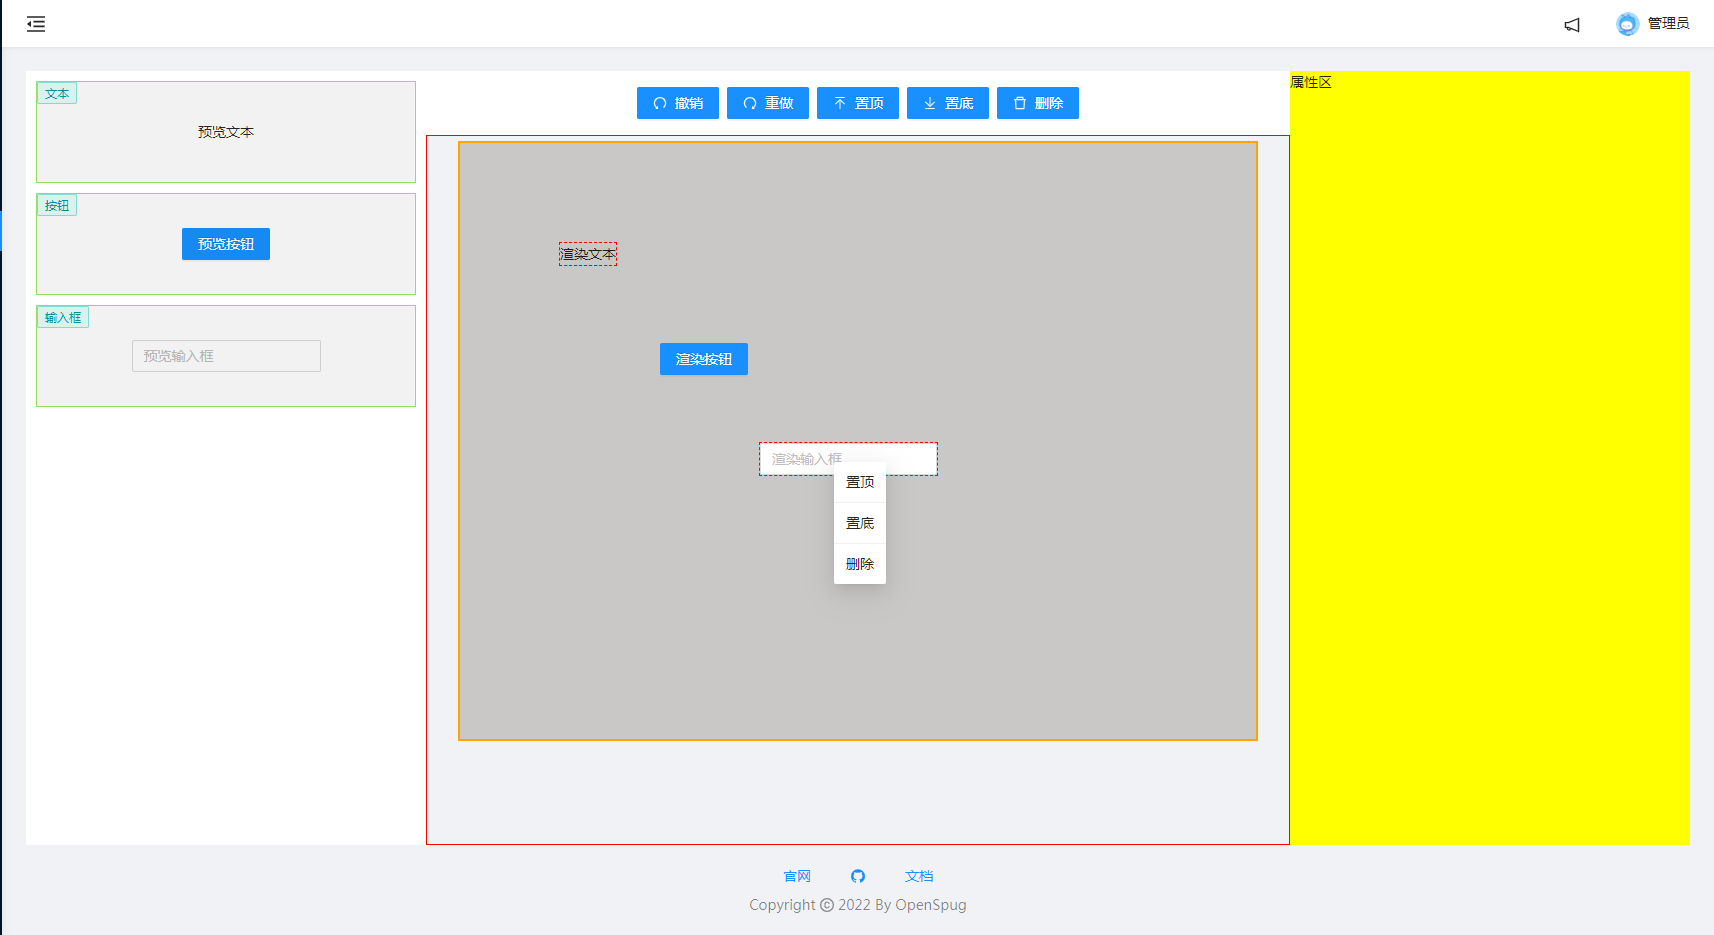
思路:最初打算用原生事件 contextmenu 实现,最后直接用 andt 的 Menu + Dropdown 实现。请看代码:
// spug\src\pages\lowcodeeditor\ComponentBlock.js
import { Dropdown, Menu } from 'antd';

// 右键菜单
const ContextMenu = (
  <Menu>
    <Menu.Item onClick={() => store.snapshotState.commands.setTop()} >
      置顶
    </Menu.Item>
    <Menu.Divider />
    <Menu.Item onClick={() => store.snapshotState.commands.setBottom()}>
      置底
    </Menu.Item>
    <Menu.Divider />
    <Menu.Item onClick={() => store.snapshotState.commands.delete()}>
      删除
    </Menu.Item>
  </Menu>
);

class ComponentBlock extends React.Component {
  render() {
    return (
      <div ref={this.box}
      - className={styles.containerBlockBox}
        ...
      >
        <Dropdown overlay={ContextMenu} trigger={['contextMenu']} style={{ background: '#000' }}>
          <div className={styles.containerBlockBox}>
            {store.componentMap[item.type]?.render()}
          </div>
        </Dropdown>
      </div>
    )
  }
}
给每个组件外用 Dropdown 封装一下,点击菜单时触发响应命令即可。
支持同时对多个选中元素进行操作,比如同时删除多个,撤回和重做当然也支持。
最后给菜单添加图标,就像这样:
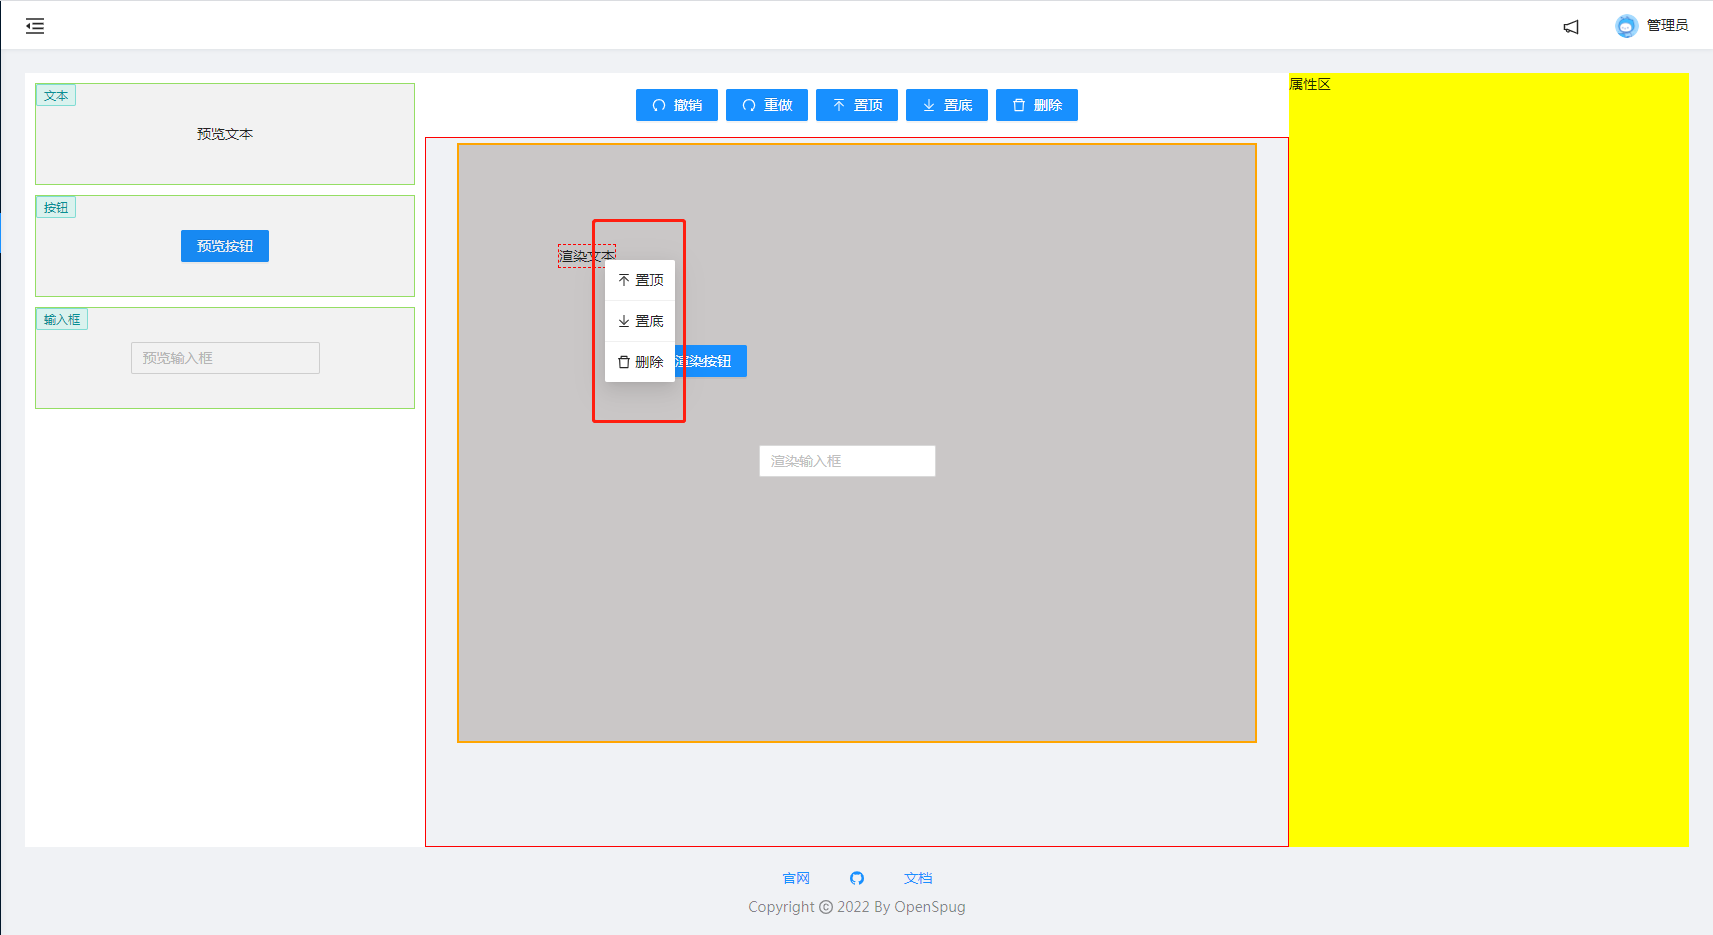
设置 Icon 的 fill 或 style 不起作用,图标总是白色。最后删除置顶和置底的 svg 中 fill='#ffffff' 就可以了。代码如下:
// spug\src\pages\lowcodeeditor\ComponentBlock.js
import Icon, { DeleteOutlined } from '@ant-design/icons';
import { ReactComponent as BottomSvg } from './images/set-bottom.svg'
import { ReactComponent as TopSvg } from './images/set-top.svg'

// 右键菜单
const ContextMenu = (
  <Menu>
    <Menu.Item onClick={() => store.snapshotState.commands.setTop()} >
      <Icon component={TopSvg} /> 置顶
    </Menu.Item>
    <Menu.Divider />
    <Menu.Item onClick={() => store.snapshotState.commands.setBottom()}>
      <Icon component={BottomSvg} /> 置底
    </Menu.Item>
    <Menu.Divider />
    <Menu.Item onClick={() => store.snapshotState.commands.delete()}>
      <DeleteOutlined /> 删除
    </Menu.Item>
  </Menu>
);
删除 svg 中的 fill 属性后,图标的颜色随文字颜色变化。
其他章节请看:
出处:https://www.cnblogs.com/pengjiali/p/16844280.html
本文版权归作者和博客园共有,欢迎转载,但未经作者同意必须保留此段声明,且在文章页面明显位置给出原文连接。

