基于ARM64的Qemu/KVM学习环境搭建2
在基于ARM64的Qemu/KVM学习环境搭建中介绍了搭建环境的方法。
使用新的Qemu版本:qemu-8.0.0
#!/bin/bash ../configure --prefix=`pwd` \ --target-list=x86_64-softmmu,aarch64-softmmu \ --enable-virtfs \ --enable-kvm \ --enable-sdl \ --enable-slirp
运行模式
ARMv8运行虚拟机有两种模式,一种是Hyp mode,一种是VHE mode。
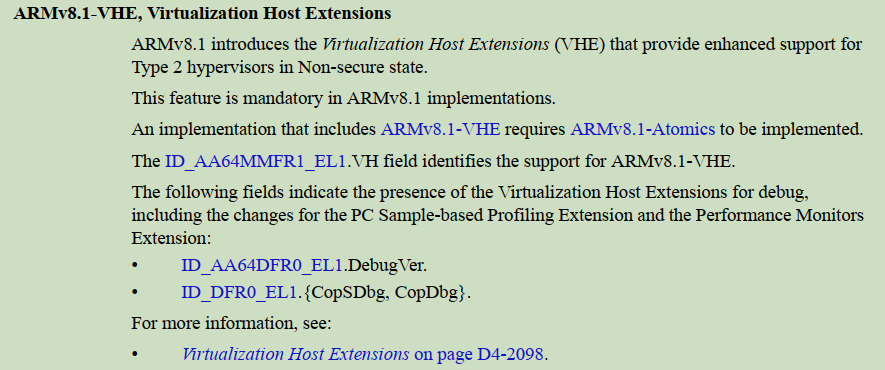
VHE是ARMv8.1引入的,如果要使用VHE模式,需要使用支持这个特性的CPU。ARM官网提供了[不同Cortex-A系列的处理器特性对比](Arm Cortex-A Processor Comparison Table "不同Cortex-A系列的处理器特性对比")。
使用Hyp Mode
如Cortex-A72或者A53等:
sudo /home/pengdl/work/qemu-8.0.0/build/aarch64-softmmu/qemu-system-aarch64 \ -M virt,gic-version=3,virtualization=on,type=virt \ -cpu cortex-a72 \ -nographic \ -m 8G \ -smp 8 \ -kernel /home/pengdl/work/Qemu/arm64/$kernel/arch/arm64/boot/Image \ -append "noinitrd root=/dev/vda rootfstype=ext4 rw console=ttyAMA0 crashkernel=256M" \ -fsdev local,security_model=passthrough,id=fsdev0,path=/home/pengdl/work/Qemu/arm64/share \ -device virtio-9p-pci,id=fs1,fsdev=fsdev0,mount_tag=hostshare \ -drive if=none,format=qcow2,file=/home/pengdl/work/Qemu/arm64/ubuntu20.qcow2,id=hd0 \ -device virtio-blk-device,drive=hd0 \ -netdev user,id=eth0,hostfwd=tcp::8080-:22 -device virtio-net-device,netdev=eth0 \ -nographic
可以看到启动日志里有如下内容:
[ 2.341397] kvm [1]: Hyp mode initialized successfully
使用VHE mode
使用Cortex-A76,实现了ARMv8.2扩展:
sudo /home/pengdl/work/qemu-8.0.0/build/aarch64-softmmu/qemu-system-aarch64 \ -M virt,gic-version=3,virtualization=on,type=virt \ -cpu cortex-a76 \ -nographic \ -m 8G \ -smp 8 \ -kernel /home/pengdl/work/Qemu/arm64/$kernel/arch/arm64/boot/Image \ -append "noinitrd root=/dev/vda rootfstype=ext4 rw console=ttyAMA0 crashkernel=256M" \ -fsdev local,security_model=passthrough,id=fsdev0,path=/home/pengdl/work/Qemu/arm64/share \ -device virtio-9p-pci,id=fs1,fsdev=fsdev0,mount_tag=hostshare \ -drive if=none,format=qcow2,file=/home/pengdl/work/Qemu/arm64/ubuntu20.qcow2,id=hd0 \ -device virtio-blk-device,drive=hd0 \ -netdev user,id=eth0,hostfwd=tcp::8080-:22 -device virtio-net-device,netdev=eth0 \ -nographic
也可以写成-cpu max
可以从启动日志中看到:
[ 2.444577] kvm [1]: VHE mode initialized successfully
GDB
-
如果是fedora系统上,gdb已经包含了multiarch的信息,所以直接用gdb即可
本文来自博客园,作者:dolinux,未经同意,禁止转载


【推荐】编程新体验,更懂你的AI,立即体验豆包MarsCode编程助手
【推荐】凌霞软件回馈社区,博客园 & 1Panel & Halo 联合会员上线
【推荐】抖音旗下AI助手豆包,你的智能百科全书,全免费不限次数
【推荐】博客园社区专享云产品让利特惠,阿里云新客6.5折上折
【推荐】轻量又高性能的 SSH 工具 IShell:AI 加持,快人一步
· PPT革命!DeepSeek+Kimi=N小时工作5分钟完成?
· What?废柴, 还在本地部署DeepSeek吗?Are you kidding?
· DeepSeek企业级部署实战指南:从服务器选型到Dify私有化落地
· 程序员转型AI:行业分析
· 重磅发布!DeepSeek 微调秘籍揭秘,一键解锁升级版全家桶,AI 玩家必备神器!
2022-12-13 给kprobe添加字符数据显示方式
2014-12-13 Linux下DNW源码及安装
2013-12-13 技术随笔 查找速度最快的Google IP
2013-12-13 Linux SSH远程文件/目录传输命令scp
2013-12-13 GCC 编译选项(转)
2013-12-13 Makefile中指示符“include”、“-include”和“sinclude”的区别