What every SRE should know about GNU/Linux shell related internals: file descriptors, pipes, terminals, user sessions, process groups and daemons
Despite the era of containers, virtualization, and the rising number of UI of all kinds, SREs often spend a significant part of their time in GNU/Linux shells. It could be debugging, testing, developing, or preparing the new infrastructure. It may be the good old bash, the more recent and fancy zsh, or even fish or tcsh with their interesting and unique features.

But it is common nowadays how little people know about the internals of their shells, terminals, and relations between processes. All are taken primarily for granted without really thinking about such aspects.
Have you ever thought about how a shell pipe works, how pressing the CTRL+C combination delivers the interrupt signal to the currently running shell processes, or how vim rewrites the content of the console when you change the size of your terminal window?
I want to show you some indeed neat parts of pipes, file descriptors, shells, terminals, processes, jobs, and signals in this series of posts. We’ll touch on how all of them interact with each other to build a responsible, simple, and reliable environment. And all of this, of course, will be shown in the context of the Linux kernel, its internals, and various debugging tools and approaches.
We are going to play with file descriptors, pipes, different tools such as nohup and pv, experiment with background and foreground processes, understand how tmux gives us the ability to continue where we stopped, why and how the CTRL+C interrupts the currently running pipeline of commands and much much more. Also, we will use strace to trace syscalls, read the Linux kernel source code, and use bpftrace to get under the hood of arbitrary kernel functions.
Prepare environment
During the series, I’ll mix python and golang for my examples. Also, we’ll need a file for our experiments. I use /var/tmp/file1.db. You can easily generate it using the following command:
$ dd if=/dev/random of=/var/tmp/file1.db count=100 bs=1M
Dive
With all that said, let’s learn, experiment, and have fun.
File descriptor and open file description
First of all, I want to touch on the two fundamental concepts of working with files:
- file descriptor;
- open file description.
These two abstractions are crucial for understanding the internals of a process creation, communication, and data transition.
The first concept is a file descriptor or fd. It’s a positive integer number used by file system calls instead of a file path in order to make a variety of operations. Every process has its own file descriptor table (see Image 1 below). The main idea of a file descriptor is to decouple a file path (or, more correctly, an inode with minor and major device numbers) from a file object inside a process and the Linux kernel. This allows software developers to open the same file an arbitrary number of times for different purposes, with various flags (for instance: O_DIRECT, O_SYNC, O_APPEND, etc.), and at different offsets.
For example, a program wants to read from and write to one file in two separate places. In this case, it needs to open the file twice. Thus, two new file descriptors will refer to 2 different entries in the system-wide open file description table.
In its turn, the open file description table is a system-wide kernel abstraction. It stores the file open status flags (man 2 open) and the file positions (we can use man 2 lseek to change this position).
Frankly speaking, there is no such thing inside the Linux kernel where we can find the open file description table. To be more accurate, every created process in the kernel has a per-thread struct task_struct. This struct has a pointer to another structure called the files_struct, and that contains an array of pointers to a file struct. This final struct is actually what holds all file flags, a current position, and a lot of other information about the open file: such as its type, inode, device, etc. All such entries among all running threads are what we call the open file descriptor table.
So, now let’s see how we can create entities in these two tables. In order to create a new entry in the open file description table we need to open a file with one of the following syscalls: open, openat, create, open2 (man 2 open). These functions also add a corresponding entry in the file descriptor table of the calling process, build a reference between the open file description table entry and the file descriptor table, and return the lowest positive number not currently opened by the calling process. The latest statement is very important to remember and understand because it means that a fd number can be reused during the process life if it opens and closes files in an arbitrary order.
Linux kernel also provides an API to create copies of a file descriptor within a process. We will discuss why this technique can be helpful in a few minutes. For now, let’s just list them here: dup, dup2, dup3 (man 2 dup) and fcntl (man 2 fcntl) with F_DUPFD flag. All these syscalls create a new reference in the fd table of the process to the existing entry in the system-wide open file description table.
Let’s take a closer look at an example in the image below with a snapshot of a system state. The image shows us possible relations among all the above components.
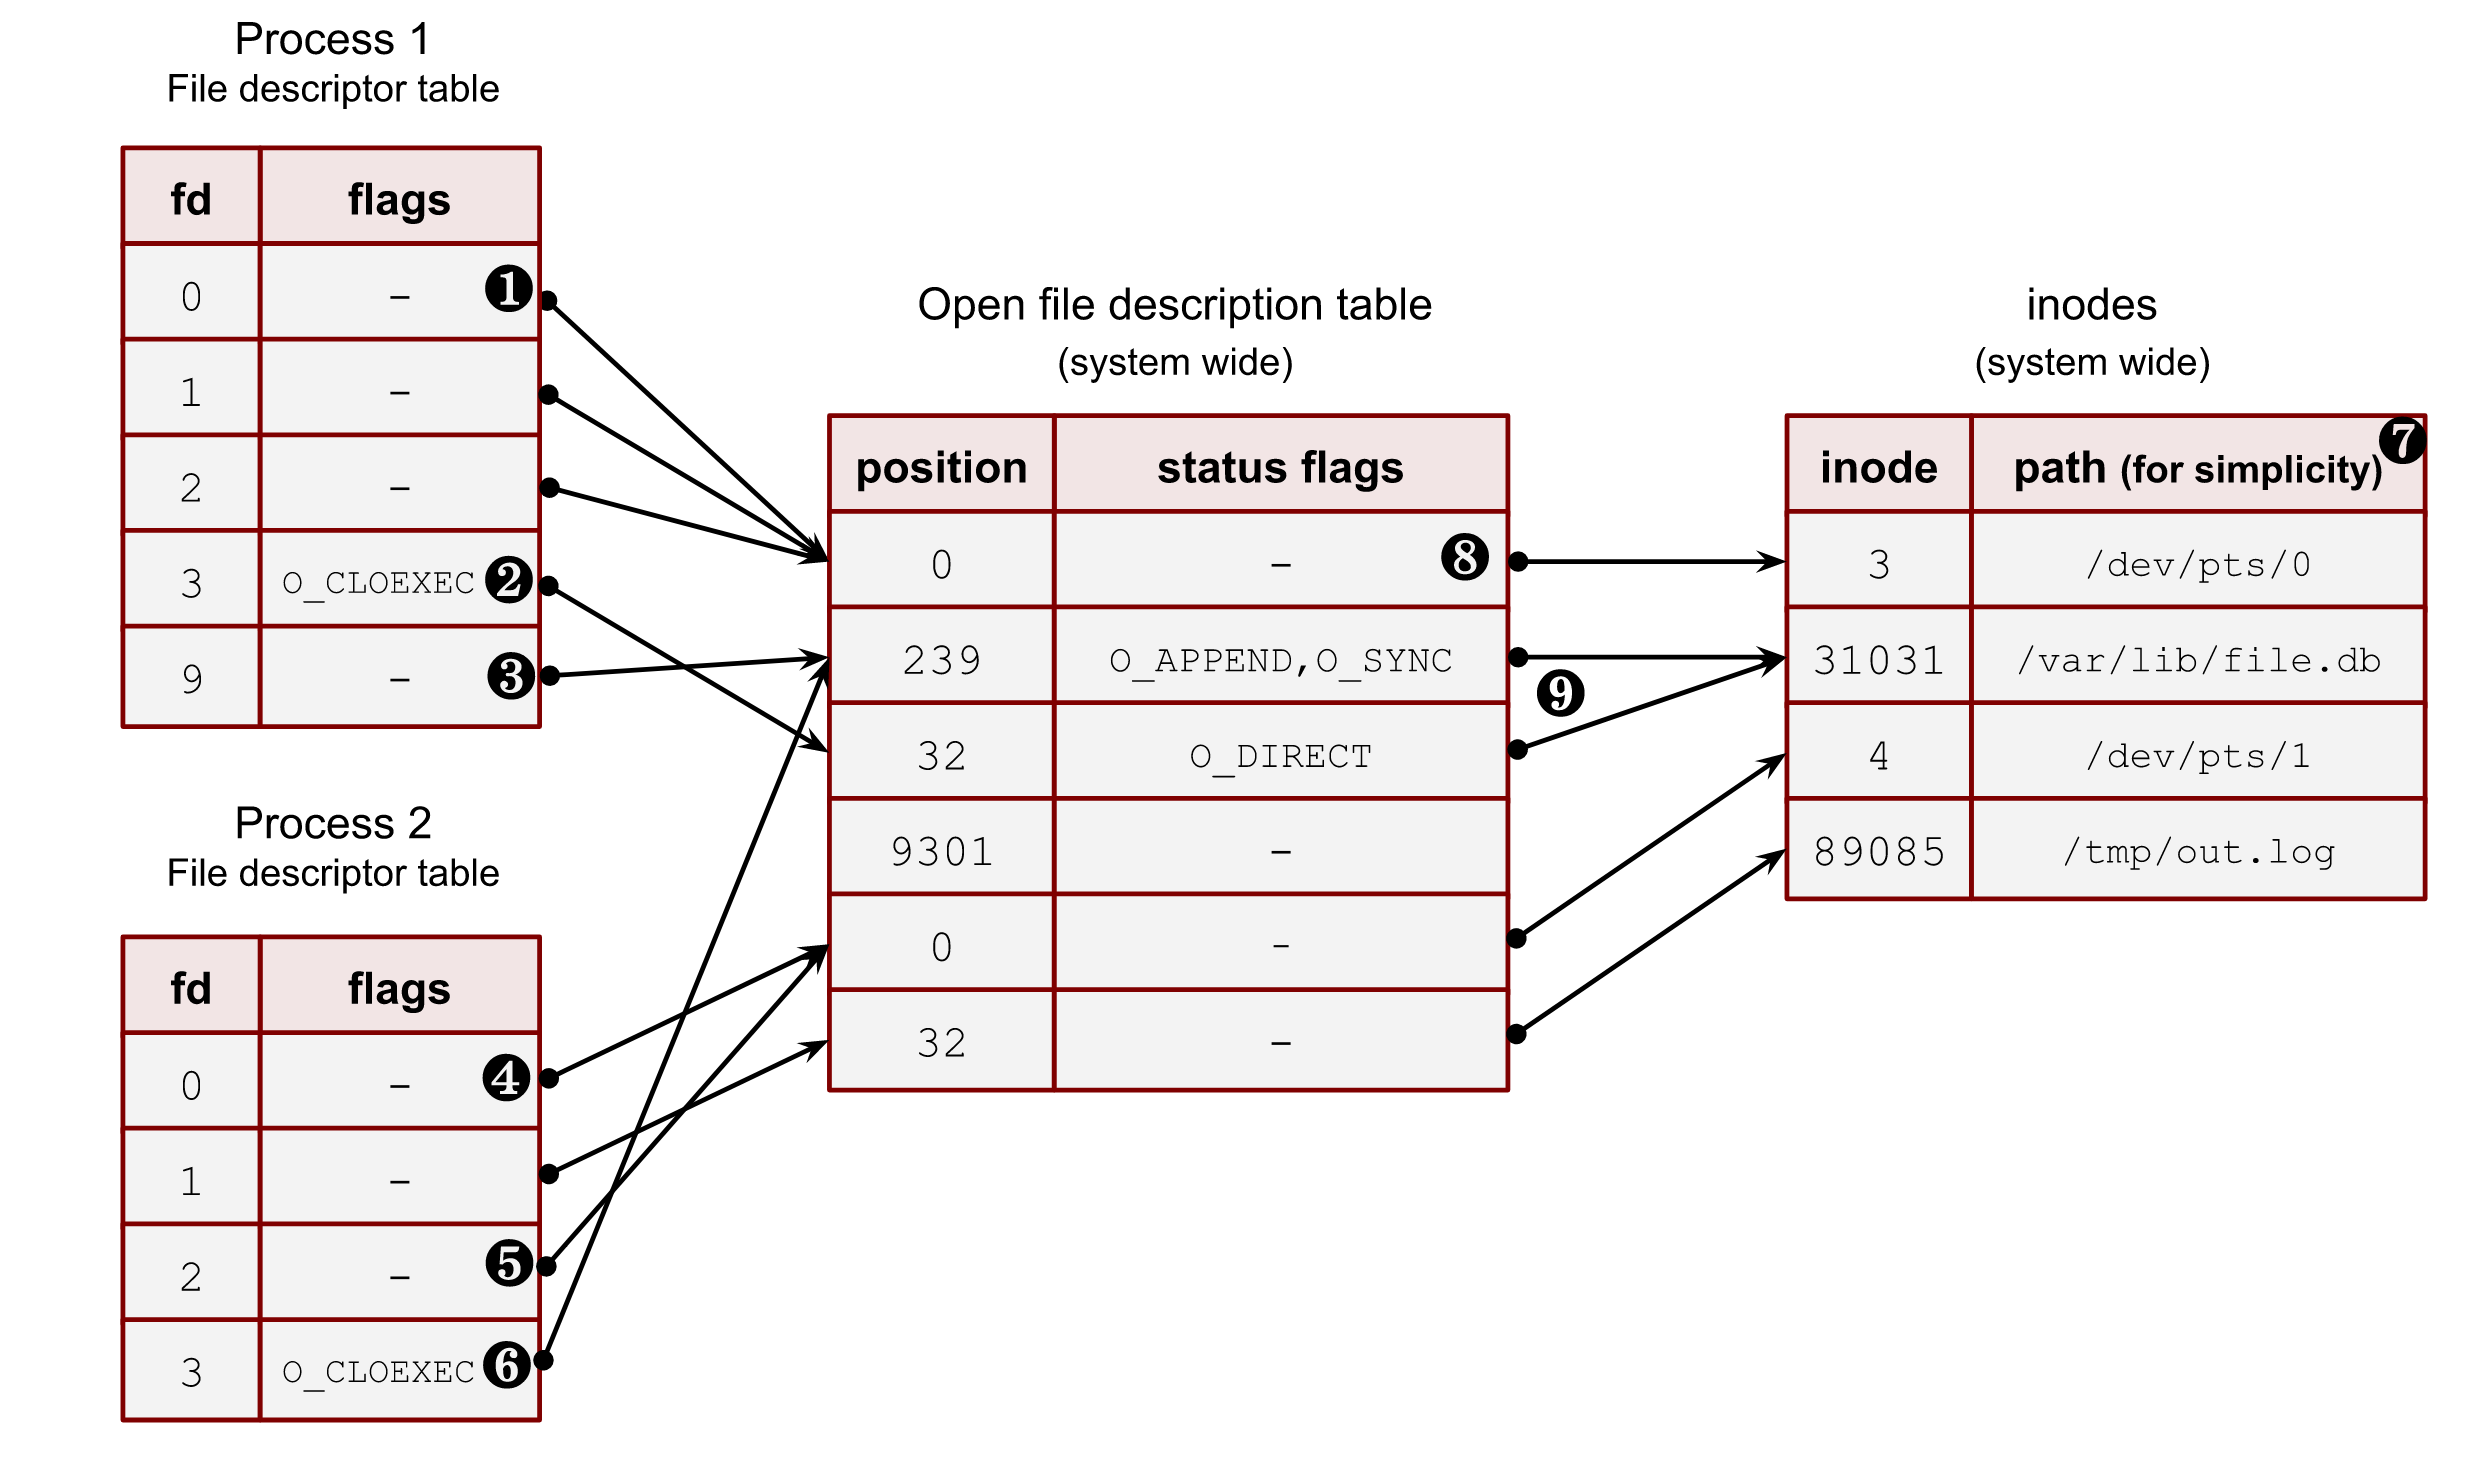
Image 1. – Relations between process file descriptors, system-wide open file description table and files
❶ – The first three file descriptors (stdin, stdout and stderr) are special file descriptors. We will work with them later in this post. This example shows that all three point to a pseudoterminal (/dev/pts/0). These files don’t have positions due to their character device type. Thus process_1 and process_2 must be running under the terminal sessions. Please, note that the stdout of the process_2 (fd 1) points to the file on a disk /tmp/out.log. This is an example of shell redirection; we will discuss it later.
❷ – Some file descriptors can have per-process flags. Nowadays, there is only one such flag: close-on-exec (O_CLOEXEC). We will discuss it later in this section and answer why it’s so unique. But for now, you should understand that some file descriptors may have it for the same system-wide open file description table entries. For instance: process_1 and its fd 9 and process_2 and its fd 3.
❸ – Even though the file descriptor algorithm constantly reuses the file descriptors and allocates them sequentially from the lowest available, it doesn’t mean that there can be no gaps. For example, the fd 9 of the process_1 goes after fd 3. Some files, which used fd 4, 5, 6 and 7, could already be closed. Another way of achieving such a picture can be an explicit duplication of a file descriptor with dup2, dup3 or fcntl with F_DUPFD. Using these syscalls, we can specify the wanted file descriptor number. We will see later how it works in the chapter about the duplication of fds.
❹ – A process can have more than one file descriptor that points to the same entry in the open file descriptions. System calls dup, dup2, dup3 and fcntl with F_DUPFD help with that. The fd 0 and fd 2 of the process_2 refer to the same pseudo terminal entry.
❺ – Sometimes, one of the standard file descriptors might be pointed to a regular file (or pipe) and not a terminal. In this example, the stdout of the process_2 refers to a file on disk /tmp/out.txt.
❻ – It’s possible to point file descriptors from various processes to the same entry in the system-wide open file description table. This is usually achieved by a fork call and inheriting file descriptors from the parent to its child. But there are other ways, which we’ll see later in this chapter. These descriptors could also have different int fd numbers inside processes and different process flags (O_CLOEXEC). For instance, fd 9 of process_1 and fd 3 of process_2.
❼ – I put the file path here for simplicity. Instead, Linux kernel uses inode numbers, minor and major numbers of a device.
❽ – Often, for a shell, the 0,1 and 2 file descriptors are pointed to a pseudo-terminal.
❾ – Multiple open file descriptor entries can be linked with the same file on disk. The kernel allows us to open a file with different flags and at various offset positions.
stdin, stdout and stderr
The first three file descriptors of processes are treated differently by shells and other programs. These fds also have well-known aliases:
- 0 – stdin
- 1 – stdout
- 2 – stderr
For a process started and running within a terminal session, these fds can be pointed to a pseudoterminal, a terminal, a file, a pipe, etc. For classical-UNIX-style daemons, they usually refer to a /dev/null device.
Later in this series, I’ll show how this works in shells and why we must be careful with these three fds when working with long-running background processes.
Procfs and file descriptors
The kernel exposes all open file descriptors of a process with the virtual procfs file system. So in order to get information about the open files for the current shell process, we can use a shell variable $$ with its PID. For instance:
$ ls -l /proc/$$/fd/

lrwx------ 1 vagrant vagrant 64 Jul  9 21:15 0 -> /dev/pts/0
lrwx------ 1 vagrant vagrant 64 Jul  9 21:15 1 -> /dev/pts/0
lrwx------ 1 vagrant vagrant 64 Jul  9 21:15 2 -> /dev/pts/0
We can see only pseudoterminal /dev/pts/0 here. We will talk more about them a bit later.
Another useful directory in the procfs is the fdinfo folder under the process directory. It contains per file descriptor info. For example, for the stdin of the current shell process:
$ cat /proc/$$/fdinfo/0

pos:	0
flags:  02
mnt_id: 28
Keep in mind that the flags section here contains only the status flags (man 2 open). Let’s use it to write a tool to decode this flag mask to human-readable flags:
import os
import sys


pid = sys.argv[1]
fd = sys.argv[2]


with open(f"/proc/{pid}/fdinfo/{fd}", "r") as f:
   flags = f.readlines()[1].split("\t")[1].strip()

   print(f"Flags mask: {flags}")

   flags = int(flags, 8)

   # check status flags
   if flags & os.O_RDONLY:
       print("os.O_RDONLY is set")
   if flags & os.O_WRONLY:
       print("os.O_WRONLY is set")
   if flags & os.O_RDWR:
       print("os.O_RDWR is set")
   if flags & os.O_APPEND:
       print("os.O_APPEND is set")
   if flags & os.O_DSYNC:
       print("os.O_DSYNC is set")
   if flags & os.O_RSYNC:
       print("os.O_RSYNC is set")
   if flags & os.O_SYNC:
       print("os.O_SYNC is set")
   if flags & os.O_NDELAY:
       print("os.O_NDELAY is set")
   if flags & os.O_NONBLOCK:
       print("os.O_NONBLOCK is set")
   if flags & os.O_ASYNC:
       print("os.O_ASYNC is set")
   if flags & os.O_DIRECT:
       print("os.O_DIRECT is set")
   if flags & os.O_NOATIME:
       print("os.O_NOATIME is set")
   if flags & os.O_PATH:
       print("os.O_PATH is set")

   # check close on exec
   if flags & os.O_CLOEXEC:
       print("os.O_CLOEXEC is set")
Out test program, which opens a file with some status flags:
import os
import sys
import time

file_path = sys.argv[1]

print(os.getpid())
fd = os.open(file_path,  os.O_APPEND | os.O_RSYNC | os.O_NOATIME )
with os.fdopen(fd, "r+") as f:
   print(f.fileno())
   time.sleep(9999)
Let’s run it:
$ python3 ./open.py /tmp/123.txt
925
3
And run our tool:
$ python3 ./flags.py 925 3

Flags mask: 07112000
os.O_APPEND is set
os.O_DSYNC is set
os.O_RSYNC is set
os.O_SYNC is set
os.O_NOATIME is set
os.O_CLOEXEC is set
Some flags in the kernel are aliases to other flags. That’s why we see more flags here.
Another example is if we run our tool with a socket fd (I used nginx process):
$ sudo python3 ./flags.py 943 6

Flags mask: 02004002
os.O_RDWR is set
os.O_NDELAY is set
os.O_NONBLOCK is set
os.O_CLOEXEC is set
We can see that the socket is in nonblocking mode: O_NONBLOCK is set.
Sharing file descriptors between parent and child after fork()
Another important concept of file descriptors is how they behave with fork() (man 2 fork) and clone() (man 2 clone) system calls.
After a fork() or a clone() (without CLONE_FILES set) call, a child and a parent have an equal set of file descriptors, which refer to the same entries in the system-wide open file description table. It means they share identical file positions, status flags and process fd flags (O_CLOEXEC)
Let’s start with an example where 2 processes are not relatives. Both open the same file and get the same integer number for their fd. But because they both call open() independently, these two references to the open file description table will differ. After the file opening, the first example process makes a lseek() (man 2 lseek) at one position, and another program makes a lseek() call for the same file but at a different place. These actions don’t affect each other.
Code:
import time
import os
import sys

print(f"pid: {os.getpid()}")
with open("/var/tmp/file1.db", "r") as f:
   print(f.fileno())
   f.seek(int(sys.argv[1]))
   time.sleep(99999)
Run them in 2 different terminals:
$ python3 ./file1.py 100 # <----------- lseek() to 100 bytes

pid: 826
3

$ python3 ./file1.py 200 # <----------- lseek() to 200 bytes

pid: 827
3
Now check procfs:
$ ls -l /proc/826/fd
lrwx------ 1 vagrant vagrant 64 Jul  9 21:18 0 -> /dev/pts/0
lrwx------ 1 vagrant vagrant 64 Jul  9 21:18 1 -> /dev/pts/0
lrwx------ 1 vagrant vagrant 64 Jul  9 21:18 2 -> /dev/pts/0
lr-x------ 1 vagrant vagrant 64 Jul  9 21:18 3 -> /var/tmp/file1.db    <---------

$ ls -l /proc/827/fd
lrwx------ 1 vagrant vagrant 64 Jul  9 21:18 0 -> /dev/pts/1
lrwx------ 1 vagrant vagrant 64 Jul  9 21:18 1 -> /dev/pts/1
lrwx------ 1 vagrant vagrant 64 Jul  9 21:18 2 -> /dev/pts/1
lr-x------ 1 vagrant vagrant 64 Jul  9 21:18 3 -> /var/tmp/file1.db    <---------
We have the same file path and the same file descriptor number. Now verify that the positions are different because we have unrelated open file descriptions:
$ cat /proc/826/fdinfo/3
pos:	100                  <------------------------
flags:  02100000
mnt_id: 26

$ cat /proc/827/fdinfo/3
pos:	200                  <------------------------
flags:  02100000
mnt_id: 26
Let’s now see how the file positions will behave after a fork() call between a parent process and its child. We open a file in a parent process, fork(), make lseek() in the child, and check whether the positions are the same or not.
import time
import os
import sys


with open("/var/tmp/file1.db", "r") as f:
   print(f.fileno())

   print(f"parent pid: {os.getpid()}")
   pid = os.fork()
   if not pid:
       # child
       print(f"child pid: {os.getpid()}")
       f.seek(int(sys.argv[1]))
       time.sleep(99999)

   os.waitpid(pid, 0)
Run it:
$ python3 ./file2.py 100 # <----------- lseek() to 100 bytes

3
parent pid: 839
child pid: 840
Our procfs picture:
$ ls -l /proc/839/fd/
lrwx------ 1 vagrant vagrant 64 Jul  9 21:23 0 -> /dev/pts/0
lrwx------ 1 vagrant vagrant 64 Jul  9 21:23 1 -> /dev/pts/0
lrwx------ 1 vagrant vagrant 64 Jul  9 21:23 2 -> /dev/pts/0
lr-x------ 1 vagrant vagrant 64 Jul  9 21:23 3 -> /var/tmp/file1.db    <---------

$ ls -l /proc/840/fd/
lrwx------ 1 vagrant vagrant 64 Jul  9 21:23 0 -> /dev/pts/0
lrwx------ 1 vagrant vagrant 64 Jul  9 21:23 1 -> /dev/pts/0
lrwx------ 1 vagrant vagrant 64 Jul  9 21:23 2 -> /dev/pts/0
lr-x------ 1 vagrant vagrant 64 Jul  9 21:23 3 -> /var/tmp/file1.db    <---------
$ cat /proc/839/fdinfo/3
pos:	100                   <--------- 100 bytes
flags:  02100000
mnt_id: 26

$ cat /proc/840/fdinfo/3
pos:	100                   <--------- 100 bytes
flags:  02100000
mnt_id: 26
The primary purpose of such sharing is to protect files from being overwritten by children and its parent process. If all relatives start writing to a file simultaneously, the Linux kernel will sort this out and won’t lose any data because it’ll hold the lock and update the offset after each write. It’s worth mentioning that the data can appear in the file in a mixed way due to the CPU scheduler, arbitrary sizes of write buffers, and the amount of data to write.
If it’s not what you want, you should close all file descriptors after a successful fork(), including the three standard ones. This is basically how the classical daemons usually start. We will talk about them later in this series of posts.
Duplication of file descriptors
We already know that we can open a new file in order to create a new file descriptor within the process. But it’s not always needed. Usually it’s handy to copy the existing fd to another one.
Let’s start with the existing kernel API. We have a bunch of syscalls to duplicate fd:
- dup() – creates a new fd using the lowest unused int number. It usually follows the close() syscall for the one of standard fd (stdin, stdout, stderr) in order to replace it.
- dup2() – does the same as above but has a second argument. Here we can specify the target fd. If the target fd already exists, the dup2() closes it first. All dup2() operations are atomic.
- dup3() – does the same as the dup2() but has a third parameter, where the O_CLOEXEC flag can be set.
- fcntl() with F_DUPFD flag behaves as dup2() with one exception: if the target fd exists, it uses the next one instead of closing it.
When dup(), dup2(), or fcntl() are used to create a duplicate of a file descriptor, the close-on-exec (O_CLOEXEC) flag is always reset for the duplicate fd.
We can in theory open the file twice with the O_APPEND flag and don’t use the duplication syscalls at all. In the following example O_APPEND flag preserves the strace tool from overwriting data in the results.log file by its concurrent writes from the stdout and stderr:
$ strace 1>>results.log 2>>results.log
where 1>> and 2>> are append shell redirections for stdout and stderr.
But if we use a shell pipe, the following example will only work with fd duplication logic. Pipes don’t have O_APPEND open flag, and they are much convenient for the redirection task (I’m covering the power of pipes later in the chapter 2 where you can find more justifications for the below technique):
$ strace 2>&1 | less
Let’s write an example that shows all the power of fd duplication:
import os
import time

print(f"{os.getpid()}")

fd1 = os.open("/var/tmp/file1.db", os.O_RDONLY, 777)

fd2 = os.dup(fd1)
fd3 = os.dup2(fd1, 999)

os.lseek(fd3, 100, 0)

time.sleep(9999)
We opened one file, duplicate it several times, change the file position and it’s changed for all of the fs:
$ ls -la /proc/2129/fd

lrwx------ 1 vagrant vagrant 64 Aug  6 19:52 0 -> /dev/pts/0
lrwx------ 1 vagrant vagrant 64 Aug  6 19:52 1 -> /dev/pts/0
lrwx------ 1 vagrant vagrant 64 Aug  6 19:52 2 -> /dev/pts/0
lr-x------ 1 vagrant vagrant 64 Aug  6 19:52 3 -> /var/tmp/file1.db
lr-x------ 1 vagrant vagrant 64 Aug  6 19:52 4 -> /var/tmp/file1.db
lr-x------ 1 vagrant vagrant 64 Aug  6 19:52 999 -> /var/tmp/file1.db

$ cat /proc/2129/fdinfo/999
pos:	100                    <------------ position
flags:  0100000
mnt_id: 26

$ cat /proc/2129/fdinfo/3
pos:	100                    <------------ position
flags:  02100000
mnt_id: 26

$ cat /proc/2129/fdinfo/4
pos:	100                   <------------ position
flags:  02100000
mnt_id: 26
Execve() and file descriptors
Now let’s talk what may happen with file descriptors during the execve() system call (man 2 execve).
Just to start, execve() is the only way the Linux kernel can start a new program. This syscall executes a binary file if the first argument is an ELF compiled file and has an executable bit set, or starts an interpreter with the content of the file if the argument has a hashbang (for example: #!/usr/bin/python) on the first line of the file and has an exec bit set.
After an execve() call a file offsets and flags are copied and shared if the close-on-exec (O_CLOEXEC) flag is not set.
Let’s prove it with an example. We need 2 files: sleep.py and exec.py. The second one will execute the first one.
#!/usr/bin/python3

import time

print("sleep")
time.sleep(99999)
Don’t forget to set an exec bit on it:
$ chmod +x ./sleep.py
The exec.py opens a file, duplicates it with dup2() syscall, clearing the close-on-exec (O_CLOEXEC) flag.
import os


with open("/var/tmp/file1.db", "r") as f:
   print(f.fileno())

   print(f"parent {os.getpid()}")
   os.dup2(f.fileno(), 123)

   pid = os.fork()
   if not pid:
       # child
       print(f"child {os.getpid()}")
       os.execve("./sleep.py", ["./sleep.py"], os.environ)

   f.seek(234)
   os.waitpid(-1, 0)
If we run it in the console, the output should be something like the following:
$ python3 ./exec.py

3
parent 6851
child 6852
sleep
If we check the procfs. First, we will not be able to see the fd 3 for the child. This happens because python, by default, opens all files with the O_CLOEXEC flag (but dup2 resets this flag for 123 fd) We can get this info by running out script under strace:
$ strace -s0 -f python3 ./exec.py
And in the output we can find the following:
openat(AT_FDCWD, "/var/tmp/file1.db", O_RDONLY|O_CLOEXEC) = 3
That’s why we used dup2(). It resets the O_CLOEXEC flag and allows us to check whether the fd sharing is established.
The parent process:
$ ls -l /proc/6851/fd/

lrwx------ 1 vagrant vagrant 64 Jul 11 20:07 0 -> /dev/pts/1
lrwx------ 1 vagrant vagrant 64 Jul 11 20:07 1 -> /dev/pts/1
lr-x------ 1 vagrant vagrant 64 Jul 11 20:07 123 -> /var/tmp/file1.db <---
lrwx------ 1 vagrant vagrant 64 Jul 11 20:07 2 -> /dev/pts/1
lr-x------ 1 vagrant vagrant 64 Jul 11 20:07 3 -> /var/tmp/file1.db   <---
The child has only fd 123:
$ ls -l /proc/6852/fd/
lrwx------ 1 vagrant vagrant 64 Jul 11 20:07 0 -> /dev/pts/1
lrwx------ 1 vagrant vagrant 64 Jul 11 20:07 1 -> /dev/pts/1
lr-x------ 1 vagrant vagrant 64 Jul 11 20:07 123 -> /var/tmp/file1.db <----
lrwx------ 1 vagrant vagrant 64 Jul 11 20:07 2 -> /dev/pts/1
Check the positions in the parent’s fds:
$ cat /proc/6851/fdinfo/3
pos:	234                  <-------------------
flags:  02100000
mnt_id: 26

$ cat /proc/6851/fdinfo/123
pos:	234                  <-------------------
flags:  0100000
mnt_id: 26
And the child:
$ cat /proc/6852/fdinfo/123
pos:	234                  <-------------------
flags:  0100000
mnt_id: 26
The reasonable question you may ask now is how we can protect ourselves from leaking file descriptors from a parent to children, keeping in mind that we usually execute a binary that we didn’t write. For instance, a shell starts programs like ls, ping, strace, etc.
Back in the past (before Linux 5.9), people iterated over all possible file descriptors and tried to close them. In order to find out the upper boundary, the ulimit limit for open files was used (RLIMIT_NOFILE).
Some people open the /proc/self/fd/ in their programs after fork() and close all fd from it.
But there is a more elegant way of doing this in the modern Linux kernels. It’s a close_range() syscall (man 2 close_range). It allows us to avoid heavy user space iterations and use a kernel help instead.
The fixed version:
    ...
    pid = os.fork()
    if not pid:
        # child
        print(f"child {os.getpid()}")

        max_fd = os.sysconf("SC_OPEN_MAX") # <---- added
        os.closerange(3, max_fd)           # <---/

        os.execve("./sleep.py", ["./sleep.py"], os.environ)
    ...
O_CLOEXEC
And finally 2 sentences about the O_CLOEXEC flag, and why we need it in the first place if we can close all unneeded file descriptors? The main issue is libraries. You should always open all files with it because it’s hard to track opened files from the main program.
Another crucial case is a situation when the exec() fails (due to permissiom issues, wrong path, etc), and we still need some previously opened files (for instance, to write logs). Usually, reopening them after such an error is quite hard.
As I showed earlier, for some modern programming language it’s a default behavior for their open file functions.
Check if 2 file descriptors share the same open file description with kcmp() #
Let’s continue our journey with more unusual and elegant system calls.
You can use the kcmp() syscall (man 2 kcmp) to test whether 2 fds refer to the same open file description.
NOTE
We have this syscall instead of a full view of the open file description table due to security reasons. The kernel developers don’t feel good about exporting all this information to the user space https://lwn.net/Articles/845448/.
Let’s write a tool that we can use to identifies identical file descriptors for two processes. This system call is not widely used, so many programming languages don’t have a wrapper in their standard libraries. But it’s not a problem for us. First of all, we need to find a number of this syscall. For example, we can find it in the Linux kernel sources syscall_64.tbl:
...
    311	64	process_vm_writev	sys_process_vm_writev
    312	common	kcmp			sys_kcmp
    313	common	finit_module	sys_finit_module
...
The full code of our tool (if something is not clear, please read the man 2 kcmp):
package main

import (
   "fmt"
   "os"
   "strconv"
   "syscall"
)

const (
   SYS_KCMP  = 312
   KCMP_FILE = 0
)

func kcmp_files(pid1, pid2, fd1, fd2 int) (int, error) {
   r1, _, err := syscall.Syscall6(SYS_KCMP, uintptr(pid1), uintptr(pid2), KCMP_FILE, uintptr(fd1), uintptr(fd2), 0)

   return int(r1), err
}

func main() {
   var (
       pid1, pid2, fd1, fd2 int
       err                  error
   )

   pid1, err = strconv.Atoi(os.Args[1])
   pid2, err = strconv.Atoi(os.Args[2])
   fd1, err = strconv.Atoi(os.Args[3])
   fd2, err = strconv.Atoi(os.Args[4])

   if err != nil {
       panic(err)
   }

   r1, err := kcmp_files(pid1, pid2, fd1, fd2)
   fmt.Println(r1, err)
}
For the targets, we will use the exec.py program from the previous chapter:
$ go run ./kcmp.go 1957 1958 123 123
0 errno 0

$ go run ./kcmp.go 1957 1958 3 123
0 errno 0

$ go run ./kcmp.go 1957 1958 3 2
1 errno 0

$ go run ./kcmp.go 1957 1958 1 1
0 errno 0
As we can see, the parent and the child shared the fd 123, and the fd 3 in the parent is the copy of the 123 in the child. Also both stdout refer to the same shell pseudoterminal.
More ways to transfer file descriptors between processes: pidfd_getfd() and Unix datagrams.
So far, we’ve seen file descriptors sharing only from the parent to the child with the fork() call.
On some occasions, we want to send an fd to a target process or processes. For example, for a zero downtime program upgrades, where we want to preserve the file descriptor of a listening socket and transfer it to the new process with a new binary.
We have two options to do that in modern Linux kernels.
The first one is pretty standard and old. It works over a Unix socket. With a special UDP message, one process can pass an fd to another process. This, of course, works only locally (that’s why it’s a UNIX domain socket). The code for such transferring is massive and if you’re wondering how to write such a tool, please check out this detailed blog post.
The second option is quite new and allows a process to steal an fd from another process. I’m talking about the pidfd_getfd() system call (man 2 pidfd_getfd).
In order to leverage it, we need to open a process with another syscall: pidfd_open() (man 2 pidfd_open). Also, we would need a special set of ptrace permission: PTRACE_MODE_ATTACH_REALCREDS.
We can allow it system-wide in your test box, but please don’t do it in production. For production environments, please review the man 2 ptrace.
echo 0 | sudo tee /proc/sys/kernel/yama/ptrace_scope
Let’s run our old python example which opens a file with fd 3:
$ python3 ./file2.py 123
parent pid: 3155
3
child pid: 3156
And our stealing fd tool:
package main

import (
   "fmt"
   "os"
   "strconv"
   "syscall"
   "time"
)

const (
   sys_pidfd_open  = 434  // from kernel table
   sys_pidfd_getfd = 438
)

func pidfd_open(pid int) (int, error) {
   r1, _, err := syscall.Syscall(sys_pidfd_open, uintptr(pid), 0, 0)
   if err != 0 {
       return -1, err
   }
   return int(r1), nil
}

func pidfd_getfd(pidfd, targetfd int) (int, error) {
   r1, _, err := syscall.Syscall(sys_pidfd_getfd, uintptr(pidfd), uintptr(targetfd), 0)
   if err != 0 {
       return -1, err
   }
   return int(r1), nil
}

func main() {
   var (
       pid, fd int
       err     error
   )

   pid, err = strconv.Atoi(os.Args[1])
   fd, err = strconv.Atoi(os.Args[2])
   if err != nil {
       panic(err)
   }

   fmt.Println("pid:", os.Getpid())

   pidfd, err := pidfd_open(pid)

   if err != nil {
       panic(err)
   }

   newFd, err := pidfd_getfd(pidfd, fd)
   if err != nil {
       panic(err)
   }
   fmt.Println(newFd)

   time.Sleep(time.Hour)
}
If we run it:
$ go run ./getfd.go 3155 3
pid: 4009
4
And check procfs:
$ ls -la /proc/4009/fd/
lrwx------ 1 vagrant vagrant 64 Jul 10 13:24 0 -> /dev/pts/2
lrwx------ 1 vagrant vagrant 64 Jul 10 13:24 1 -> /dev/pts/2
lrwx------ 1 vagrant vagrant 64 Jul 10 13:24 2 -> /dev/pts/2
lrwx------ 1 vagrant vagrant 64 Jul 10 13:24 3 -> 'anon_inode:[pidfd]'
lr-x------ 1 vagrant vagrant 64 Jul 10 13:24 4 -> /var/tmp/file1.db     <--------------
lrwx------ 1 vagrant vagrant 64 Jul 10 13:24 5 -> 'anon_inode:[eventpoll]'
lr-x------ 1 vagrant vagrant 64 Jul 10 13:24 6 -> 'pipe:[43607]'
l-wx------ 1 vagrant vagrant 64 Jul 10 13:24 7 -> 'pipe:[43607]'
File is with the same position:
$ cat /proc/4009/fdinfo/4
pos:	123                   <--------------
flags:  02100000
mnt_id: 26
By the way, if we check the file descriptor of the pidfd object, we can observe some additional info about the opened pid:
$ cat /proc/4009/fdinfo/3
pos:	0
flags:  02000002
mnt_id: 15
Pid:	3155 <-------------------
NSpid:  3155
Shell redirections and file descriptors
Now it’s time to talk about file descriptors and shells. We start with some basics, but later in this chapter you’ll find several really nit examples which could significantly improve your shell experience and performance.
For all examples, I’ll use GNU Bash 5.1. But I’m sure, the same concerts and techniques are available in your favorite shell.
Let’s start with simple and well-known redirections.
Instead of stdin read, we can use a file:
$ cat < /tmp/foo
Some text
The same we can do for the stdout:
$ echo "123" > /tmp/foo # redirected stdout
$ cat /tmp/foo
123

>> appends to a file instead of overwriting it:

$ echo "123" >> /tmp/foo # append to a file
$ cat /tmp/foo
123
123
In order to write stderr to file, we need to specify the file descriptor number:
$ cat "123" 2> /tmp/foo # write stderr to a file
$ cat  /tmp/foo
cat: 123: No such file or directory
We can use the same file for both stdout and stderr:
cat "123" > /tmp/foo 2>&1
All of the above internally opens a target file with the open() syscall and uses dup2() calls to overwrite the standard file descriptors with the fd of the file. For the latest one, the shell runs dup2() twice for the stdout() and stderr()
The general syntax for the redirection:
-
fd > file_name
-
& fd >& fd
With bash we aren’t restricted by the standard fds and can open new ones. For instance to open an fd 10:
$ exec 10<> /tmp/foo
Check the procfs:
$ ls -la /proc/$$/fd
lrwx------ 1 vagrant vagrant 64 Jul  9 21:17 0   -> /dev/pts/2
lrwx------ 1 vagrant vagrant 64 Jul  9 21:17 1   -> /dev/pts/2
lrwx------ 1 vagrant vagrant 64 Jul 10 14:56 10  -> /tmp/foo   <---------
lrwx------ 1 vagrant vagrant 64 Jul  9 21:17 2   -> /dev/pts/2
lrwx------ 1 vagrant vagrant 64 Jul 10 14:56 255 -> /dev/pts/2
If we run strace we can see how it works:
...
openat(T_FDCWD, "/tmp/foo", O_RDWR|O_CREAT, 0666) = 3    # open
dup2(3, 10)                        	              = 10   # duplicate
close(3)                            	          = 0    # close unneded initial fd
...
Now we can write there:
echo "123" >&10
And read from it:
$ cat <&10
123
And when we finish, we can close it:
$ exec 10<&-
Fun fact: if you close the stdin, you’ll lose your ssh connection:
$ exec 0<&-
This happens because your bash is a session leader and a controlling terminal process. When the controlling terminal closes its terminal, the kernel sends a SIGHUP signal to it, and the shell exits. We will talk about sessions, leaders and terminals later in next series of posts.
We also can use “-” (dash, minus) char instead of a file name for some tools. It means to read a file content from the stdin. For example, it may be really useful with diff:
$ echo "123" | diff -u /tmp/file1.txt -
--- /tmp/file1.txt  	2022-07-10 21:42:02.256998049 +0000
+++ -   2022-07-10 21:42:15.733486844 +0000
@@ -1 +1 @@
-124
+123
Another advanced feature of the bash is a process substitution, which involves the duplication of file descriptors. Long story short, you can create tmp files with on demand and use them in other tools awaiting file parameters.
Process substitution uses /dev/fd/
I like the following two examples. This approach helps improve my shell experience and saves me from creating temporary files. The first one is a diff example:
$ diff -u <(cat /tmp/file.1 | sort | grep "string") <(echo "string2")
--- /dev/fd/63  2022-07-10 21:53:39.960846984 +0000
+++ /dev/fd/62  2022-07-10 21:53:39.960846984 +0000
@@ -1 +1 @@
-string1
+string2
And the following one helps with strace and grep:
$ strace -s0 -e openat -o >(grep file1.db) python3 ./dup.py
2243
openat(AT_FDCWD, "/var/tmp/file1.db", O_RDONLY|O_CLOEXEC) = 3
Pipes
The pipe is a neat feature of the Linux kernel that allows us to build one-directional communication channels between related processes (often a parent and a child).
Pipes are usually well known from shells, where we use “|” symbol to build command pipelines. But first of all, the pipe is a system call, or actually, there are 2 of them: pipe() and pipe2() (man 2 pipe).
You can think of a pipe as a memory buffer with a byte stream API. Thus, by default, there are no messages or strict boundaries. The situation has changed since the Linux kernel 3.4 where the O_DIRECT flag and the packet mode were introduced. We will touch all variant of working with pipes in this chapter.
Another important feature of pipes is the max size of an atomic write. The PIPE_BUF constant (man 7 pipe) determines it and sets it to 4096 bytes. Please, read the man carefully if you want to rely on this guarantee.
As a result of a streaming nature, a reader and a writer can use completely different user-space buffer sizes if they want. All written bytes are read sequentially, so making the lseek() syscall for a pipe is impossible.
The pipes also provide a convenient notification API for both ends. The write calls to a pipe block if the internal kernel buffer is full. The writer will block or return EAGAIN (if it’s in nonblocking mode) until sufficient data has been read from the pipe to allow the writer to complete. On the other hand, if all pipe readers close their read file descriptors, the writer will get the SIGPIPE signal from the kernel, and all subsequent write() calls will return the EPIPE error.
From a reader’s perspective, a pipe can return a zero size read (end-of-file, EOF) if all writers close all their write pipe file descriptors. A reader blocks if there is nothing to read until data is available (you can change this by opening a pipe in the nonblocking mode).

Image 2. – Using a pipe to connect 2 processes
Pipes are widely used in shells. The elegance of such an approach is that processes don’t have to know that they use pipes. They continue working with their standard file descriptors (stdin, stdout and stderr) as usual. Developers also don’t need to make any changes in their program’s source code in order to support this concept. It makes the process of connecting 2 programs composite, flexible, fast and reliable. Of course, in order to support such communication, shells have to do some additional work before spawning new commands (more details and examples below).
Internally, a pipe buffer is a ring buffer with slots. Each slot has a size of a PIPE_BUF constant. The number of slots is variable, and the default number is 16. So, if we multiply 16 by 4KiB, we can get a default size of 64KiB for a pipe buffer.
We can control the capacity of a pipe by calling the fcntl() with the F_SETPIPE_SZ flag. A pipe’s system max size limit can be found in the /proc/sys/fs/pipe-max-size (man 7 pipe).
We can get the size of unread bytes in a pipe by calling ioctl() with FIONREAD operation. We’ll write an example later.
The usual question about pipes is, do we really need them? Can we use regular files instead? There are several issues and lacking of API with using files instead of pipes:
- There is no easy way to notify a writer that a reader has stopped reading.
- For a reader, we can set up inotify (man 7 inotify) to efficiently track whether new changes appear.
- Also, regular files don’t have nonblocking API (this is changing with io_uring, but still, it’s much harder to use it in comparison with the pipe() syscall).
One final introduction remark is that a pipe can be used by more than 2 processes. It’s possible to have multiple writers and readers for a single pipe. It’s not usuall because of the streaming nature of pipes and no clear boundaries by default, but with the new packet mode, it’s become more useful in some situations.
How shells internally create pipes
With shells we usually use pipes to connect the stdout and/or the stderr of a process and stdin of another process. For example:
stdout to stdin:
$ command1 | command2
stdout and stderr to stdin:
$ command1 |& command2
or
command1 2>&1 | command2
So let’s understand how shells connect the following 2 commands internally.
$ ls -la | wc -l
As we already know, a shell process has three special standard open file descriptors. Thus, all its children inherit them by default because of the fork() syscalls. The following simple program shows how a shell can create a pipe and connect 2 programs. It creates a pipe in the parent process, then makes a fork() call twice in order to run execve() for the ls and wc binaries. Before the execve() calls, the children duplicate the needed standart fd with one of the ends of the pipe.
import sys
import os

r, w = os.pipe()

ls_pid = os.fork()
if not ls_pid:
   # child
   os.close(r)
   os.dup2(w, sys.stdout.fileno())
   os.close(w)
   os.execve("/bin/ls", ["/bin/ls", "-la", ], os.environ)


wc_pid = os.fork()
if not wc_pid:
   # child
   os.close(w)
   os.dup2(r, sys.stdin.fileno())
   os.close(r)
   os.execve("/usr/bin/wc", ["/usr/bin/wc", "-l"], os.environ)


os.close(r)
os.close(w)

for i in range(2) :
   pid, status = os.waitpid(-1, 0)
And if we run it:
$ python3 ./simple_pipe.py
12
The one important note about the above code is how I close all not needed file descriptors of the pipe. We have to close them to allow the kernel to send us correct signals, block operations, and return EOF when there are no more writers.
Pipe and write buffer
Modern programming languages (for example, python) often buffer all their writes in memory before the actual write syscall executes. The main idea of such buffering is to get better I/O performance. It’s cheaper to make one big write() call than several smaller ones. There are 2 types of buffers that are widely used:
- Block buffer
For example, if its size is 4KiB, the buffer will write its content (flush) to the underlying fd only when it fills up completely or the explicit flush() call is invoked. - Line buffer
This buffer type flushes its content when the new line character write occurs to the buffer.
The python (and other programming languages) changes the buffer type depending on the type of the underlying file descriptor. If the fd is a terminal, the buffer will be a line buffer. That makes sense because when we are in the interactive shell, we want to get the output as soon as possible. However, a block buffer will be used for pipes and regular files because it’s usually OK to postpone the flush for better performance.
The libc function isatty() (man 3 isatty) tests whether a file descriptor refers to a terminal.
Let’s demonstrate this behavior with 2 scripts connected by a pipe. The first one will print 10 lines to stdout, and the other one will consumethese lines from its stdin.
The printing script print.py:
import time

for i in range(4):
   print(f"{i}")
   time.sleep(0.1)
And the consumer script: stdin.py
import fileinput

for i, line in enumerate(fileinput.input()):
   print(f"{i+1}: {line.rstrip()}")
If you run the print.py, you should see how the output will be printed in a line-by-line manner:
$ python3 ./print.py
0
1
2
3
Now, if we run these 2 scripts with a pipe, you should see that the output freezes for a second, and it prints all lines at once afterwards:
$ python3 ./print.py | python stdin.py
1: 0
2: 1
3: 2
4: 3
Now let’s make it smoother. We need to add a flush() call after each print() in the print.py:
import time
import sys

for i in range(4):
   print(f"{i}")
   sys.stdout.flush()
   time.sleep(0.1)
And rerun it. Now, you should be able to see that the lines appear smoothly one-by-one:
$ python3 ./print.py | python stdin.py
1: 0
2: 1
3: 2
4: 3
It’s worth knowing that some core utilities have an option to control their buffering. For example, the grep can be forced to use a per line buffer with the --line-buffered option. Of course, this will give you a more interactive experience with some performance penalties. You can play with it and compare the outputs:
$ strings /var/tmp/file1.db | grep --line-buffered -E "^sek" | cat
sek.^ \
sekA
sekt

$ strings /var/tmp/file1.db | grep  -E "^sek" | cat
sek.^ \
sekA
sekt
SIGPIPE signal
One of the exciting aspects of the pipes is their notification and synchronization features.
We intentionally closed all unused fd in the above code with fork() and execve() calls. The reason for doing that was not only our desire to save file descriptors and write a cleaner code but also to support the pipe notification features.
If all readers close their fd of the pipe and a writer tries to send data into it, the writer process will get the SIGPIPE signal from the kernel. This is a brilliant idea. Let’s assume we want to grep a huge nginx access log (for example, 500GiB) in order to find a target string and care only about the first three results:
$ cat /var/log/nginx/access.log | grep some_string | head -3
So, if we assume that the log file has all three target lines somewhere at the beginning of the file, the head command will exit almost immediately. Thus we don’t need to continue reading the file. As so, when the head util exits, it closes all its fd, including the stdin (which is a pipe). The subsequent writes from the grep will cause the kernel to send the SIGPIPE signal to it. The default handler for the SIGPIPE signal is to terminate, so grep will exit and close all its fd, including its stdin. And in its turn, the cat command will exit after receiving its own SIGPIPE signal. So the exit of the head starts the cascading exit of the whole shell pipeline.
A shell are usually waiting on the processes with the waitpid() syscall and collects all return codes. When it sees that all the process pipeline has finished, the shell sets the exit status variable $? to the returned code of the last command in the pipeline (head in our case) and populates the $PIPESTATUS (bash) or $pipestatus (zsh) array variable with all return codes of the piplene.
Let me demonstrate it. As you can see, all the above works without any support in the cat, grep or head tools. It’s the beauty of the pipes and shells collaboration.
Now we are ready to write our own prove of the above:
import signal
import os
import sys

def signal_handler(signum, frame):
	print(f"[pipe] signal number: {signum}", file=sys.stderr)
	os._exit(signum)

signal.signal(signal.SIGPIPE, signal_handler)

for i in range(9999):
	print(f"{i}")
And run it:
$ python3 ./print.py | head -3
0
1
2
[pipe] signal number: 13 <--------------
$ echo ${PIPESTATUS[@]}
13 0
$pipestatus, $? and pipefail
We are ready to take a bit closer look at the exit statuses of a bash pipeline. By default, the last command in the pipe is used for the $? variable, which could sometimes lead to unexpected results. For instance:
$ echo 'some text' | grep no_such_text | cut -f 1
$ echo $?
0

$ echo 'some text' | grep no_such_text | cut -f 1
$ echo ${PIPESTATUS[@]}
0 1 0
But fortunately, we can change this behavior with a pipefail bash option:
$ set -o pipefail
$ echo 'some text' | grep no_such_text | cut -f 1
$ echo $?
1
FIFO or Named pipes
So far, we have been talking about pipes in the context of related processes (a parent and its children), but we also have the option to share a pipe easily among any number of unrelated processes. We can create a disk reference for a pipe which is called a named pipe or a FIFO file.
There is one high-level man 7 fifo and a tool to create a fifo file mkfifo (man 1 mkfifo)).
The permission control is based on regular file permissions. So, if a process has “write” permissions, it can write to this named pipe.
All other aspects are identical to a regular pipe. The kernel internally creates the same pipe object and doesn’t store any data on disk.
The FIFO file could be helpful when you need to build a connection between completely unrelated programs or daemons without changing their source code.
pv tool
pv or pipe viewer (man 1 pv) is a nifty tool to work with pipes and file descriptors. We can insert it in any pipeline place, and it will show additional info such as ETA, write rate and amount of transferred data with an incredible visual progress bar.
Here is the basic usage with a file shows us how fast the reading strings command can consume a file:
$ pv /var/tmp/file1.db | strings > /dev/null
 100MiB 0:00:01 [67.9MiB/s] [===========================================>] 100%
It also can rate limit a pipe, which is really useful for tests:
$ cat /var/tmp/file1.db | pv --rate-limit=1K | strings
Another neat feature is monitoring a process’s progress for every open file descriptor. Under the hood it uses procfs and fdinfo folders to get the positions for all opened files:
$ pv -d 6864
   3:/var/tmp/file1.db:  234 B 0:00:01 [0.00 B/s]   [>                  	]  0% ETA 0:00:00
 123:/var/tmp/file1.db:  234 B 0:00:01 [0.00 B/s] [>                  	]  0% ETA 0:00:00
Pipe usage
We can get the size of unread bytes in a pipe by calling ioctl() with FIONREAD and a pipe fd. But how to get pipe usage from an unrelated process that doesn’t have the pipe file descriptor, for instance from a monitoring tool. Or, for example, we started a long running pipeline and not sure if the consumer of the pipe is reading data:
$ dd if=/dev/urandom | strings > /dev/null
We can, of course, use strace and check the read() syscalls in its output, but the reader could a read() syscall with a huge buffer that we can miss in the strace output.
So, in order to achieve the goal, we need to get the pipe file descriptor somehow. The most elegant solution (but not without drawbacks) is to steal the fd with sys_pidfd_getfd() system call and then use ioctl to get usage information.
The code can be something like the following:
package main

import (
   "fmt"
   "os"
   "strconv"
   "syscall"

   "golang.org/x/sys/unix"
)

const (
   sys_pidfd_open  = 434
   sys_pidfd_getfd = 438
   FIONREAD        = 0x541B
)

func pidfd_open(pid int) (int, error) {
   r1, _, err := syscall.Syscall(sys_pidfd_open, uintptr(pid), 0, 0)
   if err != 0 {
       return -1, err
   }
   return int(r1), nil
}

func pidfd_getfd(pidfd, targetfd int) (int, error) {
   r1, _, err := syscall.Syscall(sys_pidfd_getfd, uintptr(pidfd), uintptr(targetfd), 0)
   if err != 0 {
       return -1, err
   }
   return int(r1), nil
}

func main() {
   var (
       pid, fd int
       err     error
   )

   pid, err = strconv.Atoi(os.Args[1])
   fd, err = strconv.Atoi(os.Args[2])
   if err != nil {
       panic(err)
   }

   pidfd, err := pidfd_open(pid)

   if err != nil {
       panic(err)
   }

   newFd, err := pidfd_getfd(pidfd, fd)
   if err != nil {
       panic(err)
   }

   for {
       size, err := unix.IoctlGetInt(newFd, FIONREAD)
       if err != nil {
           panic(err)
       }
       fmt.Printf("size:\t%d\n", size)
   }
}
Run our target pipeline:
$ dd if=/dev/urandom | pv --rate-limit 30K | strings > /dev/null
^ KiB 0:00:16 [27.6KiB/s]
And run our tool:
$ sudo go run ./pipe_capacity.go 19990 1
size:   62464
size:   62464
size:   63488
size:   63488
size:   63488
size:   63488
size:   63488
The main drawback of such a technique is that we are holding the write end of the pipe open. This can lead to an extended life of the reader because it will block on an empty pipe instead of getting EOF (see the pipe notification feature explained above).
Packets pipe mode (O_DIRECT)
Since the Linux kernel 3.4, a pipe can be created with the O_DIRECT flag. It puts it into packet mode. From my point of view, this mode can be successfully used only with writes and reads that are less or equal to the PIPE_BUF size (4KiB) because atomicity is guaranteed only in this case.
The packet mode is different from the default stream mode in the following ways:
- The kernel doesn’t try to merge writes into one ring buffer slot here and here. It, of course, leads to the underutilization of the pipe buffer, but provides guarantee of boundaries instead.
- Readers with read() of PIPE_BUF size get the same messages as the writers wrote;
- If the reader’s buffer is less than the data in the slot (some misconfigured reader infiltrated), then the remaining data is discarded to protect the boundaries of messages.
Now let’s write an example with 2 writers and 2 readers. Every writer writes less than 4KiB, so readers will get one full message on every read:
import sys
import os
import time


PIPE_BUF = 4096

print(f"supervisor: {os.getpid()}", file=sys.stderr)

r, w = os.pipe2(os.O_DIRECT)

# fork 2 writers
for instance in range(2):
   writer_pid = os.fork()
   if not writer_pid:
       print(f"writer{instance}: {os.getpid()}", file=sys.stderr)

       os.close(r)
       pid = os.getpid()
       for i in range(100):
           os.write(w, f"writer{instance}: {i}".encode())
           time.sleep(1)

# fork 2 readers
for instance in range(2):
   reader_pid = os.fork()
   if not reader_pid:
       print(f"reader{instance}: {os.getpid()}", file=sys.stderr)

       os.close(w)
       pid = os.getpid()
       for i in range(100):
           data = os.read(r, PIPE_BUF)
           if not len(data):
               break
           print(f"reader{instance}: {data}")

os.close(r)
os.close(w)

for i in range(4):
   os.waitpid(-1,0)
Run it:
$ python3 ./packets.py
supervisor: 1200
writer0: 1201
reader0: 1203
reader0: b'writer0: 0'
writer1: 1202
reader0: b'writer1: 0'
reader1: 1204
reader0: b'writer1: 1'
reader0: b'writer0: 1'
reader0: b'writer0: 2'
reader0: b'writer1: 2'
reader0: b'writer0: 3'
reader1: b'writer1: 3'
reader0: b'writer0: 4'
reader1: b'writer1: 4'
If we remove the O_DIRECT flag and rerun it, we can see how readers start to break the boundaries of messages and, from time to time, get 2 messages instead of 1. The situation could be even worse, and the boundaries could be violated if a reader reads a buffer less than a writer’s written.
…
reader0: b'writer0: 2writer1: 2'
reader1: b'writer0: 3writer1: 3'
reader1: b'writer1: 4writer0: 4'
reader0: b'writer0: 5'
reader1: b'writer1: 5'
reader0: b'writer0: 6writer1: 6'
reader1: b'writer1: 7'
reader0: b'writer0: 7'
PIPE Nonblocking I/O
Unlike regular files, pipes natively support nonblocking I/O. You can create a new pipe or switch an existing pipe to the nonblocking I/O mode. The most important outcome of doing this is the ability to poll a pipe using poll(), select() and epoll() event notification facilities. Nonblocking mode saves the CPU (if correctly written) and provides a unified API for programs and developers.
Nonblocking mode might be also useful to write user space busy loops in order to get better throughput by trading more CPU usage. The idea is to skip some kernel wake up logic and return from kernel mode as soon as possible.
The following example shows that even with python, where exceptions are slow, we can get a better throughput with a busy loop:
No busy loop code:
import os

rand = os.getrandom(1<<16-1)

while True:
   os.write(1, rand)
Max throughput: in my virtual machine:
$ python3 ./no_busy_loop.py  | pv | strings > /dev/null
 631MiB 0:00:10 [74.5MiB/s]
With busy loop:
import os
import fcntl

flags = fcntl.fcntl(1, fcntl.F_GETFL, 0)
fcntl.fcntl(1, fcntl.F_SETFL, flags | os.O_NONBLOCK)

rand = os.getrandom(1<<16-1)

while True:
   try:
       n = os.write(1, rand)
   except BlockingIOError:
       continue
I was able to get 10% better throughput in my test vm:
$ python3 ./busy_loop.py  | pv | strings > /dev/null
 799MiB 0:00:11 [82.7MiB/s]
Partial writes and syscall restarts
Now we are ready to delve into the kernel internals a bit deeper. Let’s assume we want to write 512 MiB of some data to a pipe. We already have it all in memory and call the write() syscall:
data = os.getrandom(1<<29) # 512 MiB
os.write(1, data) # where stdout is a pipe in a shell pipeline
We know from the above that the size of a pipe by default is 64KiB, but the man 7 pipe says:
Applications should not rely on a particular capacity: an application should be designed so that a reading process consumes data as soon as it is available, so that a writing process does not remain blocked.
It means that, in default blocking I/O mode, our write() call should block until all bytes have not been transferred through a pipe. It makes sense, the userspace application should not, in theory, care about the underlying kernel machinery. We have a userspace buffer with data, and we should be able to write it in one blocking call. But fortunately or unfortunately, things are a bit more complicated.
One theory we also need to recall here is that the kernel puts a process into a sleep state if a syscall blocks. There are 2 sleep types: interruptible (S) sleep and uninterruptible (D) sleep.
For example, the above code snippet with the write() syscall puts a process into the interruptible state (because it writes to a pipe):
$ ps axu | grep write2.py
vagrant    S+   20:36   0:15 python3 ./write2.py
where S informs us that the process is in the interruptible sleep (waiting for an event to complete).
Such processes are removed from the kernel scheduler list and are put in a dedicated queue waiting for a particular event.
The interruptible sleep state differs from the uninterruptible in that the kernel can deliver signals to the process. Rephrasing, it’s possible to receive and handle signals during the blocking syscall in the interruptible sleep state. But the reasonable question is, what happens after the signal is handled in the middle of such a syscall? Let’s figure it out.
We start with the pipe_write() kernel function, where we can find the following code:
if (signal_pending(current)) {
   if (!ret)
       ret = -ERESTARTSYS;
   break;
}
The above confirms that the signal could interrupt the process during the blocking pipe write() syscall. The interesting part here is the ret variable. If it doesn’t have anything, the kernel sets it to the -ERESTARTSYS error. Otherwise, the kernel leaves it as is. In both cases, the kernel exits from the infinitive for loop. This infinitive for loop is what keeps the write() syscall in the blocking state, and it’s in charge of data transferring between usersapace buffer (512 MiB in our case) and kernel space pipe ring buffer.
In turn, the ret variable stores the number of transferred through the pipe bytes. It can be much bigger than the 64KiB default pipe size because there is always at least one consumer that reads from this pipe.
One more piece of information that will help us understand the following examples and behavior is the ERESTARTSYS error. It signals that the kernel can safely restart a syscall because it hasn’t done any meaningful work and has no side effects.
With all the above said, we are ready to do some coding and debugging in order to answer the question of whether it is sufficient to do one write() to a pipe.
In our tests we’ll use bpftrace. It’s a handy tool that allows us to trace kernel functions via eBPF trampolines, which allows kernel code to call into BPF programs with practically zero overhead.
We’ll be tracing a pipe_write() kernel function to get insides about the actual pipe writes.
Let’s start with a producer of data. Here we have a signal handler for the SIGUSR1 signal, which prints the signal code, a buffer with random 512 MiB, and one write() syscall to stdout fd.
import signal
import sys
import os

def signal_handler(signum, frame):
   print(f"signal {signum} {frame}" ,file=sys.stderr)

signal.signal(signal.SIGUSR1, signal_handler)

print(os.getpid(), file=sys.stderr)

rand = os.getrandom(1<<29)
print("generated", file=sys.stderr)

n = os.write(1, rand)

print(f"written: {n}", file=sys.stderr)
Now we need to write a consumer for a pipe. It will sleep for 30 seconds and afterward reads all data from the stdin in 4KiB chunks.
import time
import sys


print("start sleeping", file=sys.stderr)
time.sleep(30)
print("stop sleeping", file=sys.stderr)

r = sys.stdin.buffer.read(4096)
while len(r) > 0:
   r = sys.stdin.buffer.read(4096)

print("finished reading", file=sys.stderr)
We are ready for experiments. Let’s launch bpftrace first. We’re looking for python3 commands and want to print the return value of the pipe_write() kernel function. Please, run the following in a terminal window.
$ sudo bpftrace -e 'kretfunc:pipe_write /comm == "python3"/  { printf("%d\n", retval);}'
Attaching 1 probe...
In another terminal window, we need to start our shell pipeline under strace tool for the writer. strace logs all write() syscalls into log.txt.
$ strace --output log.txt -s0 -e write -- python3 ./write2.py | python3 ./slow_reader.py
start sleeping
1791
generated
We are in a situation where the buffer is full, the writer is in the interruptible sleep state (S), and the reader is still sleeping. It’s time to open one more console and send the SIGUSR1 signal to the blocked writer:
$ kill -USR1 1791
In the console with the pipeline, you should eventually see something like the following:
$ strace --output log.txt -s0 -e write -- python3 ./write2.py | python3 ./slow_reader.py
start sleeping
1791
generated
signal 10 <frame at 0x7f59b135da40, file '/home/vagrant/data/blog/post2/./write2.py', line 15, code <module>>
written: 65536
stop sleeping
finished reading
The writer received the signal and exited. It also printed that it had successfully transferred only 65536 bytes (doesn’t look familiar?).
The console with the bpftrace confirms the above. The pipe_write() syscall managed to write only 64KiB of data.
$ sudo bpftrace -e 'kretfunc:pipe_write /comm == "python3"/  { printf("%d\n", retval);}'
Attaching 1 probe...
65536
The strace log shows the same:
$ cat log.txt

write(1, ""..., 536870912)           	= 65536
--- SIGUSR1 {si_signo=SIGUSR1, si_code=SI_USER, si_pid=806, si_uid=1000} ---
It looks like it is not sufficient to have only one syscall. If we now open the write() syscall documentation (man 2 write):
Note that a successful write() may transfer fewer than count bytes. Such partial writes can occur for various reasons; for example, because there was insufficient space on the disk device to write all of the requested bytes, or because a blocked write() to a socket, pipe, or similar was interrupted by a signal handler after it had transferred some, but before it had transferred all of the requested bytes. In the event of a partial write, the caller can make another write() call to transfer the remaining bytes. The subsequent call will either transfer further bytes or may result in an error (e.g., if the disk is now full).
The documentation answers our initial question, but there is something, even more, to show here.
As we saw, the pipe_write() function can also return the ERESTARTSYS error if no bytes are written. It is an interesting case, and the kernel can be asked to restart such syscalls automatically without any userspace retries. It makes total sense; the syscall didn’t have any chances to do its work, so the state is the same. The configuration of the kernel restart is done by setting the SA_RESTART flag. By default, it is already enabled in python. You can check it with the strace:
rt_sigaction(SIGUSR1, {sa_handler=0x45c680, sa_mask=~[], sa_flags=SA_RESTORER|SA_ONSTACK|SA_RESTART|SA_SIGINFO, sa_restorer=0x45c7c0}, NULL, 8) = 0
Now we are finished with all the theory and experiments. But still have the task unresolved. What is the recommended way to write such big buffers into a pipe? We can find the answer in the python source code and its buffer writer implementation:
def _flush_unlocked(self):
   …
   while self._write_buf:
      …
      n = self.raw.write(self._write_buf)
      …
      del self._write_buf[:n]
The above snippet shows how python restarts the write() syscall in case of a partial write.
Now let’s rewrite our producer to use a buffered writer and demonstrate two restart concepts:
- the automatic syscall restart;
- the restart after a partial write.
import signal
import sys
import os

def signal_handler(signum, frame):
   print(f"signal {signum} {frame}" ,file=sys.stderr)

signal.signal(signal.SIGUSR1, signal_handler)

print(os.getpid(), file=sys.stderr)

rand = os.getrandom(1<<29)
print("generated", file=sys.stderr)

n = sys.stdout.buffer.write(rand)  # <------------------- changed
print(f"written: {n}", file=sys.stderr)
Start a pipeline:
$ strace --output log.txt -s0 -e write -- python3 ./write2.py | python3 ./slow_reader.py
start sleeping
19058
generated
This time let’s send 4 signals:
$ kill -USR1 19058
$ kill -USR1 19058
$ kill -USR1 19058
$ kill -USR1 19058
The output has changed. Now the writer was able to write all the data.
$ strace --output log.txt -s0 -e write -- python3 ./write2.py | python3 ./slow_reader.py
start sleeping
19058
generated
signal 10 <frame at 0x7f21a4705a40, file './write2.py', line 15, code <module>>
signal 10 <frame at 0x7f21a4705a40, file './write2.py', line 15, code <module>>
signal 10 <frame at 0x7f21a4705a40, file './write2.py', line 15, code <module>>
signal 10 <frame at 0x7f21a4705a40, file './write2.py', line 15, code <module>>
stop sleeping
written: 536870912
finished reading
The bpftrace logs show what we expected. For the first write we see the default pipe buffer size, next we see three ERESTARTSYS errors which reflect our 4 signals, and a final big write with all remaining data.
$ sudo bpftrace -e 'kretfunc:pipe_write /comm == "python3"/  { printf("%d\n", retval);}'
65536
-512
-512
-512
536805376
In strace log we can also see the information on syscall restarts, and it confirms what we saw in bpftrace log.
$ cat log.txt

write(1, ""..., 536870912)           	= 65536
--- SIGUSR1 {si_signo=SIGUSR1, si_code=SI_USER, si_pid=14994, si_uid=1000} ---
write(1, ""..., 536805376)           	= ? ERESTARTSYS (To be restarted if SA_RESTART is set)
--- SIGUSR1 {si_signo=SIGUSR1, si_code=SI_USER, si_pid=14994, si_uid=1000} ---
write(1, ""..., 536805376)           	= ? ERESTARTSYS (To be restarted if SA_RESTART is set)
--- SIGUSR1 {si_signo=SIGUSR1, si_code=SI_USER, si_pid=14994, si_uid=1000} ---
write(1, ""..., 536805376)           	= ? ERESTARTSYS (To be restarted if SA_RESTART is set)
--- SIGUSR1 {si_signo=SIGUSR1, si_code=SI_USER, si_pid=14994, si_uid=1000} ---
write(1, ""..., 536805376)           	= 536805376
Also, if we sum the returns of the write() syscalls, we’ll get the initial random bytes buffer:
536805376 + 65536 = 536870912
The first write() restart was done by the python buffered writer due to a partial write of 64KiB, and all other 3 were restarted by the kernel due to the ERESTARTSYS error and the SA_RESTART flag.
Pipe performance: splice(), vmsplice() and tee()
Generally, it uses double buffering when a program makes reads()/writes() calls to a regular file, a socket or a pipe. One buffer is allocated in the user space and then copied to the kernel. Such a situation leads to the loss of performance and undesirable memory allocations. Another potential performance penalty for high-performance tools is the number and duration of system calls for one unit of program iteration. For instance, if we want to replace every 2nd line of a file, we need to read the file in some chunks (1 read() syscall), make changes, and write the changed buffer back (1 write() syscall). These sequences of operations should be while we don’t reach the EOF.
But luckily, there are 3 syscalls that can significantly improve your code, especially if you are going to use stdin or stdout:
- splice() – moves data from the buffer to an arbitrary file descriptor, or vice versa, or from one buffer to another (man 2 splice)
- vmsplice() – “copies” data from user space into the buffer (man 2 vmsplice)
- tee() - allocates internal kernel buffer (man 2 tee)
The main idea here is what if we use a pipe not as a channel between 2 or more processes but just as an in-kernel ring buffer? Yes, of course, if you need to work with stdin and stdout, you can get a win-win situation because you don’t have to create an artificial pipe and use your real one.
So, for example, golang uses pipes (or pool of them) in some zero-copy operations between sockets when the io.Copy()/io.CopyN()/io.CopyBuffer()/io.ReaderFrom() are called.
So, the usage:
r,w = pipe() # allocate a kernel ring buffer of 64KB size.

for ;; {
	n = splice(socket1, w)
	if n < 0 {
    	    break // error, need to check it more carefully here
	}

	m = splice(r, socket2)
	if m < 0 {
    	    break // error, need to check it more carefully here
	}

	if m < n {
           // partial write
           // need to resend the rest of the buffer
	}
}
The above code is, of course, a pseudo code and doesn’t cover interruption errors and partial writes. But the main idea should be clear.
In theory, we can also increase the pipe buffer size, but it depends on the system and the CPU cache size. But in some cases, the bigger buffer might lead to performance degradations. So do your performance tests carefully.
You can also use this approach to copy a file to another place. But there is even a better solution – the copy_file_range syscall (man 2 copy_file_range). This one syscall does all the work for copying a file. As I mentioned earlier, fewer syscalls lead to better performance.
vmsplice() is another beast that could be useful when you want to make changes in the user space and then move this memory to the kernel pipe buffer without copying it. The example:
r,w = pipe() // allocate a kernel ring buffer of 64KB size.

n = read(file, buf) // read data from the file into the user space buffer

modify_data(buf) // apply some business logic to the data chunk

m = vmsplice(w, buf) // transfer buffer to the kernel buffer
The above code is a simplified version of what can be done. But unfortunately, in reality, dealing with vmsplice is complex, and bad documentation doesn’t help at all. If you want to go this way, please read the kernel source code first in order to understand all possible problems with vmsplice and zero data coping.
The last syscall that we have is tee(). It’s usually used with splice(). You probably know about the tee cli tool. (man 1 tee). The purpose of the util is to copy data from one pipe to another one while duplicating the data to a file. The coreutils implementation of tee uses read() and write() system calls to work with the pipes. But we are going to write our own version with 2 pretty new syscalls: tee() and splice() instead.
The tee()system call “copies” data from one buffer (pipe) to another. In reality, no real coping happens. Under the hood, the kernel just changes buffer references for pipe memory. Thus, tee() syscall does not consume any data, so the subsequent splice() call can get this data from a pipe.
So our homebrew implementation could be the following:
package main

import (
   "fmt"
   "os"
   "syscall"
)

const (
   SPLICE_F_MOVE     = 1
   SPLICE_F_NONBLOCK = 2
)

func main() {

   file_path := os.Args[1]

   fmt.Println("pid:", os.Getpid())

   file, err := os.OpenFile(file_path, os.O_RDWR|os.O_CREATE|os.O_TRUNC, 0755)
   if err != nil {
       panic(err)
   }

   for {
       n, err := syscall.Tee(0, 1, 1<<32-1, SPLICE_F_NONBLOCK)
       if err == syscall.EAGAIN {
           continue
       }

       if err != nil {
           panic(err)
       }

       if n == 0 {
           break
       }

       for n > 0 {
           slen, err := syscall.Splice(0, nil, int(file.Fd()), nil, int(n), SPLICE_F_MOVE)
           if err != nil {
               panic(err)
           }
           n -= slen
       }
   }
}
Let’s test it:
$ cat /var/tmp/file1.db |./tee /tmp/tee.log | strings | grep -E "^ss1"
ss1T
ss1vg
ss1j1;
ss1*
And verify that the file are identical with md5sum:
$ md5sum /var/tmp/file1.db
737f4f46feed57b4c6bdde840945948e  /var/tmp/file1.db
$ md5sum /tmp/tee.log
737f4f46feed57b4c6bdde840945948e  /tmp/tee.log
And a final note, I would suggest reading the archive of Linus’s emails about splice(), tee() and vmsplice() here https://yarchive.net/comp/linux/splice.html. You can find there a lot of design questions and solution for all these syscalls.
Process groups, jobs and sessions
A new process group is created every time we execute a command or a pipeline of commands in a shell. Inside a shell, a process group is usually called a job. In its turn, each process group belongs to a session. Linux kernel provides a two-level hierarchy for all running processes (look at Image 3 below). As such, a process group is a set of processes, and a session is a set of related process groups. Another important limitation is that a process group and its members can be members of a single session.
$ sleep 100  # a process group with 1 process

$ cat /var/log/nginx.log | grep string | head #  a process group with 3 processes
Process groups
A process group has its process group identificator PGID and a leader who created this group. The PID of the group leader is equal to the corresponding PGID. As so, the type of PID and PGID are the same, and is (pid_t)[https://ftp.gnu.org/old-gnu/Manuals/glibc-2.2.3/html_node/libc_554.html]. All new processes created by the group members inherit the PGID and become the process group members. In order to create a group, we have setpgid() and setpgrp() syscalls (man 2 getpgrp()).
A process group lives as long as it has at least one member. It means that even if the group leader terminates, the process group is valid and continues carrying out its duties. A process can leave its process group by:
- joining another group;
- creating its own new group;
- terminating.
Linux kernel can reuse PIDs for new processes if only the process group with that PGID doesn’t have members. It secures a valid hierarchy of processes.
A leader of a process group can’t join another process group because the constraints between PID of the process and PGID of the members of the group will be violated.
Two interesting features of process groups are:
- a parent process can wait() for its children using the process group id;
- a signal can be sent to all members of a process group by using killpg() or kill() with a negative PGID parameter.
The below command sends a SIGTERM(15) to all members of the process group 123:
$ kill -15 -123
The following 2 scripts demonstrate this feature. We have 2 long-running scripts in a process group (it was created for us automatically by shell) connected by a pipe.
print.py
import signal
import os
import sys
import time

def signal_handler(signum, frame):
	print(f"[print] signal number: {signum}", file=sys.stderr)
	os._exit(signum)

signal.signal(signal.SIGTERM, signal_handler)

print(f"PGID: {os.getpgrp()}", file=sys.stderr)

for i in range(9999):
	print(f"{i}")
	sys.stdout.flush()
	time.sleep(1)
and
stdin.py
import fileinput
import signal
import os
import sys

def signal_handler(signum, frame):
	print(f"[stdin] signal number: {signum}", file=sys.stderr)
	os._exit(signum)

signal.signal(signal.SIGTERM, signal_handler)


for i, line in enumerate(fileinput.input()):
	print(f"{i+1}: {line.rstrip()}")
Start the pipeline, and in the middle of the execution, run a kill command in a new terminal window.
$ python3 ./print.py | python3 ./stdin.py
PGID: 9743
1: 0
2: 1
3: 2
4: 3
[stdin] signal number: 15
[print] signal number: 15
And kill it by specifying the PGID:
$ kill -15 -9743
Sessions
For its part, a session is a collection of process groups. All members of a session identify themselves by the identical SID. It’s also the pid_t type, and as a process group, also inherited from the session leader, which created the session. All processes in the session share a single controlling terminal (we’ll talk about this later).
A new process inherits its parent’s session ID. In order to start a new session a process should call setsid() (man 2 setsid). The process running this syscall begins a new session, becomes its leader, starts a new process group, and becomes its leader too. SID and PGID are set to the process’ PID. That’s why the process group leader can’t start a new session: the process group could have members, and all these members must be in the same session.
Basically, a new session is created in two cases:
- When we need to log in a user with an interactive shell. A shell process becomes a session leader with a controlling terminal (about this later).
- A daemon starts and wants to run in its own session in order to secure itself (we will touch daemons in more detail later).
The following image shows a relationship between a session, its process groups and processes.
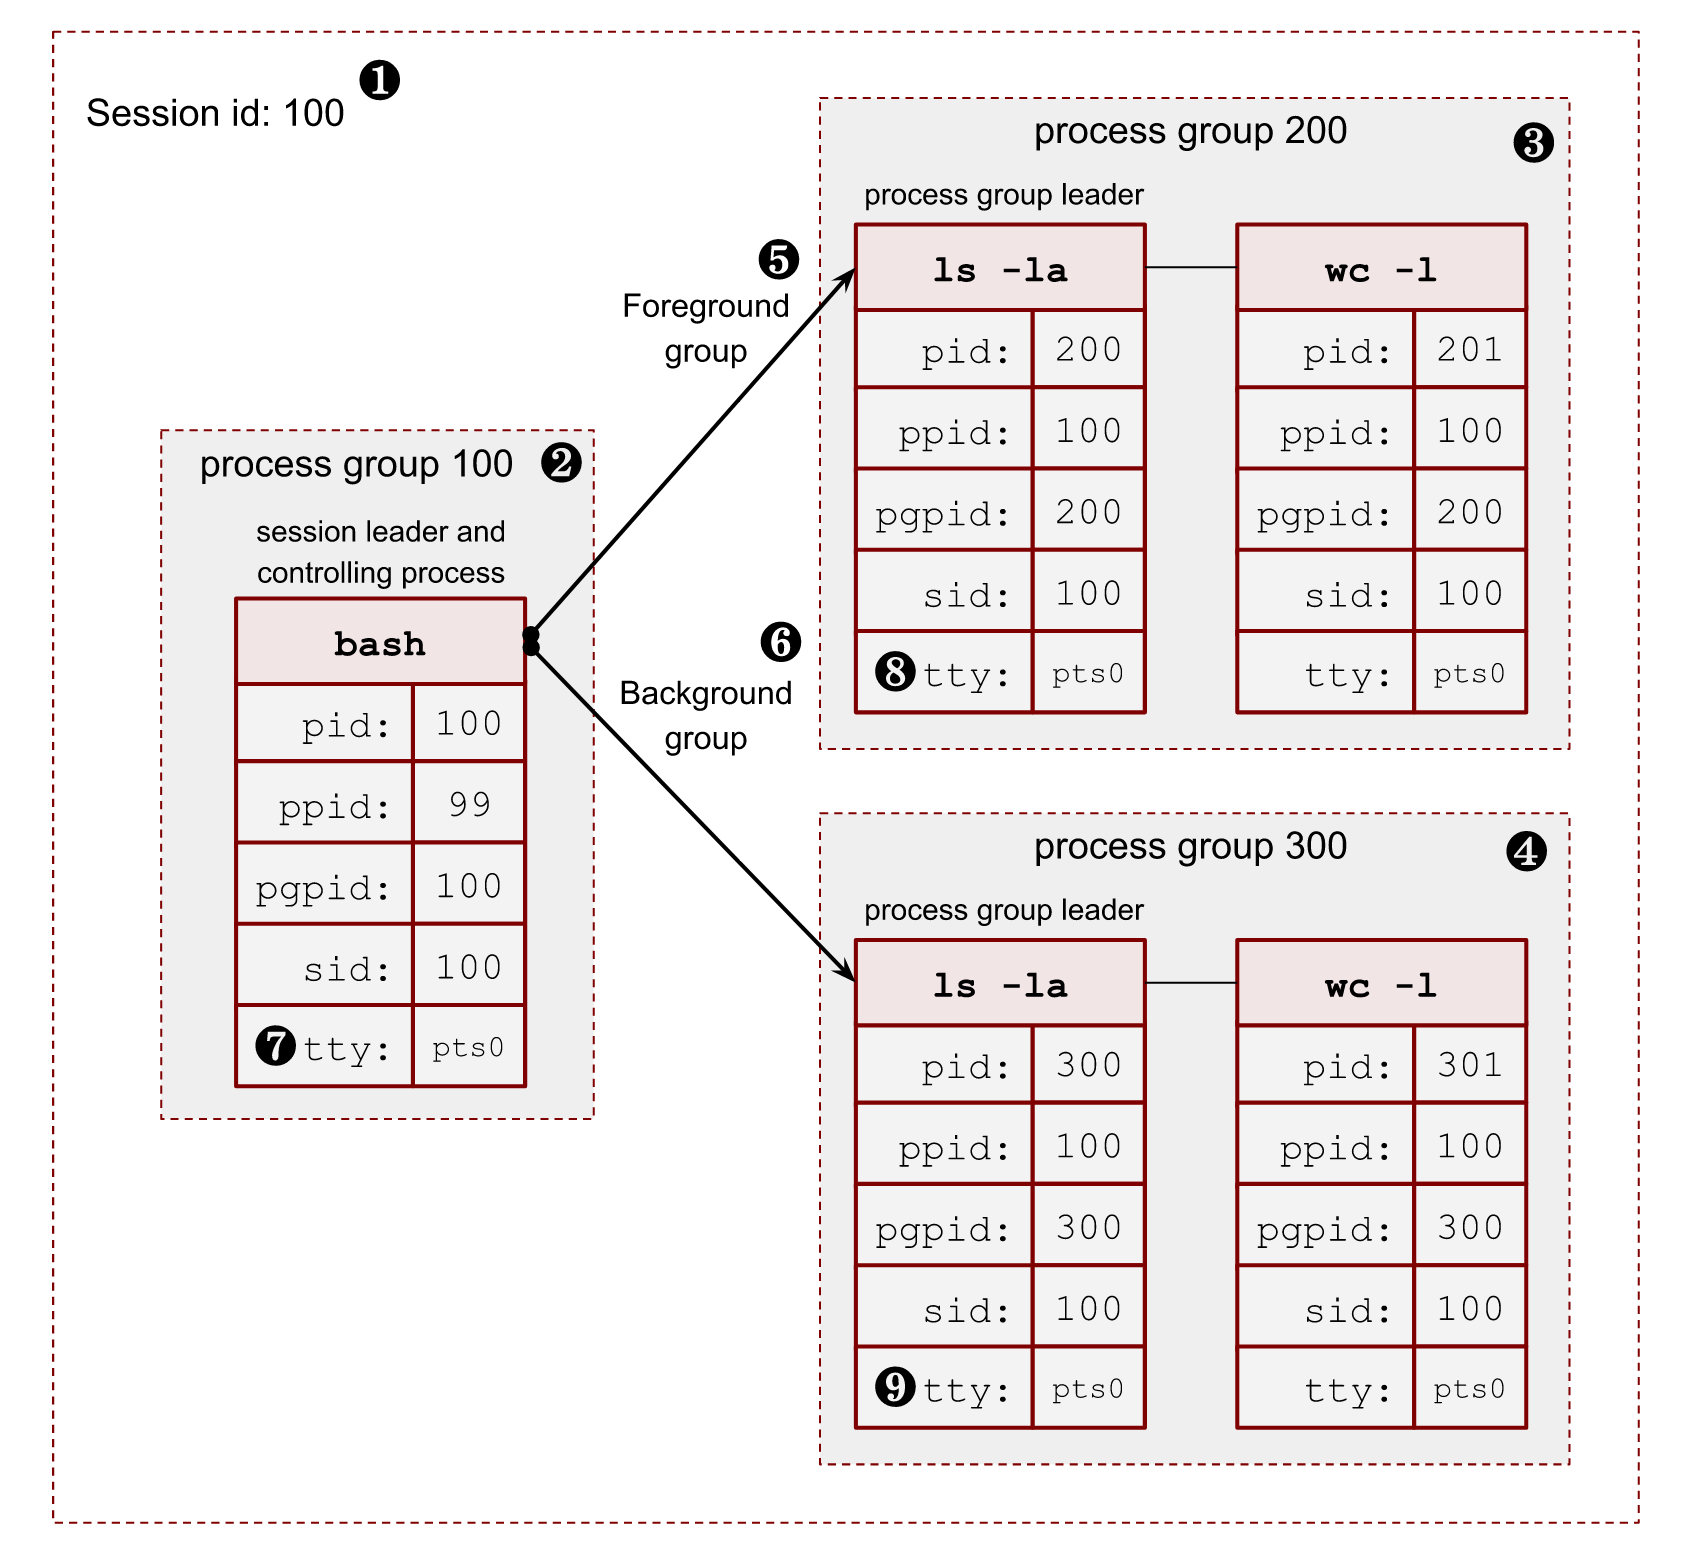
Image 3. – 2 level hierarchy of processes
- ❶ – Session id (SID) is the same as the session leader process (bash) PID.
- ❷ – The session leader process (bash) has its own process group, where it’s a leader, so PGID is the same as its PID.
- ❸, ❹ – The session has 2 more process groups with PGIDs 200 and 300.
- ❺, ❻ – Only one group can be a foreground for a terminal. All other process groups are background. We will touch on these terms in a minute.
- ❼, ❽, ❾ – All members of a session share a pseudoterminal /dev/pts/0.
In order to get all the above information for a running process, we can read the /proc/$PID/stat file. For example, for my running bash shell $$ porcess:
$ cat /proc/$$/stat | cut -d " " -f 1,4,5,6,7,8 | tr ' ' '\n' | paste <(echo -ne "pid\nppid\npgid\nsid\ntty\ntgid\n") -
pid 	8415  # PID
ppid	8414  # parent PID
pgid	8415  # process group ID
sid 	8415  # sessions ID
tty 	34816 # tty number
tgid	9348  # foreground process group ID
where (man 5 procfs https://man7.org/linux/man-pages/man5/proc.5.html):
- pid – the process id.
- ppid – the PID of the parent of this process.
- pgrp – the process group id of the process.
- sid – the session id of the process.
- tty – the controlling terminal of the process. (The minor device number is contained in the combination of bits 31 to 20 and 7 to 0; the major device number is in bits 15 to 8.)
- tgid – the id of the foreground process group of the controlling terminal of the process.
Controlling terminal, controlling process, foreground and background process groups
A controlling terminal is a terminal (tty, pty, console, etc) that controls a session. There may not be a controlling terminal for a session. It is usual for daemons.
In order to create a controlling terminal, at first, the session leader (usually a shell process) starts a new session with setsid(). This action drops a previously available terminal if it exists. Then the process needs to open a terminal device. On this first open() call, the target terminal becomes the controlling terminal for the session. From this point in time, all existing processes in the session are able to use the terminal too. The controlling terminal is inherited by fork() call and preserved by execve(). A particular terminal can be the controlling terminal only for one session.
A controlling terminal sets 2 important definitions: a foreground process group and a background process group. At any moment, there can be only one foreground process group for the session and any number of background ones. Only processes in the foreground process group can read from the controlling terminal. On the other hand, writes are allowed from any process by default. There are some tricks with terminals, we touch them later, when we will talk solely about terminals.
A terminal user can type special signal-generating terminal characters on the controlling terminal. The most famous ones are CTRL+C and CTRL+Z. As its name suggests, a corresponding signal is sent to the foreground process group. By default, the CTRL+C triggers a SIGINT signal, and CTRL+Z a SIGTSTP signal.
Also, opening the controlling terminal makes the session leader the controlling process of the terminal. Starting from this moment, if a terminal disconnection occurs, the kernel will send a SIGHUP signal to the session leader (usually a shell process).
The tcsetpgrp() (man 3 tcsetpgrp) is a libc function to promote a process group to the foreground group of the controlling terminal. There is also the tcgetpgrp() function to get the current foreground group. These functions are used primarily by shells in order to control jobs. On linux, we can also use ioctl() with TIOCGPGRP and TIOCSPGRP operations to get and set the foreground group.
Let’s write a script that emulates the shell logic of creating a process group for a pipeline.
pg.py
import os


print(f"parent: {os.getpid()}")
pgpid = os.fork()  # ⓵
if not pgpid:
   # child
   os.setpgid(os.getpid(), os.getpid())  # ⓶
   os.execve("./sleep.py", ["./sleep.py", ], os.environ)

print(f"pgid: {pgpid}")

pid = os.fork()
if not pid:
  # child
  os.setpgid(os.getpid(), pgpid)  # ⓷
  os.execve("./sleep.py", ["./sleep.py", ], os.environ)


pid = os.fork()
if not pid:
  # child
  os.setpgid(os.getpid(), pgpid)  # ⓷
  os.execve("./sleep.py", ["./sleep.py", ], os.environ)


for i in range(3) :
  pid, status = os.waitpid(-1, 0)
⓵ – Create the first process in the shell pipeline.
⓶ – Start a new process group and store its PID as a new PGID for all future processes.
⓷ – Start new processes and move them into the process group with PGID.
So when we run it we can see the following output:
python3 ./pg.py

parent: 8429
pgid: 8430
8431 sleep
8432 sleep
8430 sleep
The full state of processes:
$ cat /proc/8429/stat | cut -d " " -f 1,4,5,6,7,8 | tr ' ' '\n' | paste <(echo -ne "pid\nppid\npgid\nsid\ntty\ntgid\n") -
pid   	8429
ppid    8415
pgid    8429
sid   	8415
tty   	34816
tgid    8429
$ cat /proc/8430/stat | cut -d " " -f 1,4,5,6,7,8 | tr ' ' '\n' | paste <(echo -ne "pid\nppid\npgid\nsid\ntty\ntgid\n") -
pid   	8430
ppid    8429
pgid    8430
sid   	8415
tty   	34816
tgid    8429
$ cat /proc/8431/stat | cut -d " " -f 1,4,5,6,7,8 | tr ' ' '\n' | paste <(echo -ne "pid\nppid\npgid\nsid\ntty\ntgid\n") -
pid   	8431
ppid    8429
pgid    843
sid   	8415
tty   	34816
tgid    8429
$ cat /proc/8432/stat | cut -d " " -f 1,4,5,6,7,8 | tr ' ' '\n' | paste <(echo -ne "pid\nppid\npgid\nsid\ntty\ntgid\n") -
pid   	8432
ppid    8429
pgid    8430
sid   	8415
tty   	34816
tgid    8429
The only problem with the above code is we didn’t transfer the foreground group to our newly created process group. The tgid in the above output shows that. The 8429 PID is a PGID of the parent pg.py script, not the newly created process group 8430.
Now, if we press CTRL+C to terminate the processes, we’ll stop only the parent with PID 8429. It happens because it’s in the foreground group from the perspective of the controlling terminal. All processes in the 8430 group will continue running in the background. If they try to read from the terminal (stdin), they will be stopped by the controlling terminal by sending them a SIGTTIN signal. It is a result of trying to read from the controlling terminal without acquiring the foreground group. If we log out or close the controlling terminal, this group will not get a SIGHUP signal, because the bash process (the controlling process) doesn’t know that we started something in the background.
In order to fix this situation, we need to notify the controlling terminal that we want to run another process group in the foreground. Let’s modify the code and add the tcsetpgrp() call.
import os
import time
import signal


print(f"parent: {os.getpid()}")
pgpid = os.fork()
if not pgpid:
   # child
   os.setpgid(os.getpid(), os.getpid())
   os.execve("./sleep.py", ["./sleep.py", ], os.environ)

print(f"pgid: {pgpid}")

pid = os.fork()
if not pid:
  # child
  os.setpgid(os.getpid(), pgpid)
  os.execve("./sleep.py", ["./sleep.py", ], os.environ)


pid = os.fork()
if not pid:
  # child
  os.setpgid(os.getpid(), pgpid)
  os.execve("./sleep.py", ["./sleep.py", ], os.environ)


tty_fd = os.open("/dev/tty", os.O_RDONLY)  # ⓵

os.tcsetpgrp(tty_fd, pgpid)  # ⓶

for i in range(3):  # ⓷
   os.waitpid(-1, 0)

h = signal.signal(signal.SIGTTOU, signal.SIG_IGN)  # ⓸
os.tcsetpgrp(tty_fd, os.getpgrp())  # ⓹
signal.signal(signal.SIGTTOU, h)  # ⓺

print("got foreground back")

time.sleep(99999)
⓵ – In order to run the tcsetpgrp(), we need to know the current controlling terminal path. The safest way to do that is to open a special virtual file /dev/tty. If a process has a controlling terminal, it returns a file descriptor for that terminal. We, in theory, can use one of the standard file descriptors too. But it’s not sustanable because the caller can redirects all of them.
⓶ – Put the new process group into the foreground group of the controlling terminal.
⓷ – Here, we wait for the processes to exit. It is where we should call CTRL+C.
⓸ – Before we command the controlling terminal to return into the foreground session we need to silence the SIGTTOU signal. The man page says: If tcsetpgrp() is called by a member of a background process group in its session, and the calling process is not blocking or ignoring SIGTTOU, a SIGTTOU signal is sent to all members of this background process group. We don’t need this signal, so it’s OK to block it.
⓹ – Returning to the foreground.
⓺ – Restoring the SIGTTOU signal handler.
And if we now run the script and press CTRL+C, everything should work as expected.
$ python3 ./pg.py

parent: 8621
pgid: 8622
8622 sleep
8624 sleep
8623 sleep
^C                            <------------------- CTRL+C was pressed

Traceback (most recent call last):
  File "/home/vagrant/data/blog/post2/./sleep.py", line 7, in <module>
Traceback (most recent call last):
  File "/home/vagrant/data/blog/post2/./sleep.py", line 7, in <module>
Traceback (most recent call last):
  File "/home/vagrant/data/blog/post2/./sleep.py", line 7, in <module>
	time.sleep(99999)
KeyboardInterrupt
	time.sleep(99999)
KeyboardInterrupt
	time.sleep(99999)
KeyboardInterrupt

got foreground back            <----------------- back to foreground
Shell job control
Now it’s time to understand how shells allow us to run multiple commands simultaneously and how we can control them.
For instance, when we run the following pipeline:
$ sleep 999 | grep 123
The shell here:
-
creates a new process group with the PGID of the first process in the group;
-
puts this group in the foreground group by notifying the terminal with tcsetpgrp();
-
stores the PIDs and sets up a waitpid() syscall.
The process group is also known as a shell job.
The PIDs:
$ ps a | grep sleep
   9367 pts/1	S+ 	0:00 sleep 999
$ ps a | grep grep
   9368 pts/1	S+ 	0:00 grep 123
And if we get the details for sleep:
$ cat /proc/9367/stat | cut -d " " -f 1,4,5,6,7,8 | tr ' ' '\n' | paste <(echo -ne "pid\nppid\npgid\nsid\ntty\ntgid\n") -
pid 	9367
ppid	6821
pgid	9367
sid 	6821
tty 	34817
tgid	9367
and for grep:
$ cat /proc/9368/stat | cut -d " " -f 1,4,5,6,7,8 | tr ' ' '\n' | paste <(echo -ne "pid\nppid\npgid\nsid\ntty\ntgid\n") -
pid 	9368
ppid	6821
pgid	9367
sid 	6821
tty 	34817
tgid	9367
While waiting for the foreground job to finish, we can move this job to the background by pressing Ctrl+Z. It is a control action for the terminal, which sends a SIGTSTP signal to the foreground process group. The default signal handler for a process is to stop. In its turn, bash gets a notification from the waitpid(), that the statuses of the monitoring processes have changed. When bash sees that the foreground group has become stopped, it returns the foreground back to shell by running tcsetpgrp():
^Z
[1]+  Stopped             	sleep 999 | grep 123
$
We can get the current statuses of all known jobs by using the built-in jobs command:
$ jobs -l
[1]+  7962 Stopped             	sleep 999
  	  7963                   	| grep 123
We may resume a job in the background by calling bg shell built-in with the ID of the job.When we use bg with a background stopped job, the shell uses killpg and SIGCONT signal.
$ bg %1
[1]+ sleep 999 | grep 123 &
If we check the status now, we can see that it’s running in the background.
$ jobs -l
[1]+  7962 Running             	sleep 999
  	7963                   	| grep 123 &
If we want, we can move the job back in the foreground by calling fg built-in shell command:
$ fg %1
sleep 999 | grep 123
We also can start a job in the background by adding an ampersand (&) char in the end of the pipeline:
$ sleep 999 | grep 123 &
[1] 9408
$
kill command
kill is usually a shell built-in for at least two reasons:
- Shell usually allows to kill jobs by their job ids. So we need to be able to resolve internal job IDs into process group IDs (the %job_id syntaxis).
- Allow users to send signals to processes if the system hits the max running process limit. Usually, during emergencies and system misbehaviour.
For example, we can check how bash does it – int kill_builtin() and zsh – int bin_kill().
Another helpful piece of knowledge about the kill command and system calls is a “-1” process group. It’s a special group, and the signal to it will fan out the signal to all processes on the system except the PID 1 process (it’s almost always a systemd process on all modern GNU/Linux distributions):
[remote ~] $ sudo kill -15 -1
Connection to 192.168.0.1 closed by remote host.
Connection to 192.168.0.1 closed.
[local ~] $
Terminating shell
When a controlling process loses its terminal connection, the kernel sends a SIGHUP signal to inform it of this fact. If either the controlling process or other members of the session ignores this signal, or handle it and do nothing, then the further read from and write to the closed terminal (ususally /dev/pts/*) calls will return the end-of-file (EOF) zero bytes.
Shell processes (which are usually control terminals) have a handler to catch SIGHUP signals. Receiving a signal starts a fan-out process of sending SIGHUP signals to all jobs it has created and know about (remember the fg, bg and waitpid()). The default action for the SIGHUP is terminate.
nohup and disown
But suppose we want to protect our long-running program from being suddenly killed by a broken internet connection or low laptop battery. In that case, we can start a program under nohup tool or use bash job control disownbuilt-in command. Let’s understand how they work and where they are different.
The nohup performs the following tricks:
- Changes the stdin fd to /dev/null.
- Redirects the stdout and stderr to a file on disk.
- Set an ignore SIG_IGN flag for SIGHUP signal. The interesting moment here is that the SIG_IGN is preserved after the execve() syscall.
- Run the execve().
All the above make the program immune to the SIGHUP signal and can’t fail due to writing to or reading from the closed terminal.
$ nohup ./long_running_script.py &
[1] 9946
$ nohup: ignoring input and appending output to 'nohup.out'
$ jobs -l
[1]+  9946 Running             	nohup ./long_running_script.py &
As you can see from the output, the bash knows about this process and can show it in jobs.
Another way we have to achieve long-running programs to survive the controlling terminal closure is a built-in disown of the bash shell. Instead of ignoring the SIGHUP signal, it just removes the job’s PID from the list of known jobs. Thus no SIGHUP signal will be sent to the group.
$ ./long_running_script.py &
[1] 9949

$ jobs -l
[1]+  9949 Running             	./long_running_script.py &

$ disown 9949

$ jobs -l

$ ps a | grep 9949
   9949 pts/0	S  	0:00 /usr/bin/python3 ./long_running_script.py
   9954 pts/0	S+ 	0:00 grep 9949
The drawback of the above solution is we don’t overwrite and close the terminal standard fd. So if the tool decides to write to or read from the closed terminal, it could fail.
The other conclusion we can make is that the shell doesn’t send SIGHUP to processes or groups it did not create, even if the process is in the same session where the shell is a session leader.
Daemons
A daemon is a long living process. It is often started at the system’s launch and service until the OS shutdown. Daemon runs in the background without a controlling terminal. The latest guarantees that the process never gets terminal-related signals from the kernel: SIGINT, SIGTSTP, and SIGHUP.
The classic “unix” way of spawning daemons is performed by a double-fork technique. After both fork() calls the parents exit immediately.
- The first fork() is needed:
- to become a child of the systemd process with PID 1;
- if a daemon starts manually from a terminal, it puts itself into the background and a shell doesn’t know about it, so it can’t terminate the daemon easily;
- the child is guaranteed not to be a process group leader, so the following setsid() call starts a new session and breaks a possible connection to the existing controlling terminal.
- The second fork() is done in order to stop being the session leader. This step protects a daemon from opening a new controlling terminal, as only a session leader can do that.
The gnu provides a convininet libc function to demonize our program: daemon() man 3 daemon.
But nowadays, systems with systemd tend not to follow the double-fork trick. Instead developers highly rely on systemd features:
- systemd can starts a new process session for daemons;
- it can swap the standard file descriptors for stdin, stdout and stderr with regular files or sockets instead of manually close or redirect them to syslog. For example nginx code:
   ...
   fd = open("/dev/null", O_RDWR);
   ...
   if (dup2(fd, STDIN_FILENO) == -1) {
       ngx_log_error(NGX_LOG_EMERG, log, ngx_errno, "dup2(STDIN) failed");
       return NGX_ERROR;
   }
   ...
So, a daemon can continue safely write to the stderr and stdout and don’t be afraid of getting the EOF because of a closed terminal. The following setting controls that:
StandardOutput=
StandardError=
For instance, etcd service doesn’t do a double-fork and fully rely on the systemd. That’s why its PID is a PGID and SID, so it’s a session leader.
$ cat /proc/10350/stat | cut -d " " -f 1,4,5,6,7,8 | tr ' ' '\n' | paste <(echo -ne "pid\nppid\npgid\nsid\ntty\ntgid\n") -
pid 	10350
ppid	1
pgid	10350
sid 	10350
tty 	0
tgid	-1
Also systemd has a lot of other features for modern service developers such as helpers for live upgrades, socket activation, sharing sockets, cgroup limits, etc…
Terminals and pseudoterminals
Terminals come to us from the history of UNIX systems. Basically, terminals provided an API for the console utils (physical ones!) to generalize interaction with users. It includes ways of reading input and writing to it in two modes:
- the canonical mode (default) – input is buffered line by line and read into after a new line char \n occurs;
- the noncanonical mode – an application can read terminal input a character at a time. For example vi, emacs and less use this mode.
Nowadays, with the widespread use of rich graphical UIs, the significance of the terminals are lesser than it was, but still, we use this protocol implicitly every time we start an ssh connection.
The are a bunch of files under /dev/ directory that represents different types of terminals:
- /dev/tty* – physical consoles;
- /dev/ttyS* – serial connections;
- /dev/pts/* – pseudoterminals.
Also, the /proc/tty/drivers file contains other supported drivers.
So, in order to determine what terminal file the current shell session is using, we have a tty cli tool (man 1 tty).
On my remote ssh connection:
$ tty
/dev/pts/0
For a physical console:
$ tty
/dev/tty1
We can also open a virtual device /dev/tty to get a fd of the controlling terminal if it exists for the current process.
Pseudoterminal (devpts)
In order to make it possible to use a terminal remotely, the Linux kernel provides a feature called pseudoterminal or devpts (https://www.kernel.org/doc/html/latest/filesystems/devpts.html).
It allows us to build terminal emulators and use them instead of a real terminal, where an application expects a terminal device. Using pseudoterminals we can build terminal proxies, record screen sessions and mock user input. You can think about pseudoterminal like as a special type of Inter-process communication (IPC). It’s a bidirectional communication channel. All operations that can be applied to a terminal device can also be applied to a pts device end, including something that doesn’t make sense. For example: changing the speed of connection transforms into a no-op internally.
Pseudoterminal consists of 2 parts:
- A ptmx part which is a leader for the pseudoterminal. This end is used to emulate the user input and read back the program output.
- A pts is a secondary end. This part is given to an application that needs a terminal.
The following image shows how an ssh client uses pseudoterminals to establish remote access.
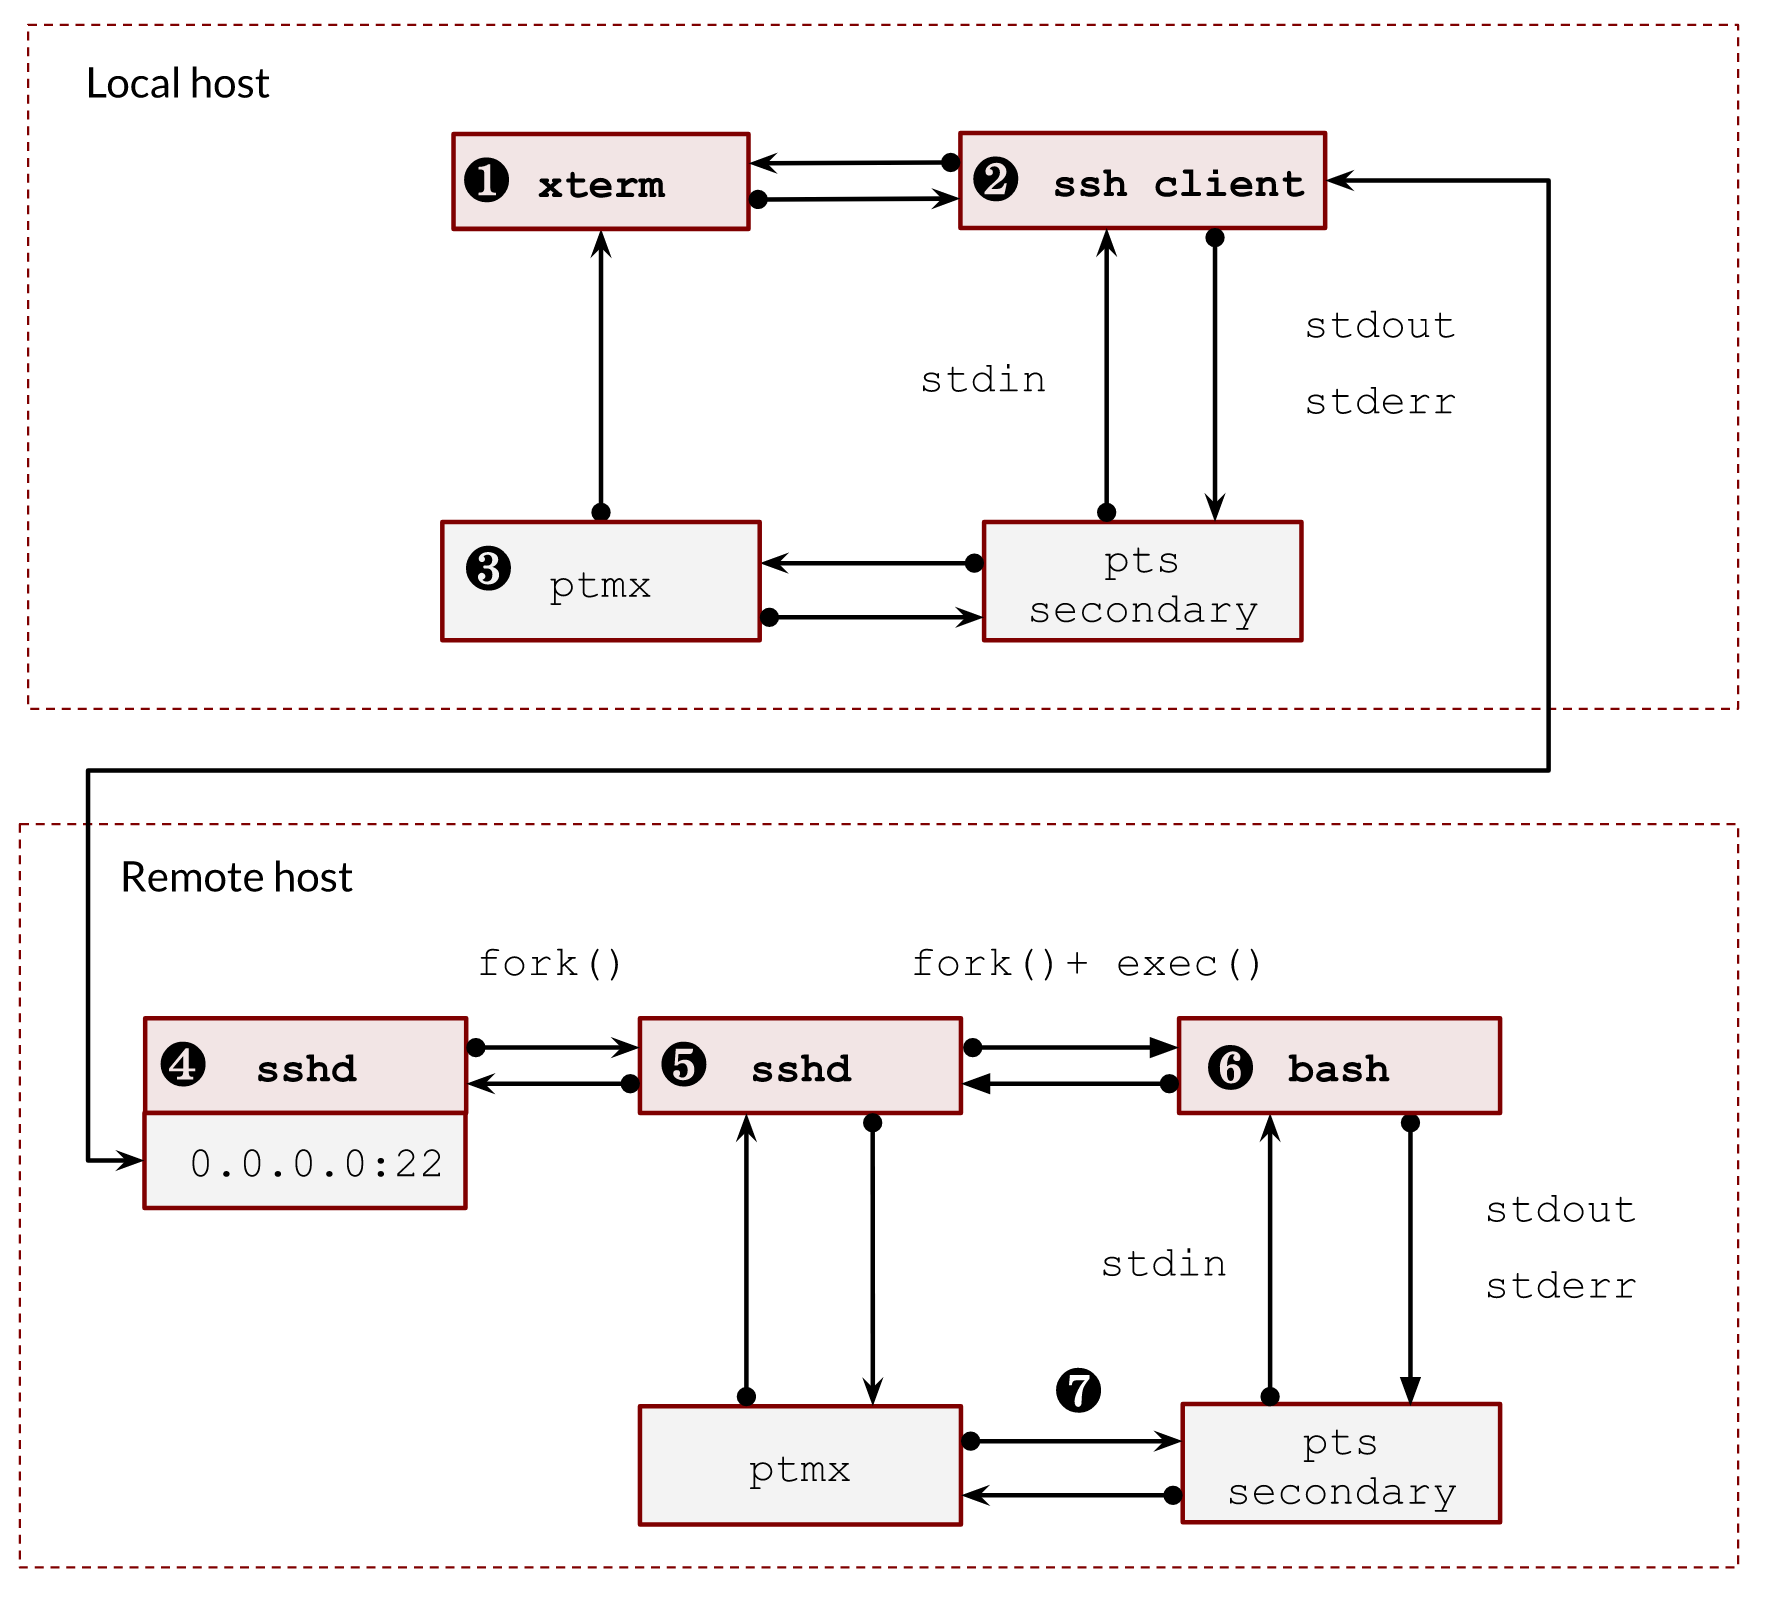
Image 4. – ssh client, sshd server and two pairs of pseudoterminals
- ❶ – We usually have a graphical UI on our local host and use some kind of xterm to run a local console. The UI subsystem receives all keyboard inputs, so it opens a pseudoterminal and redirects it into its ptmx device. The other side of the terminal is what an xterm emulator sees.
- ❷ – The local bash process creates a new foreground process group (job). It’s running in the foreground, so a ssh gets full control of the terminal. ssh client is a special terminal program that leverages the full power of terminals. It sets the terminal into the raw mode. Thus, the future CTRL-C and CTRL-Z combinations do not affect the local ssh process. Instead, all such commands will be sent to the remote side of the ssh connection and interpreted there. When the ssh client exits, it returns all settings back.
- ❸, ❼ – The communication between the ptmx and pts happens in the kernel and is hidden from our eyes.
- ❹ – sshd server is listening to new connections. It makes a fork for each connected user and checks their credentials.
- ❺ – The sshd process creates a new pseudoterminal pair. It basically connects the ptmx side and the client tcp socket.
- ❻ – Then the sshd process makes a fork(), opens a corresponding new pts, starts a new session (setsid()), opens our pts making it the controlling terminal of the session and duplicates standard file descriptors 0,1 and 2 with the pts descriptor. Now it’s ready to call execve() to start bash shell.
Let’s emulate the above with a small example. We are creating a new session with a new pseudoterminal pair and write the stdin into a file on disk.
import os
import time
import sys

print(f"parent: {os.getpid()}")

ptmx, secondary = os.openpty()

pid = os.fork()
if not pid:
	print(f"child: {os.getpid()}")
	os.close(ptmx)
	os.setsid()
	name = os.ttyname(secondary)
	print(name)
	s = os.open(name, os.O_RDWR)
	os.dup2(s, 0)
	os.dup2(s, 1)
	os.dup2(s, 2)
	os.close(secondary)
	os.close(s)
	with open('/tmp/file.txt', "w") as f:
    	for l in sys.stdin:
        	f.write(l)
        	f.flush()
	time.sleep(999999)
else:
	os.close(secondary)
	os.write(ptmx, b"text\n")
	os.waitpid(-1,0)
Run it:
$ python3 ./terminal.py
parent: 8776
child: 8777
/dev/pts/3
Check the file:
$ cat /tmp/file.txt
text
File descriptors show that all is good:
$ ls -l  /proc/8776/fd
lrwx------ 1 vagrant vagrant 64 Jul 12 21:45 0 -> /dev/pts/0
lrwx------ 1 vagrant vagrant 64 Jul 12 21:45 1 -> /dev/pts/0
lrwx------ 1 vagrant vagrant 64 Jul 12 21:45 2 -> /dev/pts/0
lrwx------ 1 vagrant vagrant 64 Jul 12 21:45 3 -> /dev/ptmx

$ ls -l  /proc/8777/fd
lrwx------ 1 vagrant vagrant 64 Jul 12 21:45 0 -> /dev/pts/3
lrwx------ 1 vagrant vagrant 64 Jul 12 21:45 1 -> /dev/pts/3
lrwx------ 1 vagrant vagrant 64 Jul 12 21:45 2 -> /dev/pts/3
l-wx------ 1 vagrant vagrant 64 Jul 12 21:45 3 -> /tmp/file.txt
Terminal settings
The ptmx and pts devices share terminal attributes (termios) and window size (winsize) structures.
The current setting of a terminal can be obtained and updated by the stty command:
$ stty -a
As we discussed earlier, the background jobs can print to the stdout by default. However, we can change it by setting TOSTOP flag for the terminal. If we do that, the background process group will receive a SIGTTOU signal from the kernel. The default handler for this signal is stop.
$ stty tostop
And run some background job:
$ yes | grep y &
[1] 10694
[vagrant@archlinux post2]$ jobs -l
[1]+ 10693 Stopped (tty output)	yes
 	10694                   	| grep y
And return it back:
$ stty -tostop
We also can return back to the default setting by using the “sane” parameter:
$ stty sane
Handling Terminal Signals
As we discussed, the kernel can send some terminal signals to foreground and background processes. Some of them we already touched:
- SIGTTIN – a background process tried to read from a terminal.
- SIGTTOU – a background process tries to write to a terminal when the tostop flag is set or a background process asks to send it to the foreground.
- SIGTSTP – a default response to a CTRL-Z pressed combination.
The noncanonical programs such as vi, emacs and less, need to handle all the above signals in order to reset terminal settings back and forth, redraw a terminal content and place the cursor in the right place.
Another interesting terminal signal we haven’t seen is the SIGWINCH signal. A foreground process receives it when size of a terminal window has changed. Usually, a program uses ioctl() with the TIOCGWINSZ operation to get the current size in its signal handler. For example:
import time
import signal
import termios
import fcntl
import struct

def signal_handler(signum, frame):
   packed = fcntl.ioctl(0, termios.TIOCGWINSZ, struct.pack('HHHH', 0, 0, 0, 0))
   rows, cols, h_pixels, v_pixels = struct.unpack('HHHH', packed)
   print(rows, cols, h_pixels, v_pixels)

signal.signal(signal.SIGWINCH, signal_handler)

time.sleep(9999)
And if you start it and play with size of terminal window:
$ python3 ./size.py
32 85 1360 1280
32 72 1152 1280
32 74 1184 1280
32 86 1376 1280
32 83 1328 1280
33 73 1168 1320
screen and tmux
screen (man 1 screen) and tmux (man 1 tmux) are usually used for protecting shell sessions between connections. It is also widely used for long-running jobs and better ssh user client experience. Both use pseudoterminals to multiplex a single physical terminal (or terminal window) between multiple processes (multiple shell sessions). In this section, we will talk about tmux, but the screen is almost the same in all discussed topics here.
On the first start, tmux starts a server with a set of ptmx corresponding to its panes. Clients of tmux (tmux attach) use a default unix socket to find and connect to the server:
$ ls -lad /tmp/tmux-1000/default
srwxrwx--- 1 vagrant vagrant 0 Jul 14 12:57 /tmp/tmux-1000/default
where 1000 is a user id UID.
tmux doesn’t do any tcsetpgrp() calls, because any panel or window creates a new pair of terminals.
So let’s demonstrate it. After we ssh to a box, we have our bash with PID 11761 :
$ echo $$
11761

$ ls -la /proc/$$/fd
lrwx------ 1 vagrant vagrant 64 Jul 14 12:08 0 -> /dev/pts/0
lrwx------ 1 vagrant vagrant 64 Jul 14 12:08 1 -> /dev/pts/0
lrwx------ 1 vagrant vagrant 64 Jul 14 12:08 2 -> /dev/pts/0
Let assume, that we already have a working tmux session on the server. So if we check the ps command, we can see it with PID 11781.
...
├─sshd(11619)───sshd(11749)───sshd(11760)───bash(11761)
...
└─tmux: server(11780)───bash(11781)
Now let’s attach to the tmux session:
$ tmux attach
We get a new bash PID from the above ps output and a new pseudoterminal:
$ echo $$
11781

$ ls -la /proc/$$/fd
lrwx------ 1 vagrant vagrant 64 Jul 14 12:10 0 -> /dev/pts/1
lrwx------ 1 vagrant vagrant 64 Jul 14 12:10 1 -> /dev/pts/1
lrwx------ 1 vagrant vagrant 64 Jul 14 12:10 2 -> /dev/pts/1
If we check the pseudoterminal devpts folder /dev/pts/:
$ ls -la /dev/pts/
crw--w----  1 vagrant tty  136, 0 Jul 14 12:11 0
crw--w----  1 vagrant tty  136, 1 Jul 14 12:11 1
c---------  1 root	root   5, 2 Jul  9 21:14 ptmx
we can see that there are 2 pseudoterminals, one is our ssh client, and the other is our tmux.
Let’s observe the tmux server’s file descriptors:
$ ls -la /proc/11780/fd
lrwx------ 1 vagrant vagrant 64 Jul 14 12:09 0 -> /dev/null
lrwx------ 1 vagrant vagrant 64 Jul 14 12:09 1 -> /dev/null
lrwx------ 1 vagrant vagrant 64 Jul 14 12:09 2 -> /dev/null
…
lrwx------ 1 vagrant vagrant 64 Jul 14 12:09 5 -> /dev/pts/0
…
lrwx------ 1 vagrant vagrant 64 Jul 14 12:09 8 -> /dev/ptmx
We see it has an open /dev/ptmx to control the terminal on /dev/pts/1, and a /dev/pts/0 to read our input and write output back to our ssh connection.
Now, if we detach, we can still see the bash process in the ps output:
$ pstree -p
tmux: server(11780)───bash(11781)
It’s left there and is waiting for us. Talkinh about the tmux server, it closed /dev/pts/0 because we returned back control of the ssh terminal and it doesn’t need to read and write to it anymore:
$ ls -la /proc/11780/fd
lrwx------ 1 vagrant vagrant 64 Jul 14 12:09 0 -> /dev/null
lrwx------ 1 vagrant vagrant 64 Jul 14 12:09 1 -> /dev/null
lrwx------ 1 vagrant vagrant 64 Jul 14 12:09 2 -> /dev/null
…
lrwx------ 1 vagrant vagrant 64 Jul 14 12:09 8 -> /dev/ptmx
Also, if we take a look the procfs, we will find out that tmux server has its own session and process group. It makes sense, it should not depend on any of the active terminal connections.
$ cat /proc/11780/stat | cut -d " " -f 1,5,6,7,8,9 | tr ' ' '\n' | paste <(echo -ne "pid\nppid\npgid\nsid\ntty\ntgid\n") -
pid    11780
ppid   1
pgid   11780
sid    11780
tty    0
tgid   -1
If we open one more session, we will see one more shell process:
└─tmux: server(11780)─┬─bash(11781)
                      └─bash(11846)
And open file descriptors of the server:
$ ls -la /proc/11780/fd
lrwx------ 1 vagrant vagrant 64 Jul 14 12:09 0 -> /dev/null
lrwx------ 1 vagrant vagrant 64 Jul 14 12:09 1 -> /dev/null
lrwx------ 1 vagrant vagrant 64 Jul 14 12:18 10 -> /dev/pts/2
lrwx------ 1 vagrant vagrant 64 Jul 14 12:20 11 -> /dev/ptmx
...
lrwx------ 1 vagrant vagrant 64 Jul 14 12:09 7 -> /dev/pts/0
lrwx------ 1 vagrant vagrant 64 Jul 14 12:09 8 -> /dev/ptmx
The overall schema described above could be presented in the below image 5:
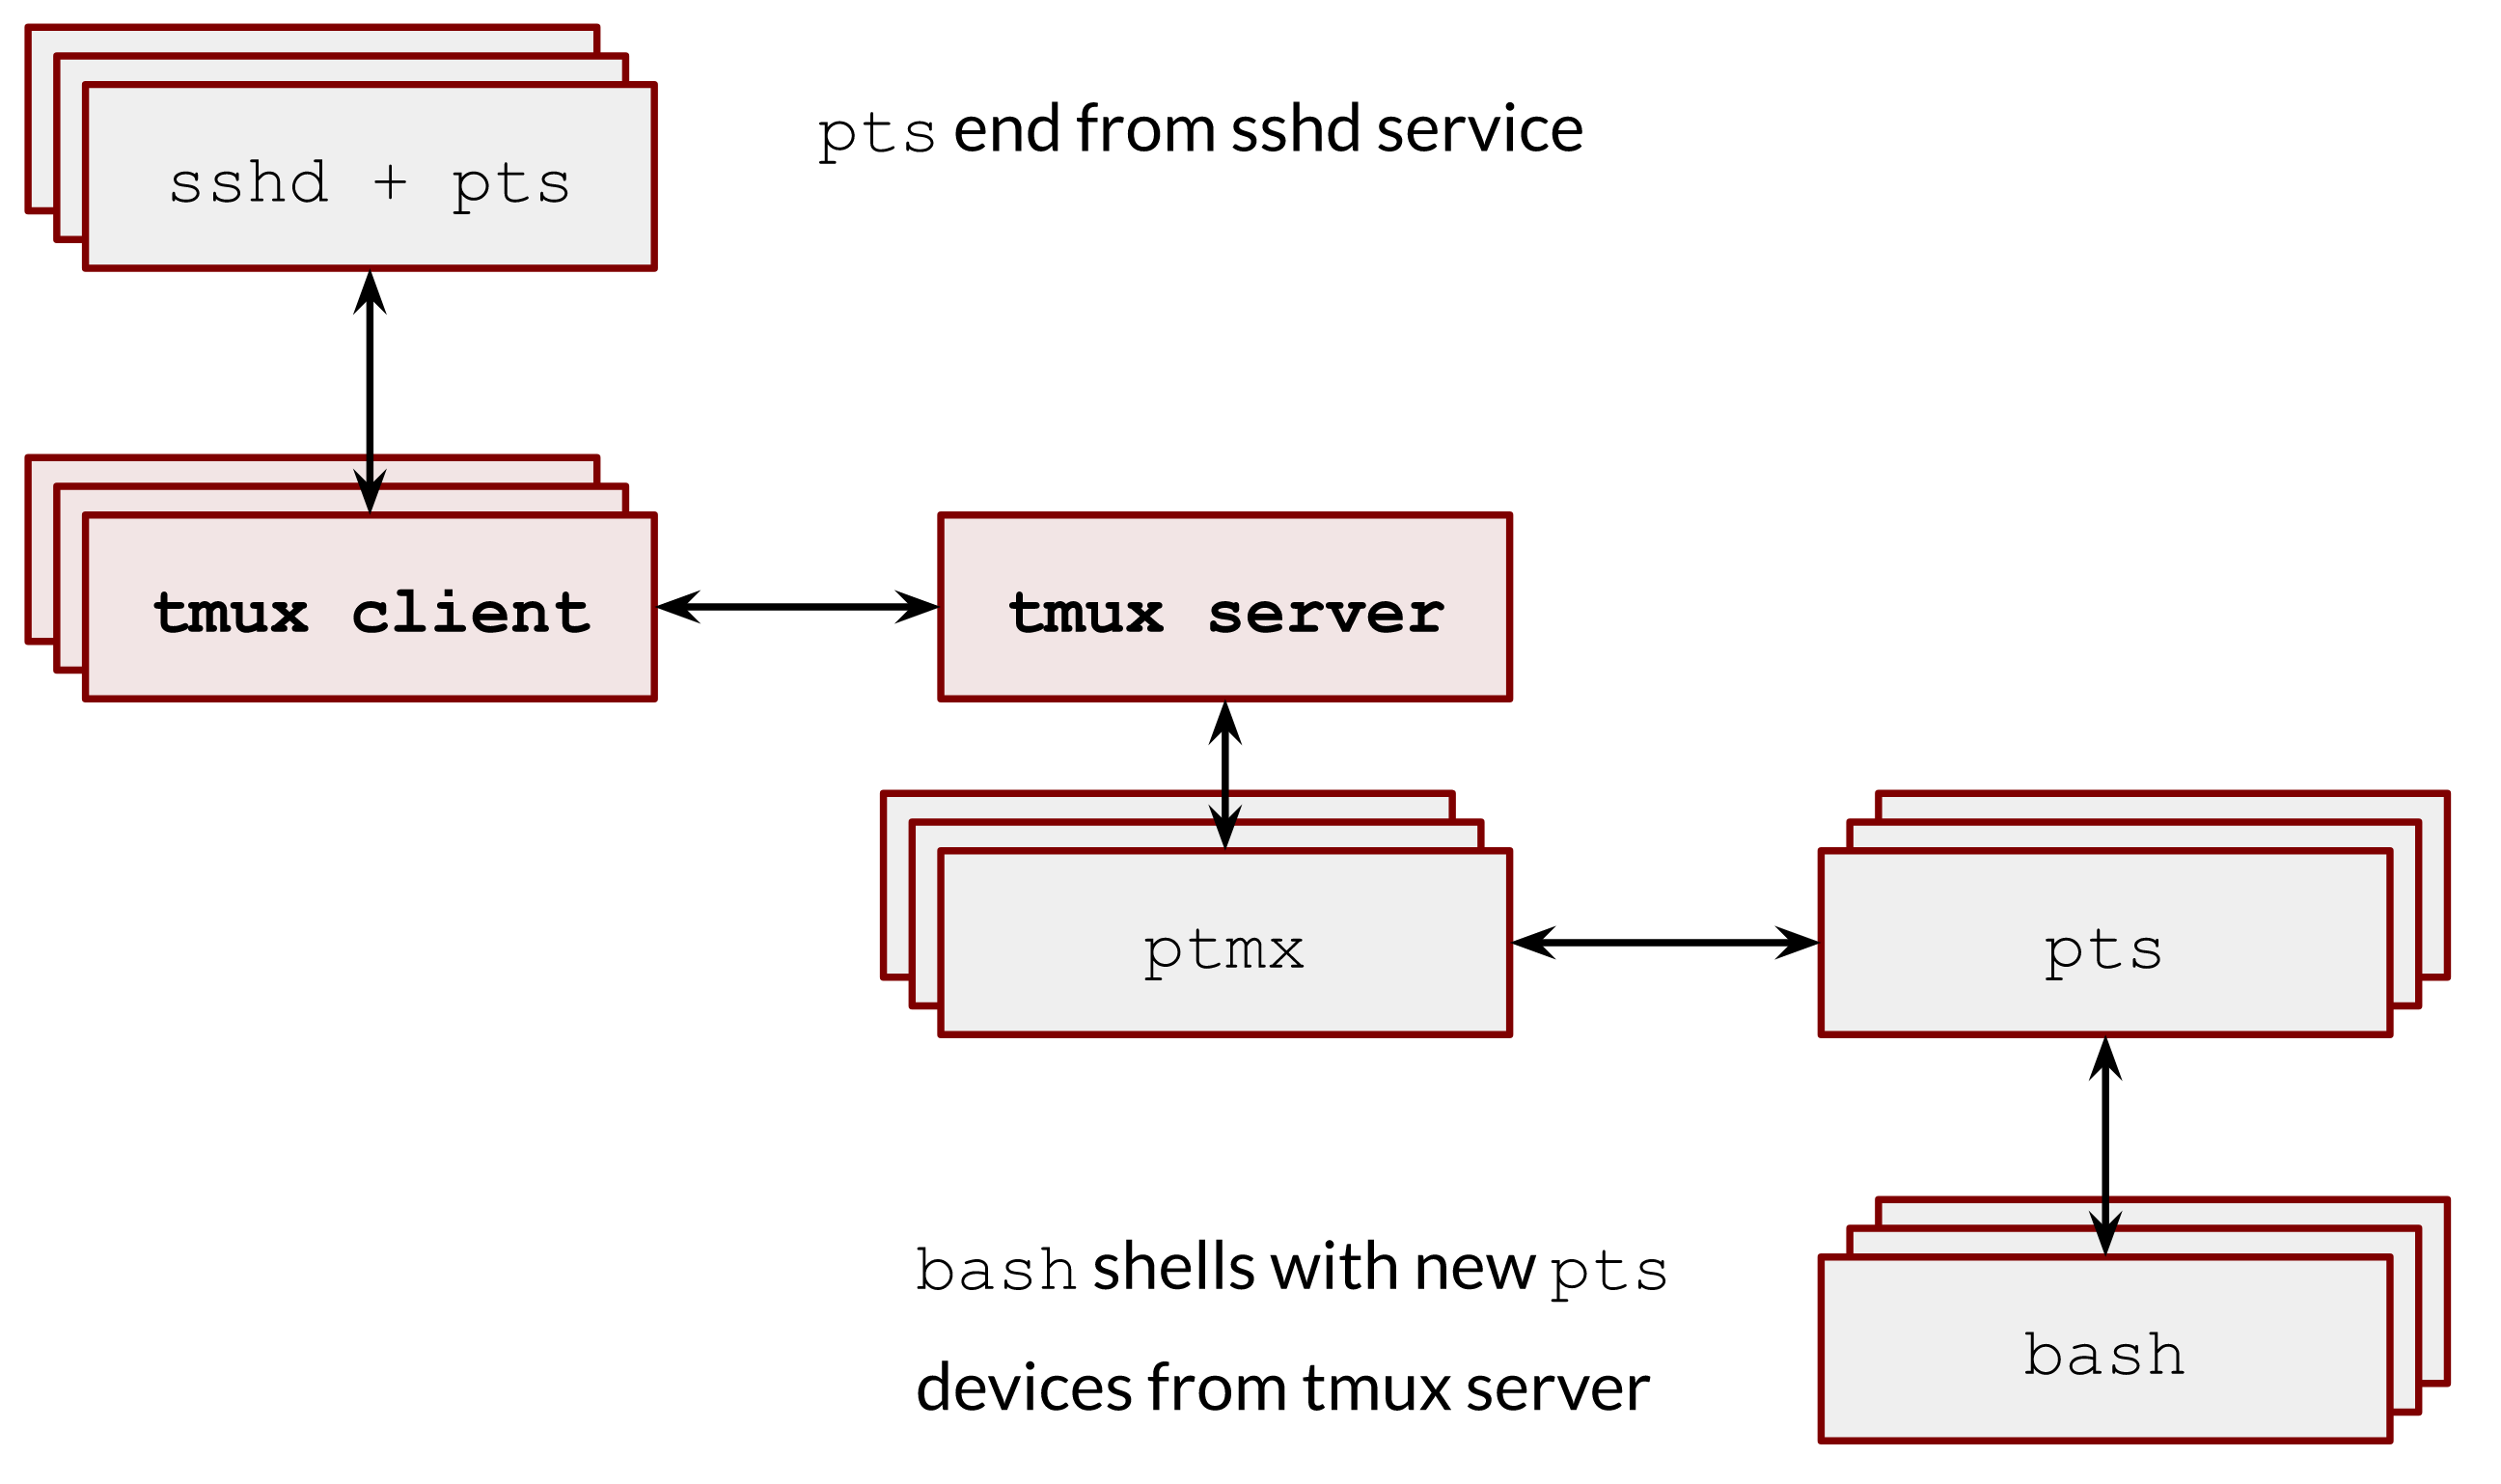
Image 5. – tmux client-server architecture
tmux server opens as many pseudoterminals as needed, but none of them is a controlling terminal. It is possible to do it in several ways, and the most simple one is to open a /dev/pts/ptmx with the O_NOCTTY open flag (man 2 open).
In order to set a demonize, the tmux server made a single fork() and setsid():
int
daemon(int nochdir, int noclose)
{
    int fd;

    switch (fork()) {
    case -1:
   	 return (-1);
    case 0:
   	 break;
    default:
   	 _exit(0);
    }

    if (setsid() == -1)
   	 return (-1);

    if (!nochdir)
   	 (void)chdir("/");

    if (!noclose && (fd = open(_PATH_DEVNULL, O_RDWR, 0)) != -1) {
   	 (void)dup2(fd, STDIN_FILENO);
   	 (void)dup2(fd, STDOUT_FILENO);
   	 (void)dup2(fd, STDERR_FILENO);
   	 if (fd > 2)
   		 (void)close (fd);
    }

#ifdef __APPLE__
    daemon_darwin();
#endif
    return (0);
}
It makes the tmux server immune to terminal terminations and signals logic I described earlier.
Pseudoterminal proxy
As I mentioned earlier, we could think about pseudoterminals as a proxy. The reasonable question is can we leverage them in our day-to-day scripting routines? The answer, as you can guess, is yes. There are two incredible tools: expect (man 1 expect) and script (man 1 script) that uses pseudoterminals in the proxy mode and are super helpful in writing basic automation.
expect
The expect program uses a pseudoterminal to allow an interactive terminal-oriented program to be driven from a script file. Let’s assume we need to automate an ssh connection in a shell script. We want to insert username and password when the ssh client asks for them. We can easily achieve this with expect:
#!/usr/bin/expect

set timeout 20

set host [lindex $argv 0]
set username [lindex $argv 1]
set password [lindex $argv 2]

spawn ssh "$username\@$host"

expect "password:"
send "$password\r";

interact
And test it:
[local ~] $ ./ssh.exp 192.168.0.1 vagrant vagrant
spawn ssh vagrant@192.168.0.1
vagrant@192.168.0.1's password:
[remote ~]$
where ”vagrant“ is our username and password.
script
Another task is to record a terminal session. The pseudoterminals are used in the script program, which records all of the input and output that occurs during a shell session.
Record to file:
$ script --timing=time.txt script.log
Replay:
$ scriptreplay --timing=time.txt script.log
Changing a process’s controlling terminal
And lastly, I want to show you one more fascinating tool reptyr https://github.com/nelhage/reptyr. Imagine, you forgot to start a screen or tmux session and have run a long-running script. Using reptyr you can move it under a screen or tmux session without a restart!
It uses ptrace systemcall to change the session id of the running process.
We use ptrace to attach to a target process and force it to execute code of our own choosing in order to open the new terminal, and dup2 it over stdout and stderr.
More info about it could be found in the detailed author’s blog post:
https://blog.nelhage.com/2011/02/changing-ctty/
How it works tl;dr:
While we have mutt captured with ptrace, we can make it fork a dummy child, and start tracing that child, too. We’ll make the child setpgid to make it into its own process group, and then get mutt to setpgid itself into the child’s process group. mutt can then setsid, moving into a new session, and now, as a session leader, we can finally ioctl(TIOCSCTTY) on the new terminal, and we win.
本文来自博客园,作者:摩斯电码,未经同意,禁止转载
