.Net5 IdentityServer4下SqlServer和Mysql数据迁移
1.概念
以下概念从官网整理的,我也是看官网一步一步学习的
官网地址 https://identityserver4.readthedocs.io/en/latest/index.html
1.1 IdentityServer 是将符合规范的 OpenID Connect 和 OAuth 2.0 端点添加到任意 ASP.NET Core 应用程序的中间件。
IdentityServer 是一个 OpenID Connect 提供者——它实现了 OpenID Connect 和 OAuth 2.0 协议。
1.2 IdentityServer 能做什么
- 保护您的资源
- 使用本地帐户存储或通过外部身份提供商对用户进行身份验证
- 提供会话管理和单点登录
- 管理和验证客户
- 向客户端颁发身份和访问令牌
- 验证令牌
1.3 身份服务器:IdentityServer 是一个 OpenID Connect 提供者——它实现了 OpenID Connect 和 OAuth 2.0 协议。
1.4 用户:用户是使用注册客户端访问资源的人。
1.5 客户:客户端是一个从 IdentityServer 请求令牌的软件——用于验证用户(请求身份令牌)或访问资源(请求访问令牌)。客户端必须先向 IdentityServer 注册,然后才能请求令牌。
1.7 资源:资源是您想要使用 IdentityServer 保护的东西——您的用户的身份数据或 API。
1.8 身份令牌:身份令牌代表身份验证过程的结果。它至少包含用户的标识符(称为sub又名主题声明)以及有关用户如何以及何时进行身份验证的信息。它可以包含额外的身份数据。
1.9 访问令牌:访问令牌允许访问 API 资源。客户端请求访问令牌并将它们转发到 API。访问令牌包含有关客户端和用户(如果存在)的信息。API 使用该信息来授权对其数据的访问。
2.安装IdentityServer模板及数据库迁移
2.1 安装命令 dotnet new -i IdentityServer4.Templates
2.2 所需依赖包
<ItemGroup>
<PackageReference Include="IdentityServer4" Version="4.1.2" />
<PackageReference Include="IdentityServer4.AspNetIdentity" Version="4.1.2" />
<PackageReference Include="IdentityServer4.EntityFramework" Version="4.1.2" />
<PackageReference Include="Microsoft.AspNetCore.Identity.EntityFrameworkCore" Version="5.0.6" />
<PackageReference Include="Microsoft.EntityFrameworkCore.Design" Version="5.0.6">
<IncludeAssets>runtime; build; native; contentfiles; analyzers; buildtransitive</IncludeAssets>
<PrivateAssets>all</PrivateAssets>
</PackageReference>
<PackageReference Include="Microsoft.EntityFrameworkCore.SqlServer" Version="5.0.6" />
<PackageReference Include="Microsoft.EntityFrameworkCore.Tools" Version="5.0.6">
<PrivateAssets>all</PrivateAssets>
<IncludeAssets>runtime; build; native; contentfiles; analyzers; buildtransitive</IncludeAssets>
</PackageReference>
<PackageReference Include="Serilog.AspNetCore" Version="3.2.0" />
</ItemGroup>
2.3 创建项目模板 (依次执行以下命令)
创建项目模板
md MyIdentityServer4DataMigration
cd MyIdentityServer4DataMigration
md src
cd src
dotnet new is4empty -n IdentityServerBySqlServer
dotnet new is4empty -n IdentityServerByMySql
cd ../
dotnet new sln -n MyIdentityServer4DataMigration
dotnet sln add .\src\IdentityServerBySqlServer\IdentityServerBySqlServer.csproj
dotnet sln add .\src\IdentityServerByMySql\IdentityServerByMySql.csproj
创建完成后打开,如下如所示

然后安装依赖包,首先是sqlserver的
把上面的依赖包命令粘贴到IdentityServerBySqlServer.csproj里,control+s保存,会自动安装依赖包
然后
cd src
dotnet new is4ui
大部分包我是通过Nuget手动安装的,命令没有那么全,SqlServer相关依赖包安装完成后如下图所示

3. Startup代码
3.1sqlserver代码
public class Startup
    {
        public IWebHostEnvironment Environment { get; }

        public Startup(IWebHostEnvironment environment)
        {
            Environment = environment;
        }

        public void ConfigureServices(IServiceCollection services)
        {

            //var serverVersion = new MySqlServerVersion(new Version(8, 0, 21));

            //// Replace 'YourDbContext' with the name of your own DbContext derived class.
            //services.AddDbContext<YourDbContext>(
            //    dbContextOptions => dbContextOptions
            //        .UseMySql(connectionString, serverVersion)
            //        .EnableSensitiveDataLogging() // <-- These two calls are optional but help
            //        .EnableDetailedErrors()       // <-- with debugging (remove for production).
            //);

            var migrationsAssembly = typeof(Startup).GetTypeInfo().Assembly.GetName().Name;
            const string connectionString = @"Server=localhost; Port=3306;Stmt=; Database=MyIdentityServer4DB; Uid=root; Pwd=Docimax@123;";
            var serverVersion = new MySqlServerVersion(new Version(5, 7, 28));
            services.AddDbContext<ApplicationDbContext>(options => options.UseMySql(connectionString,serverVersion));
            services.AddIdentity<ApplicationUser, ApplicationRole>(options =>
            {
                options.User = new UserOptions
                {
                    RequireUniqueEmail = true, //要求Email唯一
                    AllowedUserNameCharacters = null //允许的用户名字符
                };
                options.Password = new PasswordOptions
                {
                    RequiredLength = 8, //要求密码最小长度,默认是 6 个字符
                    RequireDigit = true, //要求有数字
                    RequiredUniqueChars = 3, //要求至少要出现的字母数
                    RequireLowercase = true, //要求小写字母
                    RequireNonAlphanumeric = false, //要求特殊字符
                    RequireUppercase = false //要求大写字母
                };

                //options.Lockout = new LockoutOptions
                //{
                //    AllowedForNewUsers = true, // 新用户锁定账户
                //    DefaultLockoutTimeSpan = TimeSpan.FromHours(1), //锁定时长,默认是 5 分钟
                //    MaxFailedAccessAttempts = 3 //登录错误最大尝试次数,默认 5 次
                //};
                //options.SignIn = new SignInOptions
                //{
                //    RequireConfirmedEmail = true, //要求激活邮箱
                //    RequireConfirmedPhoneNumber = true //要求激活手机号
                //};
                //options.ClaimsIdentity = new ClaimsIdentityOptions
                //{
                //    // 这里都是修改相应的Cliams声明的
                //    RoleClaimType = "IdentityRole",
                //    UserIdClaimType = "IdentityId",
                //    SecurityStampClaimType = "SecurityStamp",
                //    UserNameClaimType = "IdentityName"
                //};
            })
              .AddEntityFrameworkStores<ApplicationDbContext>()
              .AddDefaultTokenProviders();


            services.AddIdentityServer()
                  //.AddTestUsers(TestUsers.Users)
                .AddAspNetIdentity<ApplicationUser>()
                .AddConfigurationStore(options =>
                {
                    options.ConfigureDbContext = b => b.UseMySql(connectionString, serverVersion,
                        sql => sql.MigrationsAssembly(migrationsAssembly));
                })
                .AddOperationalStore(options =>
                {
                    options.ConfigureDbContext = b => b.UseMySql(connectionString, serverVersion,
                        sql => sql.MigrationsAssembly(migrationsAssembly));
                });
        }

        public void Configure(IApplicationBuilder app)
        {
            InitializeDatabase(app);

            if (Environment.IsDevelopment())
            {
                app.UseDeveloperExceptionPage();
            }

            // uncomment if you want to add MVC
            //app.UseStaticFiles();
            //app.UseRouting();

            app.UseIdentityServer();

            // uncomment, if you want to add MVC
            //app.UseAuthorization();
            //app.UseEndpoints(endpoints =>
            //{
            //    endpoints.MapDefaultControllerRoute();
            //});
        }

        private void InitializeDatabase(IApplicationBuilder app)
        {
            using (var serviceScope = app.ApplicationServices.GetService<IServiceScopeFactory>().CreateScope())
            {
                serviceScope.ServiceProvider.GetRequiredService<PersistedGrantDbContext>().Database.Migrate();

                var context = serviceScope.ServiceProvider.GetRequiredService<ConfigurationDbContext>();
                context.Database.Migrate();
                if (!context.Clients.Any())
                {
                    foreach (var client in Config.Clients)
                    {
                        context.Clients.Add(client.ToEntity());
                    }
                    context.SaveChanges();
                }

                if (!context.IdentityResources.Any())
                {
                    foreach (var resource in Config.IdentityResources)
                    {
                        context.IdentityResources.Add(resource.ToEntity());
                    }
                    context.SaveChanges();
                }

                if (!context.ApiScopes.Any())
                {
                    foreach (var resource in Config.ApiScopes)
                    {
                        context.ApiScopes.Add(resource.ToEntity());
                    }
                    context.SaveChanges();
                }
            }
        }
    }
3.2 Mysql代码
 public class Startup
    {
        public IWebHostEnvironment Environment { get; }

        public Startup(IWebHostEnvironment environment)
        {
            Environment = environment;
        }

        public void ConfigureServices(IServiceCollection services)
        {

            //var serverVersion = new MySqlServerVersion(new Version(8, 0, 21));

            //// Replace 'YourDbContext' with the name of your own DbContext derived class.
            //services.AddDbContext<YourDbContext>(
            //    dbContextOptions => dbContextOptions
            //        .UseMySql(connectionString, serverVersion)
            //        .EnableSensitiveDataLogging() // <-- These two calls are optional but help
            //        .EnableDetailedErrors()       // <-- with debugging (remove for production).
            //);

            var migrationsAssembly = typeof(Startup).GetTypeInfo().Assembly.GetName().Name;
            const string connectionString = @"Server=localhost; Port=3306;Stmt=; Database=MyIdentityServer4DB; Uid=root; Pwd=Docimax@123;";
            var serverVersion = new MySqlServerVersion(new Version(5, 7, 28));
            services.AddDbContext<ApplicationDbContext>(options => options.UseMySql(connectionString,serverVersion));
            services.AddIdentity<ApplicationUser, ApplicationRole>(options =>
            {
                options.User = new UserOptions
                {
                    RequireUniqueEmail = true, //要求Email唯一
                    AllowedUserNameCharacters = null //允许的用户名字符
                };
                options.Password = new PasswordOptions
                {
                    RequiredLength = 8, //要求密码最小长度,默认是 6 个字符
                    RequireDigit = true, //要求有数字
                    RequiredUniqueChars = 3, //要求至少要出现的字母数
                    RequireLowercase = true, //要求小写字母
                    RequireNonAlphanumeric = false, //要求特殊字符
                    RequireUppercase = false //要求大写字母
                };

                //options.Lockout = new LockoutOptions
                //{
                //    AllowedForNewUsers = true, // 新用户锁定账户
                //    DefaultLockoutTimeSpan = TimeSpan.FromHours(1), //锁定时长,默认是 5 分钟
                //    MaxFailedAccessAttempts = 3 //登录错误最大尝试次数,默认 5 次
                //};
                //options.SignIn = new SignInOptions
                //{
                //    RequireConfirmedEmail = true, //要求激活邮箱
                //    RequireConfirmedPhoneNumber = true //要求激活手机号
                //};
                //options.ClaimsIdentity = new ClaimsIdentityOptions
                //{
                //    // 这里都是修改相应的Cliams声明的
                //    RoleClaimType = "IdentityRole",
                //    UserIdClaimType = "IdentityId",
                //    SecurityStampClaimType = "SecurityStamp",
                //    UserNameClaimType = "IdentityName"
                //};
            })
              .AddEntityFrameworkStores<ApplicationDbContext>()
              .AddDefaultTokenProviders();


            services.AddIdentityServer()
                  //.AddTestUsers(TestUsers.Users)
                .AddAspNetIdentity<ApplicationUser>()
                .AddConfigurationStore(options =>
                {
                    options.ConfigureDbContext = b => b.UseMySql(connectionString, serverVersion,
                        sql => sql.MigrationsAssembly(migrationsAssembly));
                })
                .AddOperationalStore(options =>
                {
                    options.ConfigureDbContext = b => b.UseMySql(connectionString, serverVersion,
                        sql => sql.MigrationsAssembly(migrationsAssembly));
                });
        }

        public void Configure(IApplicationBuilder app)
        {
            InitializeDatabase(app);

            if (Environment.IsDevelopment())
            {
                app.UseDeveloperExceptionPage();
            }

            // uncomment if you want to add MVC
            //app.UseStaticFiles();
            //app.UseRouting();

            app.UseIdentityServer();

            // uncomment, if you want to add MVC
            //app.UseAuthorization();
            //app.UseEndpoints(endpoints =>
            //{
            //    endpoints.MapDefaultControllerRoute();
            //});
        }

        private void InitializeDatabase(IApplicationBuilder app)
        {
            using (var serviceScope = app.ApplicationServices.GetService<IServiceScopeFactory>().CreateScope())
            {
                serviceScope.ServiceProvider.GetRequiredService<PersistedGrantDbContext>().Database.Migrate();

                var context = serviceScope.ServiceProvider.GetRequiredService<ConfigurationDbContext>();
                context.Database.Migrate();
                if (!context.Clients.Any())
                {
                    foreach (var client in Config.Clients)
                    {
                        context.Clients.Add(client.ToEntity());
                    }
                    context.SaveChanges();
                }

                if (!context.IdentityResources.Any())
                {
                    foreach (var resource in Config.IdentityResources)
                    {
                        context.IdentityResources.Add(resource.ToEntity());
                    }
                    context.SaveChanges();
                }

                if (!context.ApiScopes.Any())
                {
                    foreach (var resource in Config.ApiScopes)
                    {
                        context.ApiScopes.Add(resource.ToEntity());
                    }
                    context.SaveChanges();
                }
            }
        }
    }
4.数据迁移
第一种方式(推荐)
1. vs2019 ===> 工具 ===> Nuget 包管理器 ====> 程序包管理器控制台
2. 执行以下命令
add-migration InitialIdentityServerPersistedGrantDbMigration -c PersistedGrantDbContext -o Data/Migrations/IdentityServer/PersistedGrantDb
add-migration InitialIdentityServerConfigurationDbMigration -c ConfigurationDbContext -o Data/Migrations/IdentityServer/ConfigurationDb
add-migration AppDbMigration -c ApplicationDbContext -o Data
update-database -context PersistedGrantDbContext
update-database -context ConfigurationDbContext
update-database -context ApplicationDbContext
第二种方式
PowerShell执行数据迁移命令,然后运行程序
dotnet ef migrations add InitialIdentityServerPersistedGrantDbMigration -c PersistedGrantDbContext -o Data/Migrations/IdentityServer/PersistedGrantDb
dotnet ef migrations add InitialIdentityServerConfigurationDbMigration -c ConfigurationDbContext -o Data/Migrations/IdentityServer/ConfigurationDb
迁移完成后如下图所示

检查SqlServer数据库是否生成表结构

//接下来操作mysql
cd ../
cd IdentityServerByMySql
dotnet new is4ui
dotnet add package IdentityServer4.EntityFramework
mysql的相关依赖包,如下图所示:

dotnet ef migrations add InitialIdentityServerPersistedGrantDbMigration -c PersistedGrantDbContext -o Data/Migrations/IdentityServer/PersistedGrantDb
dotnet ef migrations add InitialIdentityServerConfigurationDbMigration -c ConfigurationDbContext -o Data/Migrations/IdentityServer/ConfigurationDb
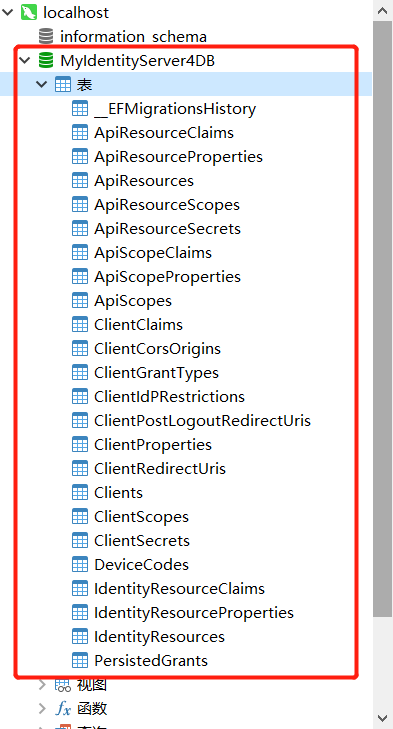
MySql迁移完成后检查MySql数据库

 浙公网安备 33010602011771号