Springboot 配置 自动装配原理
原理初探
pom.xml
- spring-boot-dependencies:核心依赖在父工程中
- 我们在写或者引入一些Springboot依赖的时候,不需要指定版本,就因为有这些版本仓库
启动器
-
通式
<dependency> <groupId>org.springframework.boot</groupId> <artifactId>spring-boot-starter-xxx</artifactId> </dependency> -
启动器:说白了就是springboot的启动场景
-
比如,spring-boot-starter-web,他就会帮我们自动导入web环境所有的依赖
-
springboot会将所有的功能场景,都变成一个个的启动器
-
我们要使用什么功能,就只需要找到对应的启动器就可以了
starter
主程序
@SpringBootApplication //标注这个类是一个springboot的应用
public class HelloworldApplication {

	public static void main(String[] args) {
		//将springboot应用启动
		SpringApplication.run(HelloworldApplication.class, args);
	}
}
- 注解
@SpringBootConfiguration:springboot的配置
	@Configuration:spring配置类
	@Component:说明这也是一个spring的组件
@EnableAutoConfiguration:自动配置
	@AutoConfigurationPackage:自动配置包
		@Import({Registrar.class}):导入选择器,包注册
	@Import({AutoConfigurationImportSelector.class}):自动配置导入选择
List configurations = this.getCandidateConfigurations(annotationMetadata, attributes); //获取所有的配置
获取候选的配置
protected List<String> getCandidateConfigurations(AnnotationMetadata metadata, AnnotationAttributes attributes) {
	List<String> configurations = SpringFactoriesLoader.loadFactoryNames(getSpringFactoriesLoaderFactoryClass(),getBeanClassLoader());
	Assert.notEmpty(configurations, "No auto configuration classes found in META-INF/spring.factories. If you are using a custom packaging, make sure that file is correct.");
	return configurations;
}
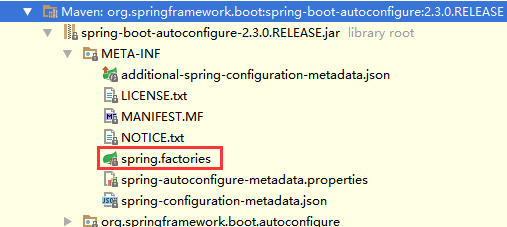
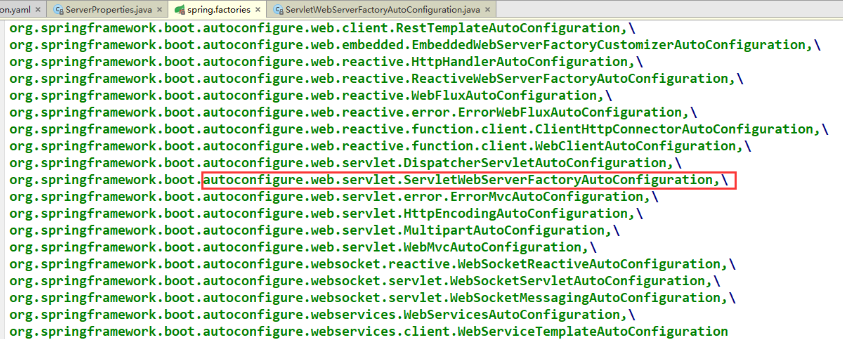
META-INF/spring.factories:自动配置的核心文件
Properties properties = PropertiesLoaderUtils.loadProperties(resource);
//所有资源加载到配置类中!
结论:springboot所有自动配置都是在启动的时候扫描并加载:spring.factories所有的自动配置类都在这里面,但是不一定生效,要判断条件是否成立,只要导入了对应的start,就有对应的启动器了,有了启动器,我们自动装配就会生效,然后就配置成功!
- springboot在启动的时候,从类路径下 /MEAT-INF/
spring.factories获取指定的值 - 将这些自动配置的类导入容器,自动配置就会生效,帮我进行自动配置
- 以前我们需要自动配置的东西,现在 springboot 帮我们做了
- 整个javaEE,解决方案和自动配置的东西都在 spring-boot-autoconfigure-2.2.0.RELEASE.jar 这个包下
- 它会把所有需要导入的组件,以类名的方式返回,这些组件就会被添加到容器
- 容器中也会存在非常多的 xxxAutoConfiguration 的文件(@Bean),就是这些类给容器中导入了这个场景需要的所有组件;并自动配置,@Configuration,JavaConfig!
- 有了自动配置类,免去了我们手动编写配置注入功能组件等的工作
SpringApplication这个类(加了@SpringApplication注解的主类)主要做了以下四件事情:
- 推断应用的类型是普通的项目还是Web项目
- 查找并加载所有可用初始化器, 设置到 initializers 属性中
- 找出所有的应用程序监听器,设置到 listeners 属性中
- 推断并设置main方法的定义类,找到运行的主类
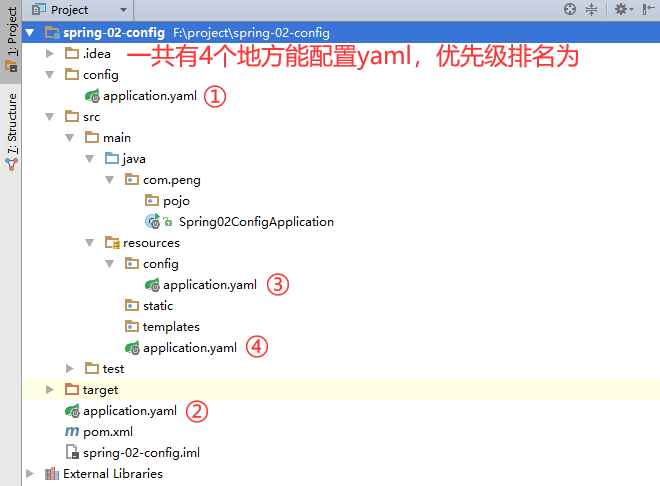
springboot配置
配置文件
SpringBoot使用一个全局的配置文件,配置文件名称是固定的
- application.properties
语法结构:key=value - application.yaml
。语法结构:key: 空格value
配置文件的作用:修改SpringBoot自动配置的默认值,因为SpringBoot在底层都给我们自动配置好了
#springboot配置文件都能配置什么东西呢?

#官方文档:https://docs.spring.io/spring-boot/docs/2.1.6.RELEASE/reference/htmlsingle/#boot-features-external-config
#Part X. Appendices Appendix A. Common application properties

#官方的配置太多了,了解原理

##基本语法,对空格缩进要求很高

#普通的key-value
name: peng

#存一个对象
student:
  name: peng
  age: 18

#行内写法
student: {name: peng,age: 18}

#数组
pets:
  - cat
  - dog

pet: [cat,dog,pig]
yaml 可以直接给实体类赋值
yaml配置类的属性
application.yaml 配置
person:
  name: peng${random.uuid}
  age: 18
  happy: false
  birth: 2001/06/03
  maps: {k1: v1,k2: v2}
  lists: [eat,sleep,girl]
  dog:
    name: ${person.name:没有主人}的狗 #冒号后面的是默认值
    age: ${random.int(1,5)}
Person.java Person类
package com.peng.pojo;

import org.springframework.boot.context.properties.ConfigurationProperties;
import org.springframework.stereotype.Component;

import java.util.Date;
import java.util.List;
import java.util.Map;

@Component
@ConfigurationProperties(prefix = "person") //绑定yanl,让yaml生效
public class Person {
    private String name;
    private Integer age;
    private boolean happy;
    private Date birth;
    private Map<String,Object> maps;
    private List<Object> lists;
    private Dog dog;

    public Person() {
    }

    public Person(String name, Integer age, boolean happy, Date birth, Map<String, Object> maps, List<Object> lists, Dog dog) {
        this.name = name;
        this.age = age;
        this.happy = happy;
        this.birth = birth;
        this.maps = maps;
        this.lists = lists;
        this.dog = dog;
    }

    public String getName() {
        return name;
    }

    public void setName(String name) {
        this.name = name;
    }

    public Integer getAge() {
        return age;
    }

    public void setAge(Integer age) {
        this.age = age;
    }

    public boolean isHappy() {
        return happy;
    }

    public void setHappy(boolean happy) {
        this.happy = happy;
    }

    public Date getBirth() {
        return birth;
    }

    public void setBirth(Date birth) {
        this.birth = birth;
    }

    public Map<String, Object> getMaps() {
        return maps;
    }

    public void setMaps(Map<String, Object> maps) {
        this.maps = maps;
    }

    public List<Object> getLists() {
        return lists;
    }

    public void setLists(List<Object> lists) {
        this.lists = lists;
    }

    public Dog getDog() {
        return dog;
    }

    public void setDog(Dog dog) {
        this.dog = dog;
    }

    @Override
    public String toString() {
        return "Person{" +
                "name='" + name + '\'' +
                ", age=" + age +
                ", happy=" + happy +
                ", birth=" + birth +
                ", maps=" + maps +
                ", lists=" + lists +
                ", dog=" + dog +
                '}';
    }
}
Spring02ConfigApplicationTest.java 测试类
package com.peng;

import com.peng.pojo.Person;
import org.junit.Test;
import org.junit.runner.RunWith;
import org.springframework.beans.factory.annotation.Autowired;
import org.springframework.boot.test.context.SpringBootTest;
import org.springframework.test.context.junit4.SpringJUnit4ClassRunner;

@RunWith(SpringJUnit4ClassRunner.class)
@SpringBootTest
public class Spring02ConfigApplicationTest {

    @Autowired
    private Person person;

    @Test
    public void contextLoads() {
        System.out.println(person);
    }
}
输出:
Person{name='peng24756efe-3e05-4d61-abe7-f31e59e94f6f', age=18, happy=false, birth=Sun Jun 03 00:00:00 CST 2001, maps={k1=v1, k2=v2}, lists=[eat, sleep, girl], dog=Dog{name='peng92a5f5f2-3149-4336-9c45-76da5e680285的狗', age=3}}

-
松散绑定
lastName,在yaml中可以写成last-name
-
JSR303校验:赋值前验证数据类型
@Validated //数据校验
public class Person {
    @NotNull //传入的值必须不为空才能通过验证
    private String name;
}
Bean Validation 中内置的 constraint
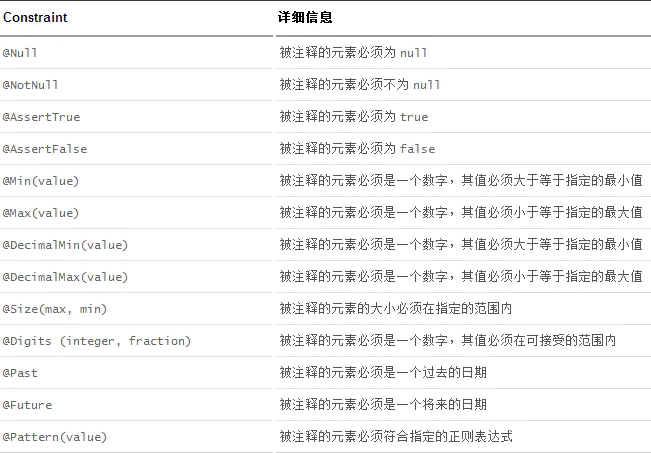
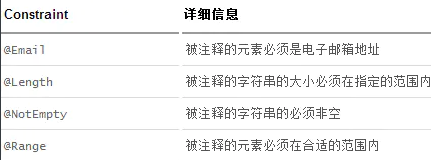
Hibernate Validator 附加的 constraint
多环境配置
#springboot的多环境配置:可以选择激活哪一个配置文件
server:
  port: 8080
spring:
  profiles:
    active: dev

# --- 分文档模块
---
server:
  port: 8081
spring:
  profiles: dev
---
server:
  port: 8082
spring:
  profiles: test
浅显的底层原理
# 配置文件里到底能写什么 --联系-- spring.factories
# 在我们这配置文件中能配置的东西,都存在一个固有的规律
# xxxAutoConfiguration --连接-- xxxProperties --连接-- yaml
# xxxAutoConfiguration:自动装配的默认值
# xxxProperties有set方法改变默认值,和配置文件yaml绑定,设置新值并使用
server:
  port: 8080
ctrl+鼠标左键,点进 port 看源码,果然有 port 属性和 set 方法
private Integer port;

public void setPort(Integer port) {
    this.port = port;
}
发现这个方法属于 ServerProperties 类,类上有注解 @ConfigurationProperties,他连接 server 的默认配置文件
@ConfigurationProperties(prefix = "server", ignoreUnknownFields = true)
public class ServerProperties{...}
自动默认配置文件中果然有

点进去之后,确实是个自动配置类,在注解中,他允许了 ServerProperties 类重新设置 port 等属性,这些设置可通过配置文件 yaml 配置
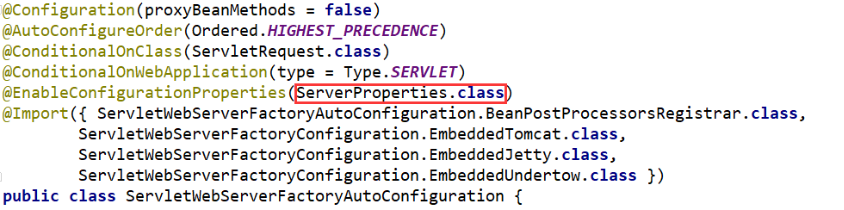
而 ServerProperties 类连接 yaml,就是通过之前说过的 @ConfigurationProperties 注解,点进 prefix,是一个配置属性的注解
@ConfigurationProperties(prefix = "server", ignoreUnknownFields = true)
public class ServerProperties {
本质:我们原先需要在 bean 中配置的属性(properties)封装成一个类然后通过 yaml 文件进行自动注入,而我们可以在 application.yaml 文件中自定义这些 property 属性
-
自动装配原理总结
-
SpringBoot 启动会加载大量的自动配置类
-
我们看我们需要的功能有没有在SpringBoot默认写好的自动配置类当中
-
我们再来看这个自动配置类中到底配置了哪些组件;(只要我们要用的组件存在在其中,我们就不需要再手动配置了)
-
给容器中自动配置类添加组件的时候,会从properties类中获取某些属性。我们只需要在配置文件中指定这些属性的值即可
xxxAutoConfigurartion:自动配置类;给容器中添加组件
xxxProperties:封装配置文件中相关属性;
-
-
通过 debug=true 来查看,哪些配置生效,哪些没有
debug: true

 浙公网安备 33010602011771号