

mmdetection2损失为nan
###好久没用mmdetection了,今天用visdrone数据集训练一个cascade-rcnn-r101模型,损失总是会出现nan,先考率学习率是否太高的问题,学习率分别设为0.02*batchsize/16,0.000001,0,仍然出现损失为nan。所以怀疑是数据问题,可能存在无效的目标框(目标框的左下角坐标<=右上角坐标),具体判别代码:
import xml.etree.ElementTree as ET
import os
xml_root = "./data"
new_xml_root = "./data"
image_root = "./data"
xml_name_list = sorted(os.listdir(xml_root))
def check_bbox():
    if not os.path.exists(new_xml_root):
        os.makedirs(new_xml_root)

    for xml_name in xml_name_list:
        xml_path = os.path.join(xml_root, xml_name)
        tree = ET.parse(xml_path)
        root = tree.getroot()
        for obj in root.findall("object"):
            bnd_box = obj.find("bndbox")
            bbox = [
                int(float(bnd_box.find("xmin").text)),
                int(float(bnd_box.find("ymin").text)),
                int(float(bnd_box.find("xmax").text)),
                int(float(bnd_box.find("ymax").text)),
            ]

            if bbox[0] >= bbox[2] or bbox[1] >= bbox[3]:
                print("bbox[0] >= bbox[2] or bbox[1] >= bbox[3]", bbox, xml_name)
check_bbox()
现记录使用mmdetection2训练visdrone的具体过程
- 处理visdrone数据,将其txt标签转为VOC格式
import os
from PIL import Image

root_dir = "/mnt/A/pengyuan/data/Visd2019/trainval/"
annotations_dir = root_dir+"annotations/"
image_dir = root_dir + "images/"
xml_dir = root_dir+"Annotations/"
class_name = ['ignored regions','pedestrian','people','bicycle','car','van','truck','tricycle','awning-tricycle','bus','motor','others']

for filename in os.listdir(annotations_dir):
    fin = open(annotations_dir+filename, 'r')
    image_name = filename.split('.')[0]
    img = Image.open(image_dir+image_name+".jpg")
    xml_name = xml_dir+image_name+'.xml'
    with open(xml_name, 'w') as fout:
        fout.write('<annotation>'+'\n')

        fout.write('\t'+'<folder>VOC2007</folder>'+'\n')
        fout.write('\t'+'<filename>'+image_name+'.jpg'+'</filename>'+'\n')

        fout.write('\t'+'<source>'+'\n')
        fout.write('\t\t'+'<database>'+'VisDrone2019 Database'+'</database>'+'\n')
        fout.write('\t\t'+'<annotation>'+'VisDrone2019'+'</annotation>'+'\n')
        fout.write('\t\t'+'<image>'+'flickr'+'</image>'+'\n')
        fout.write('\t\t'+'<flickrid>'+'Unspecified'+'</flickrid>'+'\n')
        fout.write('\t'+'</source>'+'\n')

        fout.write('\t'+'<owner>'+'\n')
        fout.write('\t\t'+'<flickrid>'+'Haipeng Zhang'+'</flickrid>'+'\n')
        fout.write('\t\t'+'<name>'+'Haipeng Zhang'+'</name>'+'\n')
        fout.write('\t'+'</owner>'+'\n')

        fout.write('\t'+'<size>'+'\n')
        fout.write('\t\t'+'<width>'+str(img.size[0])+'</width>'+'\n')
        fout.write('\t\t'+'<height>'+str(img.size[1])+'</height>'+'\n')
        fout.write('\t\t'+'<depth>'+'3'+'</depth>'+'\n')
        fout.write('\t'+'</size>'+'\n')

        fout.write('\t'+'<segmented>'+'0'+'</segmented>'+'\n')

        for line in fin.readlines():

            line = line.split(',')
            if int(line[5])==0 or int(line[5])==11:
                continue
            fout.write('\t'+'<object>'+'\n')
            print(line)
            print(image_name)
            fout.write('\t\t'+'<name>'+class_name[int(line[5])]+'</name>'+'\n')
            fout.write('\t\t'+'<pose>'+'Unspecified'+'</pose>'+'\n')
            fout.write('\t\t'+'<truncated>'+line[6]+'</truncated>'+'\n')
            fout.write('\t\t'+'<difficult>'+str(int(line[7]))+'</difficult>'+'\n')
            fout.write('\t\t'+'<bndbox>'+'\n')
            fout.write('\t\t\t'+'<xmin>'+line[0]+'</xmin>'+'\n')
            fout.write('\t\t\t'+'<ymin>'+line[1]+'</ymin>'+'\n')
            # pay attention to this point!(0-based)
            fout.write('\t\t\t'+'<xmax>'+str(int(line[0])+int(line[2])-1)+'</xmax>'+'\n')
            fout.write('\t\t\t'+'<ymax>'+str(int(line[1])+int(line[3])-1)+'</ymax>'+'\n')
            fout.write('\t\t'+'</bndbox>'+'\n')
            fout.write('\t'+'</object>'+'\n')

        fin.close()
        fout.write('</annotation>')
-
设置mmdetection2训练自己的数据集
-
更改config.py
这里我选择的是./configs/cascade_rcnn/cascade_rcnn_r101_fpn_1x_coco.py的config,发现其是调用./configs/cascade_rcnn/cascade_rcnn_r50_fpn_1x_coco.py。
由于本次使用VOC数据格式,故更改cascade_rcnn_r50_fpn_1x_coco.py的datasets为../-base-/datasets/voc0712.py -
更改datasets的config.py
数据config在configs/-base-/datasets/voc0712.py,中,需要更改输入尺寸,数据集路径,batchsize,具体如下图:

-
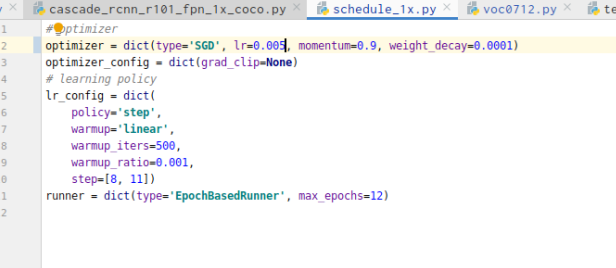
更改学习率
学习率在configs/-base-/schedules/schedule_1x.py中更改,单卡训练学习率推荐值为0.02*batchsize/16,具体如下图:
-
更改类别数
cascade_rcnn_r101_fpn_1x_coco.py的类别数在/configs/-base-/models/cascade_rcnn_r50_fpn.py中更改。将其中的num_classes改为需要的类别数,mmdetection2不需要再加1了,此处设为10 -
更改类别名
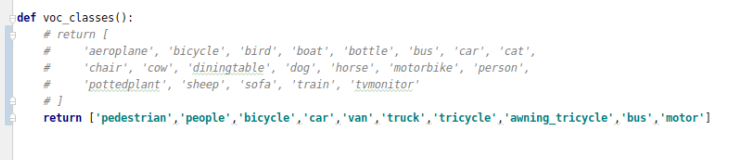
有两个地方需要更改类别名,首先是mmdet/datatsets/voc.py中的class VOCDatasets,如下图

另外是计算mAP的地方需要更改类别,具体在/mmdet/core/evaluation/class_names.py
-
-
训练
为了方便训练,写一个小脚本mytrain.sh来训练
#!/bin/bash
CUDA_VISIBLE_DEVICES=6 python tools/train.py configs/cascade_rcnn/cascade_rcnn_r50_fpn_1x_coco.py
然后运行sh mytrain.sh
- 测试
为了方便测试,写一个小脚本mytest.sh来测试
#!/bin/bash
CUDA_VISIBLE_DEVICES=6 \
python tools/test.py configs/cascade_rcnn/cascade_rcnn_r50_fpn_1x_coco.py work_dirs/epoch_12.pth --out results.pkl --eval bbox --show \
python tools/voc_eval.py results.pkl ./configs/my_data.py
-
有时候改完config后还是不能运行报错:of MMDataParallel does not matches the length of
CLASSES20) in RepeatDataset。很有可能是需要重构代码:
运行
python setup.py develop
