
一、前言
使用注解代替之前在spring配置文件中配置目标类、切面类和aop配置。
二、注意
- 需要注意的是,需要在spring配置文件中引入如下,如果不添加,切面类中的@Aspect注解将不起作用
<aop:aspectj-autoproxy/>
-
使用的时候通知单独使用
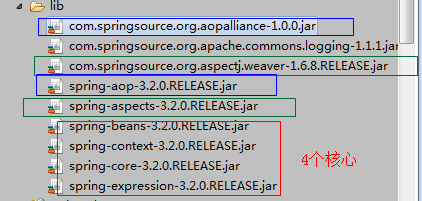
- 导入的jar包
- 当有多个切面,需要考虑其优先级时切面类使用@Order(数字:越小优先级越高) 参考:https://www.cnblogs.com/dreamfree/p/4102619.html
三、注解的使用
切面类:
@Aspect 声明切面,修饰切面类,从而获得 通知。
通知:
@Before 前置
@AfterReturning 后置
@Around 环绕
@AfterThrowing 抛出异常
@After 最终
切入点:
@PointCut ,修饰方法 private void xxx(){} 之后通过“方法名”获得切入点引用
四、代码实现
beans.xml
    <!-- 扫描注解 -->
    <context:component-scan base-package="com.xx"/>
    <!-- aspectj自动代理 -->
    <aop:aspectj-autoproxy/>
切面类:通知单独使用
package com.xx.myaspect;

import java.util.Arrays;

import org.aspectj.lang.JoinPoint;
import org.aspectj.lang.ProceedingJoinPoint;
import org.aspectj.lang.annotation.After;
import org.aspectj.lang.annotation.AfterThrowing;
import org.aspectj.lang.annotation.Around;
import org.aspectj.lang.annotation.Aspect;
import org.aspectj.lang.annotation.Before;
import org.aspectj.lang.annotation.Pointcut;
import org.springframework.core.annotation.Order;
import org.springframework.stereotype.Component;
/**
 * 切面类
 * @author phoebe
 * @Component:类级注解
 * @Aspect:切面注解
 */
@Component
@Aspect
@Order(1)
public class MyAscpect {

	/*
	 * 切点,方法名即是切点的id
	 * 后面的切点直接引用方法名称即可
	 * 方法体不需要再配置其他
	 */
	@Pointcut(value="execution(* com.xx.dao.UserDaoImpl.*(..))")


	public void pointCut(){}
	/*
	 * 前置通知
	 * JoinPoint:带有方法名称
	 */
	@Before("pointCut()")
	public void before(JoinPoint joinPoint){
		String methodName = joinPoint.getSignature().getName();
		System.out.println("方法名称是:"+methodName);
	}

	/*
	 * 环绕通知需要携带ProceedingJoinPoint类型的参数
	 * 环绕通知类似于动态代理的全过程:ProceedingJoinPoint类型的参数可以决定是否执行目标方法。
	 *  而且环绕通知必须有返回值,返回值即为目标方法的返回值
	 *
	 */
	@Around(value="pointCut()")
	public Object arround(ProceedingJoinPoint pjp){
		Object obj = null;
		String methodName = pjp.getSignature().getName();
		try {
			//前置通知@Before
			System.out.println("The method " + methodName + " begins with " + Arrays.asList(pjp.getArgs()));
			//执行目标方法
			obj = pjp.proceed();
			//后置通知@After
			System.out.println("The method " + methodName + " ends with " + Arrays.asList(pjp.getArgs()));
		} catch (Throwable e) {
			//异常通知@AfterThrowing
			System.out.println("The method " + methodName + " occurs expection : " + e);
			throw new RuntimeException(e);
		}
		//返回通知@AfterReturning
		System.out.println("The method " + methodName + " ends");
		return obj;
	}

}
dao接口类:
package com.xx.dao;

public interface UserDao {

	public void run1();
	public void run2();
	public void run3();

}
dao实现类
package com.xx.dao;
import org.springframework.stereotype.Repository;

@Repository("userDaoImpl")
public class UserDaoImpl implements UserDao{
	@Override
	public void run1() {
		int x = 1/0;
		System.out.println("run1");
	}
	@Override
	public void run2() {
		System.out.println("run2");
	}
	@Override
	public void run3() {
		System.out.println("run3");
	}
}
测试类:
package com.xx;
import org.springframework.context.ApplicationContext;
import org.springframework.context.support.ClassPathXmlApplicationContext;
import com.xx.dao.UserDao;

public class Test {
	public static void main(String[] args) {
		String xmlPath = "classpath:beans.xml";
		ApplicationContext context = new ClassPathXmlApplicationContext(xmlPath);
		UserDao userDao = (UserDao) context.getBean("userDaoImpl");
		userDao.run1();
		userDao.run2();
		userDao.run3();
	}
}
Best Regards

 浙公网安备 33010602011771号