

linux经验和防火墙、linux python安装、pycharm安装破解、vmware tools安装和共享目录设置

deepin得到root权限的方法
sudo su
然后输入当前用户密码
查看软件所在目录:
[root@xy-main bin]# whereis python
python: /usr/bin/python /usr/bin/python2.7 /usr/lib/python2.7 /usr/lib64/python2.7 /etc/python /usr/include/python2.7 /root/bin/python3.11 /usr/share/man/man1/python.1.gz
一、visualbox共享文件夹

虚拟机中操作内容:
root@sam-vm:/home/sam# mkdir share
root@sam-vm:/home/sam# ls
Desktop  Documents  Downloads  Music  opt  Pictures  share  Videos
root@sam-vm:/home/sam# ls -ld share
drwxr-xr-x 2 root root 4096 11月  4 01:22 share
root@sam-vm:/home/sam# sudo mount -t vboxsf doc share
mount: (hint) your fstab has been modified, but systemd still uses
       the old version; use 'systemctl daemon-reload' to reload.
root@sam-vm:/home/sam# systemctl daemon-reload
root@sam-vm:/home/sam# sudo mount -t vboxsf doc share
二、增强工具,双向拷贝
通过共享目录拷贝 visualbox增强工具到虚拟机里面,然后运行下列指令:
sudo sh VBoxLinuxAdditions.run
cd /etc/apt
创建一个备份: ` sudo cp sources.list source.list.backup
sam@pop-os:/etc/apt$ sudo apt-get install vim
sudo vim sources.list

添加阿里源:
    deb http://mirrors.aliyun.com/ubuntu/ focal main restricted universe multiverse deb-src http://mirrors.aliyun.com/ubuntu/ focal main restricted universe multiverse

    deb http://mirrors.aliyun.com/ubuntu/ focal-security main restricted universe multiverse deb-src http://mirrors.aliyun.com/ubuntu/ focal-security main restricted universe multiverse

    deb http://mirrors.aliyun.com/ubuntu/ focal-updates main restricted universe multiverse deb-src http://mirrors.aliyun.com/ubuntu/ focal-updates main restricted universe multiverse

    deb http://mirrors.aliyun.com/ubuntu/ focal-proposed main restricted universe multiverse deb-src http://mirrors.aliyun.com/ubuntu/ focal-proposed main restricted universe multiverse

    deb http://mirrors.aliyun.com/ubuntu/ focal-backports main restricted universe multiverse deb-src http://mirrors.aliyun.com/ubuntu/ focal-backports main restricted universe multiverse

再保存并退出。
最后` sudo apt update 更新一下。
四、安装chrome
sudo apt update
sudo apt install google-chrome-stable

然后在已安装软件中可以找到chrome
五、安装VMware tools 到 Debian 11/10
sudo apt update
sudo apt-get install open-vm-tools
python3.83安装全过程
安装依赖
sudo apt update
sudo apt install build-essential zlib1g-dev libncurses5-dev \
libgdbm-dev libnss3-dev libssl-dev libsqlite3-dev \
libreadline-dev libffi-dev curl libbz2-dev curl -y
下载
curl -O https://www.python.org/ftp/python/3.11.0/Python-3.11.0rc2.tar.xz
解压
tar -xf Python-3.11.0rc2.tar.xz
cd Python-3.11.0rc2/
编译、安装
./configure --enable-optimizations
make -j 4
sudo make altinstall
python3.11 --version
实际安装目录
root@debian:/home/sam/opt/Python-3.8.3# ls /usr/local/bin
2to3-3.11  easy_install-3.8  idle3.8  pip3.11  pydoc3.11  python3.11         python3.8
2to3-3.8   idle3.11          pip3.10  pip3.8   pydoc3.8   python3.11-config  python3.8-config
root@debian:/home/sam/opt/Python-3.8.3# python3.8
建立软链接
sudo ln -sf /usr/local/bin/python3.11 /usr/bin/python
建立虚拟目录
mkdir ttlock
python3.11 -m venv ttlock
cd ttlock
source bin/activate
python -v
deactivate
使用douban源
python -m pip install --upgrade pip -i http://pypi.douban.com/simple/ --trusted-host=pypi.douban.com/simple/
pip install -r requirements.txt -i http://pypi.douban.com/simple/ --trusted-host=pypi.douban.com/simple/
一、python安装全过程
1、安装依赖包
yum -y install zlib-devel bzip2-devel openssl-devel ncurses-devel sqlite-devel readline-devel tk-devel gdbm-devel db4-devel libpcap-devel xz-devel libffi-devel
2、从软件网站获得软件链接

选择gzipped 和 xz都可以,一个是tgz压缩包一个是tar.xz压缩包。
后续都可以用tar -vxf packageName命令解压。
step1. 下载
下载
[root@xy-main opt]# wget https://www.python.org/ftp/python/3.11.0/Python-3.11.0.tar.xz
step2. 解压压缩包
[root@xy-main opt]# tar -xvf Python-3.11.0.tar.xz
step3. 编译安装
进入解压后软件目录
[root@xy-main opt]# cd Python-3.11.0

安装到指定目录:/root/bin/python3.11
[root@xy-main Python-3.11.0]# ./configure --prefix=/root/bin/python3.11 && make && make install
step4. 已经安装进入目录
[root@xy-main bin]# pwd
/root/bin/python3.11/bin
[root@xy-main bin]# ls
2to3       idle3     pip3     pip3.11  pydoc3.11  python3.11         python3-config
2to3-3.11  idle3.11  pip3.10  pydoc3   python3    python3.11-config
5、建立软连接
注意:这个地方是重点,一个是连接python运行位置,另一个则连接着pip的运行位置
通俗的说,这个软连接的作用,就是告诉系统,python和pip在哪呢!
我个人比较习惯使用python、pip,不习惯使用python3、pip3,所以我软连接设置的为 /usr/bin/python 和 /usr/bin/pip

sudo ln -s /opt/python3.11/bin/python3.11 /usr/bin/python
sudo ln -s /opt/python3.11/bin/pip3.11 /usr/bin/pip

注:/opt/python3.11/bin/python3.11 (安装在的位置)
命令中的 /usr/bin/python 和 /usr/bin/pip 是大部分机器的位置,那怎么确定你的机器的具体位置是哪呢?
「确定python和pip的方法一样,以python为例」
① 确定python和pip的运行位置
root@sam-vm:/usr/bin# whereis python
python: /usr/bin/python /etc/python /usr/share/python /usr/share/man/man1/python.1.gz
root@sam-vm:/usr/bin# whereis pip
pip: /usr/bin/pip
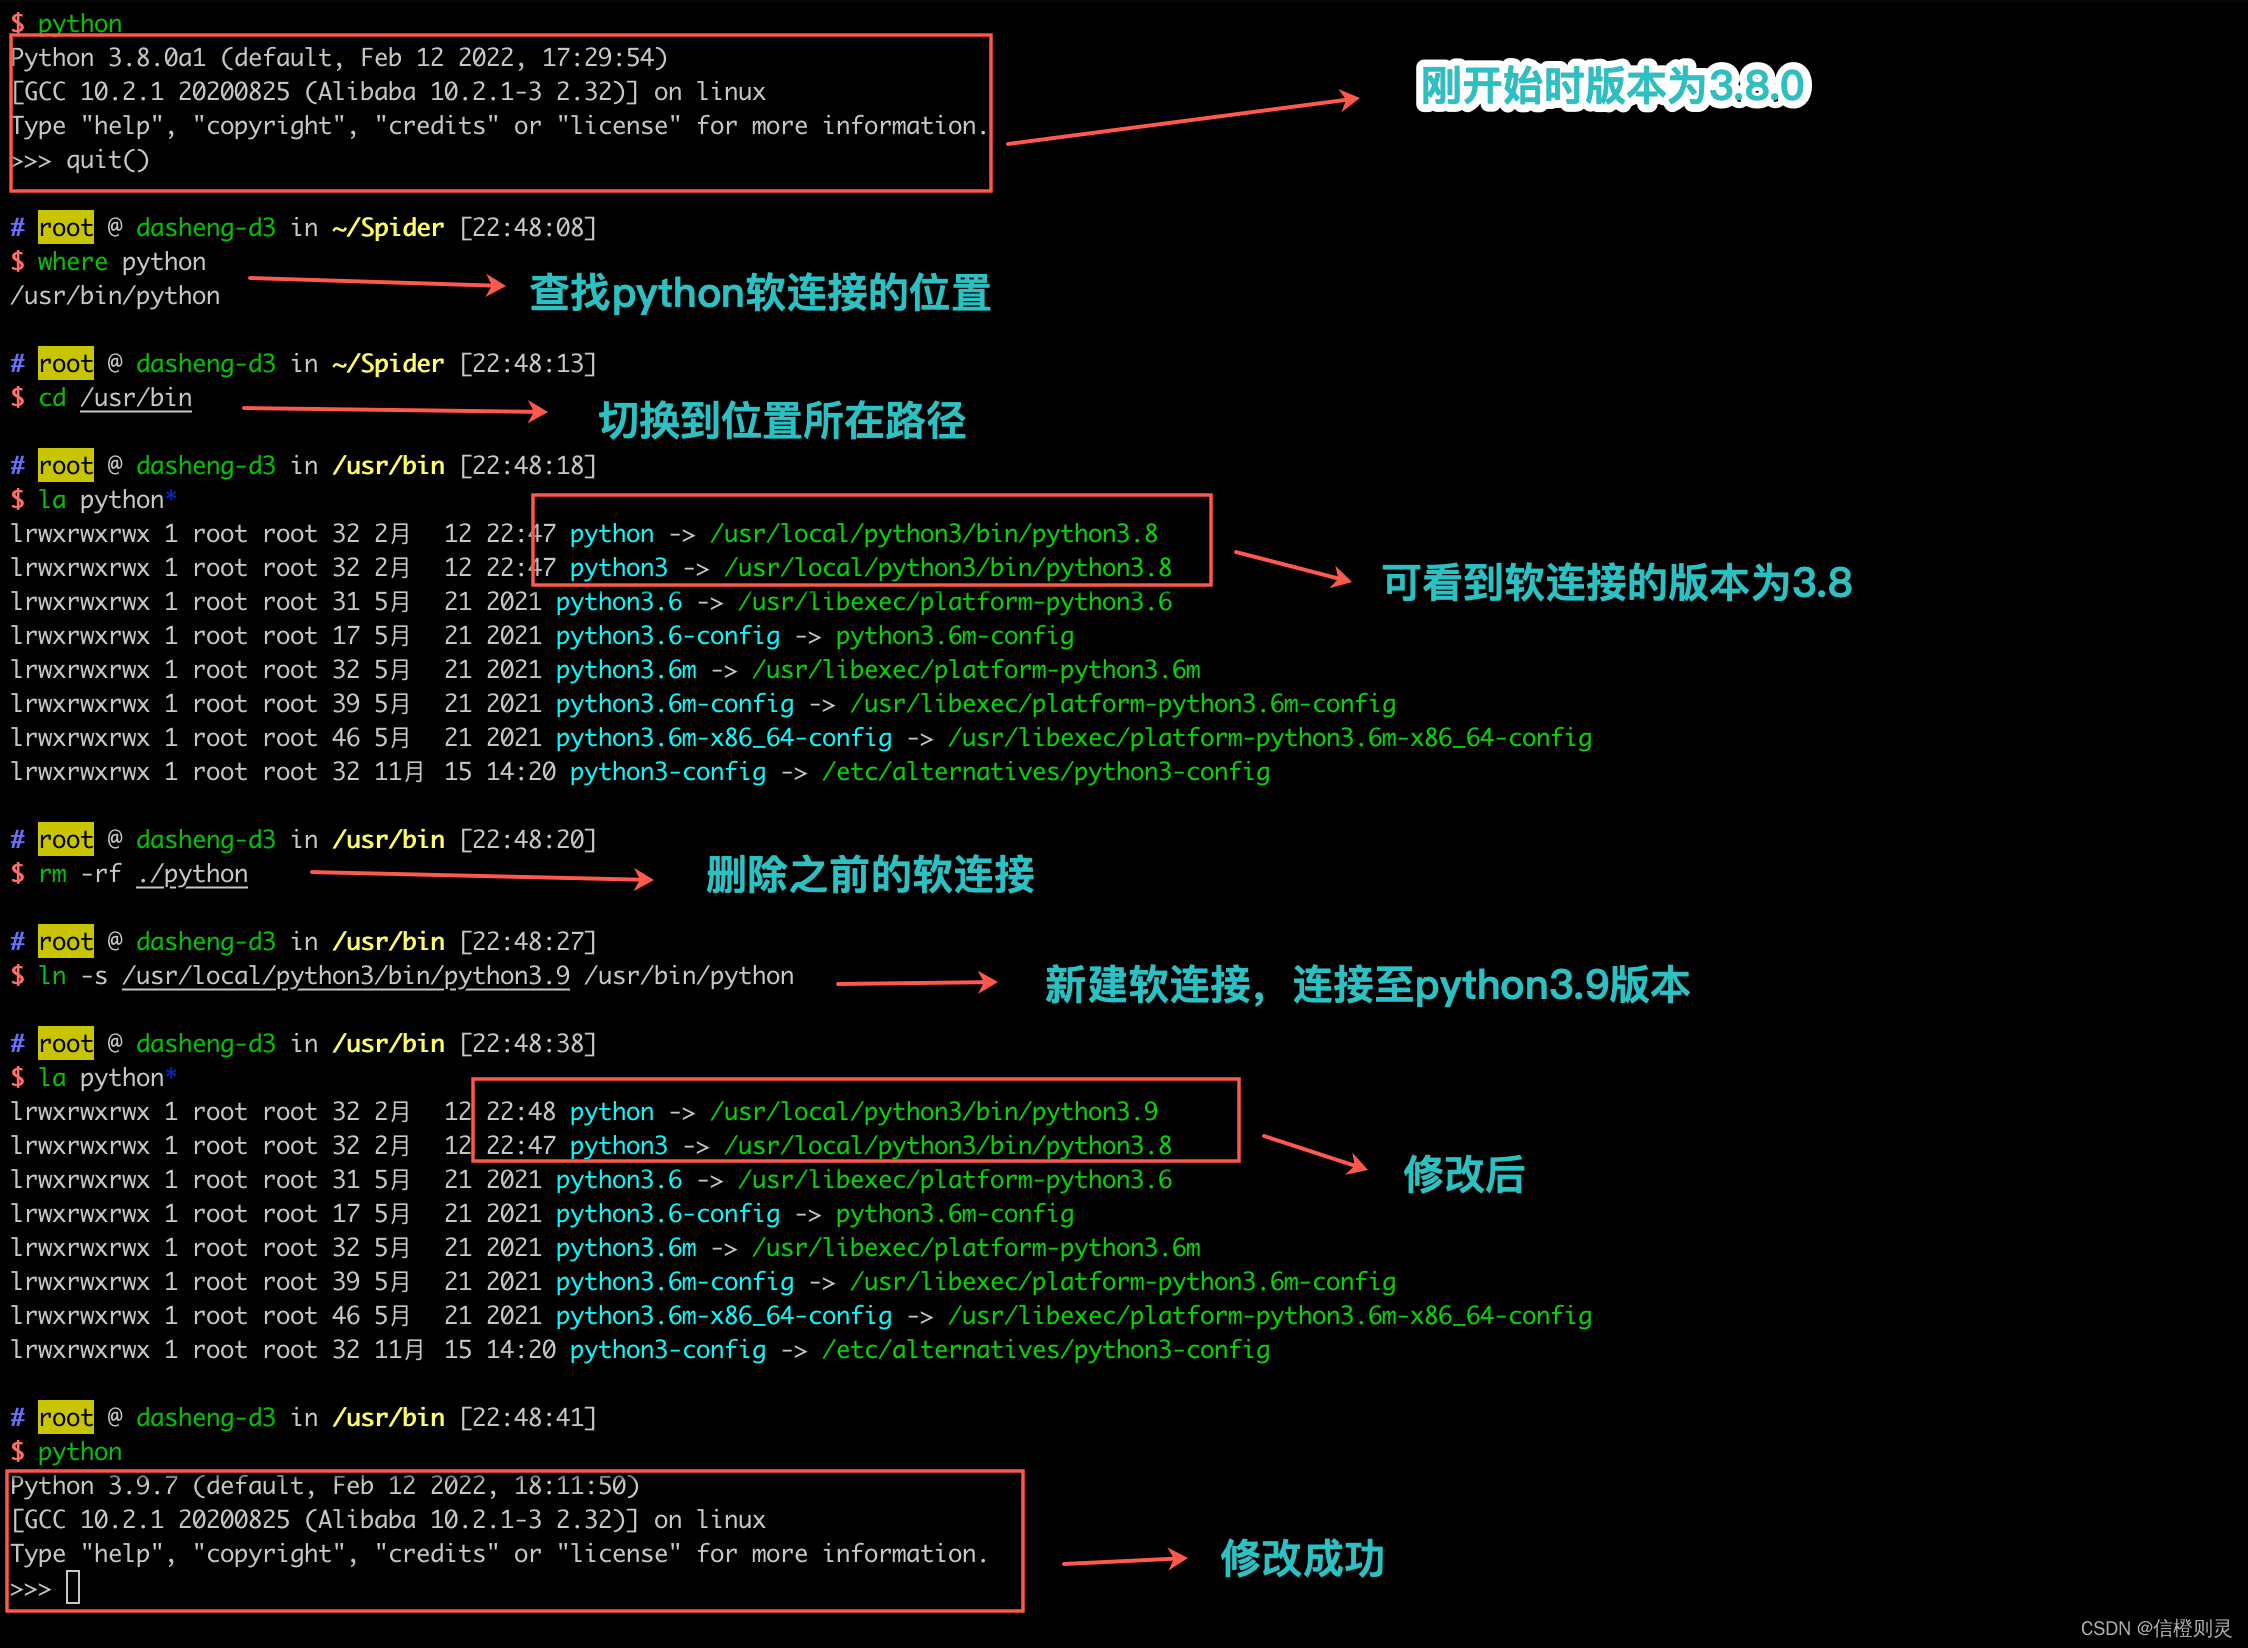
6、如果之前已经有软链接,首先cd到where命令查出的路径,然后删除当前的软连接,重新设置,操作步骤如下图:
查看位置
root@sam-vm:/usr/bin# whereis python
python: /usr/bin/python /etc/python /usr/share/python
root@sam-vm:/usr/bin# whereis pip
删除旧链接
[root@xy-main ~]# cd /usr/bin
[root@xy-main bin]# rm -rf ./python
[root@xy-main bin]# rm -rf ./pip
二、安装pycharm ,注:破解文件在百度云盘python目录
下载
root@sam-vm:/home/sam/opt# wget https://download.jetbrains.com/python/pycharm-professional-2020.1.1.tar.gz
解压
root@sam-vm:/home/sam/opt#  tar -xzf pycharm-professional-2020.1.1.tar.gz
转到目录
root@sam-vm:/home/sam/opt# cd pycharm-2020.1.1
root@sam-vm:/home/sam/opt/pycharm-2020.1.1# ls
root@sam-vm:/home/sam/opt/pycharm-2020.1.1# cd bin
运行
root@sam-vm:/home/sam/opt/pycharm-2020.1.1/bin# ./pycharm.sh
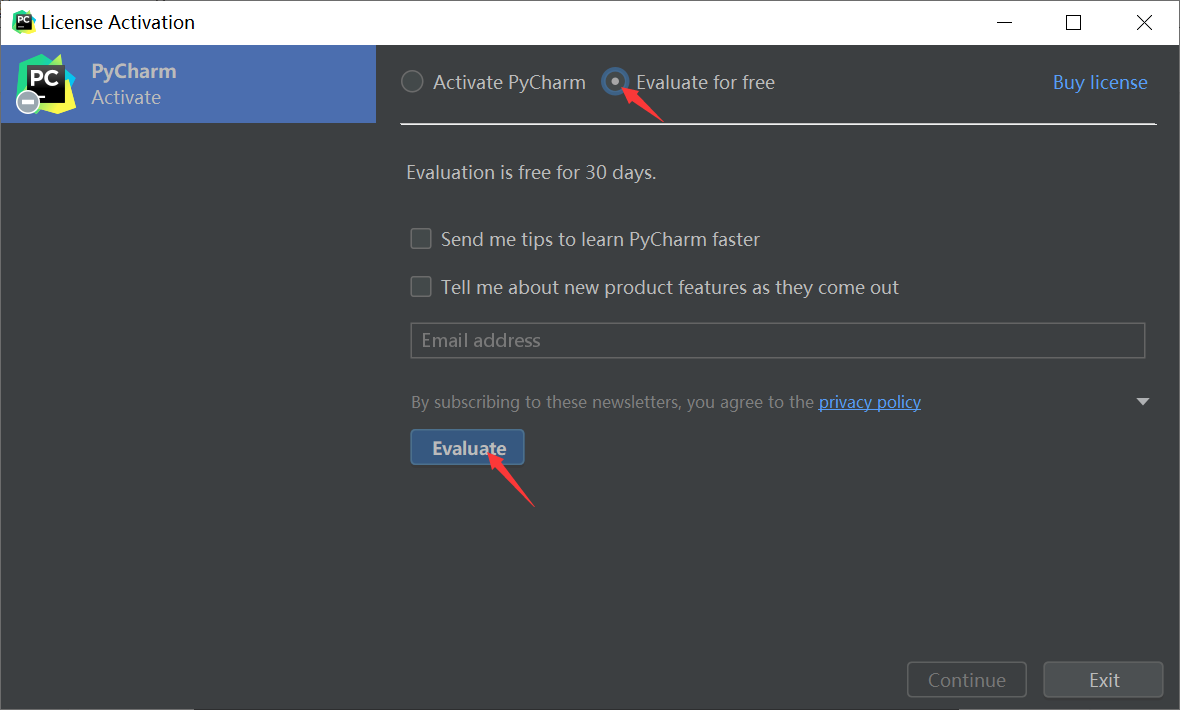
4. 进入到主页面后,选择“Evaluate for free”免费试用,点击“Evaluate”

5. 将 jetbrains-agent-latest.zip拖进下面窗口,点 "Restart" 按钮,重启pycharm

注:
如果已经打开项目,直接将 jetbrains-agent-latest.zip包拖到代码区,即可
三、vmware共享目录
1、在主机中设置

2、在虚拟机中查看
五、centos安装python
yum 源准备
1、更新一下yum:
sudo yum -y update
该 -y 标志用于提醒系统我们知道我们正在进行更改,免去终端提示我们要确认再继续
2、安装yum-utils 【一组扩展和补充yum的实用程序和插件】
sudo yum -y install yum-utils
3、安装CentOS开发工具 【用于允许您从源代码构建和编译软件】
sudo yum -y groupinstall development
1. 安装编译依赖工具
yum install gcc openssl-devel gcc-c++ compat-gcc-34 compat-gcc-34-c++
2. 下载python 3.11.0
 curl -O https://www.python.org/ftp/python/3.11.0/Python-3.11.0.tgz
#crul -O url 下载文件(使用文件本来的名字)。
#curl -o new_name url 下载文件(将文件重新命名为 new_name)
或者
wget https://www.python.org/ftp/python/3.10.0/Python-3.10.0.tgz

#解压
tar zxf Python-3.11.0.tgz
3. 编译安装 Python
cd Python-3.11.0
./configure --enable-optimizations --with-ssl --prefix=/usr/local/python-3.11.0
编译成二进制:
make
#检查编译结果
make test
#安装软件
make altinstall
4、设置全局环境变量 PATH,并为 Python 设置一个别名 py。
在目录 /etc/profile.d/ 下新建一个文件,此处命名为 python.sh,在文件中写入:
export PATH=/usr/local/python-3.11.0/bin:$PATH
alias py='/usr/local/python-3.11.0/bin/python3.11'
使配置文件立即生效:
source /etc/profile.d/python.sh
六、debian11 防火墙使用
安装
apt-get install ufw

使用
#1.基础命令
# 查看ufw是否在运行,如果你发现状态是: inactive , 意思是没有被激活或不起作用。
ufw status
# 启用ufw命令
ufw enable
# 要禁用,只需输入
ufw disable
# 查看策略
ufw status verbose
#如果你有很多条规则,想快速的在每条规则上加个序号数字的话,请使用 numbered 参数。
ufw status numbered
# 恢复默认策略
ufw default deny incoming
ufw default allow outgoing
ufw default reject routed
# 重置UFW
ufw reset # 将删除所有自定义策略并关闭UFW
#2.端口开放
# 允许连接,如ssh、http、https、ftp
#ssh 设置
ufw allow ssh #将会添加ssh默认端口,即22
# http服务
ufw allow http #或者 ufw allow 80
# https 服务
ufw allow https #或者 ufw allow 443
# ftp服务
ufw allow ftp #或者 ufw allow 21
# 开放指定端口范围的服务
ufw allow 8000:10000/tcp #使用该命令必须指定规则所适用的协议
ufw allow 8000:10000/udp #使用该命令必须指定规则所适用的协议

允许指定IP或者指定IP段访问
# 允许指定IP访问
ufw allow 192.168.2.6
# 允许指定IP访问指定端口
ufw allow 192.168.2.6 to any port 端口号
# 放行ip段访问
ufw allow 192.168.2.0/24
# 放行ip段访问指定端口
ufw allow 192.168.2.0/24 to any port 端口号
# 放行ip段访问指定端口
ufw allow 192.168.2.0/24 to any port 端口号
#3. 端口拒绝
# 拒绝某服务的访问
ufw deny 服务名
# 拒绝指定ip的访问
ufw deny from 192.168.2.6
# 拒绝指定ip访问端口
ufw deny 192.168.2.6 to any port 端口号
# 拒绝ip段的访问
ufw deny from 192.168.2.0/24
# 拒绝ip段访问端口
ufw deny 192.168.2.0/24 to any port 端口号
#4. 删除规则
#4.1 按规则编号
# 查看编号
ufw status numbered
# 根据编号删除规则
ufw delete 编号

4.2 按服务和端口号
# 按服务名称来删除规则
ufw delete allow http
# 根据端口号来删除规则
ufw delete allow 端口号


【推荐】国内首个AI IDE,深度理解中文开发场景,立即下载体验Trae
【推荐】编程新体验,更懂你的AI,立即体验豆包MarsCode编程助手
【推荐】抖音旗下AI助手豆包,你的智能百科全书,全免费不限次数
【推荐】轻量又高性能的 SSH 工具 IShell:AI 加持,快人一步
· Manus重磅发布:全球首款通用AI代理技术深度解析与实战指南
· 被坑几百块钱后,我竟然真的恢复了删除的微信聊天记录!
· 没有Manus邀请码?试试免邀请码的MGX或者开源的OpenManus吧
· 园子的第一款AI主题卫衣上架——"HELLO! HOW CAN I ASSIST YOU TODAY
· 【自荐】一款简洁、开源的在线白板工具 Drawnix