实验二 跟踪分析Linux内核5.0系统调用处理过程
实验二 跟踪分析Linux内核5.0系统调用处理过程
学号293 原创作品转载请注明出处 https://github.com/mengning/linuxkernel/
实验要求
实验环境
Ubuntu 18.04 LTS
gcc 7.3.0
实验步骤
1. 下载内核代码并编译
可以直接下载后然后手动解压
也可以按照以下方式下载解压
mkdir ~/LinuxKernel
cd ~/LinuxKernel
wget https://cdn.kernel.org/pub/linux/kernel/v5.x/linux-5.0.1.tar.xz
xz -d linux-5.0.1.tar.xz
tar -xvf linux-5.0.1.tar
cd linux-5.0.1
然后安装内核编译工具,(可以考虑换源为国内的,参考)
sudo apt install build-essential flex bison libssl-dev libelf-dev libncurses-dev
然后
make menuconfig
选择kernel hacking -> Compile-time checks and compiler options -> [*]compile the kernel with debug info
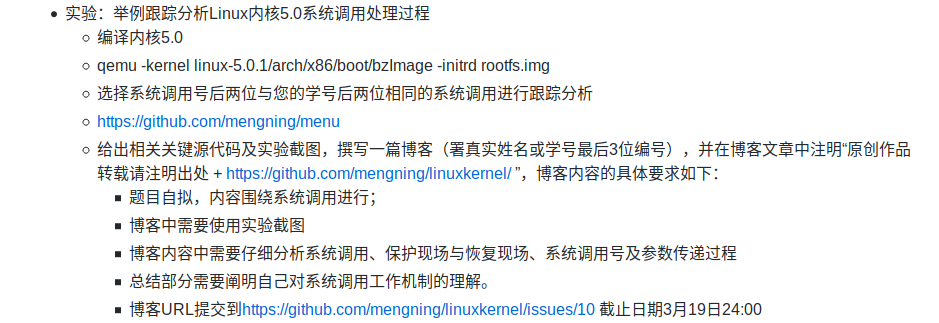
再make
make -j8

此时已经编译完成,生成的文件地址在 ./arch/x86/boot/bzImage
2.制作根文件系统
cd ~/LinuxKernel
mkdir rootfs
git clone https://github.com/mengning/menu.git
cd menu
sudo apt install gcc-multilib   #不安装,编译时会提示缺少文件,实际上是安装gcc环境不完善导致
gcc -pthread -o init linktable.c menu.c test.c -m32 -static
cd ../rootfs
cp ../menu/init ./
find . | cpio -o -Hnewc |gzip -9 > ../rootfs.img

3.启动MenuOS
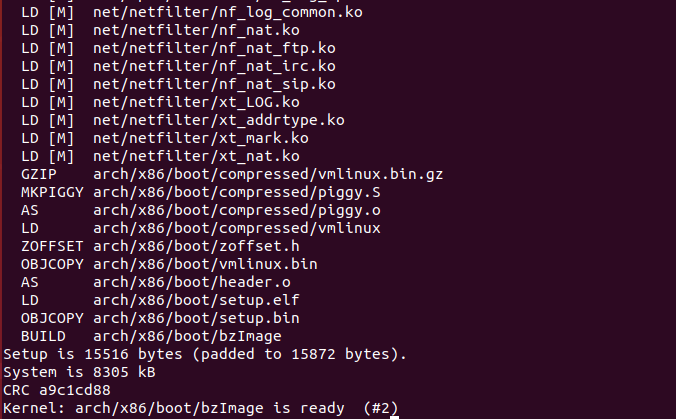
qemu-system-i386 -kernel linux-5.0.1/arch/x86/boot/bzImage -initrd rootfs.img
此时显示


尽管我已经装了qemu-system-i386
然后
我于是采用建议下载了qemu-system-x86,这里主要是因为我编译内核时编译的时64位的版本所以不能用
也可以通过重新make i386_defconfig 解决,但是这样在之后的gdb过程中,无法显示断点所在的文件与行数
所以这里我重新使用make menuconfig,去掉勾选64-bit kernel,同时勾选Kernel hacking -> Compile-time checks and compiler options -> Compile the kernel with debug info 使编译成32位的内核并且能方便显示文件位置
再编译
make -j8
此时需要重新生成rootfs.img,为了方便我这里直接修改Makefile中的设置为

然后进行编译
cd ~/LinuxKernel/menu
make rootfs
得到
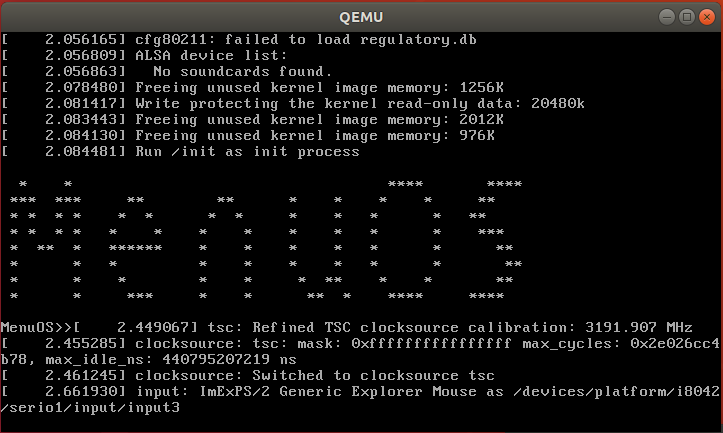
4.调试跟踪内核启动
cd ..
qemu-system-i386 -kernel linux-5.0.1/arch/x86/boot/bzImage -initrd rootfs.img -S -s -append nokaslr
注意:-append nokaslr选项的说明见知乎。
运行qemu虚拟机后,在当前目录新建一个终端窗口,运行下列命令:
cd linux-5.0
gdb vmlinux
进入gdb界面后连接到qemu,输入
target remote:1234
然后即可正常的进行debug了
5 代码分析
几乎所有的内核模块均会在start_kernel进行初始化.在start_kernel中,会对各项硬件设备进行初始化,包括一些page_address、tick等等,直到最后需要执行的rest_init中,会开始让系统跑起来。
然后在rest_init()过程中,会调用kernel_thread()来创建内核线程kernel_init,它创建用户的init进程,初始化内核,并设置成1号进程,这个进程会继续做相关的系统的初始化。
然后,start_kernel 会调用kernel_thread 并创建kthreadd,负责管理内核中得所有线程,然后进程ID会被设置为2。
最后,会创建idle进程(0号进程),不能被调度,并利用循环来不断调号空闲的CPU时间片,并且从不返回。
参考自:pianogirl123
void __init __weak arch_call_rest_init(void)
{
	rest_init();
}

asmlinkage __visible void __init start_kernel(void)
{
	char *command_line;
	char *after_dashes;

	set_task_stack_end_magic(&init_task);
	smp_setup_processor_id();
	debug_objects_early_init();

	cgroup_init_early();

	local_irq_disable();
	early_boot_irqs_disabled = true;

	/*
	 * Interrupts are still disabled. Do necessary setups, then
	 * enable them.
	 */
	boot_cpu_init();
	page_address_init();
	pr_notice("%s", linux_banner);
	setup_arch(&command_line);
	/*
	 * Set up the the initial canary and entropy after arch
	 * and after adding latent and command line entropy.
	 */
	add_latent_entropy();
	add_device_randomness(command_line, strlen(command_line));
	boot_init_stack_canary();
	mm_init_cpumask(&init_mm);
	setup_command_line(command_line);
	setup_nr_cpu_ids();
	setup_per_cpu_areas();
	smp_prepare_boot_cpu();	/* arch-specific boot-cpu hooks */
	boot_cpu_hotplug_init();

	build_all_zonelists(NULL);
	page_alloc_init();

	pr_notice("Kernel command line: %s\n", boot_command_line);
	parse_early_param();
	after_dashes = parse_args("Booting kernel",
				  static_command_line, __start___param,
				  __stop___param - __start___param,
				  -1, -1, NULL, &unknown_bootoption);
	if (!IS_ERR_OR_NULL(after_dashes))
		parse_args("Setting init args", after_dashes, NULL, 0, -1, -1,
			   NULL, set_init_arg);

	jump_label_init();

	/*
	 * These use large bootmem allocations and must precede
	 * kmem_cache_init()
	 */
	setup_log_buf(0);
	vfs_caches_init_early();
	sort_main_extable();
	trap_init();
	mm_init();

	ftrace_init();

	/* trace_printk can be enabled here */
	early_trace_init();

	/*
	 * Set up the scheduler prior starting any interrupts (such as the
	 * timer interrupt). Full topology setup happens at smp_init()
	 * time - but meanwhile we still have a functioning scheduler.
	 */
	sched_init();
	/*
	 * Disable preemption - early bootup scheduling is extremely
	 * fragile until we cpu_idle() for the first time.
	 */
	preempt_disable();
	if (WARN(!irqs_disabled(),
		 "Interrupts were enabled *very* early, fixing it\n"))
		local_irq_disable();
	radix_tree_init();

	/*
	 * Set up housekeeping before setting up workqueues to allow the unbound
	 * workqueue to take non-housekeeping into account.
	 */
	housekeeping_init();

	/*
	 * Allow workqueue creation and work item queueing/cancelling
	 * early.  Work item execution depends on kthreads and starts after
	 * workqueue_init().
	 */
	workqueue_init_early();

	rcu_init();

	/* Trace events are available after this */
	trace_init();

	if (initcall_debug)
		initcall_debug_enable();

	context_tracking_init();
	/* init some links before init_ISA_irqs() */
	early_irq_init();
	init_IRQ();
	tick_init();
	rcu_init_nohz();
	init_timers();
	hrtimers_init();
	softirq_init();
	timekeeping_init();
	time_init();
	printk_safe_init();
	perf_event_init();
	profile_init();
	call_function_init();
	WARN(!irqs_disabled(), "Interrupts were enabled early\n");

	early_boot_irqs_disabled = false;
	local_irq_enable();

	kmem_cache_init_late();

	/*
	 * HACK ALERT! This is early. We're enabling the console before
	 * we've done PCI setups etc, and console_init() must be aware of
	 * this. But we do want output early, in case something goes wrong.
	 */
	console_init();
	if (panic_later)
		panic("Too many boot %s vars at `%s'", panic_later,
		      panic_param);

	lockdep_init();

	/*
	 * Need to run this when irqs are enabled, because it wants
	 * to self-test [hard/soft]-irqs on/off lock inversion bugs
	 * too:
	 */
	locking_selftest();

	/*
	 * This needs to be called before any devices perform DMA
	 * operations that might use the SWIOTLB bounce buffers. It will
	 * mark the bounce buffers as decrypted so that their usage will
	 * not cause "plain-text" data to be decrypted when accessed.
	 */
	mem_encrypt_init();

#ifdef CONFIG_BLK_DEV_INITRD
	if (initrd_start && !initrd_below_start_ok &&
	    page_to_pfn(virt_to_page((void *)initrd_start)) < min_low_pfn) {
		pr_crit("initrd overwritten (0x%08lx < 0x%08lx) - disabling it.\n",
		    page_to_pfn(virt_to_page((void *)initrd_start)),
		    min_low_pfn);
		initrd_start = 0;
	}
#endif
	kmemleak_init();
	setup_per_cpu_pageset();
	numa_policy_init();
	acpi_early_init();
	if (late_time_init)
		late_time_init();
	sched_clock_init();
	calibrate_delay();
	pid_idr_init();
	anon_vma_init();
#ifdef CONFIG_X86
	if (efi_enabled(EFI_RUNTIME_SERVICES))
		efi_enter_virtual_mode();
#endif
	thread_stack_cache_init();
	cred_init();
	fork_init();
	proc_caches_init();
	uts_ns_init();
	buffer_init();
	key_init();
	security_init();
	dbg_late_init();
	vfs_caches_init();
	pagecache_init();
	signals_init();
	seq_file_init();
	proc_root_init();
	nsfs_init();
	cpuset_init();
	cgroup_init();
	taskstats_init_early();
	delayacct_init();

	check_bugs();

	acpi_subsystem_init();
	arch_post_acpi_subsys_init();
	sfi_init_late();

	/* Do the rest non-__init'ed, we're now alive */
	arch_call_rest_init();   //调用rest_init()
}
rest_init() 函数
void rest_init(void)
{
    int pid;
    ………………
    kernel_thread(kernel_init, NULL, CLONE_FS);
    numa_default_policy();
    pid = kernel_thread(kthreadd, NULL, CLONE_FS | CLONE_FILES);
    rcu_read_lock();
    kthreadd_task = find_task_by_pid_ns(pid, &init_pid_ns);
    rcu_read_unlock();
    complete(&kthreadd_done);
    init_idle_bootup_task(current);
    schedule_preempt_disabled();
    cpu_startup_entry(CPUHP_ONLINE);
}
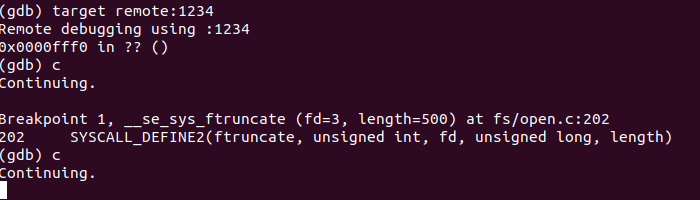
6.跟踪系统调用
增加系统调用
-
根据学号后两位93,在
/usr/include/asm/unistd_32.h中可查得#define __NR_ftruncate 93。
![]()
-
编写测试 在test.c 中添加两个函数,main函数中添加相应的Menuconfig()
int update(int argc, char *argv[]){
FILE *out;
char *file = "93temp";
int res = -2;
int fd;
out = fopen(file,"w+");
fd = fileno(out);
if(out == NULL){
printf("openFailed!!!!!");
}
//printf("res: %d\n",res);
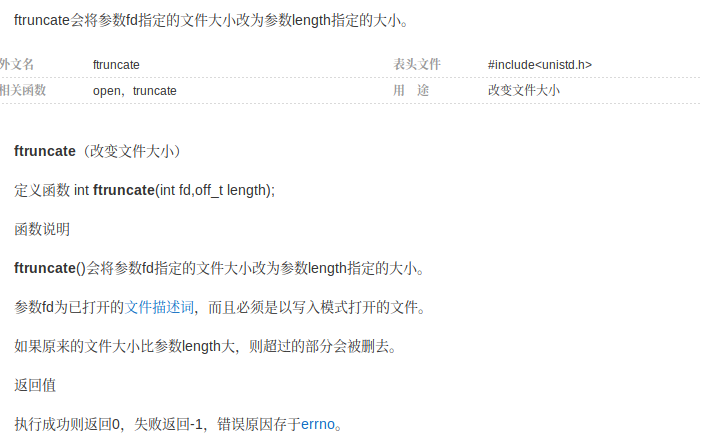
res = ftruncate(fd, 500);
fclose(out);
if(res == 0){
printf("success!\n");
out = fopen("93temp","r");
fseek(out,0L,SEEK_END);
int size=ftell(out);
printf("size %d\n",size);
fclose(out);
}else{
printf("fail\n");
}
return res;
}
int updateAsm(int argc, char *argv[]){
FILE *out;
char *file="93temp";
int fd;
int res = -2;
out = fopen(file,"w+");
if(out == NULL){
printf("openFailed!!!!!");
}
fd = fileno(out);
//printf("res: %d\n",res);
asm volatile(
"mov $0x5D, %%eax\n\t"
"int $0x80\n\t"
"mov %%eax, %0\n\t"
:"=m"(res)
:"b"(fd),"c"(200)
);
fclose(out);
printf("res: %d\n",res);
if(res == 0){
printf("Success!\n");
out = fopen(file, "r");
fseek(out,0L,SEEK_END);
int size=ftell(out);
printf("size %d\n",size);
}else{
printf("failed!\n");
}
fclose(out);
return res;
}
int main()
{
................
MenuConfig("update","updateFilesize", update);
MenuConfig("updateAsm","updateFilesizeAsm", updateAsm);
ExecuteMenu();
}
- 添加Makefile中的开始暂停设置为
![]()

重新make rootfs
cd ~/LinuxKernel/menu
make rootfs
- 使用gdb跟踪查看
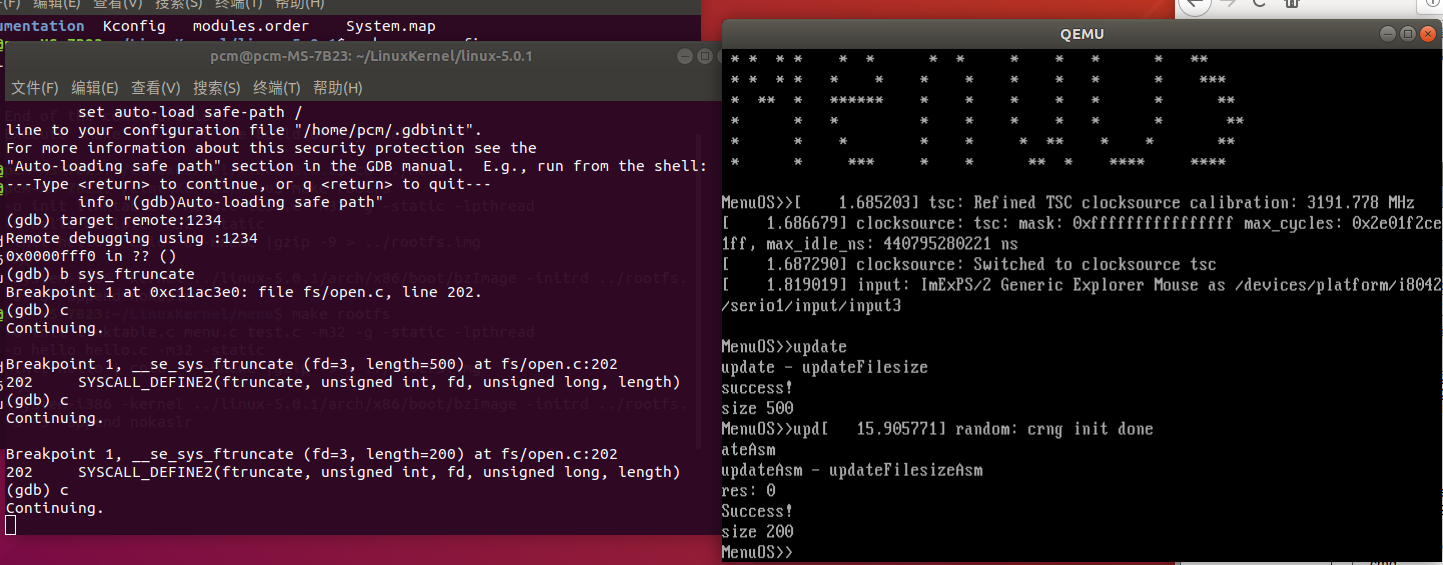
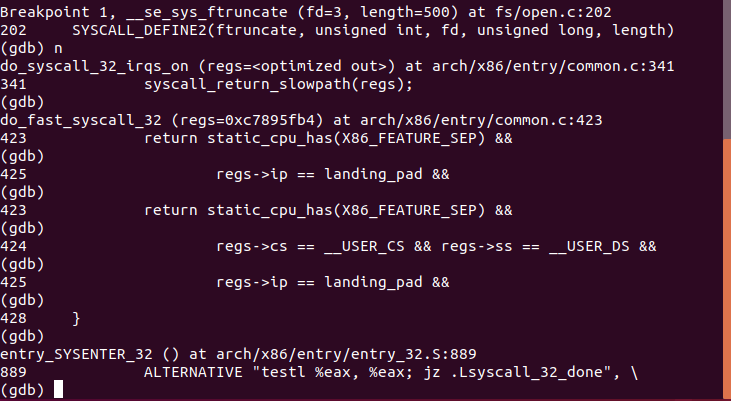
可以看见在使用int 0x80中断之后,CPU会运行arch/x86/entry/entry_32.S中的指令
-
分析entry_32.S代码
#这段代码就是系统调用处理的过程,其它的中断过程也是与此类似
#系统调用就是一个特殊的中断,也存在保护现场和回复现场
ENTRY(system_call)          #这是0x80之后的下一条指令
    RING0_INT_FRAME         # can't unwind into user space anyway
    ASM_CLAC
    pushl_cfi %eax          # save orig_eax
    SAVE_ALL                 #保护现场
    GET_THREAD_INFO(%ebp)
                    # system call tracing in operation / emulation
    testl $_TIF_WORK_SYSCALL_ENTRY,TI_flags(%ebp)
    jnz syscall_trace_entry
    cmpl $(NR_syscalls), %eax
    jae syscall_badsys
syscall_call:
    # 调用了系统调用处理函数,实际的系统调用服务程序
    call *sys_call_table(,%eax,4)#定义的系统调用的表,eax传递过来的就是系统调用号,在例子中就是调用的systime
syscall_after_call:
    movl %eax,PT_EAX(%esp)      # store the return value
syscall_exit:
    LOCKDEP_SYS_EXIT
    DISABLE_INTERRUPTS(CLBR_ANY)    # make sure we don't miss an interrupt
                    # setting need_resched or sigpending
                    # between sampling and the iret
    TRACE_IRQS_OFF
    movl TI_flags(%ebp), %ecx
    testl $_TIF_ALLWORK_MASK, %ecx  # current->work
    jne syscall_exit_work          #退出之前,syscall_exit_work
    #进入到syscall_exit_work里边有一个进程调度时机

restore_all:
    TRACE_IRQS_IRET
restore_all_notrace:        #返回到用户态
#ifdef CONFIG_X86_ESPFIX32
    movl PT_EFLAGS(%esp), %eax  # mix EFLAGS, SS and CS
    # Warning: PT_OLDSS(%esp) contains the wrong/random values if we
    # are returning to the kernel.
    # See comments in process.c:copy_thread() for details.
    movb PT_OLDSS(%esp), %ah
    movb PT_CS(%esp), %al
    andl $(X86_EFLAGS_VM | (SEGMENT_TI_MASK << 8) | SEGMENT_RPL_MASK), %eax
    cmpl $((SEGMENT_LDT << 8) | USER_RPL), %eax
    CFI_REMEMBER_STATE
    je ldt_ss           # returning to user-space with LDT SS
#end
    RESTORE_REGS 4          # skip orig_eax/error_code
irq_return:
    INTERRUPT_RETURN      #iret(宏),系统调用过程到这里结束
实验总结
其原理是进程先用适当的值填充寄存器,然后调用一个特殊的指令,这个指令会跳到一个事先定义的内核中的一个位置。在Intel CPU中,这个由中断0x80实现。硬件知道一旦你跳到这个位置,你就不是在限制模式下运行的用户,而是作为操作系统的内核--由用户态转为内核态。
进程可以跳转到的内核位置叫做sysem_call。这个过程检查系统调用号,这个号码告诉内核进程请求哪种服务。然后,它查看系统调用表(sys_call_table)找到所调用的内核函数入口地址。接着,就调用函数,等返回后,做一些系统检查,最后返回到进程(或到其他进程,如果这个进程时间用尽)。
进程号是由eax寄存器存储的,参数一般是由ebx、ecx、edx、esl、edl、ebp来存储的。

 浙公网安备 33010602011771号