
【JAVA学习】05.搭建SSM框架
【提要】SSM(Spring+SpringMVC+MyBatis)
【步骤】
=========== 配置springMVC ===========
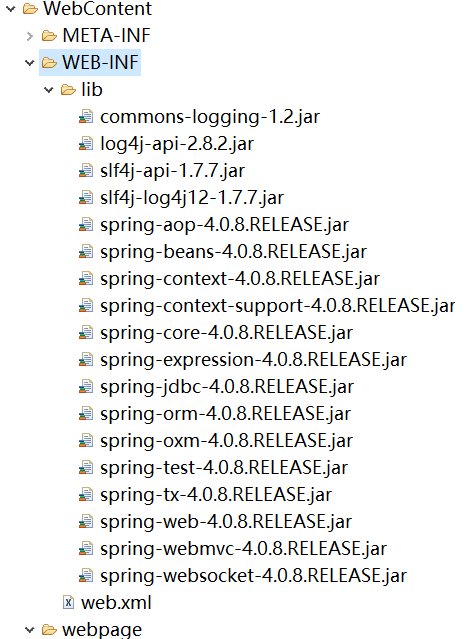
1、导入springMVC所需jar包
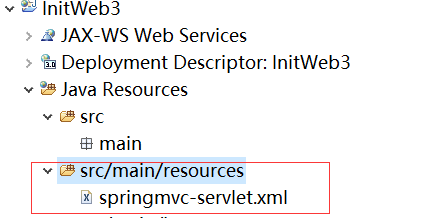
2、创建资源包集合,并创建springmvc-servlet.xml(resource为Source Folder,右键src可创建)
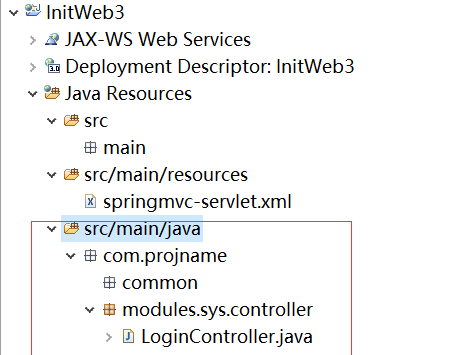
3、创建java包集合(java同样为Source Folder),并将项目结构设置为树形,选中项目首结点--展开当前目录的右上角向下箭头--Package Presentation--Hierarchical;
4、配置springmvc-servlet.xml文件(注意base-package和prefix路径,注意<beans 中spring-mvc-的版本号,用4.0.8时报错找不到spring-mvc-4.0.8.xsd 虽然Jar包是4.0.8)
<?xml version="1.0" encoding="UTF-8"?>
<beans xmlns="http://www.springframework.org/schema/beans"
    xmlns:xsi="http://www.w3.org/2001/XMLSchema-instance" xmlns:context="http://www.springframework.org/schema/context"
    xmlns:mvc="http://www.springframework.org/schema/mvc"
    xsi:schemaLocation="http://www.springframework.org/schema/beans http://www.springframework.org/schema/beans/spring-beans-4.1.xsd
        http://www.springframework.org/schema/context http://www.springframework.org/schema/context/spring-context-4.1.xsd
        http://www.springframework.org/schema/mvc http://www.springframework.org/schema/mvc/spring-mvc-4.1.xsd">

    <context:annotation-config />
    <!-- 配置自动扫描的包,完成 Bean 的创建和自动依赖注入的功能 -->
    <context:component-scan base-package="com.huawei.hidata" />

     <!-- 这两个类用来配置 annotation 类型的处理器映射器和处理器适配器 -->
    <bean class="org.springframework.web.servlet.mvc.annotation.DefaultAnnotationHandlerMapping" />
    <bean class="org.springframework.web.servlet.mvc.annotation.AnnotationMethodHandlerAdapter" />

    <!-- 配置视图解析器 -->
    <bean class="org.springframework.web.servlet.view.InternalResourceViewResolver">
        <property name="prefix" value="/webpage/"></property>
        <property name="suffix" value=".jsp"></property>
    </bean>

</beans>
6、修改web.xml指定springmvc-servlet.xml位置(注意springmvc-config路径配置)
<?xml version="1.0" encoding="UTF-8"?>
<web-app xmlns:xsi="http://www.w3.org/2001/XMLSchema-instance"
    xmlns="http://java.sun.com/xml/ns/javaee" xmlns:web="http://java.sun.com/xml/ns/javaee/web-app_2_5.xsd"
    xsi:schemaLocation="http://java.sun.com/xml/ns/javaee http://java.sun.com/xml/ns/javaee/web-app_3_0.xsd"
    id="WebApp_ID" version="3.0">
  <display-name>HiData</display-name>

  <!-- 配置Spring MVC DispatcherServlet 前端控制器 -->
  <servlet>
      <servlet-name>springmvc</servlet-name>
      <servlet-class>org.springframework.web.servlet.DispatcherServlet</servlet-class>
      <init-param>
          <param-name>contextConfigLocation</param-name>
          <param-value>classpath:springmvc-config.xml</param-value>
      </init-param>
      <!-- 在 Web 应用启动时立即加载 Servlet -->
      <load-on-startup>1</load-on-startup>
  </servlet>

  <!-- Servlet 映射声明 -->
  <servlet-mapping>
      <servlet-name>springmvc</servlet-name>
      <url-pattern>/</url-pattern>
  </servlet-mapping>

  <!-- 指定首页 -->
  <welcome-file-list>
    <welcome-file>webpage/modules/sys/sysLogin.jsp</welcome-file>
  </welcome-file-list>
</web-app>
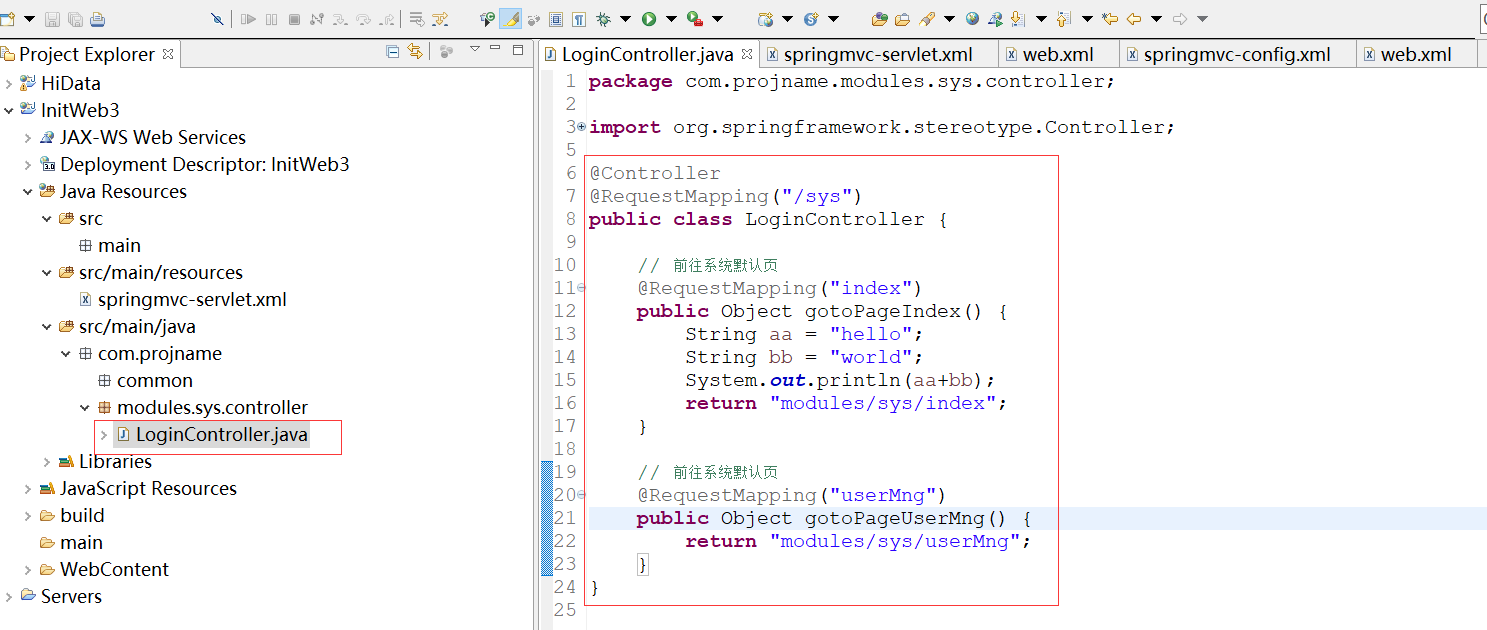
7、创建控制器,启动tomcat,输入http://localhost:8080/项目名/sys/index 即可浏览;
【项目结构图示】
1、建立基本的目录结构
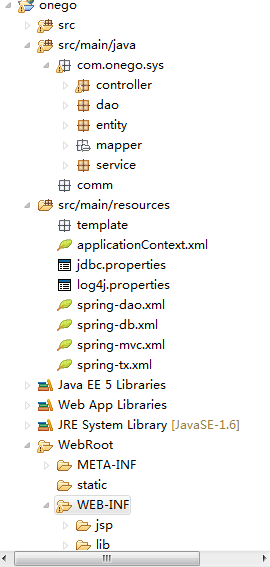
2、配置文件和接口类的创建:
https://www.cnblogs.com/DoubleEggs/p/6243216.html
3、配置静态资源文件路径,放在 <mvc:default-servlet-handler/>后(注意:static一定要放WebRoot下面)
<mvc:resources mapping="/static/**" location="/static/" />
【注意】
1、项目文件目录默认是扁平的,甚是难看,可将其换成树状结构:
文件目录右上方有下向下图标,点开后选择Package Presentation,展开后选择 Hierarchical;
2、src/main/java和src/main/resources 是source folder类型,输入包名后勾选 Update exclusion filters is other source folders to solve mesting.
3、Jar包要成套使用,官网下载:https://blog.csdn.net/vekaco/article/details/52971862
4、SSM所需Jar包:https://blog.csdn.net/lengwei1/article/details/77884220
5、web.xml配置文件中<async-supported>true</async-supported>报错的解决方案
https://blog.csdn.net/zxz547388910/article/details/50780068

 浙公网安备 33010602011771号