初学puppet
初学puppet
-
puppet是什么?
puppet是一个开源的软件自动化配置和部署工具,很多大型IT公司均在使用puppet对集群中的软件进行管理和部署。
-
Puppet简介
Puppet的目录是让管理员只集中于要管理的目标,而忽略实现的细节。Puppet即可以运行在单机上,也可以以C/S结构使用。在大规模使用puppet的情况下,通常使用C/S结构,在这种结构中puppet客户端只运行puppeclient,puppet服务端只运行puppemaster。
-
Puppet的工作原理

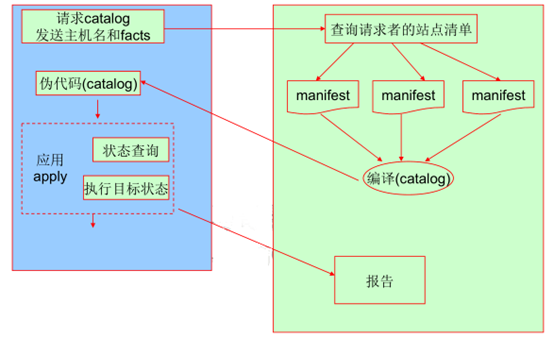
1) 客户端puppet调用fast探测出主机的一些变量,如主机名、内存大小、IP地址等。Puppet把这些信息使用SSL连接发送给服务器端
2) 服务器端的puppetmaster通过fast工具分析检测客户端的主机名,然后找到项目的主配置文件manifest里面对应的node配置,并对该部分内容进行解析,fast发送过来的信息可以作为变量处理,node牵扯到的代码才被解析,没牵扯到的不解析,解析分为语法检查,如果语法没错,继续解析,解析结果生成一个结果‘伪代码’,然后把‘伪代码’发给客户端
3) 客户端收到‘伪代码’并且执行,客户端把执行结果发给服务器
4) 服务器端把客户端的执行结果写入日志
-
Puppet工作过程中的注意事项
1) 为了保证安全,Client和Master之间是基于SSL和证书的,只有经Master证书认证的Client可以与Master通信
2) Puppet会让系统保持在人们所期望的某种状态并一直维持下去,如检测某个文件并保证其一直存在,保证SSH服务始终开启,如果文件被删除了或者ssh服务关闭了,puppet下次执行时(默认30分钟)会重新创建该文件或者启动SSH服务
-
Puppet服务端与客户端的安装
OS:Centos 6.5 x86_64
Puppet master:master.xiaohao.com(*.*.*.*)
Puppet agent:agent.xiaohao.com(*.*.*.*)
Puppet 要求所有机器有完整的域名,如果没有 DNS 服务器提供域名的话,可以在机器上设置主机名(注意:要先安装 Puppet之前设置主机名,因为安装 Puppet 时会把主机名写入证书,客户端和服务端通信需要这个证书),为了简化安装过程我配置了/etc/hosts。
[root@master ~]# cat /etc/hosts
127.0.0.1 localhost localhost.localdomain localhost4 localhost4.localdomain4
::1 localhost localhost.localdomain localhost6 localhost6.localdomain6
*.*.*.* master.xiaohao.com
*.*.*.* agent.xiaohao.com
修改设备主机名:
[root@master yum.repos.d]# cat /etc/sysconfig/network
NETWORKING=yes
HOSTNAME=master.xiaohao.com
关闭selinux内核防火墙:
#sed '/^SELINUX/s/=.*/=disabled/g' /etc/sysconfig/selinux -i
关闭iptables防火墙:
#iptables –F
#service iptables stop
#chkconfig iptables off
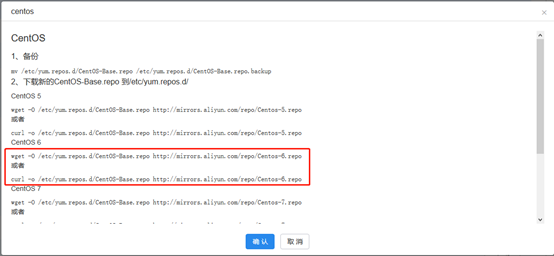
系统默认yum不使用,配置阿里的镜像yum源(百度搜索下“阿里镜像”)

本地系统是CentOS6.5,所以使用CentOS6的镜像yum源。


puppet server和两台应用服务器共三台机器依次执行下面的指令:
wget -O /etc/yum.repos.d/CentOS-Base.repo
修改yum源文件的release版本:#
cd /etc/yum.repos.d/
#
vim CentOS-Base.repo
注意:修改$releasever(版本)为6,共修改了20处,可以使用yum安装软件包了。
Puppet软件包安装:
Puppet server和agent客户端安装epel-release源#
rpm -ivh http://yum.puppetlabs.com/el/6/products/x86_64/puppetlabs-release-6-7.noarch.rpm
Puppet server端安装puppet-server:#yum –y install puppet-server puppetPuppet agent客户端安装puppet:#yum -y install puppet 查看三台机器安装的puppet版本:#puppet –V3.8.7
疑问?--如果puppet server 是3.8,那么puppet agent是 2.6能正常运行吗?
注释:第一点:最常见的Puppet部署模型是客户端-服务端模型。许多人询问是否能使用不同的Puppet版本作为master和agent。答案是可以,但前提是要遵照一些注意事项。第一点要注意的是master的版本一定要高于agent。例如,你可以将一个0.24.8版本的agent连接到一个2.6.0版本的master,但是反过来不行。第二点:要注意的是,agent的版本越老,在与新版本的master搭配时正确运行的可能性就越小。一个0.20.0版本的agent搭配一个2.6.0的master基本不可能正确工作。通常,0.24.x版的agent都能正常连接到2.6.x和0.25.x版本的master并且工作正常。更新版本的master就可能无法完全兼容早期的agent,一些功能和特性可能会出现异常。最后,将2.6.x或更新版本的master与0.24.x及早期版本的agent混合使用意味着你无法获得2.6.x版本提供的全部性能提升。0.24.x版的agent依然会使用较慢的XML-RPC传输层来进行通讯,从而无法利用新的REST接口。
设置ntp时间同步:因为公司已经有ntp服务器,直接使用了,未重新搭建ntp
# service ntpd start
修改服务端puppet.conf主配置文件[root@puppet-master ~]# vim /etc/puppet/puppet.conf
[main]
# The Puppet log directory.
# The default value is '$vardir/log'.
logdir = /var/log/puppet ###默认存放日志路径
# Where Puppet PID files are kept.
# The default value is '$vardir/run'.
rundir = /var/run/puppet ###pid存放路径
# Where SSL certificates are kept.
# The default value is '$confdir/ssl'.
ssldir = $vardir/ssl ###证书存放目录,$vardir为/var/lib/puppet
[agent]
# The file in which puppetd stores a list of the classes
# associated with the retrieved configuratiion. Can be loaded in
# the separate ``puppet`` executable using the ``--loadclasses``
# option.
# The default value is '$confdir/classes.txt'.
classfile = $vardir/classes.txt
# Where puppetd caches the local configuration. An
# extension indicating the cache format is added automatically.
# The default value is '$confdir/localconfig'.
localconfig = $vardir/localconfig
certname = master.xiaohao.com
server = master.xiaohao.com ###设置agent认证连接master端的服务器名称,此名称必须得能够解析
[master]
certname = master.xiaohao.com ###设置puppetmaster认证服务器名称
启动puppetmaster服务# /etc/init.d/puppetmaster startStarting puppetmaster: [OK]# chkconfig puppetmaster on ###设置开机启动
# chkconfig --list|grep puppetmasterpuppetmaster 0:关闭 1:关闭 2:启用 3:启用 4:启用 5:启用 6:关闭
修改客户端配置文件[root@agent ~]# cat /etc/puppet/puppet.conf [main]# The Puppet log directory.# The default value is '$vardir/log'.logdir = /var/log/puppet# Where Puppet PID files are kept.# The default value is '$vardir/run'.rundir = /var/run/puppet# Where SSL certificates are kept.# The default value is '$confdir/ssl'.ssldir = $vardir/ssl[agent]# The file in which puppetd stores a list of the classes# associated with the retrieved configuratiion. Can be loaded in# the separate ``puppet`` executable using the ``--loadclasses``# option.# The default value is '$confdir/classes.txt'.classfile = $vardir/classes.txt# Where puppetd caches the local configuration. An# extension indicating the cache format is added automatically.# The default value is '$confdir/localconfig'.localconfig = $vardir/localconfigserver = master.xiaohao.comlisten = true 启动puppet服务:#service puppet start#chkconfig puppet on
-
Puppet证书申请
Puppet客户端与服务器端是通过SSL隧道通信的,客户端安装完成后,需要向服务器端申请证书:
首次连接服务器端会发起证书申请,在客户端执行命令如下:
puppet agent --server master.xiaohao.com -test
在服务器端可以用puppet cert -list命令查看到申请证书的客户端主机名。
puppet cert -s命令可以为特定的主机颁发证书,puppet cert –s and –a 表示给所有的主机颁发证书
例如puppet cert –s agent.xiaohoa.com 为客户端颁发证书。
# puppet cert --list -all ###带“+”表明注册成功+ "agent" (SHA256) A7:19:D1:25:6E:64:AA:84:53:AF:F0:8B:63:C9:2D:B1:47:49:11:6E:C9:3A:5A:EF:00:72:F4:7B:6E:E7:24:65 -
验证puppet配置
在服务端写个例子测试一下。这个例子作用很简单,用来在客户端的/tmp目录下新建一个 test.txt 文件,内容为:hello,test!在服务端编写代码:【服务器端不需要新建这个文件】
#vi /etc/puppet/manifests/site.pp
node default {
file {
"/tmp/test.txt": content => "helo,test!";
}
}
-
puppet客户端测试
在客户端执行 puppet,运行成功后会在 /tmp 看到新生成的 test.txt:
#puppet agent -t
执行命令后显示如下:
Notice: Ignoring --listen on onetime run
Info: Retrieving pluginfacts
Info: Retrieving plugin
Info: Caching catalog for agent.xiaohao.com
Info: Applying configuration version '1534319026'
Notice: /Stage[main]/Main/Node[default]/File[/tmp/test.txt]/ensure: defined content as '{md5}bf2fcd5a98ca557c37106f400c2954be'
Info: Creating state file /var/lib/puppet/state/state.yaml
Notice: Finished catalog run in 0.01 seconds
最后查看执行结果:
#cat /tmp/test.txt
Hello,test!
此致puppet服务器端和客户端安装完毕,接下来就是深入的配置了。
附puppet自动签发证书步骤:
https://www.cnblogs.com/kaishirenshi/p/7767811.html


【推荐】编程新体验,更懂你的AI,立即体验豆包MarsCode编程助手
【推荐】凌霞软件回馈社区,博客园 & 1Panel & Halo 联合会员上线
【推荐】抖音旗下AI助手豆包,你的智能百科全书,全免费不限次数
【推荐】轻量又高性能的 SSH 工具 IShell:AI 加持,快人一步
· 深入理解 Mybatis 分库分表执行原理
· 如何打造一个高并发系统?
· .NET Core GC压缩(compact_phase)底层原理浅谈
· 现代计算机视觉入门之:什么是图片特征编码
· .NET 9 new features-C#13新的锁类型和语义
· Spring AI + Ollama 实现 deepseek-r1 的API服务和调用
· 《HelloGitHub》第 106 期
· 数据库服务器 SQL Server 版本升级公告
· 深入理解Mybatis分库分表执行原理
· 使用 Dify + LLM 构建精确任务处理应用