【django-vue】登录、注册前端实现 redis介绍 redis安装 python操作redis redis连接池 Redis之字符串类型
上节回顾
# 1 复制了登录和注册页面
# 2 子传父:自定义事件
# 3 腾讯云发送短信
	-api
    -sdk

# 4 二次封装:以后任意项目中,都可以直接包copy去,导入使用
	-包名 send_sms_v3
    	-__init__.py  # 导入了给外部使用的函数
        -settings.py  # 配置信息---》APPID。。。
        -sms.py       # 核心:获取 n 位数字验证码,send_sms

# 5 发送短信接口
	-csrf:解决方案
		-前端使用post请求,携带手机号    {mobile:'13454646',sign:asfasdfas}
    	-后端路由---》使用action装饰 send_sms---》
    		-取出手机号,生成验证码,存到【缓存】中----》
        		cache.set(key,value,过期事件)
            		# 重点:value值可以是什么类型?任意类型都可以
                	# 如何存的?序列化 pickle
            	cache.get(key)

        	-调用封装发送短信,【同步发送异步发送】


# 6 短信登录接口
    -前端:post请求  {mobile:1334535,code:8888}
    -后端:action装饰器----》
    	-视图类的代码,跟之前多方式登录的代码一模一样,使用的序列化类不一样
        	-重写get_serializer_class
    	-把逻辑写在序列化类中
            -封装


# 短信发送接口,如何防止被被人解析出地址后恶意使用
	-ip 频率限制
    -手机号 频率限制
    -先发送一个请求:从后端获取一个随机字符串,存在后端 缓存
    	-发短信,携带这个随机字符串
        -比较一下随机字符串是不是我给的

    -前端发送请求携带加密串(当前时间),前端加密(某个秘钥)---》来到后端,同样的秘钥解密--》取出当前时间,如果超过一分钟,就禁止调
今日内容
1 登录前台
# 多方式
# 短信登录
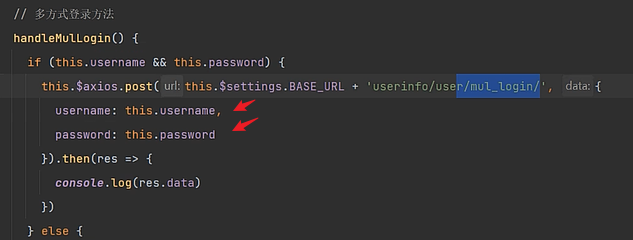
多方式登录
添加警告弹窗:
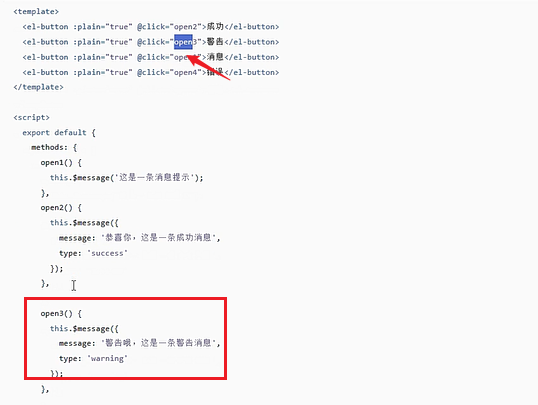
当什么都没填时,会触发警告弹窗:
使用axios发送post请求:
查看后端返回:

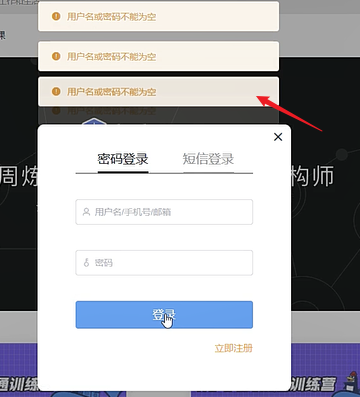
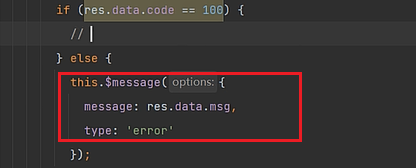
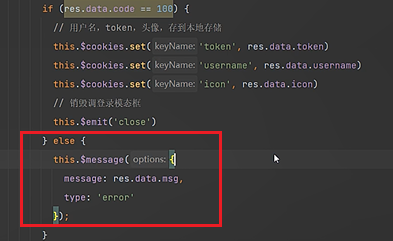
登录失败,进行错误提示:
当登录成功:
-
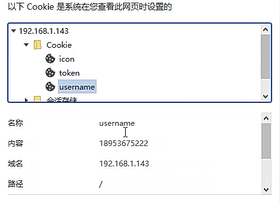
用户名、token、头像,都要存储到本地
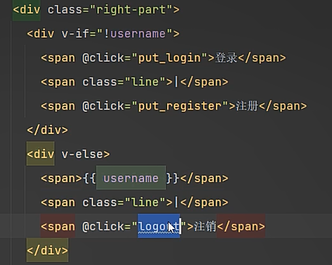
登录之后显示用户名、头像
-
销毁登录模态框
-
弹窗进行提示登录成功
created页面初始化后显示头像和用户名:
根据cookies存储的信息进行显示:
页面刷新之后,才会显示用户名和头像,这不是我们想要的:

在关闭登录模态框触发的函数里获取cookies数据。
用户退出登录可以向后端发送一个请求(正常情况下无需这么做):
短信登录
先看手机号校验函数:
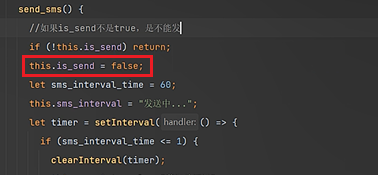
is_send为true才能发送短信:
不能持续点击发送短信的按钮,当校验通过is_send=true此时可以执行send_sms,send_sms函数第一件事就是将is_send设置为false:
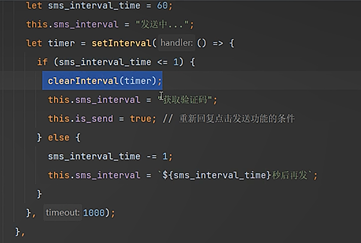
点击按钮之后,获取验证码变成发送中,然后再开始倒计时:
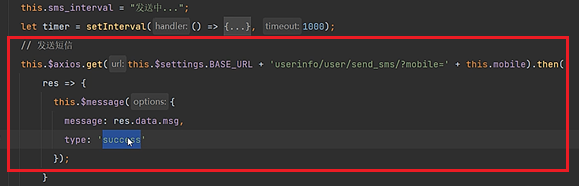
真正的发送短信:
后端校验手机号是否注册:

短信登录:

表单有值的时候发送。
不成功就弹窗:
Login.vue
<template>
<div class="login">
<div class="box">
<i class="el-icon-close" @click="close_login"></i>
<div class="content">
<div class="nav">
<span :class="{active: login_method === 'is_pwd'}"
@click="change_login_method('is_pwd')">密码登录</span>
<span :class="{active: login_method === 'is_sms'}"
@click="change_login_method('is_sms')">短信登录</span>
</div>
<el-form v-if="login_method === 'is_pwd'">
<el-input
placeholder="用户名/手机号/邮箱"
prefix-icon="el-icon-user"
v-model="username"
clearable>
</el-input>
<el-input
placeholder="密码"
prefix-icon="el-icon-key"
v-model="password"
clearable
show-password>
</el-input>
<el-button type="primary" @click="handleMulLogin">登录</el-button>
</el-form>
<el-form v-if="login_method === 'is_sms'">
<el-input
placeholder="手机号"
prefix-icon="el-icon-phone-outline"
v-model="mobile"
clearable
@blur="check_mobile">
</el-input>
<el-input
placeholder="验证码"
prefix-icon="el-icon-chat-line-round"
v-model="sms"
clearable>
<template slot="append">
<span class="sms" @click="send_sms">{{ sms_interval }}</span>
</template>
</el-input>
<el-button type="primary" @click="handleSmsLogin">登录</el-button>
</el-form>
<div class="foot">
<span @click="go_register">立即注册</span>
</div>
</div>
</div>
</div>
</template>
<script>
export default {
name: "Login",
data() {
return {
username: '',
password: '',
mobile: '',
sms: '',
login_method: 'is_pwd',
sms_interval: '获取验证码',
is_send: false, // 是true才可以发送短信
}
},
methods: {
close_login() {
this.$emit('close')
},
go_register() {
this.$emit('go')
},
change_login_method(method) {
this.login_method = method;
},
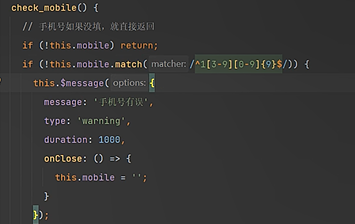
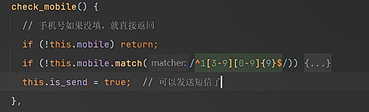
check_mobile() {
// 手机号如果没填,就直接返回
if (!this.mobile) return;
if (!this.mobile.match(/^1[3-9][0-9]{9}$/)) {
this.$message({
message: '手机号有误',
type: 'warning',
duration: 1000,
onClose: () => {
this.mobile = '';
}
});
return false;
}
//后端校验一下是否注册了
this.$axios.get(this.$settings.BASE_URL + 'userinfo/user/mobile/?mobile=' + this.mobile).then(res => {
if (res.data.code != 100) {
this.mobile = ''
this.$message({
message: '该手机号没注册,请先注册',
type: 'error'
});
return // 函数结束掉
}
})
this.is_send = true; // 可以发送短信了
},
send_sms() {
//如果is_send不是true,是不能发短信的
if (!this.is_send) return;
this.is_send = false;
let sms_interval_time = 60;
this.sms_interval = "发送中...";
let timer = setInterval(() => {
if (sms_interval_time <= 1) {
clearInterval(timer);
this.sms_interval = "获取验证码";
this.is_send = true; // 重新回复点击发送功能的条件
} else {
sms_interval_time -= 1;
this.sms_interval = `${sms_interval_time}秒后再发`;
}
}, 1000);
// 发送短信
this.$axios.get(this.$settings.BASE_URL + 'userinfo/user/send_sms/?mobile=' + this.mobile).then(
res => {
this.$message({
message: res.data.msg,
type: 'success'
});
}
)
},
// 多方式登录方法
handleMulLogin() {
if (this.username && this.password) {
this.$axios.post(this.$settings.BASE_URL + 'userinfo/user/mul_login/', {
username: this.username,
password: this.password
}).then(res => {
console.log(res.data)
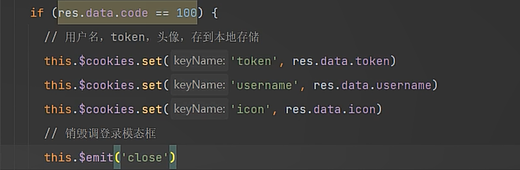
if (res.data.code == 100) {
// 用户名,token,头像,存到本地存储
this.$cookies.set('token', res.data.token)
this.$cookies.set('username', res.data.username)
this.$cookies.set('icon', res.data.icon)
// 销毁调登录模态框
this.$emit('close')
} else {
this.$message({
message: res.data.msg,
type: 'error'
});
}
})
} else {
this.$message({
message: '用户名或密码不能为空',
type: 'warning'
});
}
},
// 短信登录
handleSmsLogin() {
if (this.mobile && this.sms) {
this.$axios.post(this.$settings.BASE_URL + 'userinfo/user/mobile_login/', {
mobile: this.mobile,
code: this.sms
}).then(res => {
if (res.data.code == 100) {
// 用户名,token,头像,存到本地存储
this.$cookies.set('token', res.data.token)
this.$cookies.set('username', res.data.username)
this.$cookies.set('icon', res.data.icon)
// 销毁调登录模态框
this.$emit('close')
} else {
this.$message({
message: res.data.msg,
type: 'error'
});
}
})
}
}
}
}
</script>
<style scoped>
.login {
width: 100vw;
height: 100vh;
position: fixed;
top: 0;
left: 0;
z-index: 10;
background-color: rgba(0, 0, 0, 0.3);
}
.box {
width: 400px;
height: 420px;
background-color: white;
border-radius: 10px;
position: relative;
top: calc(50vh - 210px);
left: calc(50vw - 200px);
}
.el-icon-close {
position: absolute;
font-weight: bold;
font-size: 20px;
top: 10px;
right: 10px;
cursor: pointer;
}
.el-icon-close:hover {
color: darkred;
}
.content {
position: absolute;
top: 40px;
width: 280px;
left: 60px;
}
.nav {
font-size: 20px;
height: 38px;
border-bottom: 2px solid darkgrey;
}
.nav > span {
margin: 0 20px 0 35px;
color: darkgrey;
user-select: none;
cursor: pointer;
padding-bottom: 10px;
border-bottom: 2px solid darkgrey;
}
.nav > span.active {
color: black;
border-bottom: 3px solid black;
padding-bottom: 9px;
}
.el-input, .el-button {
margin-top: 40px;
}
.el-button {
width: 100%;
font-size: 18px;
}
.foot > span {
float: right;
margin-top: 20px;
color: orange;
cursor: pointer;
}
.sms {
color: orange;
cursor: pointer;
display: inline-block;
width: 70px;
text-align: center;
user-select: none;
}
</style>
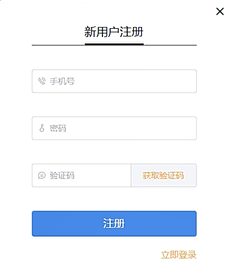
2 注册前台
注册功能
查看原型图:
校验手机号是否存在:
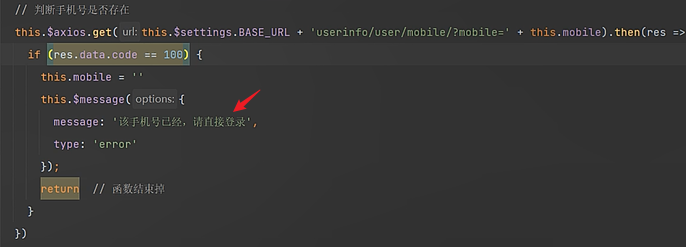
逻辑和登录刚好相反。
点击注册按钮,触发点击事件:
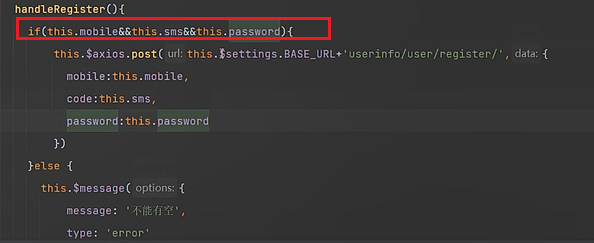
同样是表单不能为空才能发送请求。
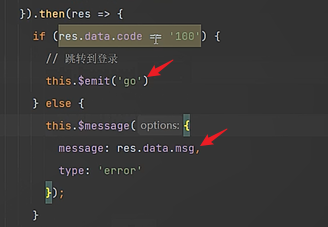
注册成功之后跳转到登录(也可能直接进入首页):
<template>
  <div class="register">
    <div class="box">
      <i class="el-icon-close" @click="close_register"></i>
      <div class="content">
        <div class="nav">
          <span class="active">新用户注册</span>
        </div>
        <el-form>
          <el-input
              placeholder="手机号"
              prefix-icon="el-icon-phone-outline"
              v-model="mobile"
              clearable
              @blur="check_mobile">
          </el-input>
          <el-input
              placeholder="密码"
              prefix-icon="el-icon-key"
              v-model="password"
              clearable
              show-password>
          </el-input>
          <el-input
              placeholder="验证码"
              prefix-icon="el-icon-chat-line-round"
              v-model="sms"
              clearable>
            <template slot="append">
              <span class="sms" @click="send_sms">{{ sms_interval }}</span>
            </template>
          </el-input>
          <el-button type="primary" @click="handleRegister">注册</el-button>
        </el-form>
        <div class="foot">
          <span @click="go_login">立即登录</span>
        </div>
      </div>
    </div>
  </div>
</template>

<script>
export default {
  name: "Register",
  data() {
    return {
      mobile: '',
      password: '',
      sms: '',
      sms_interval: '获取验证码',
      is_send: false,
    }
  },
  methods: {
    close_register() {
      this.$emit('close', false)
    },
    go_login() {
      this.$emit('go')
    },
    check_mobile() {
      if (!this.mobile) return;
      if (!this.mobile.match(/^1[3-9][0-9]{9}$/)) {
        this.$message({
          message: '手机号有误',
          type: 'warning',
          duration: 1000,
          onClose: () => {
            this.mobile = '';
          }
        });
        return false;
      }
      // 判断手机号是否存在
      this.$axios.get(this.$settings.BASE_URL + 'userinfo/user/mobile/?mobile=' + this.mobile).then(res => {
        if (res.data.code == 100) {
          this.mobile = ''
          this.$message({
            message: '该手机号已经,请直接登录',
            type: 'error'
          });
          return  // 函数结束掉
        }
      })
      this.is_send = true;
    },
    send_sms() {
      if (!this.is_send) return;
      this.is_send = false;
      let sms_interval_time = 60;
      this.sms_interval = "发送中...";
      let timer = setInterval(() => {
        if (sms_interval_time <= 1) {
          clearInterval(timer);
          this.sms_interval = "获取验证码";
          this.is_send = true; // 重新回复点击发送功能的条件
        } else {
          sms_interval_time -= 1;
          this.sms_interval = `${sms_interval_time}秒后再发`;
        }
      }, 1000);
      // 发送短信
      this.$axios.get(this.$settings.BASE_URL + 'userinfo/user/send_sms/?mobile=' + this.mobile).then(
          res => {
            this.$message({
              message: res.data.msg,
              type: 'success'
            });
          }
      )
    },
    handleRegister() {
      if (this.mobile && this.sms && this.password) {
        this.$axios.post(this.$settings.BASE_URL + 'userinfo/user/register/', {
          mobile: this.mobile,
          code: this.sms,
          password: this.password
        }).then(res => {
          if (res.data.code == '100') {
            // 跳转到登录
            this.$emit('go')
          } else {
            this.$message({
              message: res.data.msg,
              type: 'error'
            });
          }
        })
      } else {
        this.$message({
          message: '不能有空',
          type: 'error'
        });
      }

    }
  }
}
</script>

<style scoped>
.register {
  width: 100vw;
  height: 100vh;
  position: fixed;
  top: 0;
  left: 0;
  z-index: 10;
  background-color: rgba(0, 0, 0, 0.3);
}

.box {
  width: 400px;
  height: 480px;
  background-color: white;
  border-radius: 10px;
  position: relative;
  top: calc(50vh - 240px);
  left: calc(50vw - 200px);
}

.el-icon-close {
  position: absolute;
  font-weight: bold;
  font-size: 20px;
  top: 10px;
  right: 10px;
  cursor: pointer;
}

.el-icon-close:hover {
  color: darkred;
}

.content {
  position: absolute;
  top: 40px;
  width: 280px;
  left: 60px;
}

.nav {
  font-size: 20px;
  height: 38px;
  border-bottom: 2px solid darkgrey;
}

.nav > span {
  margin-left: 90px;
  color: darkgrey;
  user-select: none;
  cursor: pointer;
  padding-bottom: 10px;
  border-bottom: 2px solid darkgrey;
}

.nav > span.active {
  color: black;
  border-bottom: 3px solid black;
  padding-bottom: 9px;
}

.el-input, .el-button {
  margin-top: 40px;
}

.el-button {
  width: 100%;
  font-size: 18px;
}

.foot > span {
  float: right;
  margin-top: 20px;
  color: orange;
  cursor: pointer;
}

.sms {
  color: orange;
  cursor: pointer;
  display: inline-block;
  width: 70px;
  text-align: center;
  user-select: none;
}
</style>
Header.vue
export default {
name: "Header",
data() {
return {
url_path: sessionStorage.url_path || '/',
is_login: false,
is_register: false,
username: '',
}
},
methods: {
goPage(url_path) {
// 已经是当前路由就没有必要重新跳转
if (this.url_path !== url_path) {
// 传入的参数,如果不等于当前路径,就跳转
this.$router.push(url_path)
}
sessionStorage.url_path = url_path;
},
goLogin() {
this.loginShow = true
},
put_login() {
this.is_login = true;
this.is_register = false;
},
put_register() {
this.is_login = false;
this.is_register = true;
},
close_login() {
this.is_login = false;
this.username = this.$cookies.get('username')
},
close_register() {
this.is_register = false;
},
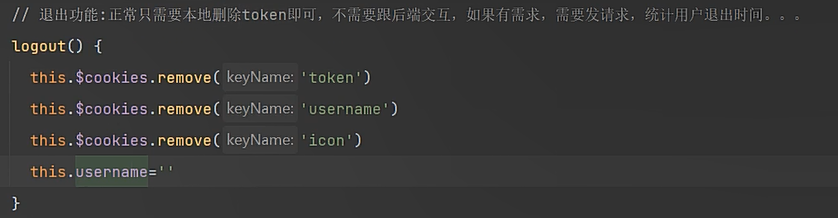
// 退出功能:正常只需要本地删除token即可,不需要跟后端交互,如果有需求,需要发请求,统计用户退出时间。。。
logout() {
this.$cookies.remove('token')
this.$cookies.remove('username')
this.$cookies.remove('icon')
this.username=''
}
},
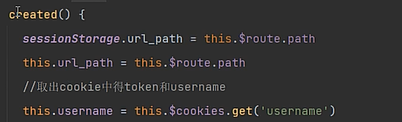
created() {
sessionStorage.url_path = this.$route.path
this.url_path = this.$route.path
//取出cookie中得token和username
this.username = this.$cookies.get('username')
},
components: {
Login,
Register
}
}
3 redis介绍
# redis是 c/s 架构的软件
redis:非关系型数据库【存数据的地方】nosql数据库,
内存存储:(断电数据消失),取值、放置速度非常快(10w qps),可以持久化【数据从内存同步到硬盘】
数据类型丰富:【5大数据类型:字符串,列表,哈希(字典),集合,有序集合】key-value形式存储【根本没有表的结构,相当于咱们的字典】字典的value值可以有五大数据类型。

    -nosql:指非关系型数据库: 1 不限于SQL(not only sql )  2 没有sql

# redis 为什么这么快
	-1 高性能的网络模型:redis是C/S架构的软件,客户端和服务端交互需要经过网络。redis使用IO多路复用的epoll模型(windows不支持这个模型),承载住非常高的并发量
    -2 纯内存操作,避免了很多io (快的本质原因,mysql慢因为要从硬盘中加载)
    -3 单线程架构,避免了线程间切换的消耗
    	-6.x之前:单线程,单进程
    	-6.x以后,多线程架构,数据操作还是使用单线程(只有一个线程处理任务),别的线程做数据持久化,其他操作

# redis 应用场景(了解)
	1 当缓存数据库使用,接口缓存,提高接口响应速度
    	第一次请求:
    	-请求进到视图---》去数据查询[多表查询,去硬盘取数据:速度慢]----》转成json格式字符串--》 存一份到redis ---》返回给前端
        第二次请求:
        -请求进到视图---》去redis[内存]----》取json格式字符串---》返回给前端
        第二次请求就无需再硬盘中读取,直接去内存读取。
        每次请求优先去redis里查询,如果没有再去硬盘查,并且存一份到redis,方便接口下一次获取数据
        。
    2 做计数器:单线程,不存在并发安全问题
    	mysql多线程但是加锁来解决并发安全问题(效率低)。
    	-统计网站访问量
        -个人站点浏览量
        -文章阅读量

    3 去重操作:集合
    4 排行榜:有序集合
    	-阅读排行榜
        -游戏金币排行榜

    5 布隆过滤器
    6 抽奖
    7 消息队列
3.1 redis应用场景
启动多个redis:相当于启动两个进程,其中数据是不共享的。
正常关闭redis(ctrl+c),会将内存数据,持久化存储到硬盘:
redis做计数器,高并发情况下不会出现数据错乱的情况:
单线程、单进程架构。没有锁的概念。
正常情况下,多个线程操作同一个变量,会出现并发安全的问题。mysql通过加锁的方式来解决(行锁、表锁、互斥锁)。相当于在这个变量的位置,程序从并行变成串行。(又会产生死锁问题)。而且加锁还会导致,效率变低。
redis做消息队列:分布式架构rabbitmq
redis分布式锁底层实现:基于nx实现的
3.2 redis安装
# 开源软件:使用c语言写的---【编译型语言,在操作系统运行,要编译成可执行文件,由于采用了IO多路复用的epoll模型,所以它不支持windows,只有linux操作系统支持epoll】
# 微软官方:改了,编译成可执行的安装包,下载一路下一步安装
-版本没有最新
# 官网:https://redis.io/
-下载完是源代码:c语言源码 :https://redis.io/download/#redis-stack-downloads
# 坂本说明
-公司里: 5.x比较多
-最稳定:6.x
-最新7.x
# 中文网:http://redis.cn/download.html
-上面最新只到5.x
# win版本下载地址
# 最新5.x版本 https://github.com/tporadowski/redis/releases/
# 最新3.x版本 https://github.com/microsoftarchive/redis/releases
下载完一路下一步即可,具体可参照:https://www.cnblogs.com/liuqingzheng/p/9831331.html
# 安装
-mac 源码编译安装
-linux 源码编译安装
-win 微软自己,基于源码,改动,编译成安装包
# 最新5.x版本 https://github.com/tporadowski/redis/releases/
# 最新3.x版本 https://github.com/microsoftarchive/redis/releases
一路下一步,安装完释放出两个命令,会把redis自动加入到服务中
redis-server # mysqld 服务端的启动命令
redis-cli # mysql 客户端的启动命令
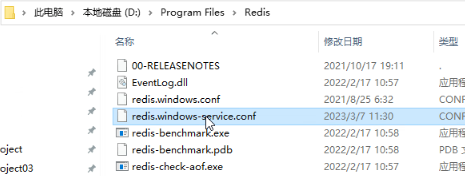
# 安装目录
redis-server
redis-cli
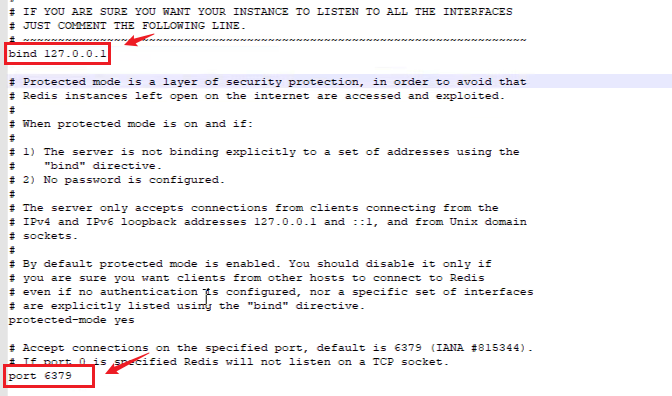
redis.windows-service.conf 配置文件
-bind 127.0.0.1 # 服务,跑在的地址
-port 6379 #监听的端口
# 启动redis
1 方式一:
-在服务中,点击启动,后台启动
2 方式二:使用命令
redis-server 指定配置文件 如果不指定,会默认
# 客户端连接redis
1 方式一
redis-cli #默认连接本地的6379端口
2 方式二:
redis-cli -h 地址 -p 端口
3 使用图形化客户端操作
-Redis Desktop Manager :开源的,原来免费,后来收费了 推荐用(mac,win,linux 都有)
-Qt5 qt是个平台,专门用来做图形化界面的
-可以使用c++写
-可以使用python写 pyqt5 使用python写图形化界面 (少量公司再用)
-resp-2022.1.0.0.exe 一路下一步,安装完启动起来
-Redis Client 小众
图形化界面,连接redis 输入地址和端口,点击连接即可 # redis默认有16个库,默认连进去就是第0个
"""
如何将django项目做成安装包?
"""
控制redis使用的最大内存: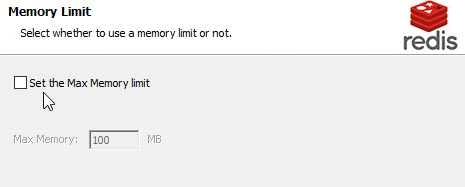
启动服务时,会执行redis配置文件:
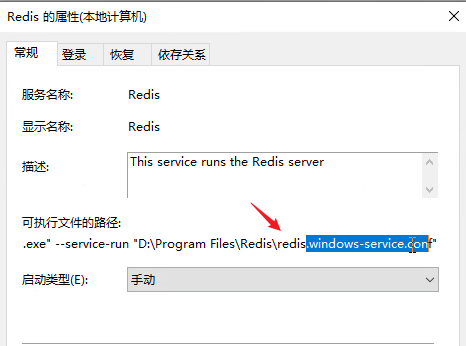
查看这个配置文件:
查看配置文件内容:
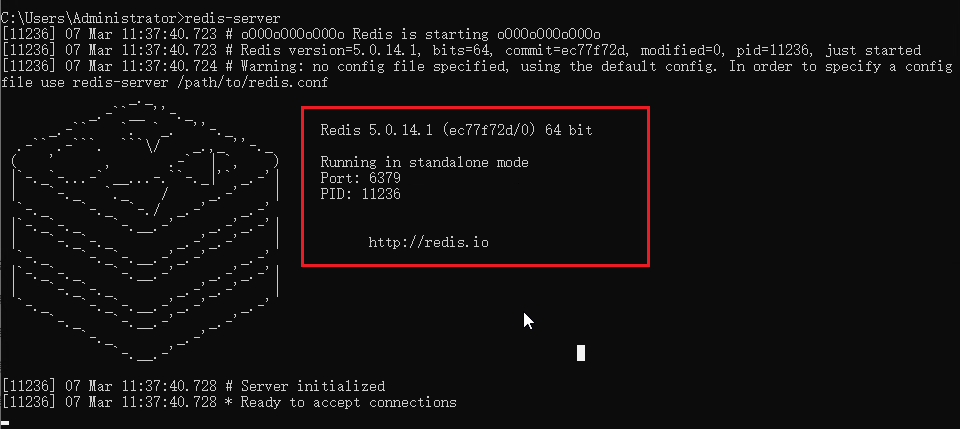
启动redis服务端
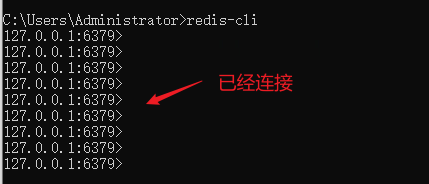
连接redis服务端:
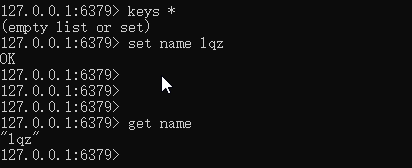
基本数据存取操作:
指定ip和端口号,连接redis(远程连接):

操作redis的图形化界面软件:
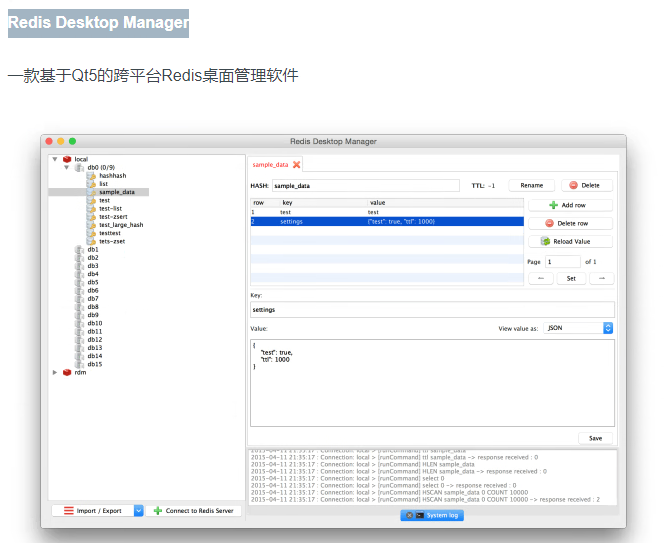
连接软件:
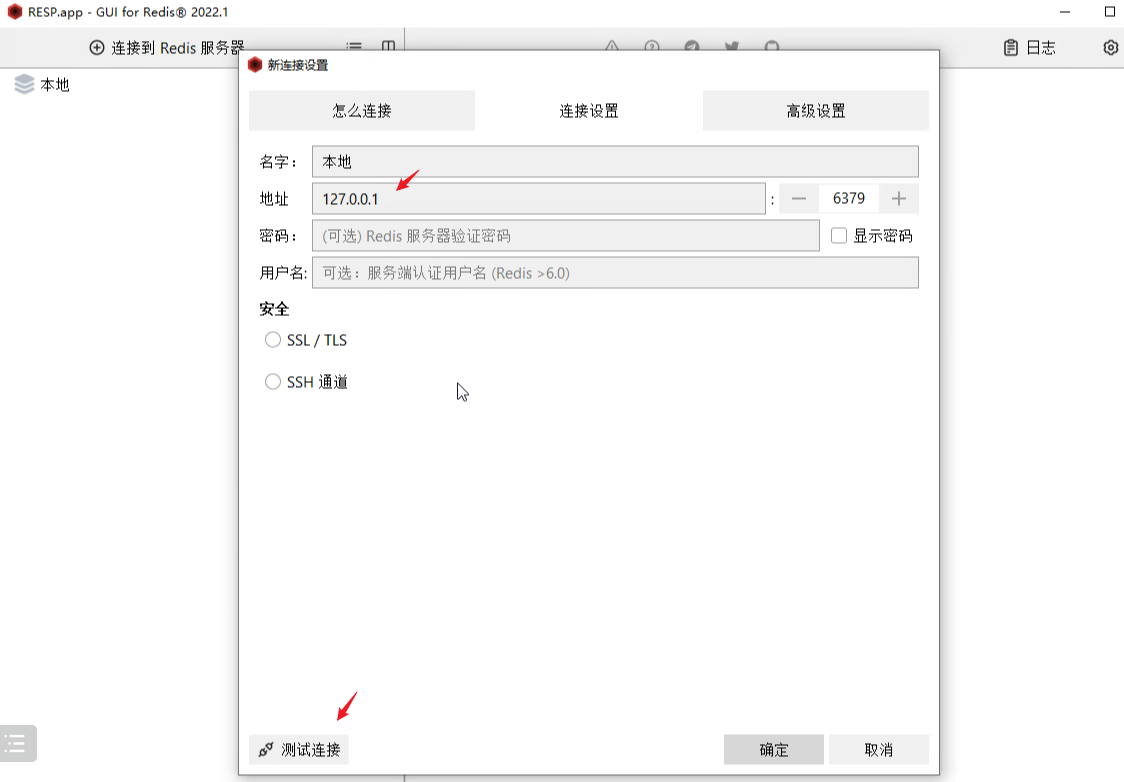
redis默认有16个库,默认连进去就是第0个。
查看配置文件,可以设置数据库的数量:

就使用第0个库即可。数据是存在机器内存。
4 python操作redis
# python 相当于客户端,操作redis
# 安装redis 模块:pip install redis
# 1 导入模块的Redis类
from redis import Redis
# 2 实例化得到对象
conn = Redis(host='127.0.0.1', port=6379)
# 3 使用conn,操作redis
# 获取name的值
# res = conn.get('name') # 返回数据是bytes格式
# 4 设置值
conn.set('age',19)
conn.close()
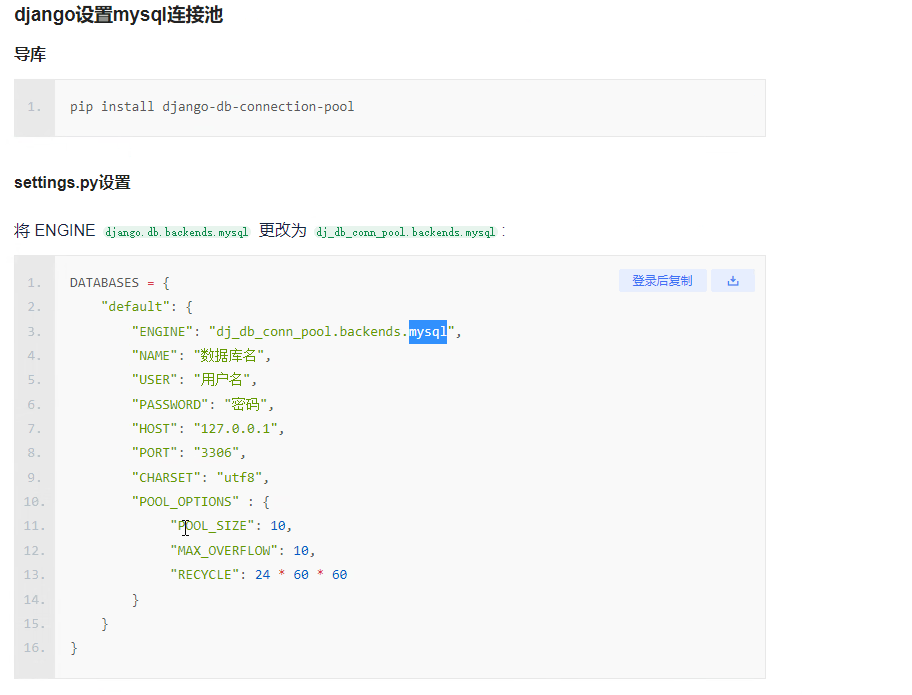
# 补充: django 中操作mysql,没有连接池的,一个请求就是一个mysql连接
-可能会有问题,并发数过高,导致mysql连接数过高,影响mysql性能
-使用django连接池:https://blog.51cto.com/liangdongchang/5140039
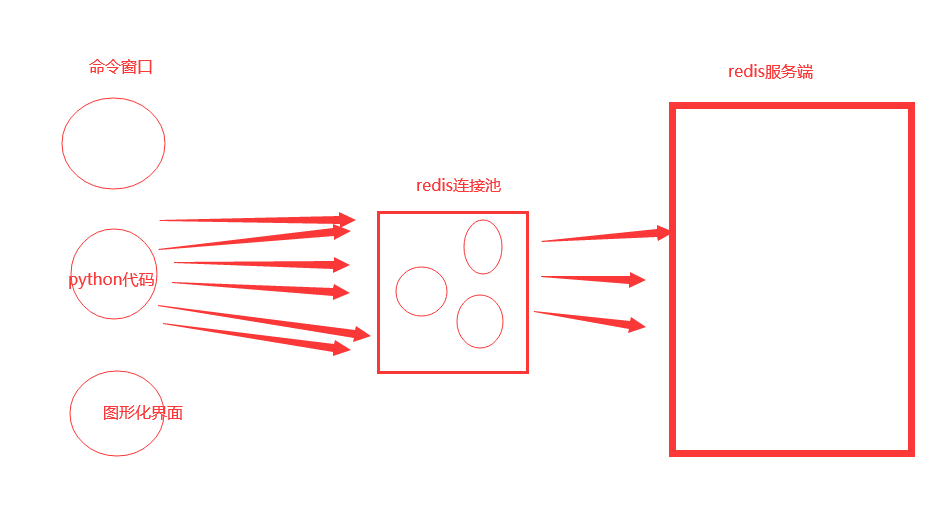
5 redis连接池
POOL.py
###pool.py
import redis
POOL = redis.ConnectionPool(max_connections=10, host='127.0.0.1', port=6379) # 创建一个大小为10的redis连接池
### 测试代码
import redis
from threading import Thread
from pool import POOL
def task():
# 做成模块后,导入,无论导入多少次,导入的都那一个POOL对象
conn = redis.Redis(connection_pool=POOL) # 报错的原因是拿连接,池里不够了,没有等待,线程报错 设置等待,参数
print(conn.get('name'))
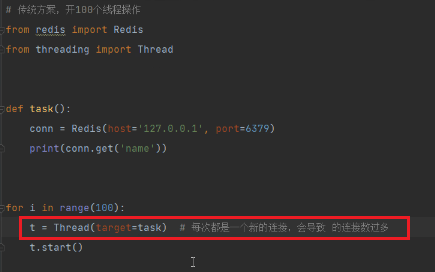
for i in range(1000):
t = Thread(target=task) # 每次都是一个新的连接,会导致 的连接数过多
t.start()
# 单例模式:设计模式 23 中设计模式
-全局只有一个 这个对象
p1=Person() # p1 对象
p2=Person() # p2 新对象
-单例模式的6种方式
-1 模块导入方式
-2 。。。
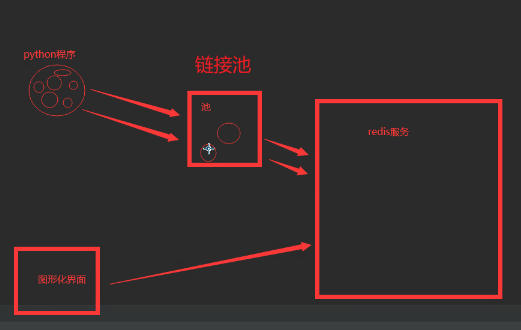
避免创建太多的链接。
django操作mysql有没有使用链接池?
没有使用。有多少个请求,就创建多少个链接。
django使用msyql连接池:
多线线程redis:
socket长连接。
使用redis连接池:

开多线程报错的原因:是因为连接池的链接不够了,这条线程不是阻塞在这里,而是直接报错。正常情况下应该设置等待时间,超过时间再报错。
单例模式
模块导入实现单例:
pyc是python编译之后的文件,导入模块时会生成pyc文件,第二次导入时会直接执行pyc。所以多次导入模块只有第一次有效。所以可以实现单例,因为之后使用的都是编译后的pyc文件。
注意,还要将连接池POOL做成单例模式:
如下,每个线程都会创建一个连接池:
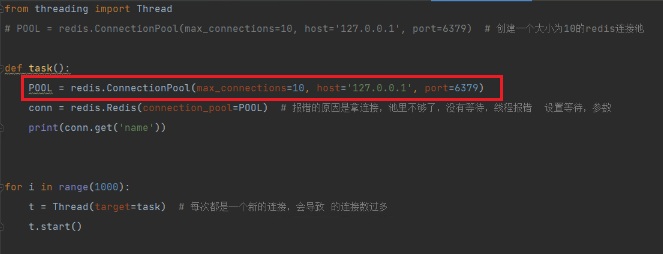
每个线程从池中拿一个链接,性能更低。
单例模式实现:使用模块导入的方式
新建一个模块,将创建链接池的代码复制过来,以后使用的时候直接导入即可。
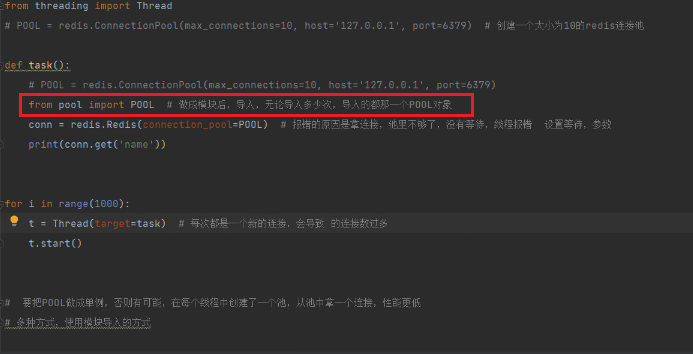
即便在新线程中导入,也导入的还是单例的连接池。
6 Redis之字符串类型
# redis 是key-value形式存储
# redis 数据放在内存中,如果断电,数据丢失---》需要有持久化的方案

# 5 种数据类型,value类型
	-字符串:用的最多,做缓存;做计数器
    -列表: 简单的消息队列
    -字典(hash):缓存
    -集合:去重
    -有序集合:排行榜
'''
1 set(name, value, ex=None, px=None, nx=False, xx=False)
2 setnx(name, value)
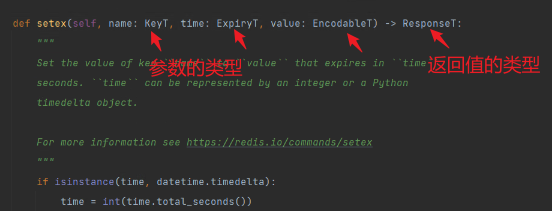
3 setex(name, value, time)
4 psetex(name, time_ms, value)
5 mset(*args, **kwargs)
6 get(name)
7 mget(keys, *args)
8 getset(name, value)
9 getrange(key, start, end)
10 setrange(name, offset, value)
11 setbit(name, offset, value)
12 getbit(name, offset)
13 bitcount(key, start=None, end=None)
14 bitop(operation, dest, *keys)
15 strlen(name)
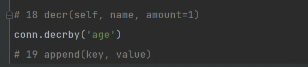
16 incr(self, name, amount=1)
# incrby
17 incrbyfloat(self, name, amount=1.0)
18 decr(self, name, amount=1)
19 append(key, value)
'''
import redis
conn = redis.Redis()
# 1 set(name, value, ex=None, px=None, nx=False, xx=False)
# ex,过期时间(秒)
# px,过期时间(毫秒)
# nx,如果设置为True,则只有name不存在时,当前set操作才执行, 值存在,就修改不了,执行没效果
# xx,如果设置为True,则只有name存在时,当前set操作才执行,值存在才能修改,值不存在,不会设置新值
# conn.set('hobby','篮球',ex=3)
# conn.set('hobby','篮球',px=3)
# conn.set('name','lqz',nx=True)
# conn.set('name','lqz',nx=False)
# conn.set('hobby','篮球',xx=True)
# conn.set('hobby','篮球',xx=False)
# redis---》实现分布式锁,底层基于nx实现的
# 2 setnx(name, value)
# 等同于:conn.set('name','lqz',nx=True)
# conn.setnx('name', '刘亦菲')
# 3 setex(name, value, time)
# 等同于:conn.set('name','lqz',ex=3)
# conn.setex('wife', 3, '刘亦菲')
# 4 psetex(name, time_ms, value)
# conn.psetex('wife',3000,'刘亦菲')
# 5 mset(*args, **kwargs)
# conn.mset({'wife': '刘亦菲', 'hobby': '篮球'})
# 6 get(name)
# print(str(conn.get('wife'),encoding='utf-8'))
# print(conn.get('wife'))
# 7 mget(keys, *args)
# res=conn.mget('wife','hobby')
# res=conn.mget(['wife','hobby'])
# print(res)
# 8 getset(name, value)
# res=str(conn.getset('wife','迪丽热巴'),encoding='utf-8')
# res=conn.getset('wife','迪丽热巴')
# print(res)
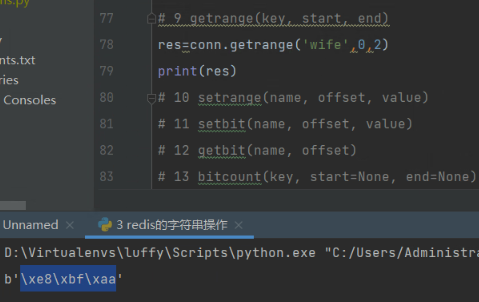
# 9 getrange(key, start, end)
# res = str(conn.getrange('wife', 0, 2), encoding='utf-8') # 字节长度,不是字符长度 前闭后闭区间
# print(res)
# 10 setrange(name, offset, value)
# conn.setrange('wife',2,'bbb')
# ---- 比特位---操作
# 11 setbit(name, offset, value)
# 12 getbit(name, offset)
# 13 bitcount(key, start=None, end=None)
# ---- 比特位---操作
# 14 bitop(operation, dest, *keys) 获取多个值,并将值做位运算,将最后的结果保存至新的name对应的值
# 15 strlen(name)
# res=conn.strlen('hobby') # 统计字节长度
# print(res)
# 16 incr(self, name, amount=1)
# 自增,不会出并发安全问题,单线程架构,并发量高
# conn.incr('age')
# # incrby
# 17 incrbyfloat(self, name, amount=1.0)
# conn.incrbyfloat('age',1.2)
# 18 decr(self, name, amount=1)
# conn.decrby('age')
# conn.decrby('age',-1)
# 19 append(key, value)
# conn.append('hobby','sb')
print(conn.strlen('hobby'))
conn.close()
'''
你需要记住的
set
get
strlen 字节长度
incr
'''
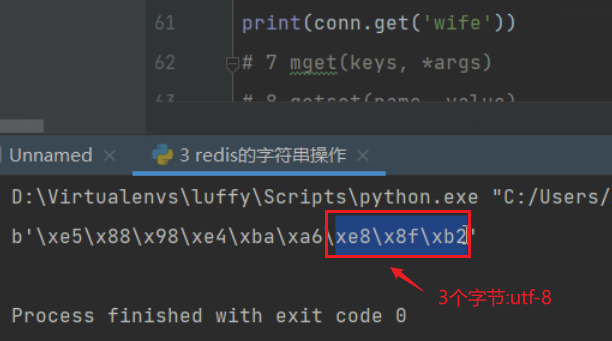
get方法获取到的是bytes类型,根据字节数可以推测使用的是utf-8编码:
getset 和 get\set 有什么区别?getset只经过一次网络请求,从服务端获取数据。
getrange拿出的是字节:(前闭后闭区间)
定时任务,将redis缓存的数据存储到mysql数据库。
int类型才能自增自减,如果是float类型,使用自增自减会报错:
练习
1 前端登录注册完成
3 装好redis
4 使用普通和连接池连接

5 照着比较测试所有string类型的方法

 浙公网安备 33010602011771号