【python-opencv】opencv基础操作之三
opencv_3
| 3 仿射变换 |
| 3.0 仿射变化基础 |
什么是仿射变换?
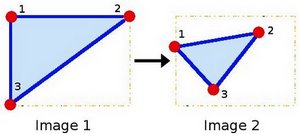
仿射变换就是图像的线性变换加上平移,用一幅图表示,就是
由 image1 到 image2 的转换经过了三个操作:
1.旋转 (线性变换)
2.缩放操作(线性变换)
3.平移 (向量加)
如果没有了第3个平移的操作,那它就是线性变换。前两个笔记已经整理了图像的旋转、缩放和平移的各个方法,接下来会介绍仿射变换的矩阵表示和使用方法。
仿射变化的矩阵形式
图像的变换要对图像的每一个像素点进行操作,假设其中的一个像素点的坐标是(x,y),我们用矩阵形式表示: $${X}=\begin{bmatrix} {x}\\ {y}\\ \end{bmatrix}\tag{1}$$ 我们通常使用$2\times3$矩阵来表示仿射变化。 $${A}=\begin{bmatrix} {a_{00}} & {a_{01}}\\ {a_{10}} & {a_{11}}\\ \end{bmatrix}_{2\times2}\tag{2}$$
$$B=\begin{bmatrix} {b_{00}}\\ {b_{10}}\\ \end{bmatrix}_{2\times1}\tag{3}$$$${M}=\begin{bmatrix} {A} & {B} \end{bmatrix} = \begin{bmatrix} {a_{00}} & {a_{01}} & {b_{00}}\\ {a_{10}} & {a_{11}} & {b_{10}}\\ \end{bmatrix}_{2\times3}\tag{4} $$矩阵${A}、{B}$就是变换矩阵。
经过仿射变换后的点的矩阵坐标是${T}$,我们已经知道放射变换就是线性变换加上平移,用矩阵表示的话就是
$${T}={A}\cdot\begin{bmatrix}
{x}\\
{y}\\
\end{bmatrix}+{B}\tag{5}
$$
也可以写成
$${T}={M}\cdot\begin{bmatrix}
{x, y, 1}
\end{bmatrix}^{T}\tag{6}
$$
计算可得:
$${T}=\begin{bmatrix}
{a_{00}\cdot{x}+a_{01}\cdot{y}+b_{00}}\\
{a_{10}\cdot{x}+a_{11}\cdot{y}+b_{10}}\\
\end{bmatrix}\tag{7}
$$
下面使用代码
import cv2
import requests
import time
from PIL import Image
from io import BytesIO
import numpy as np
from matplotlib import pyplot as plt

%matplotlib inline
# set None proxy
import os
os.environ['no_proxy'] = '*'
# get file(of Internet picture)
class InternetPicture:
    def __init__(self, url):
        # attribute
        self.url = url
        self.img = None
        # initial method
        self.get() # self代表类的实例, 而非类本身,所以self.get(self)--> self.get()
        self.show()
        self.info()

    # get Internet Picture
    def get(self):
        for i in range(5): # 多获取几次,增加成功率
            start=time.time()
            file = requests.get(self.url)
            img = cv2.imdecode(np.fromstring(file.content, np.uint8), 1)    #file.content 是读取的远程文件的字节流
            print(i + 1, ' time of Requesting Time:', time.time()-start)
        self.img = img
        print('get a file of:', type(img))

    # show image
    def show(self):
        #using plt draw picture
        plt.figure() # 设置画布
        plt.imshow(cv2.cvtColor(self.img, cv2.COLOR_BGR2RGB))
        plt.show()

    def info(self):
        # using cv2 to read Internet file of picture
        color_img = self.img
        gray_img = cv2.cvtColor(self.img, cv2.COLOR_BGR2GRAY)

        # 获取信息:行,列,通道,像素数目,图像数据类型
        print('获取信息:行,列,通道,像素数目,图像数据类型')
        print(color_img.shape, color_img.size, color_img.dtype)
        print(gray_img.shape, gray_img.size, gray_img.dtype)
        print('self.img: get a numpy image')
        print('self.show(): show a numpy image using plt')

        # using PIL.Image to read Internet file of picture
        ## image = Image.open(BytesIO(file.content))
        ## image.show()
# draw a cvMat using plt.
def draw(image):
        plt.figure() # 设置画布
        plt.imshow(cv2.cvtColor(image, cv2.COLOR_BGR2RGB))
        plt.show()
| 3.1 图像平移的代码 |
之前有讲过
实例代码
# 实例化类,并获取一个网络图像
url = 'https://ss0.bdstatic.com/70cFuHSh_Q1YnxGkpoWK1HF6hhy/it/u=672015163,3441564657&fm=26&gp=0.jpg'
instance = InternetPicture(url)
img = instance.img
rows, cols, _ = img.shape
M = np.float32([[1, 0, 200], [0, 1, 100]])
dst = cv2.warpAffine(img, M, (cols, rows))
draw(dst)
在代码:
M = np.float32([[1, 0, 200], [0, 1, 100]])
中。将这个二维矩阵的值带入${T}$,得到经过仿射变换后的点的坐标是$(x+200,y+100)$,即将整个图像平移$(200,100)$
再次强调一下:图片的高度(y方向)是rows,宽度(x方向)是cols,请勿混淆。
| 3.2 图像旋转的代码 |
之前有讲过
实例代码
# 实例化类,并获取一个网络图像
url = 'https://ss0.bdstatic.com/70cFuHSh_Q1YnxGkpoWK1HF6hhy/it/u=672015163,3441564657&fm=26&gp=0.jpg'
instance = InternetPicture(url)

# 旋转就完事儿了
img = instance.img
rows, cols, _ = img.shape
M = cv2.getRotationMatrix2D((cols / 2, rows / 2), 90, 0.5)
dst = cv2.warpAffine(img, M, (cols, rows))
draw(dst)
大部分同上类似,只是其中的${M}$矩阵不同。
M = cv2.getRotationMatrix2D((cols / 2, rows / 2), 90, 0.5) # 第一个参数是中心点的坐标
参数1:图片的旋转中心
参数2:旋转角度
参数3:缩放比例,该例中0.5表示我们缩小一半
| 3.3 图像仿射 |
那么如何通过仿射变换任意变换图形呢?
我们需要源图像和目标图像上分别一一映射的三个点来定义仿射变换
# 实例化类,并获取一个网络图像
url = 'https://ss0.bdstatic.com/70cFuHSh_Q1YnxGkpoWK1HF6hhy/it/u=672015163,3441564657&fm=26&gp=0.jpg'
instance = InternetPicture(url)

# 仿射
img = instance.img
rows, cols, _ = img.shape

# 变换前的三个点
pts1 = np.float32([[0, 0], [cols - 1, 0], [0, rows - 1]])
# 变换后的三个点
pts2 = np.float32([[cols * 0.2, rows * 0.1], [cols * 0.9, rows * 0.2], [cols * 0.1, rows * 0.9]])

# 得到变换矩阵
M = cv2.getAffineTransform(pts1, pts2)
dst = cv2.warpAffine(img, M, (cols, rows))
draw(dst)


