缓存数据一致性探究 Databus架构分析与初步实践
Open sourcing Databus: LinkedIn's low latency change data capture system | LinkedIn Engineering https://engineering.linkedin.com/data-replication/open-sourcing-databus-linkedins-low-latency-change-data-capture-system
Co-authors: Sunil Nagaraj, Shirshanka Das, Kapil Surlaker
We are pleased to announce the open source release of Databus - a real-time change data capture system. Originally developed in 2005, Databus has been in production in its latest revision at Linkedin since 2011. The Databus source code is available in our github repo for you to get started!
What is Databus?
LinkedIn has a diverse ecosystem of specialized data storage and serving systems. Primary OLTP data-stores take user facing writes and some reads. Other specialized systems serve complex queries or accelerate query results through caching. For example, search queries are served by a search index system which needs to continually index the data in the primary database.
This leads to a need for reliable, transactionally consistent change capture from primary data sources to derived data systems throughout the ecosystem. In response to this need, we developed Databus, which is an integral part of LinkedIn's data processing pipeline. The Databus transport layer provides end-to-end latencies in milliseconds and handles throughput of thousands of change events per second per server while supporting infinite lookback capabilities and rich subscription functionality.
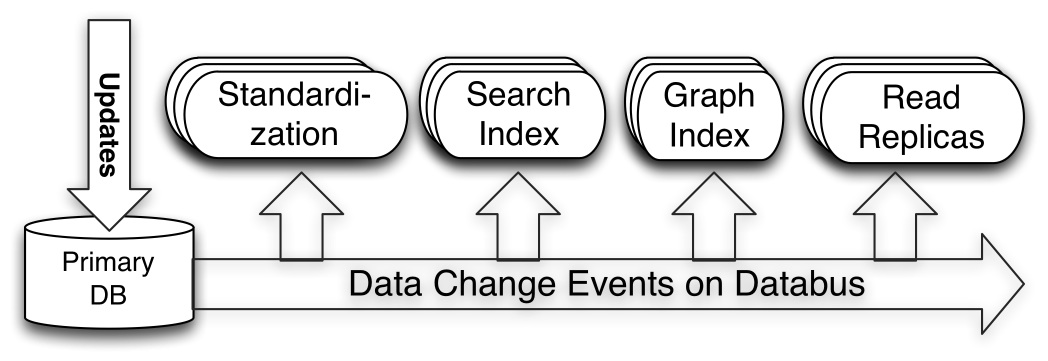
As shown above, systems such as Search Index and Read Replicas act as Databus consumers using the client library. When a write occurs to a primary OLTP database, the relays connected to that database pull the change into the relay. The databus consumer embedded in the search index or cache pulls it from the relay (or bootstrap) and updates the index or cache as the case may be. This keeps the index up to date with the state of the source database.
How does Databus work?
Databus offers the following important features:
- Source-independent: Databus supports change data capture from multiple sources including Oracle and MySQL. The Oracle adapter is included in our open-source release. We plan to open source the MySQL adapter soon.
- Scalable and highly available: Databus scales to thousands of consumers and transactional data sources while being highly available.
- Transactional in-order delivery: Databus preserves transactional guarantees of the source database and delivers change events grouped in transactions, in source commit order.
- Low latency and rich subscription: Databus delivers events to consumers within milliseconds of the changes being available from the source. Consumers can also retrieve specific partitions of the stream using server-side filtering in Databus.
- Infinite lookback: One of the most innovative components of Databus is the ability to support infinite lookback for consumers. When a consumer needs to generate a downstream copy of the entire data (for example a new search index), it can do so without putting any additional load on the primary OLTP database. This also helps consumers when they fall significantly behind the source database.
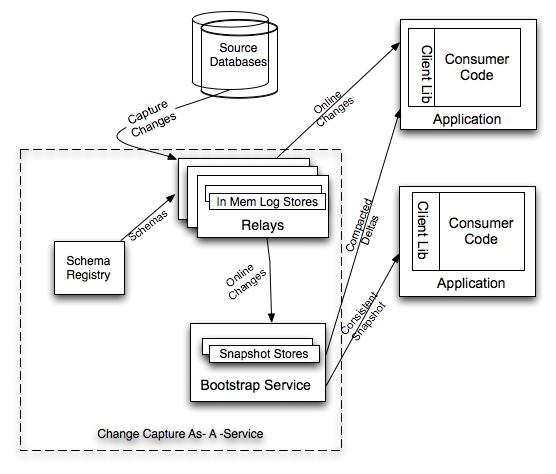
As depicted, the Databus System comprises of relays, bootstrap service and the client library. The Relay fetches committed changes from the source database and stores the events in a high performance log store. The Bootstrap Service stores a moving snapshot of the source database by periodically applying the change stream from the Relay. Applications use the Databus Client Library to pull the change stream from the Relay or Bootstrap and process the change events in Consumers that implement a callback API defined by the library.
Fast moving consumers retrieve events from the Databus relay. If a consumer were to fall behind such that the data it requests is no longer in the Relay's log, the consumer will be delivered a consolidated snapshot of changes that have occurred since the last change processed by the consumer. If a new consumer with no prior copy of the dataset shows up, it’s given a snapshot of the data (consistent as of some point in time) from the Bootstrap service, at which point it continues catching up from the Databus relay.
Databus架构分析与初步实践(for mysql)(上篇)-社区博客-网易数帆 https://sq.sf.163.com/blog/article/173552201158811648
description: 目前关于databus的相关资料较少,特别是针对mysql的文档尤为稀少。本篇文章中介绍了databus相关组件及实现原理,初步实现了databus对mysql数据库的数据抓取,希望对后续使用者能提供一定的参考作用。 categories: 后端 date: 2017/5/24 tags:
- Databus For Mysql
- 低延迟数据抓取
- 数据库日志挖掘
1. 简介
Databus是一个低延迟、可靠的、支持事务的、保持一致性的数据变更抓取系统。由LinkedIn于2013年开源。Databus通过挖掘数据库日志的方式,将数据库变更实时、可靠的从数据库拉取出来,业务可以通过定制化client实时获取变更并进行其他业务逻辑。
Databus有以下特点:
- 数据源和消费者之间的隔离。
- 数据传输能保证顺序性和至少一次交付的高可用性。
- 从变化流的任意时间点进行消费,包括通过bootstrap获取所有数据。
- 分区消费
- 源一致性保存,消费不成功会一直消费直到消费成功
2. 功能&特性
- 来源独立:Databus支持多种数据来源的变更抓取,包括Oracle和MySQL。
- 可扩展、高度可用:Databus能扩展到支持数千消费者和事务数据来源,同时保持高度可用性。
- 事务按序提交:Databus能保持来源数据库中的事务完整性,并按照事务分组和来源的提交顺寻交付变更事件。
- 低延迟、支持多种订阅机制:数据源变更完成后,Databus能在毫秒级内将事务提交给消费者。同时,消费者使用Databus中的服务器端过滤功能,可以只获取自己需要的特定数据。
- 无限回溯:对消费者支持无限回溯能力,例如当消费者需要产生数据的完整拷贝时,它不会对数据库产生任何额外负担。当消费者的数据大大落后于来源数据库时,也可以使用该功能。
3. 使用场景举例
BUSSINESS1 和 BUSSINESS2 是两个不同的业务逻辑,他们的变更需要同时写入到 DB 和 CACHE ,那么当他们同时修改同一个数据的时候是否能保证数据的一致性呢?可以发现如果按照下图标明的顺序进行操作并不能保证数据的一致性!
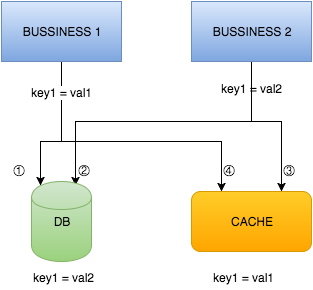
还有一个问题是变更完DB之后,更新CACHE失败怎么办?如果忽略的话,会造成后续读取到CACHE中旧的数据,如果重试的话,业务代码会写得更加复杂。针对这些场景,如果没有一个强一致协议是很难解决掉的。如果要业务逻辑去实现这些晦涩的一致性协议,却又是不现实的。
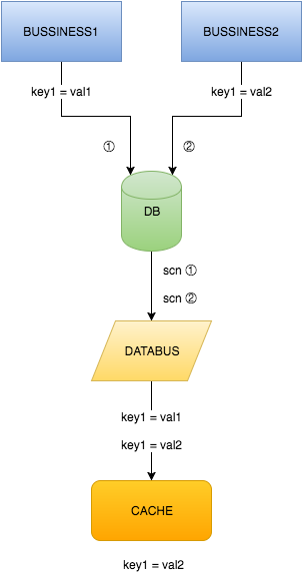
现在,有了Databus,上面提到的这些一致性问题就都没有了,并且那些冗长的双写逻辑也可以去掉了,如下图所示:
4. 系统整体架构与主要组件
4.1 系统整体架构
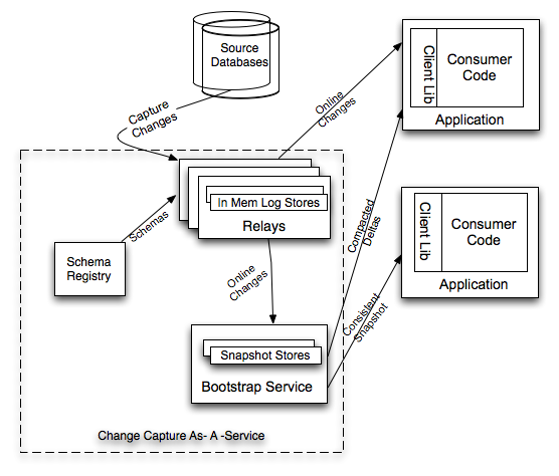
上图中介绍了Databus系统的构成,包括Relays、bootstrap服务和Client lib等。Bootstrap服务中包括Bootstrap Producer和Bootstrap Server。快速变化的消费者直接从Relay中取事件。如果一个消费者的数据更新大幅落后,它要的数据就不在Relay的日志中,而是需要请求Bootstrap服务,返回的将会是自消费者上次处理变更之后的所有数据变更快照。
- Source Databases:MySQL以及Oracle数据源
- Relays:负责抓取和存储数据库变更,全内存存储,也可配置使用mmap内存映射文件方式
- Schema Registry:数据库数据类型到Databus数据类型的一个转换表
- Bootstrap Service:一个特殊的客户端,功能和Relays类似,负责存储数据库变更,主要是磁盘存储
- Application:数据库变更消费逻辑,从Relay中拉取变更,并消费变更
- Client Lib:提供挑选关注变更的API给消费逻辑
- Consumer Code:变更消费逻辑,可以是自身消费或者再将变更发送至下游服务
4.2 主要组件及功能
上图系统整体架构图画的比较简略,下载源码观察项目结构后不难发现databus的主要由以下四个组件构成:
- Databus Relay:
- 从源数据库中的Databus源中读取变化的行并序列化为Databus变化事件保存到内存缓冲区中。
- 监听Databus客户端的请求(包括引导程序的请求)并传输Databus数据变化事件。
- Databus Client:
- 在Relay上检查新的数据变化事件和处理特定的业务逻辑的回调。
- 如果它们在relay后面落下太远,到引导程序服务运行一个追溯查询。
- 单独的客户端可以处理全部的Databus流,它们也可以作为集群的一部分而每个客户端处理一部分流。
- Databus Bootstrap Producer:
- 只是一个特殊的客户端。
- 检查Relay上的新的数据变化事件。
- 保存数据变化事件到Mysql数据库,Mysql数据库用于引导程序和为了客户端追溯数据。
- Databus Bootstrap Server:
- 监听来自Databus客户端的请求并为了引导和追溯返回一个超长的回溯的数据变化事件。
5. Databus Relay和Databus Client详细分析
5.1 Databus Relay
5.1.1 架构与组件功能
-
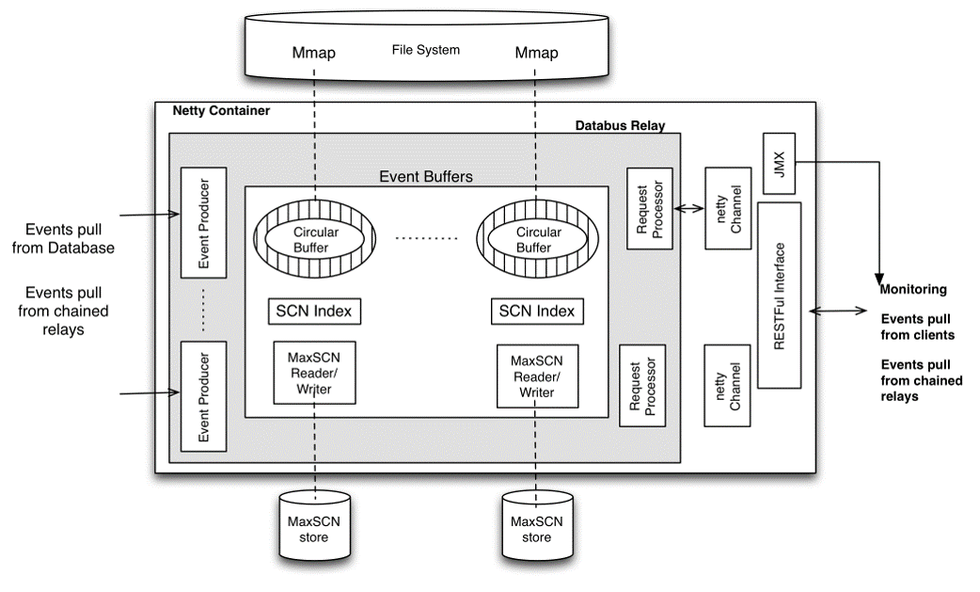
Databus Event Producer(DBEP):定期从数据库中查询变更,如果检测到变更,它将读取数据库中的所有已更改的行,并将其转换为Avro记录。因为数据库数据类型和Databus数据类型不一致,因此需要 Schema Registry 做转换。
-
SCN(System Change Number):系统改变号,是数据库中非常重要的一个数据结构。SCN用以标识数据库在某个确切时刻提交的版本。在事务提交时,它被赋予一个唯一的标识事务的SCN。
-
Event Buffers:按照SCN的顺序存储databus事件,buffer可以是纯内存的,也可以是mmap到文件系统的。每个buffer在内存中还有一个对应的SCN Index和一个MaxSCN reader/writer,SCN Index可以加快查询指定事件的速度。
-
Request Processor:通过监听Netty的channel,实现收发client的请求。
-
MaxSCN Reader/Writer:用于跟踪DBEP的处理进度;Reader在Databus启动的时候会读取存储的文件上一次DBEP处理的位置,当Databus从DBEP中读取变更存储到Event Buffers时,Writer就会最后一个SCN写入到文件中存储,这样就能保证下次启动可以从正确的位置读取数据库变更。
-
JMX(Java Management Extensions):支持标准的Jetty容器,databus提供了多个Mbean来监控relay
- ContainerStatsMBean
- DbusEventsTotalStatsMBean
- DbusEventsStatisticsCollectorMBean
-
RESTFul Interface:Realy提供了相关http接口供外部调用,Client与Relay建立http长连接,并从Relay拉取Event。
5.1.2 源码分析
-
ServerContainer._globalStatsThread:统计信息的线程
-
OpenReplicatorEventProducer.EventProducerThread:针对mysql binlog日志的Event生产者线程,每个source一个线程,持有_orListener,管理和数据库的连接,将变更写入到Event Buffer里。
-
EventProducerThread启动后会初始化类型为OpenReplicator的日志解析对象开始解析日志,同时初始化类型为ORListener的_orListener开始监听,代码如下:
  @Override
  public void run()
  {
    _eventBuffer.start(_sinceScn);
    _startPrevScn.set(_sinceScn);

    initOpenReplicator(_sinceScn);
    try
    {
      boolean started = false;
      while (!started) {
        try {
          _or.start();
          started = true;
        }
        catch (Exception e) {
          _log.error("Failed to start OpenReplicator: " + e);
          _log.warn("Sleeping for 1000 ms");
          Thread.sleep(1000);
        }
      }
      _orListener.start();
    } catch (Exception e)
    {
      _log.error("failed to start open replicator: " + e.getMessage(), e);
      return;
    }
  }
初始化方法如下:
  void initOpenReplicator(long scn)
  {
    int offset = offset(scn);
    int logid = logid(scn);

    String binlogFile = String.format("%s.%06d", _binlogFilePrefix, logid);
    // we should use a new ORListener to drop the left events in binlogEventQueue and the half processed transaction.
    _orListener = new ORListener(_sourceName, logid, _log, _binlogFilePrefix, _producerThread, _tableUriToSrcIdMap,
        _tableUriToSrcNameMap, _schemaRegistryService, 200, 100L);

    _or.setBinlogFileName(binlogFile);
    _or.setBinlogPosition(offset);
    _or.setBinlogEventListener(_orListener);

    //must set transport and binlogParser to null to drop the old connection environment in reinit case
    _or.setTransport(null);
    _or.setBinlogParser(null);

    _log.info("Connecting to OpenReplicator " + _or.getUser() + "@" + _or.getHost() + ":" + _or.getPort() + "/"
            + _or.getBinlogFileName() + "#" + _or.getBinlogPosition());
  }
EventProducerThread._orListener:监听数据库变更,将变更转换为Avro记录,写入到transaction里面,最终调用_producerThread的onEndTransaction()方法将事务里的事件写入到Event Buffer里,代码如下:
  @Override
  public void onEndTransaction(Transaction txn) throws DatabusException
  {
    try
    {
      addTxnToBuffer(txn);
      _maxSCNReaderWriter.saveMaxScn(txn.getIgnoredSourceScn()!=-1 ? txn.getIgnoredSourceScn() : txn.getScn());
    }
    catch (UnsupportedKeyException e)
    {
      _log.fatal("Got UnsupportedKeyException exception while adding txn (" + txn + ") to the buffer", e);
      throw new DatabusException(e);
    }
    catch (EventCreationException e)
    {
      _log.fatal("Got EventCreationException exception while adding txn (" + txn + ") to the buffer", e);
      throw new DatabusException(e);
    }
  }
FileMaxSCNHandler负责读写SCN,注意在写入文件时会将原有文件重命名为XXX.temp,原因是为了防止在更新文件的时候发生错误,导致SCN丢失,代码如下:
-
private void writeScnToFile() throws IOException { long scn = _scn.longValue(); File dir = _staticConfig.getScnDir(); if (! dir.exists() && !dir.mkdirs()) { throw new IOException("unable to create SCN file parent:" + dir.getAbsolutePath()); } // delete the temp file if one exists File tempScnFile = new File(_scnFileName + TEMP); if (tempScnFile.exists() && !tempScnFile.delete()) { LOG.error("unable to erase temp SCN file: " + tempScnFile.getAbsolutePath()); } File scnFile = new File(_scnFileName); if (scnFile.exists() && !scnFile.renameTo(tempScnFile)) { LOG.error("unable to backup scn file"); } if (!scnFile.createNewFile()) { LOG.error("unable to create new SCN file:" + scnFile.getAbsolutePath()); } FileWriter writer = new FileWriter(scnFile); writer.write(Long.toString(scn)); writer.write(SCN_SEPARATOR + new Date().toString()); writer.flush(); writer.close(); LOG.debug("scn persisted: " + scn); } -
以源码例子中PersonRelayServer的主类启动为起点,大致的启动流程如下:
PersonRelayServer主方法 -> new DatabusRelayMain实例 -> 调用initProducers方法初始化生产者->根据配置调用addOneProducer增加生产者->new DbusEventBufferAppendable获得Event Buffer->new EventProducerServiceProvider实例-> 调用createProducer获得OpenReplicatorEventProducer->OpenReplicatorEventProducer中包含 EventProducerThread->启动线程开始获取Event
5.2 Databus Client
5.2.1 架构与组件功能
-
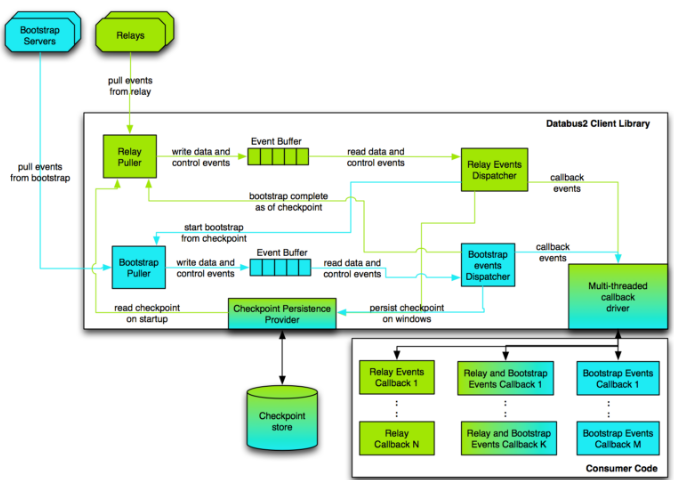
Relay Puller:负责从relay拉取数据,具体工作有挑选relay,请求source,请求Register,校验schema,设置dispatcher等。
-
Dispatcher:从event buffers中读取事件,调用消费逻辑的回调,主要职责有:
- 判断回调是否正确,回调失败后会进行重试,重试次数超限后抛出异常
- 监控错误和超时
- 持久化checkpoint
-
Checkpoint persistence Provider:checkpoint是消费者消费变更记录点的位置,负责将checkpoint持久化到本地,保证下次启动后可以从正常的位置pull event。
-
Event Callback:调用消费者自定义业务逻辑代码。
-
Bootstrap Puller:负责从Bootstrap servers拉取数据,功能类似Relay Puller。
5.2.2 源码分析
执行Client的启动脚本后会调用main方法,main方法会根据命令行参数中指定的属性文件创建StaticConfig类,然后配置类创建dbusHttpClient实例来与Relay进行通信,参数defaultConfigBuilder为默认配置类信息,可以为空,代码如下:
public static DatabusHttpClientImpl createFromCli(String[] args, Config defaultConfigBuilder) throws Exception
{
Properties startupProps =  ServerContainer.processCommandLineArgs(args);
if (null == defaultConfigBuilder) defaultConfigBuilder = new Config();

ConfigLoader<StaticConfig> staticConfigLoader =
    new ConfigLoader<StaticConfig>("databus.client.", defaultConfigBuilder);

StaticConfig staticConfig = staticConfigLoader.loadConfig(startupProps);

DatabusHttpClientImpl dbusHttpClient = new DatabusHttpClientImpl(staticConfig);

return dbusHttpClient;
}
设置要连接的Relay信息,然后通过参数defaultConfigBuilder传递给dbusHttpClient,代码如下:
DatabusHttpClientImpl.Config configBuilder = new DatabusHttpClientImpl.Config();
    configBuilder.getRuntime().getRelay("1").setHost("localhost");
    configBuilder.getRuntime().getRelay("1").setPort(11115);
    configBuilder.getRuntime().getRelay("1").setSources(PERSON_SOURCE);
}
启动databus client过程如下:
protected void doStart()
{
    _controlLock.lock();
    try
    {
      // 绑定并开始接收来到的连接
      int portNum = getContainerStaticConfig().getHttpPort();
      _tcpChannelGroup = new DefaultChannelGroup();
      _httpChannelGroup = new DefaultChannelGroup();

      _httpServerChannel = _httpBootstrap.bind(new InetSocketAddress(portNum));
      InetSocketAddress actualAddress = (InetSocketAddress)_httpServerChannel.getLocalAddress();
      _containerPort = actualAddress.getPort();

      // 持久化端口号 (文件名对容器来说必须唯一)
      File portNumFile = new File(getHttpPortFileName());
      portNumFile.deleteOnExit();
      try {
        FileWriter portNumFileW = new FileWriter(portNumFile);
        portNumFileW.write(Integer.toString(_containerPort));
        portNumFileW.close();
        LOG.info("Saving port number in " + portNumFile.getAbsolutePath());
      } catch (IOException e) {
        throw new RuntimeException(e);
      }

      _httpChannelGroup.add(_httpServerChannel);
      LOG.info("Serving container " + getContainerStaticConfig().getId() +
               " HTTP listener on port " + _containerPort);

      if (_containerStaticConfig.getTcp().isEnabled())
      {
        int tcpPortNum = _containerStaticConfig.getTcp().getPort();
        _tcpServerChannel = _tcpBootstrap.bind(new InetSocketAddress(tcpPortNum));
        _tcpChannelGroup.add(_tcpServerChannel);

        LOG.info("Serving container " + getContainerStaticConfig().getId() +
                 " TCP listener on port " + tcpPortNum);
      }

      _nettyShutdownThread = new NettyShutdownThread();
      Runtime.getRuntime().addShutdownHook(_nettyShutdownThread);

      // 5秒后开始producer线程
      if (null != _jmxConnServer && _containerStaticConfig.getJmx().isRmiEnabled())
      {
        try
        {
          _jmxShutdownThread = new JmxShutdownThread(_jmxConnServer);
          Runtime.getRuntime().addShutdownHook(_jmxShutdownThread);

          _jmxConnServer.start();
          LOG.info("JMX server listening on port " + _containerStaticConfig.getJmx().getJmxServicePort());
        }
        catch (IOException ioe)
        {
          if (ioe.getCause() != null && ioe.getCause() instanceof NameAlreadyBoundException)
          {
            LOG.warn("Unable to bind JMX server connector. Likely cause is that the previous instance was not cleanly shutdown: killed in Eclipse?");
            if (_jmxConnServer.isActive())
            {
              LOG.warn("JMX server connector seems to be running anyway. ");
            }
            else
            {
              LOG.warn("Unable to determine if JMX server connector is running");
            }
          }
          else
          {
            LOG.error("Unable to start JMX server connector", ioe);
          }
        }
      }

      _globalStatsThread.start();
    }
    catch (RuntimeException ex)
    {
        LOG.error("Got runtime exception :" + ex, ex);
        throw ex;
    }
    finally
    {
      _controlLock.unlock();
    }
}
相关阅读:Databus架构分析与初步实践(for mysql)(下篇)
缓存数据一致性探究 https://mp.weixin.qq.com/s/OWuP66WxpciBAgm2mptUxw
订阅 MySQL binlog,再操作缓存
「先更新数据库,再删缓存」的策略的第一步是更新数据库,那么更新数据库成功,就会产生一条变更日志,记录在 binlog 里。
于是我们就可以通过订阅 binlog 日志,拿到具体要操作的数据,然后再执行缓存删除,阿里巴巴开源的 Canal 中间件就是基于这个实现的。
Canal 模拟 MySQL 主从复制的交互协议,把自己伪装成一个 MySQL 的从节点,向 MySQL 主节点发送 dump 请求,MySQL 收到请求后,就会开始推送 Binlog 给 Canal,Canal 解析 Binlog 字节流之后,转换为便于读取的结构化数据,供下游程序订阅使用。
下图是 Canal 的工作原理:
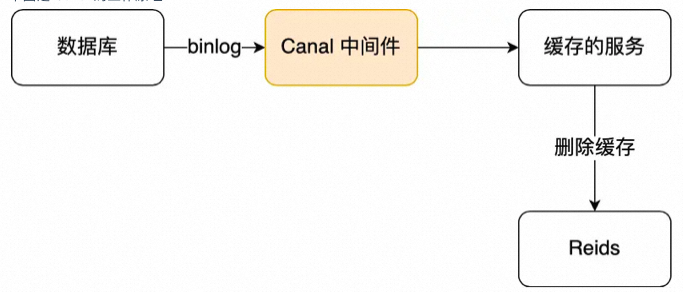
所以,如果要想保证「先更新数据库,再删缓存」策略第二个操作能执行成功,我们可以使用「消息队列来重试缓存的删除」,或者「订阅 MySQL binlog 再操作缓存」,这两种方法有一个共同的特点,都是采用异步操作缓存。
总结
1、cache aside并非万能
虽然说catch aside可以被称之为缓存使用的最佳实践,但与此同时,它引入了缓存的命中率降低的问题,(每次都删除缓存自然导致更不容易命中了),因此它更适用于对缓存命中率要求并不是特别高的场景。如果要求较高的缓存命中率,依然需要采用更新数据库后同时更新缓存的方案。
2、缓存数据不一致的解决方案
前面已经说了,在更新数据库后同时更新缓存,会在并发的场景下出现数据不一致,那我们该怎么规避呢?方案也有两种。
引入分布式锁
在更新缓存之前尝试获取锁,如果已经被占用就先阻塞住线程,等待其他线程释放锁后再尝试更新。但这会影响并发操作的性能。
设置较短缓存时间
设置较短的缓存过期时间能够使得数据不一致问题存在的时间也比较长,对业务的影响相对较小。但是与此同时,其实这也使得缓存命中率降低,又回到了前面的问题里...
所以,综上所述,没有永恒的最佳方案,只有不同业务场景下的方案取舍。
行文至此,不由得默念一声:“There is no silver bullet!”,并再次为《人月神话》作者的精准洞见而感叹。


【推荐】国内首个AI IDE,深度理解中文开发场景,立即下载体验Trae
【推荐】编程新体验,更懂你的AI,立即体验豆包MarsCode编程助手
【推荐】抖音旗下AI助手豆包,你的智能百科全书,全免费不限次数
【推荐】轻量又高性能的 SSH 工具 IShell:AI 加持,快人一步
· 周边上新:园子的第一款马克杯温暖上架
· 分享 3 个 .NET 开源的文件压缩处理库,助力快速实现文件压缩解压功能!
· Ollama——大语言模型本地部署的极速利器
· DeepSeek如何颠覆传统软件测试?测试工程师会被淘汰吗?
· 使用C#创建一个MCP客户端
2018-06-26 Linux的进程优先级NI和PR到底有什么区别
2018-06-26 MyBatis
2018-06-26 赫尔维茨公式
2018-06-26 从解析几何的角度分析二次型
2018-06-26 Struts 1 Struts 2
2018-06-26 记一次服务器被入侵的调查取证
2018-06-26 契约式设计 契约式编程 Design by contract