Spring Cloud Eureka 学习记录
SpringCloud版本
           <groupId>org.springframework.cloud</groupId>
           <artifactId>spring-cloud-dependencies</artifactId>
           <version>Finchley.RELEASE</version>
1.1 Eureka Server
引入SpringCloud
 <dependencyManagement>
        <dependencies>
            <dependency>
                <groupId>org.springframework.boot</groupId>
                <artifactId>spring-boot-parent</artifactId>
                <version>2.1.3.RELEASE</version>
                <type>pom</type>
                <scope>import</scope>
            </dependency>
            <!--引入SpringCloud依赖-->
            <dependency>
                <groupId>org.springframework.cloud</groupId>
                <artifactId>spring-cloud-dependencies</artifactId>
                <version>Finchley.RELEASE</version>
                <type>pom</type>
                <scope>import</scope>
            </dependency>
        </dependencies>
    </dependencyManagement>
新建 Module:fly-services-discovery
添加Dependency
<dependencies>
        <dependency>
            <groupId>org.springframework.cloud</groupId>
            <artifactId>spring-cloud-starter-netflix-eureka-server</artifactId>
        </dependency>
    </dependencies>
编写入口类,加上@EnableEurekaServer
@SpringBootApplication
@EnableEurekaServer
public class DiscoveryApplication {
    public static void main(String[] args) {
        SpringApplication.run(DiscoveryApplication.class,args);
    }
}
resources中添加application.yml
server:
  port: 8761
security:

eureka:
  client:
    register-with-eureka: false
    fetch-registry: false
    service-url:
      defaultZone: http://localhost:8761/eureka
启动项目,访问:http://localhost:8761/
注意事项
SpringCloud版本问题,要注意和SpringBoot相应的版本兼容。SpringBoot版本:2.1.3.RELEASE.SpringCloud版本:Finchley.RELEASE
1.2 Eureka Client
新建 Module:fly-user-service
添加Dependency
        <dependency>
            <groupId>org.springframework.cloud</groupId>
            <artifactId>spring-cloud-starter-netflix-eureka-client</artifactId>
        </dependency>
编写入口类,这里不需要加上@EnableEurekaClient。新版的会默认将此服务作为Eureka Client.
@SpringBootApplication
public class UserServiceApplication {
    public static void main(String[] args) {
        SpringApplication.run(UserServiceApplication.class,args);
    }
}
resources中添加application.yml
server:
  port: 8081
spring:
  application:
    name: fly-user-service
eureka:
  client:
    serviceUrl:
      defaultZone: http://localhost:8761/eureka
  instance:
    prefer-ip-address: true
    instanceId: ${spring.application.name}:${spring.application.instance_id:${server.port}}
启动项目.再次访问http://localhost:8761. FLY-USER-SERVICE已经注册上。

1.3 Eureka Client Matadata
在Eureka Client中新建RestController,注入o.s.cloud.client.discovery.DiscoveryClient,通过调用getInstances(serviceId) 返回matadata信息
@RestController
@RequestMapping("/api")
public class UserServiceController {

    @Value("${spring.application.name}")
    private String serviceId;

    @Autowired
    private DiscoveryClient discoveryClient;

    /**
     * 获取用户服务的详细信息
     * */
    @GetMapping("/user-service")
    public List<ServiceInstance> userServiceInfo(){
       return this.discoveryClient.getInstances(serviceId);
    }
}
修改application.yml,增加matadata
instance:
    prefer-ip-address: true
    metadata-map:
      # 这里自定义,些什么都可以 key/value
      description: 用户微服务:包含用户基础信息接口,账户接口等
运行程序,访问:http://localhost:8081/api/user-service
[{
	"host": "192.168.157.1",
	"port": 8081,
	"metadata": {
		"description": "用户微服务:包含用户基础信息接口,账户接口等",
		"management.port": "8081",
		"jmx.port": "52681"
	},
	"secure": false,
	"uri": "http://192.168.157.1:8081",
	"instanceInfo": {
		"instanceId": "fly-user-service:8081",
		"app": "FLY-USER-SERVICE",
		"appGroupName": null,
		"ipAddr": "192.168.157.1",
		"sid": "na",
		"homePageUrl": "http://192.168.157.1:8081/",
		"statusPageUrl": "http://192.168.157.1:8081/actuator/info",
		"healthCheckUrl": "http://192.168.157.1:8081/actuator/health",
		"secureHealthCheckUrl": null,
		"vipAddress": "fly-user-service",
		"secureVipAddress": "fly-user-service",
		"countryId": 1,
		"dataCenterInfo": {
			"@class": "com.netflix.appinfo.InstanceInfo$DefaultDataCenterInfo",
			"name": "MyOwn"
		},
		"hostName": "192.168.157.1",
		"status": "UP",
		"overriddenStatus": "UNKNOWN",
		"leaseInfo": {
			"renewalIntervalInSecs": 30,
			"durationInSecs": 90,
			"registrationTimestamp": 1551449194524,
			"lastRenewalTimestamp": 1551449194524,
			"evictionTimestamp": 0,
			"serviceUpTimestamp": 1551448771780
		},
		"isCoordinatingDiscoveryServer": false,
		"metadata": {
			"description": "用户微服务:包含用户基础信息接口,账户接口等",
			"management.port": "8081",
			"jmx.port": "52681"
		},
		"lastUpdatedTimestamp": 1551449194524,
		"lastDirtyTimestamp": 1551449194336,
		"actionType": "ADDED",
		"asgName": null
	},
	"serviceId": "FLY-USER-SERVICE",
	"scheme": null
}]
1.4 Eureka Authentication
在fly-services-discovery项目中添加引用
        <dependency>
            <groupId>org.springframework.boot</groupId>
            <artifactId>spring-boot-starter-security</artifactId>
        </dependency>
修改配置文件application.yml,增加以下配置:
spring:
  security:
    user:
      name: panzi
      password: 123456
将defaultZone改为http://user:password@host:port/eureka格式
defaultZone: http://panzi:123456@localhost:${server.port}/eureka
这里需要注意的是,在高版本中,Eureka Client并不能成功注册,会出现401错误.所以还需要在服务端增加配置类:
import org.springframework.context.annotation.Configuration;
import org.springframework.security.config.annotation.web.builders.HttpSecurity;
import org.springframework.security.config.annotation.web.configuration.EnableWebSecurity;
import org.springframework.security.config.annotation.web.configuration.WebSecurityConfigurerAdapter;

@EnableWebSecurity
@Configuration
public class WebSecurityConfig extends WebSecurityConfigurerAdapter {

    @Override
    protected void configure(HttpSecurity http) throws Exception {
        //关闭csrf
        http.csrf().ignoringAntMatchers("/eureka/**");
        //开启认证
        http.authorizeRequests().anyRequest().authenticated().and().httpBasic();
    }
}
修改Eureka Client:fly-user-service的配置文件,将defaultZone改为上文中的地址:
defaultZone: http://panzi:123456@localhost:${server.port}/eureka
启动服务端和客户端:访问http://localhost:8761/

1.5 Eureka High Availability
搭建Eureka Server高可用,本机模拟先将hosts修改,windows下:C:\Windows\System32\drivers\etc
127.0.0.1 eureka1 eureka2
增加 application-eureka1.yml
spring:
  application:
    name: eureka-server
  profiles: eureka1
server:
  port: 8761
eureka:
  instance:
    hostname: eureka1
  client:
    service-url:
    # server1 注册到server2上
      defaultZone: http://panzi:123456@eureka2:8762/eureka/
    register-with-eureka: true
增加 application-eureka2.yml
spring:
  application:
    name: eureka-server
  profiles: eureka2
server:
  port: 8762
eureka:
  instance:
    hostname: eureka2
  client:
    service-url:
    # server2 注册到server1 上
      defaultZone: http://panzi:123456@eureka1:8761/eureka/
    register-with-eureka: true
分别执行两个命令启动服务
java -jar fly-services-discovery-1.0-SNAPSHOT.jar --spring.profiles.active=eureka1
java -jar fly-services-discovery-1.0-SNAPSHOT.jar --spring.profiles.active=eureka2
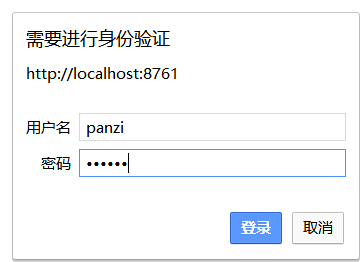
启动成功之后,输入用户名和密码

修改Eureka Client的配置文件
defaultZone:http://panzi:123456@eureka1:8761/eureka/,http://panzi:123456@eureka2:8762/eureka/
运行Eureka Client,访问:http://eureka1:8761/,http://eureka2:8761/

原文地址:https://github.com/fanpan26/Fly.SpringCloud/wiki
项目地址:https://github.com/fanpan26/Fly.SpringCloud
多学点,总不会吃亏的。


 浙公网安备 33010602011771号