vue-print 实现打印功能
一、安装
1. Vue2
npm install vue-print-nb --saveimport Print from 'vue-print-nb'
// Global instruction
Vue.use(Print);
//or
// Local instruction
import print from 'vue-print-nb'
directives: {
print
}2. Vue3
npm install vue-print-nb --save// Global instruction
import { createApp } from 'vue'
import App from './App.vue'
import print from 'vue3-print-nb'
const app = createApp(App)
app.use(print)
app.mount('#app')
//or
// Local instruction
import print from 'vue3-print-nb'
directives: {
print
}二、基本使用
1. 直接打印页面HTML
1)方法
① 给要打印的部分设置一个 id
② 在打印按钮中添加 v-print="'#id名'"
2)代码(以表格为例)
<template>
  <div>
    <a-button v-print="'#printMe'">打印</a-button>
    <a-table :columns="columns" :data-source="data" bordered id="printMe">
  	</a-table>
  </div>
</template>
<script>
const columns = [
  {
    title: 'Name',
    dataIndex: 'name',
  },
  {
    title: 'Cash Assets',
    className: 'column-money',
    dataIndex: 'money',
  },
  {
    title: 'Address',
    dataIndex: 'address',
  },
];

const data = [
  {
    key: '1',
    name: 'John Brown',
    money: '¥300,000.00',
    address: 'New York No. 1 Lake Park',
  },
  {
    key: '2',
    name: 'Jim Green',
    money: '¥1,256,000.00',
    address: 'London No. 1 Lake Park',
  },
  {
    key: '3',
    name: 'Joe Black',
    money: '¥120,000.00',
    address: 'Sidney No. 1 Lake Park',
  },
];

export default {
  data() {
    return {
      data,
      columns,
    };
  },
};
</script>
2. 个性化设置
(1)方法
打印按钮的 v-print 绑定一个对象
(2)代码
<template>
  <div class="box">
    <a-table :columns="columns" :data-source="data" bordered id="printMe"></a-table>
    <a-button v-print="printContent" class="btn no-print">打印</a-button>
  </div>
</template>
<script>
const columns = [
  {
    title: 'Name',
    dataIndex: 'name',
  },
  {
    title: 'Cash Assets',
    className: 'column-money',
    dataIndex: 'money',
  },
  {
    title: 'Address',
    dataIndex: 'address',
  },
];

const data = [
  {
    key: '1',
    name: 'John Brown',
    money: '¥300,000.00',
    address: 'New York No. 1 Lake Park',
  },
  {
    key: '2',
    name: 'Jim Green',
    money: '¥1,256,000.00',
    address: 'London No. 1 Lake Park',
  },
  {
    key: '3',
    name: 'Joe Black',
    money: '¥120,000.00',
    address: 'Sidney No. 1 Lake Park',
  },
];

export default {
  data() {
    return {
      data,
      columns,
      tableHead: '测试表格',
      printContent: {
        id: "printMe", // 打印的区域
        preview: false, // 预览工具是否启用
        previewTitle: '这是预览标题', // 预览页面的标题
        popTitle: '', // 打印页面的页眉
        extraCss: "https://cdn.bootcdn.net/ajax/libs/animate.css/4.1.1/animate.compat.css, https://cdn.bootcdn.net/ajax/libs/hover.css/2.3.1/css/hover-min.css",
        extraHead: '<meta http-equiv="Content-Language"content="zh-cn"/>',
        previewBeforeOpenCallback() {
          console.log('正在加载预览窗口')
        },
        previewOpenCallback() {
          console.log('已经加载完预览窗口')
        },
        beforeOpenCallback(vue) {
          vue.printLoading = true
          console.log('打开之前')
        },
        openCallback(vue) {
          vue.printLoading = false
          console.log('执行了打印')
        },
        closeCallback() {
          console.log('关闭了打印工具')
        },
        clickMounted(vue){
          console.log('点击了打印按钮');
          vue.printContent.popTitle = vue.tableHead // 动态设置页眉
        }
      }
    }
  }
};
</script>
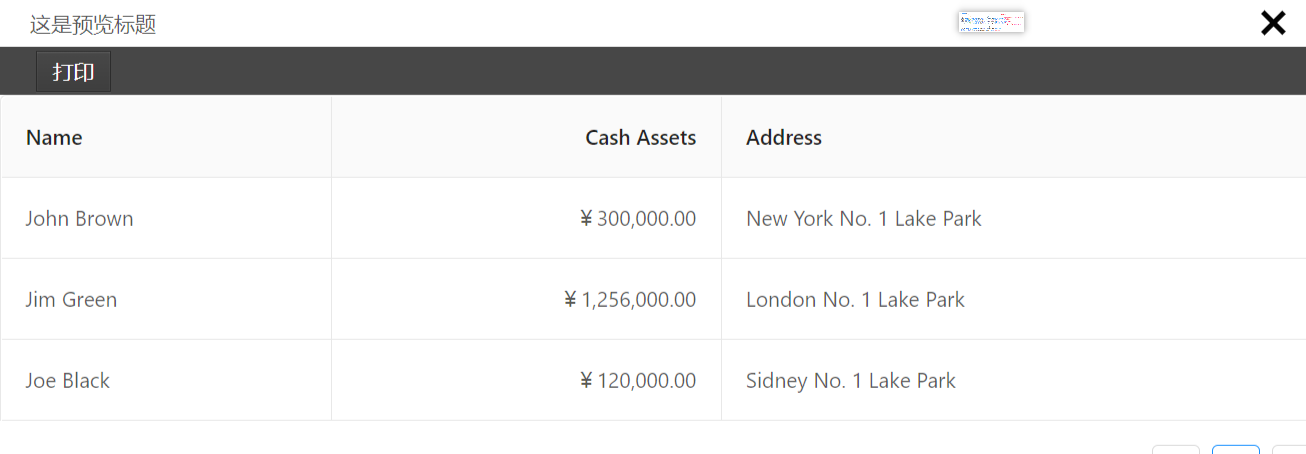
3 效果展示
① 预览工具

3. 打印URL
1 方法
① 给 打印按钮的 v-print 绑定一个对象
② 对象添加 url 属性
2 代码
<template>
  <div class="box">
    <a-table :columns="columns" :data-source="data" bordered></a-table>
    <a-button v-print="printContent" class="btn no-print" >打印</a-button>
  </div>
</template>
<script>
const columns = [
  {
    title: 'Name',
    dataIndex: 'name',
  },
  {
    title: 'Cash Assets',
    className: 'column-money',
    dataIndex: 'money',
  },
  {
    title: 'Address',
    dataIndex: 'address',
  },
];

const data = [
  {
    key: '1',
    name: 'John Brown',
    money: '¥300,000.00',
    address: 'New York No. 1 Lake Park',
  },
  {
    key: '2',
    name: 'Jim Green',
    money: '¥1,256,000.00',
    address: 'London No. 1 Lake Park',
  },
  {
    key: '3',
    name: 'Joe Black',
    money: '¥120,000.00',
    address: 'Sidney No. 1 Lake Park',
  },
];

export default {
  data() {
    return {
      data,
      columns,
      tableHead: '测试表格',
      printContent: {
        url: 'http://localhost:8081/', // 打印的url
        preview: false, // 预览工具是否启用
        previewTitle: '这是预览标题',
        popTitle: '', // 打印页面的页眉
        extraCss: "https://cdn.bootcdn.net/ajax/libs/animate.css/4.1.1/animate.compat.css, https://cdn.bootcdn.net/ajax/libs/hover.css/2.3.1/css/hover-min.css",
        extraHead: '<meta http-equiv="Content-Language"content="zh-cn"/>',
      }
    }
  },
};
</script>

