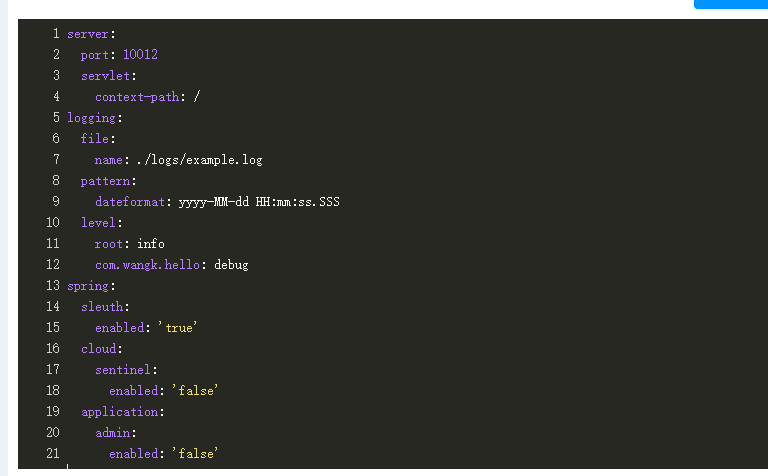
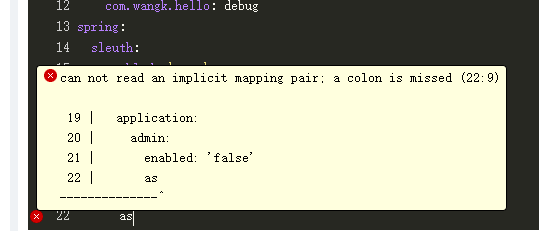
vue yaml代码编辑器组件
一、前期准备
此组件的功能主要依赖于codemirror,另外加入了js-yaml进行语法检查,方便在实时编辑时提示语法不正确的地方。因此首先需要在项目中安装codemirror与js-yaml:
codemirror: npm install codemirror
js-yaml: npm install js-yaml --save
二、组件源码及说明
新建@/components/YamlEditor/index.vue文件:
<template>
<div class="yaml-editor">
<textarea ref="textarea" />
</div>
</template>
<script>
import CodeMirror from 'codemirror'
import 'codemirror/addon/lint/lint.css'
import 'codemirror/lib/codemirror.css'
import 'codemirror/theme/monokai.css'
import 'codemirror/mode/yaml/yaml'
import 'codemirror/addon/lint/lint'
import 'codemirror/addon/lint/yaml-lint'
window.jsyaml = require('js-yaml') // 引入js-yaml为codemirror提高语法检查核心支持
export default {
name: 'YamlEditor',
// eslint-disable-next-line vue/require-prop-types
props: ['value'],
data() {
return {
yamlEditor: false
}
},
watch: {
value(value) {
const editorValue = this.yamlEditor.getValue()
if (value !== editorValue) {
this.yamlEditor.setValue(this.value)
}
}
},
mounted() {
this.yamlEditor = CodeMirror.fromTextArea(this.$refs.textarea, {
lineNumbers: true, // 显示行号
mode: 'text/x-yaml', // 语法model
gutters: ['CodeMirror-lint-markers'], // 语法检查器
theme: 'monokai', // 编辑器主题
lint: true // 开启语法检查
})
this.yamlEditor.setValue(this.value)
this.yamlEditor.on('change', (cm) => {
this.$emit('changed', cm.getValue())
this.$emit('input', cm.getValue())
})
},
methods: {
getValue() {
return this.yamlEditor.getValue()
}
}
}
</script>
<style scoped>
.yaml-editor{
height: 100%;
position: relative;
}
.yaml-editor >>> .CodeMirror {
height: auto;
min-height: 300px;
}
.yaml-editor >>> .CodeMirror-scroll{
min-height: 300px;
}
.yaml-editor >>> .cm-s-rubyblue span.cm-string {
color: #F08047;
}
</style>
codemirror的核心配置如下:
this.yamlEditor = CodeMirror.fromTextArea(this.$refs.textarea, {
lineNumbers: true, // 显示行号
mode: 'text/x-yaml', // 语法model
gutters: ['CodeMirror-lint-markers'], // 语法检查器
theme: 'monokai', // 编辑器主题
lint: true // 开启语法检查
})
这里的配置只有几个简单的参数,个人认为有这些功能已经足够了,更多的详细参数配置可以移步官方文档;如果想让编辑器支持其他语言,可以查看codemirror官方文档的语法支持,这里我个人比较倾向下载codemirror源码,可以看到对应语法demo的源代码,使用不同的语法在本组件中import相应的依赖即可。
三、组件使用
<template>
<div>
<div class="editor-container">
<yaml-editor v-model="value" />
</div>
</div>
</template>
<script>
import YamlEditor from '@/components/YamlEditor/index.vue';
const yamlData = "- hosts: all\n become: yes\n become_method: sudo\n gather_facts: no\n\n tasks:\n - name: \"install {{ package_name }}\"\n package:\n name: \"{{ package_name }}\"\n state: \"{{ state | default('present') }}\"";
export default {
name: 'YamlEditorDemo',
components: { YamlEditor },
data() {
return {
value: yamlData,
};
},
};
</script>
<style scoped>
.editor-container{
position: relative;
height: 100%;
}
</style>
四、效果截图


 浙公网安备 33010602011771号