Centos7基于容器安装运行Docker私有仓库及添加认证
一、前言
官方的Docker hub是一个用于管理公共镜像的好地方,我们可以在上面找到我们想要的镜像,也可以把我们自己的镜像推送上去。但是,有时候,我们的使用场景需要我们拥有一个私有的镜像仓库用于管理我们自己的镜像。这个可以通过开源软件Registry来达成目的。
Registry在github上有两份代码:老代码库和新代码库。老代码是采用python编写的,存在pull和push的性能问题,出到0.9.1版本之后就标志为deprecated,不再继续开发。从2.0版本开始就到在新代码库进行开发,新代码库是采用go语言编写,修改了镜像id的生成算法、registry上镜像的保存结构,大大优化了pull和push镜像的效率。目前Docker Registry已经升级到了v2,最新版的Docker已不再支持v1。Registry v2使用Go语言编写,在性能和安全性上做了很多优化,重新设计了镜像的存储格式。
使用私有仓库有许多优点:
- 节省网络带宽,针对于每个镜像不用每个人都去中央仓库上面去下载,只需要从私有仓库中下载即可;
- 提供镜像资源利用,针对于公司内部使用的镜像,推送到本地的私有仓库中,以供公司内部相关人员使用。
环境准备
环境:三个装有Docker的Centos7虚拟机
虚拟机1:192.168.0.106 用作私有仓库
虚拟机2:192.168.0.107 用户开发机 (测试私有仓库)
虚拟机3:192.168.0.108 用户开发机 (测试私有仓库用户名密码验证)
1、可以连接互联网
2、添加 yum源
二、Registry的部署
1.安装docker,并启动服务
[root@registry-server ~]# yum install docker -y
[root@registry-server ~]# systemctl start docker
2.查看docker版本信息
[root@registry-server ~]#  docker version
Client:
 Version:         1.12.6
 API version:     1.24
 Package version: docker-1.12.6-61.git85d7426.el7.centos.x86_64
 Go version:      go1.8.3
 Git commit:      85d7426/1.12.6
 Built:           Tue Oct 24 15:40:21 2017
 OS/Arch:         linux/amd64

Server:
 Version:         1.12.6
 API version:     1.24
 Package version: docker-1.12.6-61.git85d7426.el7.centos.x86_64
 Go version:      go1.8.3
 Git commit:      85d7426/1.12.6
 Built:           Tue Oct 24 15:40:21 2017
 OS/Arch:         linux/amd64
3.下载registry镜像
[root@registry-server ~]# docker pull registry:2
Trying to pull repository docker.io/library/registry ...
2: Pulling from docker.io/library/registry
ab7e51e37a18: Pull complete
c8ad8919ce25: Pull complete
5808405bc62f: Pull complete
f6000d7b276c: Pull complete
f792fdcd8ff6: Pull complete
Digest: sha256:9d295999d330eba2552f9c78c9f59828af5c9a9c15a3fbd1351df03eaad04c6a
#注:由于国内网络问题直接连接官网下载可能会超时,可以重试几次,或者使用国内加速器,具体方法可以看文章最后。
启动docker registry
[root@registry-server ~]#  docker run -idt -v /opt/registry:/var/lib/registry -p 5000:5000 --restart=always --name registry-server registry:2
71a418cbf1fc515f4c603011a0994d4f1ec86e1fe94f9425456677dbd4727e5b
参数详解:
i:    保持sdtin开放状态
d:    使容器以守护进程方式后台运行,并打印容器id
t:    分配一个tty(虚拟终端设备)
v:    绑定挂载一个容器内的路径到宿主机路径
p:    映射一个容器的端口到宿主机端口
restart: 当容器退出时的重启策略
name:    给容器命名一个名称
查看docker registry进程
[root@registry-server ~]# docker ps
CONTAINER ID        IMAGE               COMMAND                  CREATED             STATUS              PORTS                    NAMES
71a418cbf1fc        registry:2          "/entrypoint.sh /etc/"   4 seconds ago       Up 3 seconds        0.0.0.0:5000->5000/tcp   registry-server
4.下载测试镜像
[root@registry-server ~]# docker pull hello-world
Using default tag: latest
Trying to pull repository docker.io/library/hello-world ...
latest: Pulling from docker.io/library/hello-world
ca4f61b1923c: Pull complete
Digest: sha256:be0cd392e45be79ffeffa6b05338b98ebb16c87b255f48e297ec7f98e123905c
给测试镜像打tag #tag命令可以为以存在的重复命名,并不执行重命名,而是保留原有命名基础上,添加一个新的名称,看上去像新添加了一个image
[root@registry-server ~]# docker tag hello-world 127.0.0.1:5000/hello-world
查看本地镜像
[root@registry-server ~]#  docker images
REPOSITORY                   TAG                 IMAGE ID            CREATED             SIZE
docker.io/registry           2                   177391bcf802        4 days ago          33.26 MB
127.0.0.1:5000/hello-world   latest              f2a91732366c        2 weeks ago         1.848 kB
docker.io/hello-world        latest              f2a91732366c        2 weeks ago         1.848 kB
push测试镜像到私有仓库
[root@registry-server ~]# docker push 127.0.0.1:5000/hello-world
The push refers to a repository [127.0.0.1:5000/hello-world]
f999ae22f308: Pushed
latest: digest: sha256:8072a54ebb3bc136150e2f2860f00a7bf45f13eeb917cca2430fcd0054c8e51b size: 524
查看宿主机映射目录
root@registry-server ~]# ll /opt/registry/docker/registry/v2/repositories/
总用量 0
drwxr-xr-x 5 root root 55 12月  6 20:45 hello-world
也可以访问外网ip的5000端口查看

5.在客户机上下载刚刚上传的测试镜像
[root@docker-client1 ~]# docker pull 192.168.0.106:5000/hello-world
Using default tag: latest
Trying to pull repository 192.168.0.106:5000/hello-world ...
Get https://192.168.0.106:5000/v1/_ping: http: server gave HTTP response to HTTPS client
因为Docker从1.3.X之后,与docker registry交互默认使用的是https,然而此处搭建的私有仓库只提供http服务,所以当与私有仓库交互时就会报上面的错误。
目前很多文章都是通过修改docker的配置文件“etc/systemconfig/docker",重启docker来解决这个问题。但发现docker1.12版本并无此文件,根据网上创建此文件,并填入相应内容,重启docker无效果,仍然报此错误。
解决方法:
在”/etc/docker/“目录下,创建”daemon.json“文件。在文件中写入:
{ "insecure-registries":["192.168.0.106:5000"] },保存后重启
[root@docker-client1 ~]# cat /etc/docker/daemon.json
 {
   "insecure-registries": ["192.168.0.106:5000"]
  }
[root@docker-client1 ~]# systemctl daemon-reload
[root@docker-client1 ~]# systemctl restart docker
再一次下载测试镜像
[root@docker-client1 ~]# docker pull 192.168.0.106:5000/hello-world
Using default tag: latest
Trying to pull repository 192.168.0.106:5000/hello-world ...
latest: Pulling from 192.168.0.106:5000/hello-world
ca4f61b1923c: Pull complete
Digest: sha256:8072a54ebb3bc136150e2f2860f00a7bf45f13eeb917cca2430fcd0054c8e51b
现在docker的本地仓库已经搭建完成了,但是这样在生产环境中是不安全的,所以需要添加验证保证安全
6.添加允许访问的用户和密码
[root@registry-server ~]#mkdir -p /opt/registry-var/auth/
[root@registry-server ~]#docker run --entrypoint htpasswd registry:2 -Bbn abc 123 >> /opt/registry-var/auth/htpasswd #生成用户abc,渺密码为123
设置配置文件,启用删除镜像功能(也可以不启用,看业务需要,修改 storage - delete - enable 为 false 即可)
[root@registry-server ~]# mkdir -p /opt/registry-var/config
[root@registry-server ~]# vim /opt/registry-var/config/config.yml
version: 0.1
log:
  fields:
    service: registry
storage:
  delete:
    enabled: true
  cache:
    blobdescriptor: inmemory
  filesystem:
    rootdirectory: /var/lib/registry
http:
  addr: :5000
  headers:
    X-Content-Type-Options: [nosniff]
health:
  storagedriver:
    enabled: true
    interval: 10s
threshold: 3
启动服务(这里将镜像路径映射到宿主机的 /opt/registry-var/ 文件夹下,可以根据需要修改)
[root@registry-server ~]# docker run -d -p 5000:5000 --restart=always --name=registry -v /opt/registry-var/config/:/etc/docker/registry/ -v /opt/registry-var/auth/:/auth/ -e "REGISTRY_AUTH=htpasswd" -e "REGISTRY_AUTH_HTPASSWD_REALM=Registry Realm" -e REGISTRY_AUTH_HTPASSWD_PATH=/auth/htpasswd -v /opt/registry-var/:/var/lib/registry/ registry:2
客户端操作:
开启 http 形式访问私有仓库模式
[root@registry-cleint2 ~]# vim /etc/docker/daemon.json
{
"insecure-registries":["192.168.0.106:5000"]
}
[root@registry-cleint2 ~]# systemctl daemon-reload
[root@registry-cleint2 ~]# systemctl restart docker
测试登录
[root@registry-cleint2 ~]#  docker login 192.168.0.106:5000
Username: abc
Password:
Login Succeeded
下载测试
[root@registry-cleint2 ~]#docker push  192.168.0.106:5000/hello-world
The push refers to a repository [192.168.0.106:5000/hello-world]
An image does not exist locally with the tag: 192.168.0.106:5000/hello-world
查找私有镜像
[root@registry-cleint2 ~]#  curl -u abc:123  http://192.168.0.106:5000/v2/_catalog
{"repositories":["hello-world"]}
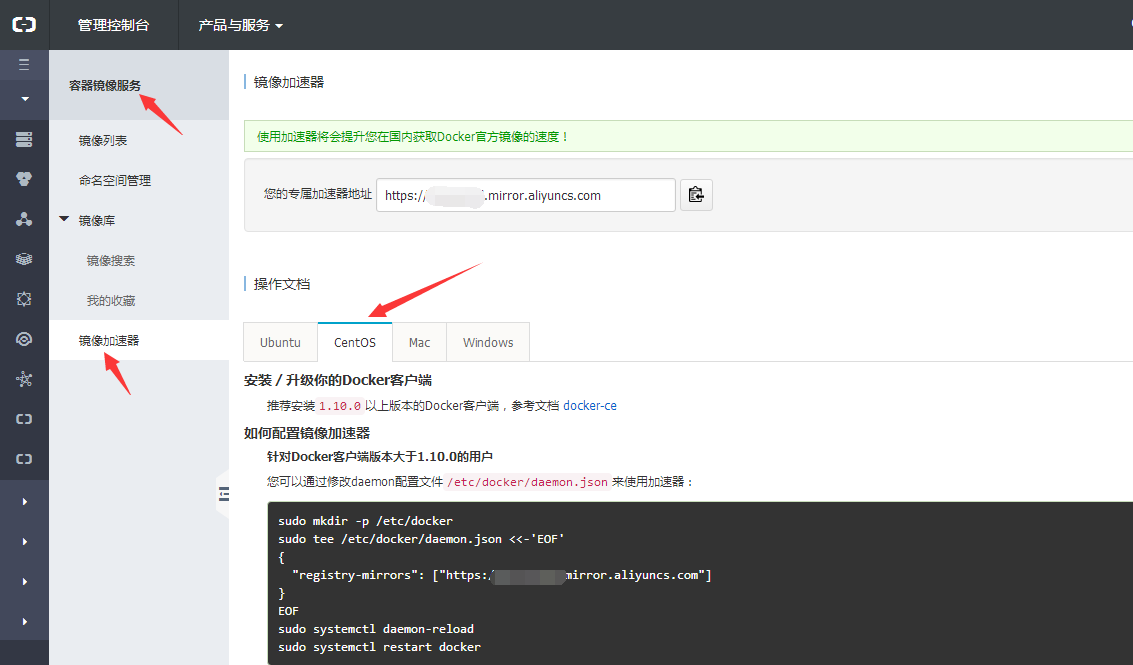
使用加速器下载官网镜像方法:
1.打开https://dev.aliyun.com/ 链接,按提示申请一个账户
2.点击容器镜像服务,再点击容器加速器按提示设置即可


【推荐】国内首个AI IDE,深度理解中文开发场景,立即下载体验Trae
【推荐】编程新体验,更懂你的AI,立即体验豆包MarsCode编程助手
【推荐】抖音旗下AI助手豆包,你的智能百科全书,全免费不限次数
【推荐】轻量又高性能的 SSH 工具 IShell:AI 加持,快人一步
· 从 HTTP 原因短语缺失研究 HTTP/2 和 HTTP/3 的设计差异
· AI与.NET技术实操系列:向量存储与相似性搜索在 .NET 中的实现
· 基于Microsoft.Extensions.AI核心库实现RAG应用
· Linux系列:如何用heaptrack跟踪.NET程序的非托管内存泄露
· 开发者必知的日志记录最佳实践
· winform 绘制太阳,地球,月球 运作规律
· TypeScript + Deepseek 打造卜卦网站:技术与玄学的结合
· AI 智能体引爆开源社区「GitHub 热点速览」
· Manus的开源复刻OpenManus初探
· 写一个简单的SQL生成工具