


使用Git LFS托管大文件
一、安装
1 2 3 4 5 6 | #当前操作系统为centos7[root@localhost ~]#curl -s https://packagecloud.io/install/repositories/github/git-lfs/script.rpm.sh | sudo bash[root@localhost ~]# yum install git-lfs[root@localhost ~]# git lfs install[root@localhost ~]# git lfs -vgit-lfs/3.3.0 (GitHub; linux amd64; go 1.19.3; git 77deabdf) |
二、代码库启用LFS
1 2 3 4 5 6 7 8 9 10 11 12 13 14 15 16 | [root@localhost ~]# cd /mnt/[root@localhost mnt]# git clone git@codeup.aliyun.com:pc-xvista.git[root@localhost mnt]# cd pc-xvista[root@localhost pc-xvista]# git lfs track "*.mp4" #将MP4文件使用LFS管理,此处的指令并不会对已存在的MP4文件进行管理,如果需要管理已存在的MP4文件请参考下放使用参考链接中的2.2章节Tracking "*.mp4" [root@localhost pc-xvista]# git lfs track #查看当前 track规则 *.mp4 (.gitattributes)Listing excluded patterns[root@localhost pc-xvista]# cd www.xvista.com/html/images[root@localhost images]# git lfs track "*.mp4" #track规则可以有多个,并且可以更加具体路径添加Listing tracked patterns www.xvista.com/html/images/*.mp4 (www.xvista.com/html/images/.gitattributes) *.mp4 (.gitattributes)Listing excluded patterns[root@localhost images]# git add .gitattributes #一定要把 .gitattributes文件提交并上传,并且如果有多个需要都提交,当前提交的为 image下,而不是项目下,按需[root@localhost images]# git commit -m "Add \"*.MP4\" LFS config " |
三、上传mp4文件
1 2 3 4 5 6 | [root@localhost images]# git add video_new.mp4[root@localhost images]# git add video_new.mp4[root@localhost images]# git commit -m "LFS manager MP4"[root@localhost images]# git push Uploading LFS objects: 100% (1/1), 95 MB | 4.3 MB/s, done. #可以看到upload LFS done字样..... |
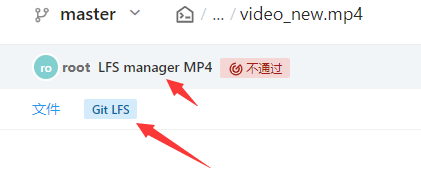
四、仓库验证
可以看到video_new.mp4已经被标记使用LFS管理了
重新clone代码查看(略)
五、注意事项
使用LFS管理后,拉取机器上也必须安装git-lfs,否则只能拉取拉取后文件内容为 Git LFS Pointer 文件内容(version,oid和size),而无法将真正存储在 Git LFS 的文件拉取到本地。
"一劳永逸" 的话,有是有的,而 "一劳永逸" 的事却极少


【推荐】国内首个AI IDE,深度理解中文开发场景,立即下载体验Trae
【推荐】编程新体验,更懂你的AI,立即体验豆包MarsCode编程助手
【推荐】抖音旗下AI助手豆包,你的智能百科全书,全免费不限次数
【推荐】轻量又高性能的 SSH 工具 IShell:AI 加持,快人一步
· winform 绘制太阳,地球,月球 运作规律
· TypeScript + Deepseek 打造卜卦网站:技术与玄学的结合
· AI 智能体引爆开源社区「GitHub 热点速览」
· Manus的开源复刻OpenManus初探
· 写一个简单的SQL生成工具