


rsyslog+ELK收集Cisco日志
一、配置rsyslog服务收集Cisco日志
1.安装配置rsyslog收集cisco日志

[root@prod_rsyslog_160_128 ~]# yum install -y rsyslog  #安装rsyslog服务
[root@prod_rsyslog_160_128 ~]# egrep -v "^$|#" /etc/rsyslog.conf
$ModLoad imudp                      # imupd是模块名,支持udp协议
$UDPServerRun 514                   #允许514端口接收使用UDP协议转发过来的日志
$ModLoad imtcp                      # imtcp是模块名,支持tcp协议
$InputTCPServerRun 514                 # 允许514端口接收使用TCP协议转发过来的日志
$WorkDirectory /var/lib/rsyslog
$ActionFileDefaultTemplate RSYSLOG_TraditionalFileFormat  #使用默认日志模板
$IncludeConfig /etc/rsyslog.d/*.conf
$OmitLocalLogging on
$IMJournalStateFile imjournal.state
*.info;mail.none;authpriv.none;cron.none                /var/log/messages
authpriv.*                                              /var/log/secure
mail.*                                                  -/var/log/maillog
cron.*                                                  /var/log/cron
*.emerg                                                 :omusrmsg:*
uucp,news.crit                                          /var/log/spooler
local7.*                                                /var/log/boot.log
$template myformat,"%FROMHOST-IP%: %msg:2:$%\n"                    #定义日志模板,只记录日志信息不添加时间戳并删除日志开头空格并且将IP地址写入开头
$template cisco,"/net-log/cisco/%FROMHOST-IP%.log"                 #定义日志文件模板,Cisco为模板名称,以来源IP作为文件名
local4.* ?cisco;myformat                                           #定义级别为4的日志使用cisco myformat模板
[root@prod_rsyslog_160_128 ~]# systemctl restart rsyslog.service   #重启服务
2.配置Cisco设备
略,我们网络工程师配置的
3.测试
[root@prod_rsyslog_160_128 ~]# tree /net-log/ #日志文件正常创建
/net-log/
└── cisco
└── 192.169.5.249.log
1 directory, 1 file
[root@prod_rsyslog_160_128 ~]# tail -1 /net-log/cisco/192.169.5.249.log
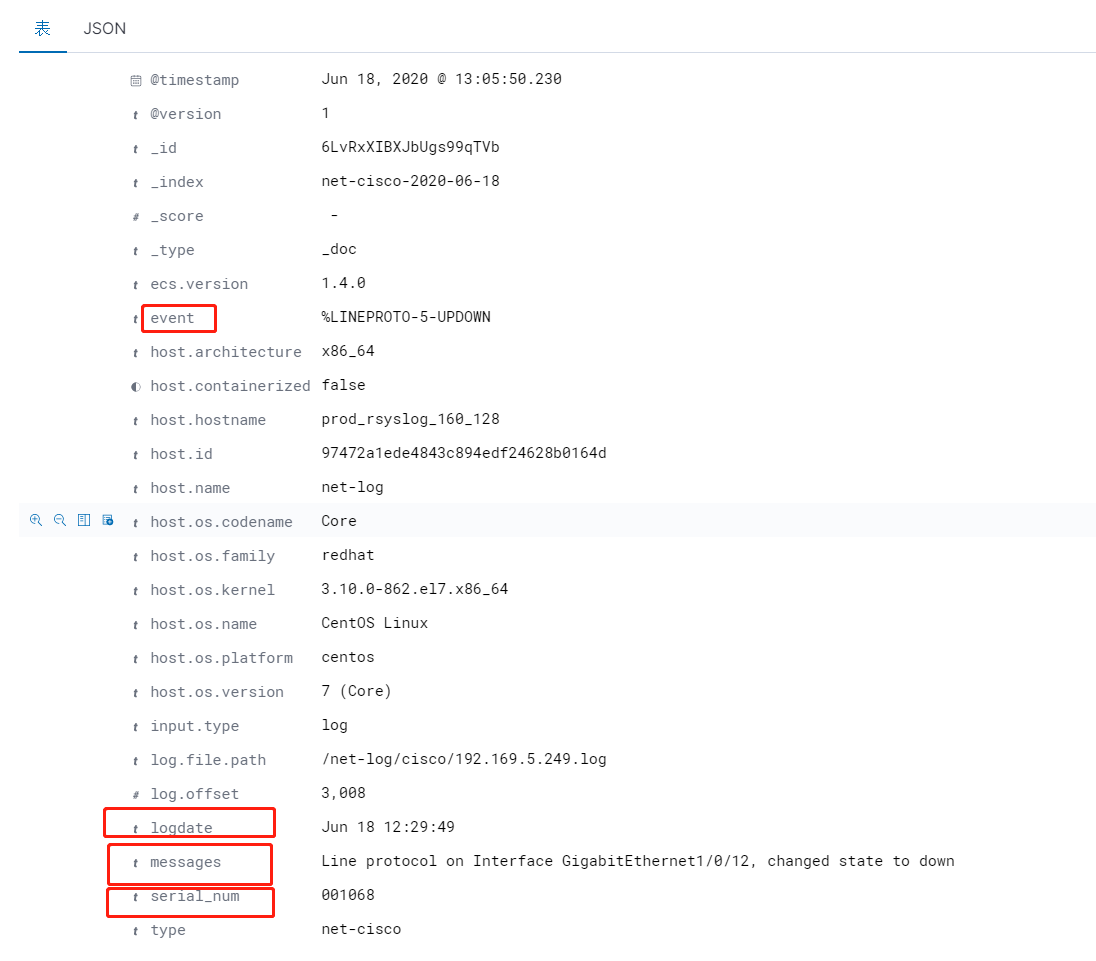
001068: Jun 18 12:29:49: %LINEPROTO-5-UPDOWN: Line protocol on Interface GigabitEthernet1/0/12, changed state to down #日志格式如下
二、配置filebeat收集Cisco日志
1.修改filebeat配置文件
[root@prod_rsyslog_160_128 filebeat]# egrep -v "^$|#" filebeat.yml
filebeat.inputs:
- type: log
  enabled: true
  fields_under_root: true   #新增fields成为顶级目录,而不是将其放在fields目录下
  paths:
    - /net-log/cisco/*.log  #日志路径
  fields:
    type: net-cisco         #输出给kafka时作为topic使用
filebeat.config.modules:
  path: ${path.config}/modules.d/*.yml
  reload.enabled: false
setup.template.settings:
  index.number_of_shards: 1
name: net-log               #主机名称
processors:
  - add_host_metadata: ~
  - drop_fields:    #删除一些不需要字段
      fields: ["sort","beat","input_type","offset","source","agent"]
output.kafka:   #kafka集群信息
  enabled: true
  hosts: ["172.16.160.121:9092","172.16.160.123:9092","172.16.160.123:9092"]
  topic: '%{[type]}'  #如果 fields_under_root为false则需要修改为fields.type
2.配置filebeat为系统服务
[root@prod_rsyslog_160_128 filebeat]# cat /etc/systemd/system/filebeat.service   #注意替换文件中filebeat的路径
[Unit]
Description=filebeat server daemon
Documentation=/usrl/local/filebeat/filebeat -help
Wants=network-online.target
After=network-online.target

[Service]
User=root
Group=root
ExecStart=/usr/local/filebeat/filebeat  -c /usr/local/filebeat/filebeat.yml --path.logs /usr/local/filebeat/logs   #不要添加-e,会使 --path.logs失效
Restart=always [Install] WantedBy=multi-user.target
启动filebeat服务
[root@prod_rsyslog_160_128 filebeat]# systemctl restart filebeat.service
3.测试日志是否可以正常输出到kafka集群
1.查看topic是否正常创建
[root@prod_zk-kafka_160_121 ~]# /usr/local/kafka/bin/kafka-topics.sh --list --zookeeper  172.16.160.121:2181
__consumer_offsets
net-cisco
2.查看topic是否可以正常消费
[root@prod_zk-kafka_160_121 ~]# /usr/local/kafka/bin/kafka-console-consumer.sh --bootstrap-server 172.16.160.121:9092 --topic net-cisco --from-beginning
三、配置logstash
[root@prod_logstash_160_124 config]# cat net-cisco.conf
input{
    kafka {
        bootstrap_servers => "172.16.160.121:9092,172.16.160.123:9092,172.16.160.123:9092"
        consumer_threads => 5
        topics => "net-cisco"
        group_id =>  "net-log"
        decorate_events => true
        type => "net-cisco"
        codec => "json"
    }

}

filter{
       mutate {
        split => ["message",": "]  #使用": "对日志内容进行切割
        add_field => {
        "remote_ip" => "%{[message][0]}"
        "serial_num"  => "%{[message][1]}"
        "logdate" => "%{[message][2]}"
        "event"  => "%{[message][3]}"
        "messages"  => "%{[message][4]}"
        }
   }
        mutate {
            remove_field => ["message"]  #日志切割后删除
        }

        date {
            match => ["timestamp", "dd/MMM/yyyy:HH:mm:ss Z"]
            timezone => "Asia/Shanghai"
        }
}

output {
# stdout { codec => rubydebug }  #调试时使用
if [type] == "net-cisco" {
     elasticsearch {
        hosts => ["172.16.160.125:9200","172.16.160.126:9200","172.16.160.127:9200"]
        index => "net-cisco-%{+YYYY-MM-dd}"  #ES中索引名称,按天创建
    }
  }
}
启动服务
[root@prod_logstash_160_124 config]# ../bin/logstash -f cisco_log.conf -t  --verbose
[root@prod_logstash_160_124 config]# nohup /usr/local/logstash-7.6.2/bin/logstash -f cisco_log.conf &> /tmp/logstch.log &
四、kibana创建索引模式并展示
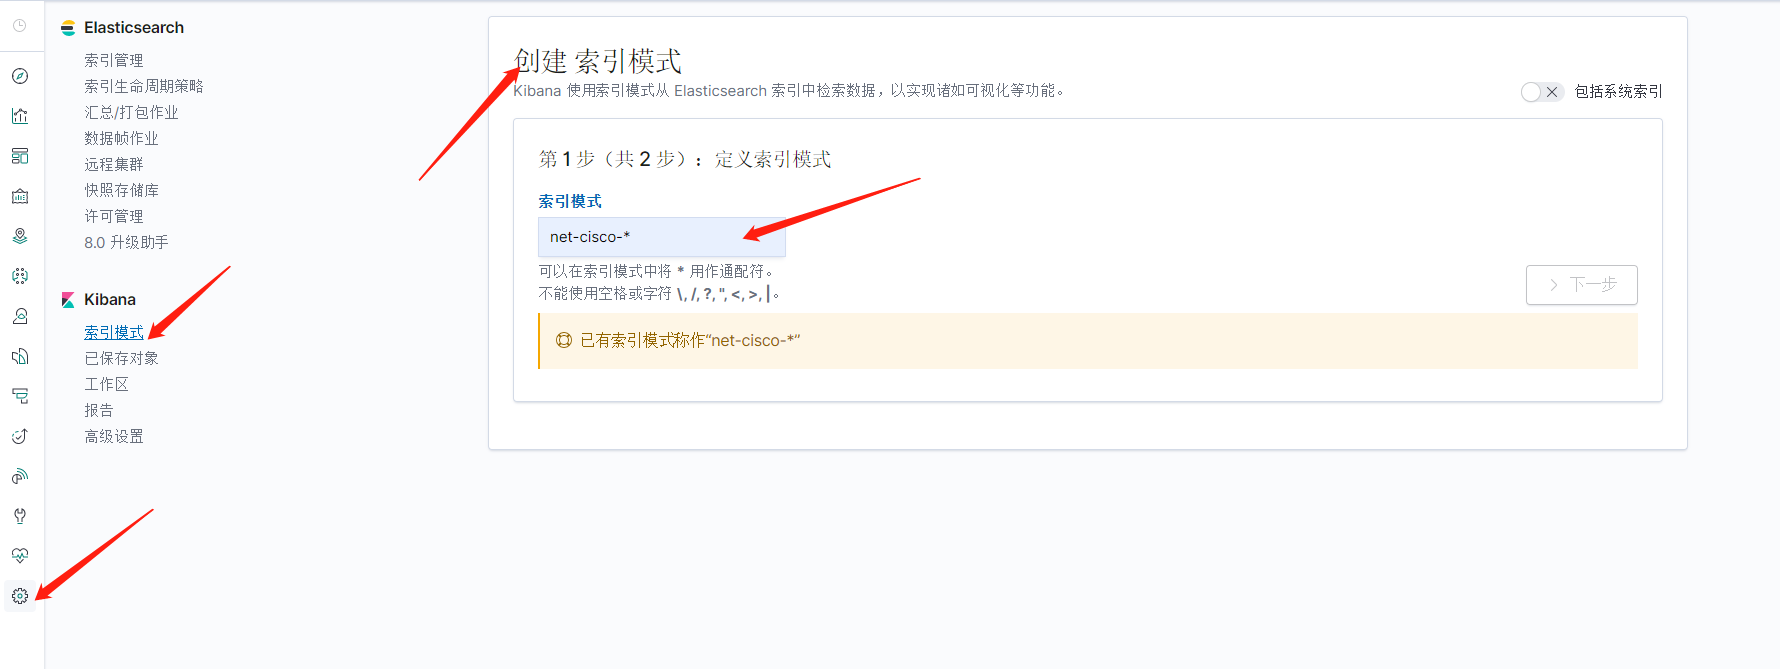
浏览日志
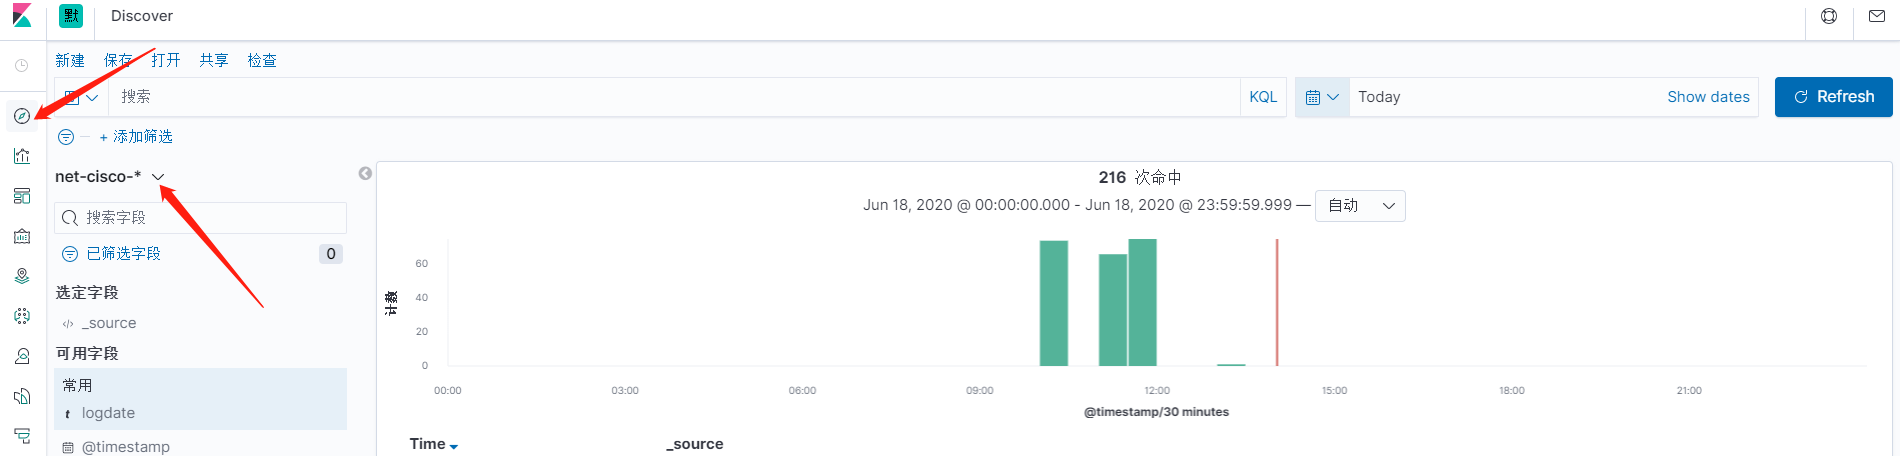
查看日志字段
五、注意事项
1.filebeat删除字段时timestamp和type字段无法被删除
2.手动修改日志文件测试时请使用echo命令而不是vim,否则会导致日志被从头开始消费。这是因为filebeat跟踪inode更改以了解是否需要读取文件。使用vim编辑时,每次保存文件时,inode都会更改。使用 ls -li  filename查看文件iNode号
3.filebeat -e和--path.logs无法同时生效
4.kafka如果禁止自动创建topic,每次新日志topic需要提前手动创建
5.kibana创建索引模式后刷新消失,可以尝试重启kibana服务
6.filebeat服务建议使用Supervisor或者systemctl管理,使用nohup启动服务可能会自动停止,社区中也有人存在同样问题,目前未找到具体原因
附rsyslog、logstash配置文件


# rsyslog configuration file

# For more information see /usr/share/doc/rsyslog-*/rsyslog_conf.html
# If you experience problems, see http://www.rsyslog.com/doc/troubleshoot.html

#### MODULES ####

# The imjournal module bellow is now used as a message source instead of imuxsock.
$ModLoad imuxsock # provides support for local system logging (e.g. via logger command)
$ModLoad imjournal # provides access to the systemd journal
#$ModLoad imklog # reads kernel messages (the same are read from journald)
#$ModLoad immark  # provides --MARK-- message capability

# Provides UDP syslog reception
$ModLoad imudp
$UDPServerRun 514

# Provides TCP syslog reception
$ModLoad imtcp
$InputTCPServerRun 514


#### GLOBAL DIRECTIVES ####

# Where to place auxiliary files
$WorkDirectory /var/lib/rsyslog

# Use default timestamp format
$ActionFileDefaultTemplate RSYSLOG_TraditionalFileFormat

# File syncing capability is disabled by default. This feature is usually not required,
# not useful and an extreme performance hit
#$ActionFileEnableSync on

# Include all config files in /etc/rsyslog.d/
$IncludeConfig /etc/rsyslog.d/*.conf

# Turn off message reception via local log socket;
# local messages are retrieved through imjournal now.
$OmitLocalLogging on

# File to store the position in the journal
$IMJournalStateFile imjournal.state


#### RULES ####

# Log all kernel messages to the console.
# Logging much else clutters up the screen.
#kern.*                                                 /dev/console

# Log anything (except mail) of level info or higher.
# Don't log private authentication messages!
*.info;mail.none;authpriv.none;cron.none                /var/log/messages

# The authpriv file has restricted access.
authpriv.*                                              /var/log/secure

# Log all the mail messages in one place.
mail.*                                                  -/var/log/maillog


# Log cron stuff
cron.*                                                  /var/log/cron

# Everybody gets emergency messages
*.emerg                                                 :omusrmsg:*

# Save news errors of level crit and higher in a special file.
uucp,news.crit                                          /var/log/spooler

# Save boot messages also to boot.log
local7.*                                                /var/log/boot.log
#$template myformat,"%$NOW% %TIMESTAMP:8:15% %hostname% %syslogtag% %msg%\n"
#$template myformat,"%msg:2:$%\n"
$template myformat,"%FROMHOST-IP%: %msg:2:$%\n"
$PreserveFQDN on   #如果使用主机名建议开启,否则主机名字包含.可能无法正常解析
#$template myformat,"%HOSTNAME%: %msg:2:$%\n"
#$ActionFileDefaultTemplate myformat
$template cisco,"/net-log/cisco/%FROMHOST-IP%.log"
local4.* ?cisco;myformat
# ### begin forwarding rule ###
# The statement between the begin ... end define a SINGLE forwarding
# rule. They belong together, do NOT split them. If you create multiple
# forwarding rules, duplicate the whole block!
# Remote Logging (we use TCP for reliable delivery)
#
# An on-disk queue is created for this action. If the remote host is
# down, messages are spooled to disk and sent when it is up again.
#$ActionQueueFileName fwdRule1 # unique name prefix for spool files
#$ActionQueueMaxDiskSpace 1g   # 1gb space limit (use as much as possible)
#$ActionQueueSaveOnShutdown on # save messages to disk on shutdown
#$ActionQueueType LinkedList   # run asynchronously
#$ActionResumeRetryCount -1    # infinite retries if host is down
# remote host is: name/ip:port, e.g. 192.168.0.1:514, port optional
#*.* @@remote-host:514
# ### end of the forwarding rule ###
input {
    kafka {
        bootstrap_servers => "172.16.160.121:9092,172.16.160.122:9092,172.16.160.123:9092"
        consumer_threads => 5
        topics => "net-cisco"
        group_id => "net-cisco"
        decorate_events => true
        type => "net-cisco"
    }
}


filter {
    grok {
        match => ["message", "%{TIMESTAMP_ISO8601:logdate}"]
    }
    date {
        match => ["logdate", "yyyy-MM-dd HH:mm:ss,SSS"]
        target => "@timestamp"
    }
mutate {
        remove_field => ["logdate", "@version", "[beat][version]", "kafka",  "offset"]
    }

}


output {
   if [type] == "net-cisco" {
     elasticsearch {
        hosts => ["172.16.160.125:9200","172.16.160.126:9200","172.16.160.127:9200"]
        index => "net-cisco-%{+YYYY-MM-dd}"
    }
  }
}
"一劳永逸" 的话,有是有的,而 "一劳永逸" 的事却极少


【推荐】国内首个AI IDE,深度理解中文开发场景,立即下载体验Trae
【推荐】编程新体验,更懂你的AI,立即体验豆包MarsCode编程助手
【推荐】抖音旗下AI助手豆包,你的智能百科全书,全免费不限次数
【推荐】轻量又高性能的 SSH 工具 IShell:AI 加持,快人一步
· 从 HTTP 原因短语缺失研究 HTTP/2 和 HTTP/3 的设计差异
· AI与.NET技术实操系列:向量存储与相似性搜索在 .NET 中的实现
· 基于Microsoft.Extensions.AI核心库实现RAG应用
· Linux系列:如何用heaptrack跟踪.NET程序的非托管内存泄露
· 开发者必知的日志记录最佳实践
· winform 绘制太阳,地球,月球 运作规律
· TypeScript + Deepseek 打造卜卦网站:技术与玄学的结合
· AI 智能体引爆开源社区「GitHub 热点速览」
· Manus的开源复刻OpenManus初探
· 写一个简单的SQL生成工具