Vue学习三:生命周期和工程化开发
一、Vue生命周期
Vue生命周期就是一个Vue实例从创建到销毁的过程
生命周期四个阶段:1、创建 2、挂载 3、更新 4、销毁
Vue生命周期函数(钩子函数)
Vue生命周期过程中,会自动运行一些函数,被称为[生命周期钩子]→让开发者可以在[特定阶段]运行自己的代码。
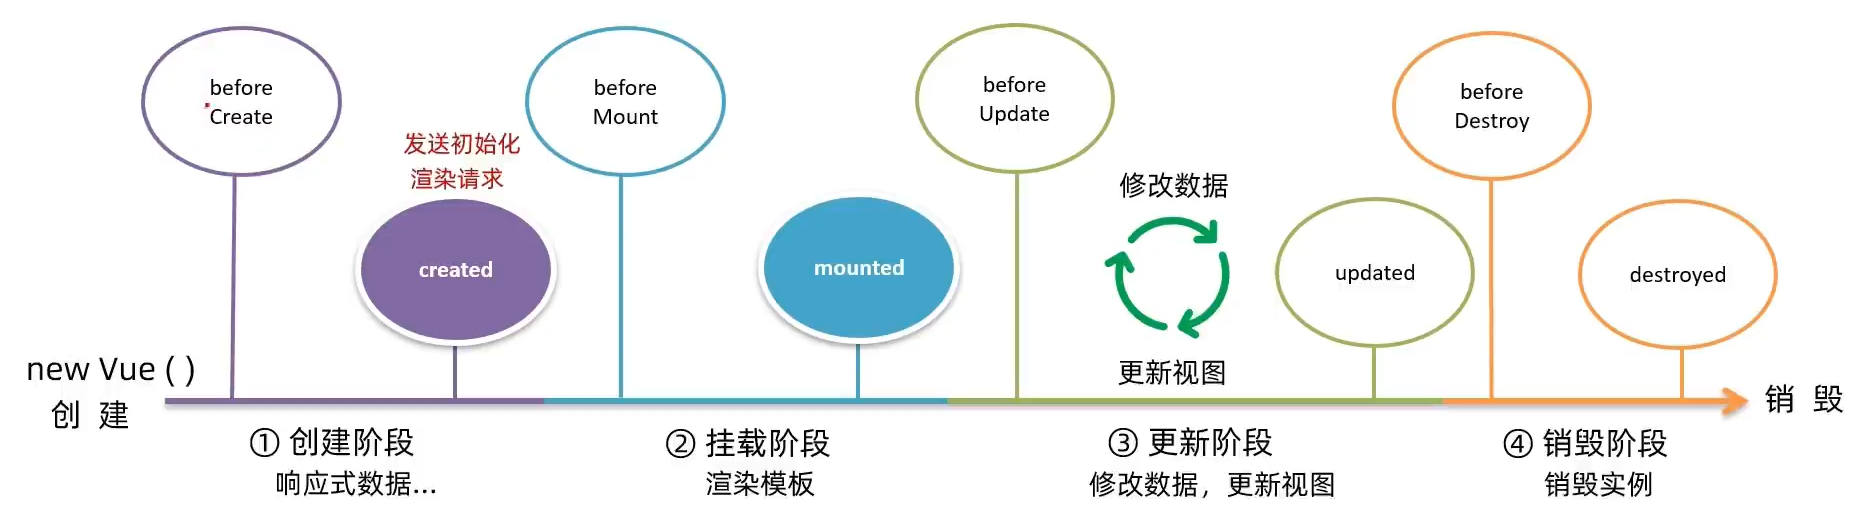
创建阶段其实就是开辟存放数据的存储空间(这时存放的一般是空字符串等默认数据)。当空间开辟好后我们可以使用created这个钩子,在函数里面向后端发送请求获取初始数据,然后赋值给我们的响应式数据。挂载阶段就是创建页面,创建页面中的DOM元素,并将数据渲染到我们的页面上。当我们第一次打开页面时,前两个周期就已经完成了。当我们修改数据时,就进入到更新阶段,更新前视图、数据不变,更新后视图、数据改变。控制台可以使用实例.$destroy销毁Vue实例,销毁后页面依然存在不过已经没有vue操控了只是一个静态页面。
我们主要使用的还是created和mounted这两个钩子,一个获取初始渲染数据,一个获取dom元素。获取数据的方法一样可以封装在methods方法中,需要的时候直接调用就可以了(比如获取初始化数据;事件执行后改变后台数据,需重新获取数据并赋值)。
二、echarts
官网:https://echarts.apache.org/zh/index.html
cdn:<script src="https://cdnjs.cloudflare.com/ajax/libs/echarts/5.4.3/echarts.min.js"></script>
具体如何使用可以看官方文档
案例阿龙记账清单(测试接口使用的是黑马的,请求axios,图表echarts)。
功能需求:
1.基本渲染
(1)立刻发送请求获取数据created
(2)拿到数据,存到data的响应式数据中
(3)结合数据,进行渲染v- for
(4)消费统计=>计算属性
2.添加功能
(1) 收集表单数据v-model
(2)给添加按钮注册点击事件,发送添加请求
(3)需要重新渲染
3.删除功能
(1) 注册点击事件,传参传id
(2)根据id发送删除请求
(3)需要重新渲染
4.饼图渲染
(1)初始化一个饼图 echarts.init(dom) mounted钩子实现
(2)根据数据实时更新饼图 echarts. setOption(option)


<!DOCTYPE html>
<html>
    <head>
        <meta charset="utf-8">
        <title></title>
        <script src="./vue.js"></script>
        <link rel="stylesheet" href="./layui/css/layui.css"  media="all">
        <script src="https://unpkg.com/axios/dist/axios.min.js"></script>
        <script src="https://cdnjs.cloudflare.com/ajax/libs/echarts/5.4.3/echarts.min.js"></script>
        <style>
            table{
                width: 600px;
                height: 300px;
                margin: 50px 50px;
                text-align: center;
            }
            tr{
                border-bottom: 1px solid black;
            }
            form{
                margin: 50px 50px;
            }
            #main{
                width: 600px;
                height: 300px;
                margin: 50px 50px;
                border: 1px solid black;
            }
        </style>
    </head>
    <body>
        <div id="box01">
            <form>
                <input v-model.trim="name" type="text" placeholder="消费名称"/>
                <input v-model.number="price" type="text" placeholder="消费价格"/>
                <button @click="add" type="button">添加账单</button>
            </form>
            <table>
                <thead>
                    <tr>
                        <th>编号</th>
                        <th>消费名称</th>
                        <th>消费价格</th>
                        <th>操作</th>
                    </tr>
                </thead>
                <tbody>
                    <tr v-for="(item,index) in list" :key="item.id">
                        <td>{{index+1}}</td>
                        <td>{{item.name}}</td>
                        <td>{{item.price}}</td>
                        <td><button @click="del(item.id)" type="button">删除</button></td>
                    </tr>
                </tbody>
                <tfoot>
                    <tr>
                        <td>消费总计:{{totalPrice}}</td>
                    </tr>
                </tfoot>
            </table>
            <div id="main">

            </div>
        </div>
        <script>
            const app = new Vue({
                el:'#box01',
                data:{
                    list:[],
                    name:'',
                    price:''
                },
                computed:{
                    totalPrice(){
                        return this.list.reduce((sum,item) => sum += item.price,0)
                    }
                },
                created(){
                    this.getList()
                },
                mounted(){
                    this.myChart = echarts.init(document.querySelector('#main'))
                    this.myChart.setOption({
                        title: {
                          text: '消费账单列表',
                          left: 'center'
                        },
                        tooltip: {
                          trigger: 'item'
                        },
                        legend: {
                          orient: 'vertical',
                          left: 'left'
                        },
                        series: [
                          {
                            name: '消费账单',
                            type: 'pie',
                            radius: '50%',
                            data: [
                            ],
                            emphasis: {
                              itemStyle: {
                                shadowBlur: 10,
                                shadowOffsetX: 0,
                                shadowColor: 'rgba(0, 0, 0, 0.5)'
                              }
                            }
                          }
                        ]
                    })
                },
                methods:{
                    async getList(){
                        let msg = await axios.get('https://applet-base-api-t.itheima.net/bill',{
                            params:{
                                creator:'阿龙'
                            }
                        })
                        this.list = msg.data.data
                        this.myChart.setOption({
                            series: [
                              {
                                data:this.list.map(item => ({value:item.price,name:item.name}))
                              }
                            ]
                        })
                    },
                    async add(){
                        let res = await axios.post('https://applet-base-api-t.itheima.net/bill',{
                            creator:'阿龙',
                            name:this.name,
                            price:this.price
                        })
                        this.getList()
                    },
                    async del(id){
                        let res = await axios.delete(`https://applet-base-api-t.itheima.net/bill/${id}`)
                        this.getList()
                    }
                }
            })
        </script>
        <script src="./layui/layui.js" charset="utf-8"></script>
    </body>
</html>
三、工程化开发和脚手架Vue CLI
开发Vue的两种方式:
1.核心包传统开发模式:基于html/ css/js文件,直接引入核心包,开发Vue。
2.工程化开发模式:基于构建工具(例如: webpack )的环境中开发Vue.
Vue CLI基本介绍:
Vue CLI是Vue官方提供的一个全局命令工具。
可以帮助我们快速创建一个开发Vue项目的标准化基础架子。[集成 了webpack配置]
安装教程看下面这个链接的博主,步骤非常全。链接地址:https://blog.csdn.net/m0_48300767/article/details/126368035
创建项目架子,以管理员身份打开命令提示符,进入到想创建项目的位置,使用vue create 项目名(项目名不能为中文)创建项目。
启动项目,以管理员身份打开命令提示符,进入到项目的位置,使用npm run serve。
项目目录介绍
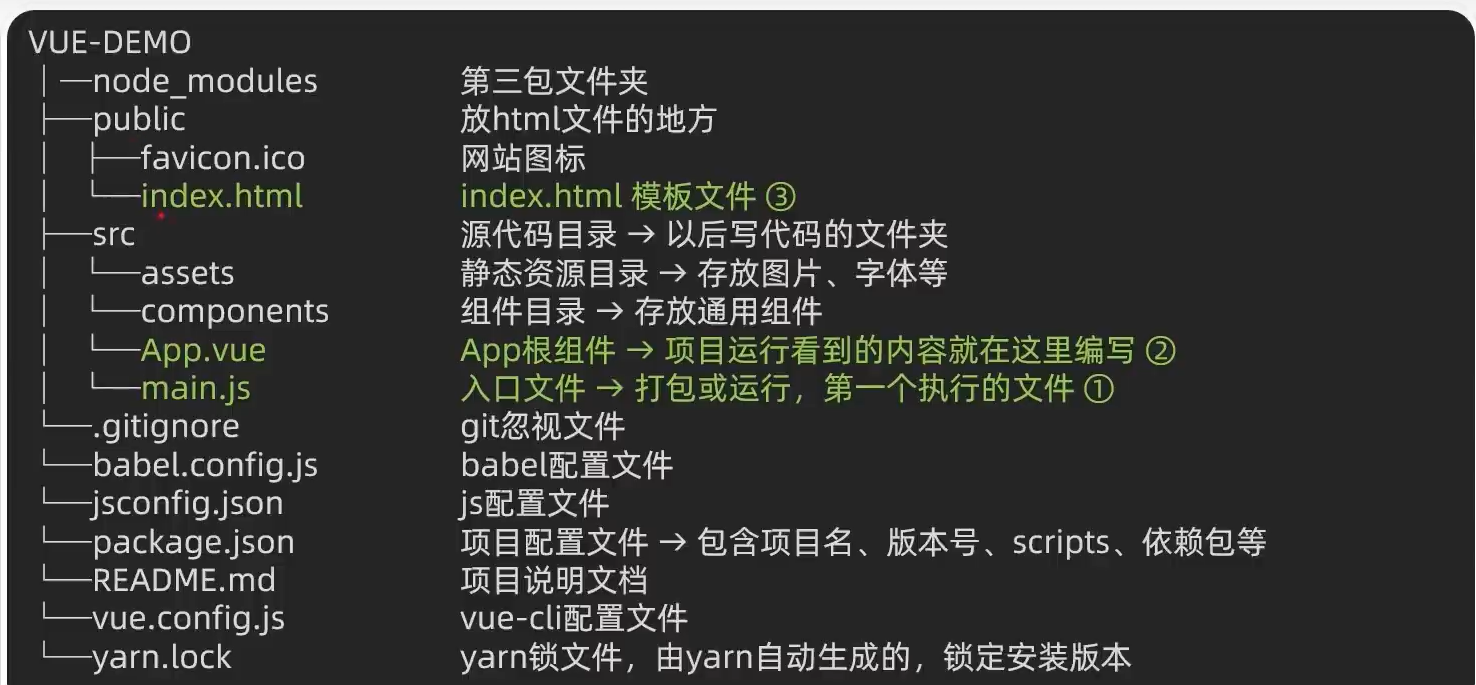
运行流程:运行时会加载main.js,main.js中有导入的vue包和App.vue这个根组件,加载App这个实例,然后使用$mount方法将App实例渲染到index.html页面中。
组件化开发&根组件
①组件化:一个页面可以拆分成一个个组件,每个组件有着自己独立的结构、样式、行为。
好处:便于维护,利于复用→提升开发效率。
组件分类:普通组件、根组件。
②根组件:整个应用最上层的组件,包裹所有普通小组件。
普通组件的注册使用:
1.两种注册方式:
①局部注册:
(1)创建.vue组件(单文件组件)
(2)使用的组件内导入,并局部注册components:{ 组件名: 组件对象}
②全局注册:
(1)创建.vue组件(单文件组件)
(2) main.js内导入,并全局注册Vue.component(组件名, 组件对象)
2.使用:
<组件名></组件名>
注意:
◆组件名规范 →大驼峰命名法,如: AlongHeader
使用案例如下
根组件App.vue
<template>
    <div class="App">
        <AlongHeader></AlongHeader>
        <AlongMain></AlongMain>
        <AlongFooter></AlongFooter>
    </div>
</template>

<script>
    import AlongHeader from './components/AlongHeader.vue'
    import AlongMain from './components/AlongMain.vue'
    import AlongFooter from './components/AlongFooter.vue'
    export default{
        components:{
            AlongHeader,
            AlongMain,
            AlongFooter
        }
    }
</script>

<style>
    .App{
        width: 600px;
        height: 650px;
        background-color: #224743;
        margin: 0 auto;
        padding: 20px;
    }
</style>
三个局部组件AlongHeader.vue、AlongMain.vue、AlongFooter.vue
<template>
    <div class="AlongHeader">
        我是Along-Header
        <AlongButton></AlongButton>
    </div>
</template>

<script>
    export default{

    }
</script>

<style>
    .AlongHeader{
        height: 100px;
        line-height: 100px;
        text-align: center;
        font-size: 30px;
        background-color: #5dab8c;
        color: white;
    }
</style>
<template>
    <div class="AlongMain">
        我是Along-Main
        <AlongButton></AlongButton>
    </div>
</template>

<script>
    export default{

    }
</script>

<style>
    .AlongMain{
        height: 400px;
        line-height: 400px;
        text-align: center;
        font-size: 30px;
        background-color: #b0b39f;
        color: white;
        margin: 20px 0;
    }
</style>
<template>
    <div class="AlongFooter">
        我是Along-Footer
        <AlongButton></AlongButton>
    </div>
</template>

<script>
    export default{

    }
</script>

<style>
    .AlongFooter{
        height: 100px;
        line-height: 100px;
        text-align: center;
        font-size: 30px;
        background-color: #639b78;
        color: white;
    }
</style>
一个通用组件AlongButton.vue
<template>
    <button class="AlongButton">通用按钮</button>
</template>

<script>
</script>

<style>
    .AlongButton{
        height: 50px;
        line-height: 50px;
        padding: 0 20px;
        background-color: #c75762;
        border-radius: 5px;
        color: white;
        border: none;
        vertical-align: middle;
        cursor: pointer;
    }
</style>
main.js
import Vue from 'vue'
import App from './App.vue'
import AlongButton from './components/AlongButton.vue'
Vue.config.productionTip = false

Vue.component('AlongButton',AlongButton)
new Vue({
  render: h => h(App),
}).$mount('#app')

 浙公网安备 33010602011771号