MySQL5.7主从同步
安装MySQL5.7
下载rpm包
wget https://cdn.mysql.com/archives/mysql-5.7/mysql-community-client-5.7.32-1.el7.x86_64.rpm
wget https://cdn.mysql.com/archives/mysql-5.7/mysql-community-common-5.7.32-1.el7.x86_64.rpm
wget https://cdn.mysql.com/archives/mysql-5.7/mysql-community-libs-5.7.32-1.el7.x86_64.rpm
wget https://cdn.mysql.com/archives/mysql-5.7/mysql-community-libs-compat-5.7.32-1.el7.x86_64.rpm
wget https://cdn.mysql.com/archives/mysql-5.7/mysql-community-server-5.7.32-1.el7.x86_64.rpm
安装
yum install -y mysql-community-*-5.7.32-1.el7.x86_64.rpm
启动mysql查看密码
cat /var/log/mysqld.log | grep password

登录mysql
mysql -u root -p

主从同步
关闭每台服务器的防火墙和selinux
systemctl disable --now firewalld
setenforce 0

主从服务器时间同步
主服务器使用本地时钟源
yum -y install ntp
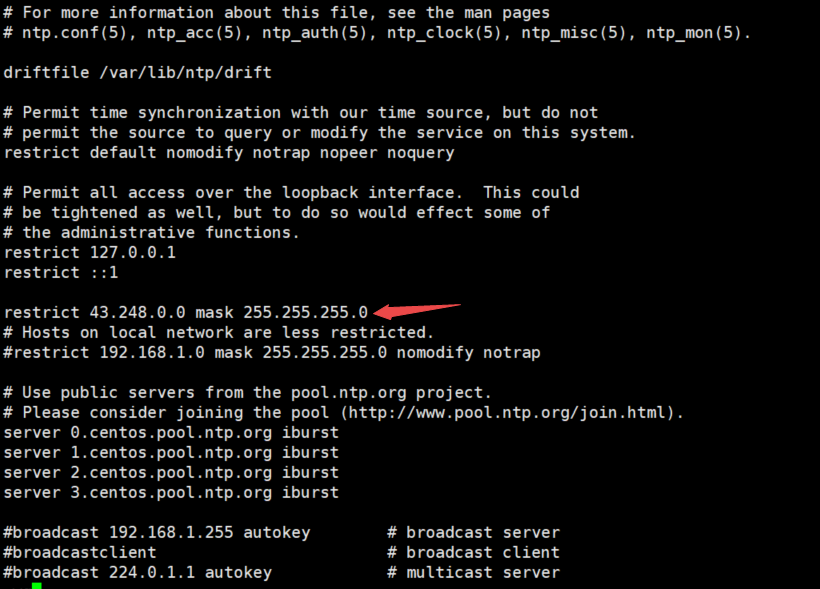
修改ntp配置文件
vi /etc/ntp.conf
添加
restrict IP段 mask 子网段
restrict 43.248.0.0 mask 255.255.255.0#添加此行–自己设置主机的ip加子网掩码;这句是手动增加的,意思是指定的43.248.0.0–43.248.0.254的服务器段都可以使用此段服务器

开启ntpd
systemctl start ntpd
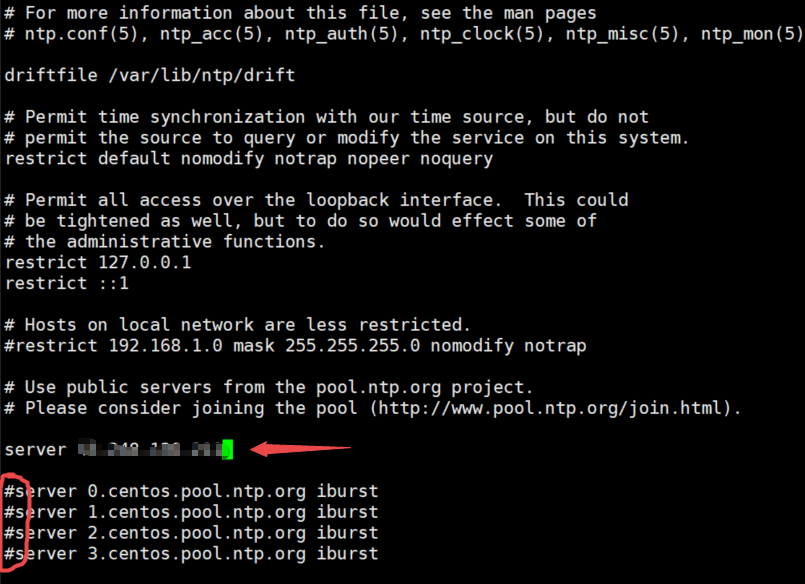
从服务器同步主服务器时间
vi /etc/ntp.conf
添加主服务器ip,并注释
server 主服务器ip

主服务器mysql配置
修改配置文件
vi /etc/my.conf

重启mysql
systemctl restart mysqld
给从服务器权限
grant replication slave on *.* to 'myslave'@'43.248.136.%' identified by '1234';

配置从服务器并重启
vi /etc/my.conf

登录mysql配置主从同步
change master to master_host='43.248.136.97',master_user='myslave',master_password='1234',master_log_file='master-bin.000001',master_log_pos=154;
start slave;
show slave status\G;

这样子mysql的主从同步就已经配置好了,大家缺乏机器练手的话可以去cnaaa看看!


【推荐】国内首个AI IDE,深度理解中文开发场景,立即下载体验Trae
【推荐】编程新体验,更懂你的AI,立即体验豆包MarsCode编程助手
【推荐】抖音旗下AI助手豆包,你的智能百科全书,全免费不限次数
【推荐】轻量又高性能的 SSH 工具 IShell:AI 加持,快人一步
· Manus重磅发布:全球首款通用AI代理技术深度解析与实战指南
· 被坑几百块钱后,我竟然真的恢复了删除的微信聊天记录!
· 没有Manus邀请码?试试免邀请码的MGX或者开源的OpenManus吧
· 园子的第一款AI主题卫衣上架——"HELLO! HOW CAN I ASSIST YOU TODAY
· 【自荐】一款简洁、开源的在线白板工具 Drawnix