mongdb分片
实验环境
主机 IP 虚拟通道
centos1 192.168.3.10 vmnet8
centos2 192.168.3.11 vmnet8
centos3 192.168.3.12 vmnet8

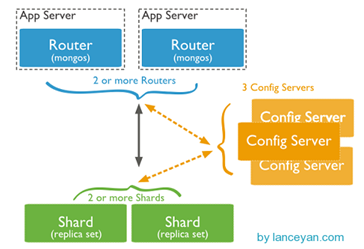
从图中可以看到有四个组件:mongos、config server、shard、replica set。
mongos,数据库集群请求的入口,所有的请求都通过mongos进行协调,不需要在应用程序添加一个路由选择器,mongos自己就是一个请求分发中心,它负责把对应的数据请求请求转发到对应的shard服务器上。在生产环境通常有多mongos作为请求的入口,防止其中一个挂掉所有的mongodb请求都没有办法操作。
config server,顾名思义为配置服务器,存储所有数据库元信息(路由、分片)的配置。mongos本身没有物理存储分片服务器和数据路由信息,只是缓存在内存里,配置服务器则实际存储这些数据。mongos第一次启动或者关掉重启就会从 config server 加载配置信息,以后如果配置服务器信息变化会通知到所有的 mongos 更新自己的状态,这样 mongos 就能继续准确路由。在生产环境通常有多个 config server 配置服务器,因为它存储了分片路由的元数据,这个可不能丢失!就算挂掉其中一台,只要还有存货, mongodb集群就不会挂掉。
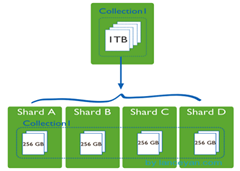
shard,这就是传说中的分片了。上面提到一个机器就算能力再大也有天花板,就像军队打仗一样,一个人再厉害喝血瓶也拼不过对方的一个师。俗话说三个臭皮匠顶个诸葛亮,这个时候团队的力量就凸显出来了。在互联网也是这样,一台普通的机器做不了的多台机器来做,如下图:

一台机器的一个数据表 Collection1 存储了 1T 数据,压力太大了!在分给4个机器后,每个机器都是256G,则分摊了集中在一台机器的压力。也许有人问一台机器硬盘加大一点不就可以了,为什么要分给四台机器呢?不要光想到存储空间,实际运行的数据库还有硬盘的读写、网络的IO、CPU和内存的瓶颈。在mongodb集群只要设置好了分片规则,通过mongos操作数据库就能自动把对应的数据操作请求转发到对应的分片机器上。在生产环境中分片的片键可要好好设置,这个影响到了怎么把数据均匀分到多个分片机器上,不要出现其中一台机器分了1T,其他机器没有分到的情况,这样还不如不分片!
replica set,其实上图4个分片如果没有 replica set 是个不完整架构,假设其中的一个分片挂掉那四分之一的数据就丢失了,所以在高可用性的分片架构还需要对于每一个分片构建 replica set 副本集保证分片的可靠性。生产环境通常是 2个副本 + 1个仲裁。
搭建过程:
分别在每台服务器上创建mongos 、config 、 shard1 、shard2、shard3 五个目录。
因为mongos不存储数据,只需要建立日志文件目录即可。
规划5个组件对应的端口号,由于一个机器需要同时部署 mongos、config server 、shard1、shard2、shard3,所以需要用端口进行区分。
这个端口可以自由定义,在本文 shard1为 1001 , shard2为1002, shard3为1003.
config server 为1004, mongos为 1005,
第一、创建配置文件目录和先关准备工作
service iptables stop
setenforce 0
mkdir /data
cd /data/
以上操作3台服务器都要操作
在第一台mongo服务器上操作
创建目录和文件
mkdir /data/{config,shard1,shard2,shard3,mongos,logs,configsvr,keyfile} -pv
touch /data/keyfile/zxl
touch /data/logs/shard{1..3}.log
touch /data/logs/{configsvr,mongos}.log
touch /data/config/shard{1..3}.conf
touch /data/config/{configsvr,mongos}.conf
cd /opt/
tar xf mongodb-linux-x86_64-rhel62-3.2.7.tgz
mv mongodb-linux-x86_64-rhel62-3.2.7 /data/mongodb
配置环境变量
echo "export PATH=$PATH:/data/mongodb/bin" >> ~/.bash_profile
source ~/.bash_profile
二、创建shard配置文件
vim /data/config/shard1.conf
systemLog:
destination: file
path: /data/logs/shard1.log
logAppend: true
processManagement:
fork: true
pidFilePath: "/data/shard1/shard1.pid"
net:
port: 10001
storage:
dbPath: "/data/shard1"
engine: wiredTiger
journal:
enabled: true
directoryPerDB: true
operationProfiling:
slowOpThresholdMs: 10
mode: "slowOp"
#security:
# keyFile: "/data/keyfile/zxl"
# clusterAuthMode: "keyFile"
replication:
oplogSizeMB: 50
replSetName: "shard1_zxl"
secondaryIndexPrefetch: "all"
vim /data/config/shard2.conf
systemLog:
destination: file
path: /data/logs/shard2.log
logAppend: true
processManagement:
fork: true
pidFilePath: "/data/shard2/shard2.pid"
net:
port: 10002
storage:
dbPath: "/data/shard2"
engine: wiredTiger
journal:
enabled: true
directoryPerDB: true
operationProfiling:
slowOpThresholdMs: 10
mode: "slowOp"
#security:
# keyFile: "/data/keyfile/zxl"
# clusterAuthMode: "keyFile"
replication:
oplogSizeMB: 50
replSetName: "shard2_zxl"
secondaryIndexPrefetch: "all"
vim /data/config/shard3.conf
systemLog:
destination: file
path: /data/logs/shard3.log
logAppend: true
processManagement:
fork: true
pidFilePath: "/data/shard3/shard3.pid"
net:
port: 10003
storage:
dbPath: "/data/shard3"
engine: wiredTiger
journal:
enabled: true
directoryPerDB: true
operationProfiling:
slowOpThresholdMs: 10
mode: "slowOp"
#security:
# keyFile: "/data/keyfile/zxl"
# clusterAuthMode: "keyFile"
replication:
oplogSizeMB: 50
replSetName: "shard3_zxl"
secondaryIndexPrefetch: "all"
在每一台服务器上配置配置服务器
vim /data/config/configsvr.conf
systemLog:
destination: file
path: /data/logs/configsvr.log
logAppend: true
processManagement:
fork: true
pidFilePath: "/data/configsvr/configsvr.pid"
net:
port: 10004
storage:
dbPath: "/data/configsvr"
engine: wiredTiger
journal:
enabled: true
#security:
# keyFile: "/data/keyfile/zxl"
# clusterAuthMode: "keyFile"
sharding:
clusterRole: configsvr
在每一台服务器上配置mongos服务器
vim /data/config/mongos.conf
systemLog:
destination: file
path: /data/logs/mongos.log
logAppend: true
processManagement:
fork: true
pidFilePath: /data/mongos/mongos.pid
net:
port: 10005
sharding:
configDB: 192.168.3.10:10004,192.168.3.11:10004,192.168.3.12:10004
#security:
# keyFile: "/data/keyfile/zxl"
# clusterAuthMode: "keyFile"
cd /data/config
[root@localhost config]# scp * 192.168.3.11:/data/config
[root@localhost config]# scp * 192.168.3.12:/data/config
启动各个机器节点的mongod,shard1、shard2、shard3
[mongodb@localhost ~]$ /data/mongodb/bin/mongod -f /data/config/shard1.conf
about to fork child process, waiting until server is ready for connections.
forked process: 26911
child process started successfully, parent exiting
[mongodb@localhost ~]$ /data/mongodb/bin/mongod -f /data/config/shard2.conf
about to fork child process, waiting until server is ready for connections.
forked process: 26935
child process started successfully, parent exiting
[mongodb@localhost ~]$ /data/mongodb/bin/mongod -f /data/config/shard3.conf
about to fork child process, waiting until server is ready for connections.
forked process: 26958
child process started successfully, parent exiting
三、初始化副本集
登陆第一个mongo服务器,连接mongo
[mongodb@localhost ~]$ /data/mongodb/bin/mongo 127.0.0.1:10001
use admin #切换数据库
config = { _id:"shard1_zxl", members:[
{_id:0,host:"192.168.3.10:10001"},
{_id:1,host:"192.168.3.11:10001"},
{_id:2,host:"192.168.3.12:10001",arbiterOnly:true}
]
}
#上边的配置是定义副本集配置
rs.initiate(config);
{ "ok" : 1 }
#初始化副本集配置
登陆第二个mongo服务器,连接mongo
[mongodb@localhost ~]$ /data/mongodb/bin/mongo 127.0.0.1:10002
use admin #切换数据库
config = { _id:"shard2_zxl", members:[
{_id:0,host:"192.168.3.11:10002"},
{_id:1,host:"192.168.3.12:10002"},
{_id:2,host:"192.168.3.10:10002",arbiterOnly:true}
]
}
rs.initiate(config);
{ "ok" : 1 }
登陆第三个mongo服务器,连接mongo
/data/mongodb/bin/mongo 127.0.0.1:10003
use admin #切换数据库
config = { _id:"shard3_zxl", members:[
{_id:0,host:"192.168.3.12:10003"},
{_id:1,host:"192.168.3.10:10003"},
{_id:2,host:"192.168.3.11:10003",arbiterOnly:true}
]
}
rs.initiate(config);
{ "ok" : 1 }
启动三台服务器的configsvr和mongos节点
[root@localhost ~]# /data/mongodb/bin/mongod -f /data/config/configsvr.conf
about to fork child process, waiting until server is ready for connections.
forked process: 3028
child process started successfully, parent exiting
三台服务器全部启动configsvr后在启动mongos
启动三台服务器的mongos服务器
/data/mongodb/bin/mongos -f /data/config/mongos.conf
about to fork child process, waiting until server is ready for connections.
forked process: 11683
child process started successfully, parent exiting
第四、配置分片
在第一台服务器上配置分片
/data/mongodb/bin/mongo 127.0.0.1:10005
mongos> use admin
mongos>db.runCommand({addshard:"shard1_zxl/192.168.3.10:10001,192.168.3.11:10001,192.168.3.12:10001"});
"shardAdded" : "shard1_zxl", "ok" : 1 }
mongos>db.runCommand({addshard:"shard2_zxl/192.168.3.10:10002,192.168.3.11:10002,192.168.3.12:10002"});
{ "shardAdded" : "shard2_zxl", "ok" : 1 }
mongos>db.runCommand({addshard:"shard3_zxl/192.168.3.10:10003,192.168.3.11:10003,192.168.3.12:10003"});
{ "shardAdded" : "shard2_zxl", "ok" : 1 }
查看shard信息
mongos> sh.status();
shards:
{ "_id" : "shard1_zxl", "host" : "shard1_zxl/192.168.3.10:10001,192.168.3.11:10001" }
{ "_id" : "shard2_zxl", "host" : "shard2_zxl/192.168.3.11:10002,192.168.3.12:10002" }
{ "_id" : "shard3_zxl", "host" : "shard3_zxl/192.168.3.10:10003,192.168.3.12:10003" }
启用shard分片的库名字为'zxl',即为库
mongos>sh.enableSharding("zxl");
{ "ok" : 1 }
测试:
设置集合的名字以及字段,默认自动建立索引,zxl库,haha集合
mongos> sh.shardCollection("zxl.haha",{age: 1, name: 1})
{ "collectionsharded" : "zxl.haha", "ok" : 1 }
mongos> use zxl
mongos> for (i=1;i<=10000;i++) db.haha.insert({name: "user"+i, age: (i%150)})
WriteResult({ "nInserted" : 1 })
查看分片状态
mongos> sh.status();

zxl的数据分别存储到了3个shard数据当中
验证:
我们分别登陆3台服务器上的10005
/data/mongodb/bin/mongo 127.0.0.1:10005
shard1_zxl:PRIMARY> use zxl
switched to db zxl
shard1_zxl:PRIMARY> db.haha.find()
{ "_id" : ObjectId("5a0cf9af8ee2c0b83345ac89"), "name" : "user1", "age" : 1 }
{ "_id" : ObjectId("5a0cf9b08ee2c0b83345ac8a"), "name" : "user2", "age" : 2 }
..........
{ "_id" : ObjectId("5a0cf9b18ee2c0b83345ac9c"), "name" : "user20", "age" : 20 }
Type "it" for more
我们发现数据是一样的
我们分别登陆第一台10001
[root@CentOS6-node1 ~]# /data/mongodb/bin/mongo 127.0.0.1:10001
shard1_zxl:PRIMARY> use zxl
switched to db zxl
shard1_zxl:PRIMARY> db.haha.find()
{ "_id" : ObjectId("5a0d006a5514f2862537a50c"), "name" : "user22", "age" : 22 }
{ "_id" : ObjectId("5a0d006a5514f2862537a50d"), "name" : "user23", "age" : 23 }
{ "_id" : ObjectId("5a0d006a5514f2862537a50e"), "name" : "user24", "age" : 24 }
................
{ "_id" : ObjectId("5a0d006d5514f2862537a51d"), "name" : "user39", "age" : 39 }
{ "_id" : ObjectId("5a0d006d5514f2862537a51e"), "name" : "user40", "age" : 40 }
{ "_id" : ObjectId("5a0d006d5514f2862537a51f"), "name" : "user41", "age" : 41 }
登陆第二台的10002
[root@CentOS6-node1 ~]# /data/mongodb/bin/mongo 127.0.0.1:10002
shard2_zxl:PRIMARY> use zxl
switched to db zxl
shard2_zxl:PRIMARY> db.haha.find()
{ "_id" : ObjectId("5a0d006a5514f2862537a4f7"), "name" : "user1", "age" : 1 }
{ "_id" : ObjectId("5a0d006e5514f2862537a58c"), "name" : "user150", "age" : 0 }
...........
{ "_id" : ObjectId("5a0d006f5514f2862537a9a7"), "name" : "user1201", "age" : 1 }
{ "_id" : ObjectId("5a0d006f5514f2862537a9a8"), "name" : "user1202", "age" : 2 }
登陆第三台的10003
shard3_zxl:PRIMARY> use zxl
switched to db zxl
shard3_zxl:PRIMARY> db.haha.find()
{ "_id" : ObjectId("5a0d006a5514f2862537a4f8"), "name" : "user2", "age" : 2 }
{ "_id" : ObjectId("5a0d006a5514f2862537a4f9"), "name" : "user3", "age" : 3 }
{ "_id" : ObjectId("5a0d006a5514f2862537a4fa"), "name" : "user4", "age" : 4 }
......
{ "_id" : ObjectId("5a0d006a5514f2862537a507"), "name" : "user17", "age" : 17 }
{ "_id" : ObjectId("5a0d006a5514f2862537a508"), "name" : "user18", "age" : 18 }
{ "_id" : ObjectId("5a0d006a5514f2862537a509"), "name" : "user19", "age" : 19 }
{ "_id" : ObjectId("5a0d006a5514f2862537a50a"), "name" : "user20", "age" : 20 }
{ "_id" : ObjectId("5a0d006a5514f2862537a50b"), "name" : "user21", "age" : 21 }
这说明数据是被分片存储的。


