Mybatis中<resultMap>用法(主要用于一对多去重)
一、创建部门表和员工表:
创建部门信息表`t_department`,其中包括`id`, `name`
CREATE TABLE t_department (
id INT AUTO_INCREMENT,
name VARCHAR(20) UNIQUE NOT NULL,
PRIMARY KEY(id)
) DEFAULT CHARSET=UTF8;
往部门表中插入数据:
INSERT INTO t_department (name) VALUES
('UI'), ('RD'), ('TEST');
创建员工信息表t_user
CREATE TABLE t_user(
id INT PRIMARY KEY AUTO_INCREMENT,
username VARCHAR(20) ,
password VARCHAR(20) ,
age int ,
phone VARCHAR(20) ,
email VARCHAR(20) ,
is_Delete int
)DEFAULT CHARSET=UTF8;
往员工表中插入数据:
INSERT INTO t_user VALUES(null,'张三','123456',23,'110','11111@qq.com',1),(null,'历史','123456',23,'110','11111@qq.com',1),(null,'孙悟空','123456',23,'110','11111@qq.com',2),(null,'李白','123456',23,'110','11111@qq.com',2),(null,'八戒','123456',23,'110','11111@qq.com',2);
插入数据错误:
https://www.cnblogs.com/package-java/p/10494380.html
在查询时,`<select>`节点必须指定结果的类型,可以通过`resultType`属性来指定,也可以通过`resultMap`属性来指定。
当有直接对应的查询结果时,可以使用`resultType`,取值一般是实体类的类型,或VO类的类型。
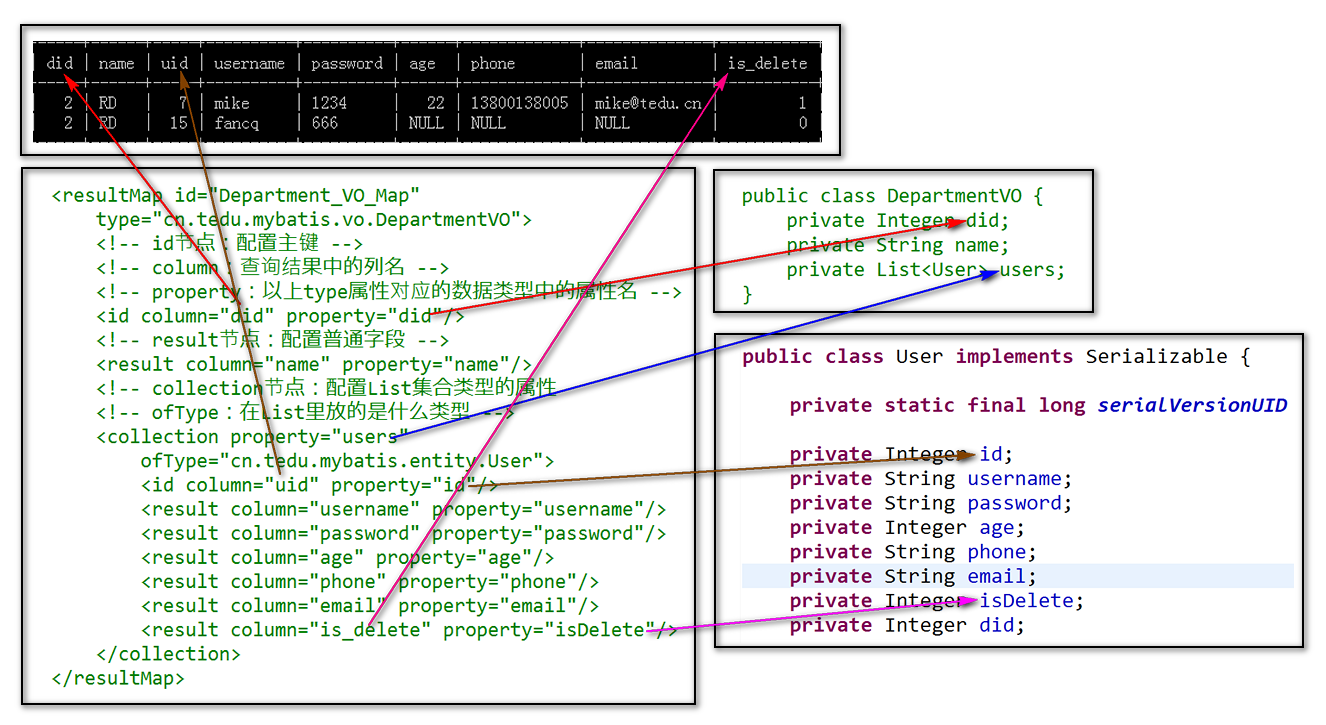
某些查询可能需要将查询结果进行特殊的封装,例如查询时存在1对多、多对多、多对1等关系,则需要使用`resultMap`来配置封装的方式。
二、创建实体类:
1、Vo类的实体类,因为部门只有三个,三个部门里面可能有很多员工,所以把员工封装到List集合中,由于将多条信息明细存储到了list中,因此查询后将不再出现重复数据,达到了去重的效果
package cn.tedu.mybatis.vo;

import java.io.Serializable;
import java.util.List;

import cn.tedu.mybatis.entity.User;

public class DepartmentVO implements Serializable {

    private static final long serialVersionUID = -6442405812964981459L;

    private Integer did;
    private String name;
    private List<User> users;

    public Integer getDid() {
        return did;
    }

    public void setDid(Integer did) {
        this.did = did;
    }

    public String getName() {
        return name;
    }

    public void setName(String name) {
        this.name = name;
    }

    public List<User> getUsers() {
        return users;
    }

    public void setUsers(List<User> users) {
        this.users = users;
    }

    @Override
    public String toString() {
        return "DepartmentVO [did=" + did + ", name=" + name + ", users=" + users + "]";
    }

}
2、员工类:
package cn.tedu.mybatis.entity;

import java.io.Serializable;

public class User implements Serializable {

    private static final long serialVersionUID = 7323921614984096421L;

    private Integer id;
    private String username;
    private String password;
    private Integer age;
    private String phone;
    private String email;
    private Integer isDelete;
    private Integer did;

    public Integer getId() {
        return id;
    }

    public void setId(Integer id) {
        this.id = id;
    }

    public String getUsername() {
        return username;
    }

    public void setUsername(String username) {
        this.username = username;
    }

    public String getPassword() {
        return password;
    }

    public void setPassword(String password) {
        this.password = password;
    }

    public Integer getAge() {
        return age;
    }

    public void setAge(Integer age) {
        this.age = age;
    }

    public String getPhone() {
        return phone;
    }

    public void setPhone(String phone) {
        this.phone = phone;
    }

    public String getEmail() {
        return email;
    }

    public void setEmail(String email) {
        this.email = email;
    }

    public Integer getIsDelete() {
        return isDelete;
    }

    public void setIsDelete(Integer isDelete) {
        this.isDelete = isDelete;
    }

    public Integer getDid() {
        return did;
    }

    public void setDid(Integer did) {
        this.did = did;
    }

    @Override
    public String toString() {
        return "User [id=" + id + ", username=" + username + ", password=" + password + ", age=" + age + ", phone="
                + phone + ", email=" + email + ", isDelete=" + isDelete + ", did=" + did + "]";
    }
}
三、创建接口和抽象方法:
package cn.tedu.mybatis.mapper;

import cn.tedu.mybatis.vo.DepartmentVO;

public interface DepartmentMapper {

    DepartmentVO findById(Integer id);

}
四、SQL语句的映射:
<?xml version="1.0" encoding="UTF-8" ?>
<!DOCTYPE mapper PUBLIC "-//ibatis.apache.org//DTD Mapper 3.0//EN"
    "http://ibatis.apache.org/dtd/ibatis-3-mapper.dtd">

<mapper namespace="cn.tedu.mybatis.mapper.DepartmentMapper">
<!-- namespace:抽象类绝对路径 -->
    <resultMap id="Department_VO_Map"
        type="cn.tedu.mybatis.vo.DepartmentVO">
     <!-- id节点:配置主键 -->
        <!-- type:实体类绝对路径 -->
        <!-- column:查询结果中的列名 -->
        <!-- property:以上type属性对应的数据类型中的属性名(类里面的属性) -->
        <id column="did" property="did"/>
        <!-- result节点:配置普通字段 -->
        <result column="name" property="name"/>
        <!-- collection节点:配置List集合类型的属性,用于1对多的查询 -->
        <!-- ofType:在List里放的是什么类型 -->
        <collection property="users"
            ofType="cn.tedu.mybatis.entity.User">
            <id column="uid" property="id"/>
            <result column="username" property="username"/>
            <result column="password" property="password"/>
            <result column="age" property="age"/>
            <result column="phone" property="phone"/>
            <result column="email" property="email"/>
            <result column="isDelete" property="isDelete"/>
        </collection>
    </resultMap>

    <select id="findById"
        resultMap="Department_VO_Map">
        SELECT
            t_department.id AS did,
            name,
            t_user.id AS uid,
            username,
            password,
            age,
            phone,
            email,
            is_delete
        FROM
            t_department
        INNER JOIN
            t_user
        ON
            t_user.did=t_department.id
        WHERE
            t_department.id=#{id}
    </select>


</mapper>
> 以上代码中,自定义别名是因为需要区分查询结果中的列的名称,并不是因为需要与数据类型中的属性对应,关于查询结果的列名与数据类型的属性名的对应,可以通过`<resultMap>`中的配置来完成!

五、测试:
package cn.tedu.mybatis.mapper;

import org.junit.After;
import org.junit.Before;
import org.junit.Test;
import org.springframework.context.support.AbstractApplicationContext;
import org.springframework.context.support.ClassPathXmlApplicationContext;

import cn.tedu.mybatis.vo.DepartmentVO;

public class DepartmentMapperTestCase {

    AbstractApplicationContext ac;
    DepartmentMapper mapper;

    @Before
    public void doBefore() {
        ac = new ClassPathXmlApplicationContext("spring-dao.xml");
        mapper = ac.getBean("departmentMapper", DepartmentMapper.class);
    }

    @After
    public void doAfter() {
        ac.close();
    }

    @Test
    public void findById() {
        Integer id = 2;
        DepartmentVO data
            = mapper.findById(id);
        System.out.println(data);
    }

}


 浙公网安备 33010602011771号