SpringBoot初探
SpringBoot核心概念
Spring Boot是什么?
SpringBoot是一个为了简化Spring应用初始搭建和开发过程的框架,它是Spring整个技术栈的整合,是J2EE开发的一站式解决方案。
使用SpringBoot
1、新建一个Maven项目
2、引入依赖
    <parent>
        <groupId>org.springframework.boot</groupId>
        <artifactId>spring-boot-starter-parent</artifactId>
        <version>1.5.10.RELEASE</version>
        <relativePath/> <!-- lookup parent from repository -->
    </parent>
    <dependency>
         <groupId>org.springframework.boot</groupId>
         <artifactId>spring-boot-starter-web</artifactId>
    </dependency>
<!--这个插件可以将应用打包成一个可执行的jar包-->
   <build>
        <plugins>
            <plugin>
                <groupId>org.springframework.boot</groupId>
                <artifactId>spring-boot-maven-plugin</artifactId>
            </plugin>
        </plugins>
    </build>
3、编写主启动类
@SpringBootApplication
public class SpringBootDemoApplication {
    public static void main(String[] args) {
        SpringApplication.run(SpringBootDemoApplication.class, args);
    }
}
4、编写Controller
@Controller
public class HelloController{
@RequestMapping("/hello")
@RequestBody
public String sayHello(){
return "hello world!";
}
}
SpringBoot应用分析
1、父项目
<parent>
    <groupId>org.springframework.boot</groupId>
    <artifactId>spring‐boot‐starter‐parent</artifactId>
    <version>1.5.9.RELEASE</version>
</parent>

<!--他的父项目是-->
<parent>
  <groupId>org.springframework.boot</groupId>
  <artifactId>spring‐boot‐dependencies</artifactId>
  <version>1.5.9.RELEASE</version>
  <relativePath>../../spring‐boot‐dependencies
</parent>
<!--他来真正管理Spring Boot应用里面的所有依赖版本;-->
父项目表明了jar的版本,我们在使用时不必声明引入jar包的版本
2、场景启动器
    <dependency>
         <groupId>org.springframework.boot</groupId>
         <artifactId>spring-boot-starter-web</artifactId>
    </dependency>
springboot-boot-starter:场景启动器,帮我们导入相应场景下可能需要的依赖。可以根据自己的需要导入相应的场景启动器。比如开发web项目,导入spring-boot-starter-web后,它会将我们可能用的所有web开发所需要的依赖全部导入进来。它是由传递依赖实现的。
3、主启动类
标注了@SpringBootApplication注解的类就是主启动类,通过运行这个类的main方法来启动SpringBoot应用。
@Target(ElementType.TYPE)
@Retention(RetentionPolicy.RUNTIME)
@Documented
@Inherited
@SpringBootConfiguration
@EnableAutoConfiguration
@ComponentScan(excludeFilters = {
          @Filter(type = FilterType.CUSTOM, classes =TypeExcludeFilter.class),
          @Filter(type = FilterType.CUSTOM, classes = AutoConfigurationExcludeFilter.class) })
public @interface SpringBootApplication {
@SpringBootConfiguration:Spring Boot的配置类;
标注在某个类上,表示这是一个Spring Boot的配置类;
@Configuration:配置类上标注这个注解;在配置文件上的配置变成在配置类上配置
@ComponentScan:扫描指定路径下的需要装配的组件自动装配到SpringBoot容器中
@EnableAutoConfiguration:开启自动配置功能;
@AutoConfigurationPackage
@Import(EnableAutoConfigurationImportSelector.class)
public @interface EnableAutoConfiguration {
@AutoConfigrationPackages:自动配置包,负责将主启动类所在的包以及子包中的所有组件扫描到容器中。
@Import(EnableAutoConfigrationImprtSelector.class):将EnableAutoConfigrationImprtSelector类导入到SpringIOC容器中。
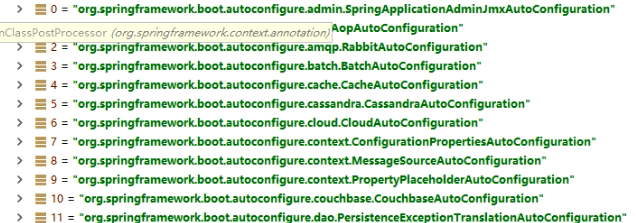
EnableAutoConfigrationImprtSelector:会给容器中导入很多与场景相关的自动配置类(****AutoConfigration),比如导入web场景启动器,就会导入如下图的自动配置类。
自动配置类:通过将配置写进配置类,免去我们编写配置文件的烦恼。每个配置类中属性都会有默认值,如果我们想要修改默认值,则需要在application.yml中修改
如果我们开启了自动配置,Spring Boot在启动的时候从类路径下的META-INF/spring.factories中获取EnableAutoConfiguration指定的值,将这些值作为自动配置类导入到容器中,自动配置类就生效,帮我们进行自动配置工作
参考:《尚硅谷-SpringBoot教学》

 浙公网安备 33010602011771号