Spring Shiro 入门必看
Shiro简介:Shiro是一个强大的简单易用的Java安全框架,主要用来更便捷的认证,授权,加密,会话管理。Shiro首要的和最重要的目标就是容易使用并且容易理解,通过Shiro易于理解的API,您可以快速、轻松地获得任何应用程序——从最小的移动应用程序最大的网络和企业应用程序。
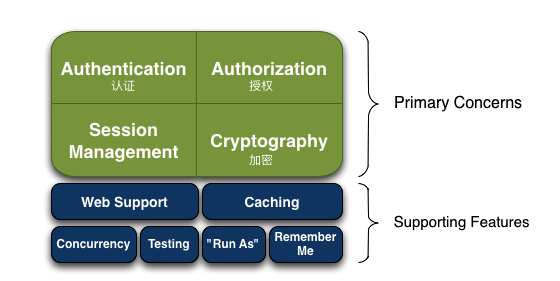
Shiro架构图

-
Authentication:身份认证/登录
-
Authorization:验证权限,即,验证某个人是否有做某件事的权限。
-
Session Management:会话管理。管理用户特定的会话,支持web,非web,ejb。
-
Cryptography: 加密,保证数据安全。
-
其他特性。
Web Support:web支持,更容易继承web应用。
Caching:缓存
Concurrency :多线程应用的并发验证,即如在一个线程中开启另一个线程,能把权限自动传播过去;
Testing:提供测试支持。
Run As:允许一个用户假装为另一个用户(如果他们允许)的身份进行访问;
Remember Me:记住我,即记住登录状态,一次登录后,下次再来的话不用登录了
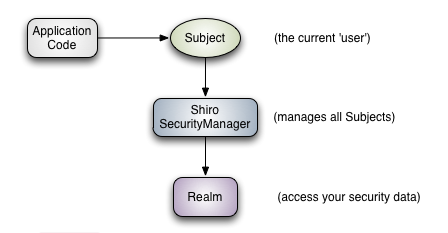
Shiro的架构有三个主要概念:Subject, SecurityManager 和 Realms。下图是一个高级的概述这些组件如何交互,下面我们将讨论每一个概念:

Subject: 当前参与应用安全部分的主角。可以是用户,可以试第三方服务,可以是cron 任务,或者任何东西。主要指一个正在与当前软件交互的东西。所有Subject都需要SecurityManager,当你与Subject进行交互,这些交互行为实际上被转换为与SecurityManager的交互。
SecurityManager:安全管理员,Shiro架构的核心,它就像Shiro内部所有原件的保护伞。然而一旦配置了SecurityManager,SecurityManager就用到的比较少,开发者大部分时间都花在Subject上面。当你与Subject进行交互的时候,实际上是SecurityManager在背后帮你举起Subject来做一些安全操作。
Realms: Realms作为Shiro和你的应用的连接桥,当需要与安全数据交互的时候,像用户账户,或者访问控制,Shiro就从一个或多个Realms中查找。Shiro提供了一些可以直接使用的Realms,如果默认的Realms不能满足你的需求,你也可以定制自己的Realms。
Shiro详细架构图
The following diagram shows Shiro’s core architectural concepts followed by short summaries of each:

Subject
第一个Apache Shiro应用
1.在pom.xml文件中添加Apache Shiro的依赖
<dependency>
    <groupId>org.apache.shiro</groupId>
    <artifactId>shiro-core</artifactId>
    <version>1.1.0</version>
</dependency>
<!-- Shiro uses SLF4J for logging. -->
<dependency>
    <groupId>org.slf4j</groupId>
    <artifactId>slf4j-simple</artifactId>
    <version>1.6.1</version>
    <scope>test</scope>
</dependency>
2.Shiro提供了一个通用的方案通过 INI 进行配置 ,当然也可以通过XML,YMAL,JSON等进行配置。
在resource目录下面,创建一个shiro.ini的文件。内容如下:
src/main/resources/shiro.ini
# =============================================================================
# Tutorial INI configuration
#
# Usernames/passwords are based on the classic Mel Brooks' film "Spaceballs" :)
# =============================================================================

# -----------------------------------------------------------------------------
# Users and their (optional) assigned roles
# username = password, role1, role2, ..., roleN
# -----------------------------------------------------------------------------
[users]
root = secret, admin
guest = guest, guest
presidentskroob = 12345, president
darkhelmet = ludicrousspeed, darklord, schwartz
lonestarr = vespa, goodguy, schwartz

# -----------------------------------------------------------------------------
# Roles with assigned permissions
# roleName = perm1, perm2, ..., permN
# -----------------------------------------------------------------------------
[roles]
admin = *
schwartz = lightsaber:*
goodguy = winnebago:drive:eagle5
引用Shiro.ini配置进行测试
现在改变我们的Tutorial类文件,内容如下
Final src/main/java/Tutorial.java
import org.apache.shiro.SecurityUtils;
import org.apache.shiro.authc.*;
import org.apache.shiro.config.IniSecurityManagerFactory;
import org.apache.shiro.mgt.SecurityManager;
import org.apache.shiro.session.Session;
import org.apache.shiro.subject.Subject;
import org.apache.shiro.util.Factory;
import org.slf4j.Logger;
import org.slf4j.LoggerFactory;

public class Tutorial {

    private static final transient Logger log = LoggerFactory.getLogger(Tutorial.class);

    public static void main(String[] args) {
        log.info("My First Apache Shiro Application");

        Factory<SecurityManager> factory = new IniSecurityManagerFactory("classpath:shiro.ini");
        SecurityManager securityManager = factory.getInstance();
        SecurityUtils.setSecurityManager(securityManager);

        // get the currently executing user:
        Subject currentUser = SecurityUtils.getSubject();

        // Do some stuff with a Session (no need for a web or EJB container!!!)
        Session session = currentUser.getSession();
        session.setAttribute("someKey", "aValue");
        String value = (String) session.getAttribute("someKey");
        if (value.equals("aValue")) {
            log.info("Retrieved the correct value! [" + value + "]");
        }

        // let's login the current user so we can check against roles and permissions:
        if (!currentUser.isAuthenticated()) {
            UsernamePasswordToken token = new UsernamePasswordToken("lonestarr", "vespa");
            token.setRememberMe(true);
            try {
                currentUser.login(token);
            } catch (UnknownAccountException uae) {
                log.info("There is no user with username of " + token.getPrincipal());
            } catch (IncorrectCredentialsException ice) {
                log.info("Password for account " + token.getPrincipal() + " was incorrect!");
            } catch (LockedAccountException lae) {
                log.info("The account for username " + token.getPrincipal() + " is locked.  " +
                        "Please contact your administrator to unlock it.");
            }
            // ... catch more exceptions here (maybe custom ones specific to your application?
            catch (AuthenticationException ae) {
                //unexpected condition?  error?
            }
        }

        //say who they are:
        //print their identifying principal (in this case, a username):
        log.info("User [" + currentUser.getPrincipal() + "] logged in successfully.");

        //test a role:
        if (currentUser.hasRole("schwartz")) {
            log.info("May the Schwartz be with you!");
        } else {
            log.info("Hello, mere mortal.");
        }

        //test a typed permission (not instance-level)
        if (currentUser.isPermitted("lightsaber:weild")) {
            log.info("You may use a lightsaber ring.  Use it wisely.");
        } else {
            log.info("Sorry, lightsaber rings are for schwartz masters only.");
        }

        //a (very powerful) Instance Level permission:
        if (currentUser.isPermitted("winnebago:drive:eagle5")) {
            log.info("You are permitted to 'drive' the winnebago with license plate (id) 'eagle5'.  " +
                    "Here are the keys - have fun!");
        } else {
            log.info("Sorry, you aren't allowed to drive the 'eagle5' winnebago!");
        }

        //all done - log out!
        currentUser.logout();

        System.exit(0);
    }
}
总结
希望这个介绍教程帮助您理解如何在一个基本的应用程序设置Shiro Shiro的主要设计概念、主体和SecurityManager。
但这是一个相当简单的应用程序。你可能会问自己,“如果我不想使用INI用户帐号,而想要连接到一个更复杂的用户数据来源?”
回答这个问题需要一个小Shiro的架构的深入了解和支持配置机制。接下来我们将介绍Shiro的架构,请拭目以待吧!
翻译自Apache Shiro 官方文档


