openmv4颜色识别
find_blobs函数:
通过find_blobs函数可以找到色块.我们来讨论一下,find_blobs的细节。
image.find_blobs(thresholds, roi=Auto, x_stride=2, y_stride=1, invert=False, area_threshold=10,

pixels_threshold=10, merge=False, margin=0, threshold_cb=None, merge_cb=None)
这里的参数比较多。
- thresholds是颜色的阈值,注意:这个参数是一个列表,可以包含多个颜色。如果你只需要一个颜色,那么在这个列表中只需要有一个颜色值,如果你想要多个颜色阈值,那这个列表就需要多个颜色阈值。注意:在返回的色块对象blob可以调用code方法,来判断是什么颜色的色块。
-
red = (xxx,xxx,xxx,xxx,xxx,xxx)
blue = (xxx,xxx,xxx,xxx,xxx,xxx)
yellow = (xxx,xxx,xxx,xxx,xxx,xxx)

img=sensor.snapshot()
red_blobs = img.find_blobs([red])

color_blobs = img.find_blobs([red,blue, yellow])
-
roi是“感兴趣区”。
left_roi = [0,0,160,240]
blobs = img.find_blobs([red],roi=left_roi) -
x_stride 就是查找的色块的x方向上最小宽度的像素,默认为2,如果你只想查找宽度10个像素以上的色块,那么就设置这个参数为10:
blobs = img.find_blobs([red],x_stride=10)
-
y_stride 就是查找的色块的y方向上最小宽度的像素,默认为1,如果你只想查找宽度5个像素以上的色块,那么就设置这个参数为5:
blobs = img.find_blobs([red],y_stride=5)
- invert 反转阈值,把阈值以外的颜色作为阈值进行查找
- area_threshold 面积阈值,如果色块被框起来的面积小于这个值,会被过滤掉
- pixels_threshold 像素个数阈值,如果色块像素数量小于这个值,会被过滤掉
- merge 合并,如果设置为True,那么合并所有重叠的blob为一个。
注意:这会合并所有的blob,无论是什么颜色的。如果你想混淆多种颜色的blob,只需要分别调用不同颜色阈值的find_blobs。 -
all_blobs = img.find_blobs([red,blue,yellow],merge=True)

red_blobs = img.find_blobs([red],merge=True)
blue_blobs = img.find_blobs([blue],merge=True)
yellow_blobs = img.find_blobs([yellow],merge=True)
- margin 边界,如果设置为1,那么两个blobs如果间距1一个像素点,也会被合并。
阈值:
一个颜色阈值的结构是这样的:
red = (minL, maxL, minA, maxA, minB, maxB)
元组里面的数值分别是L A B 的最大值和最小值。
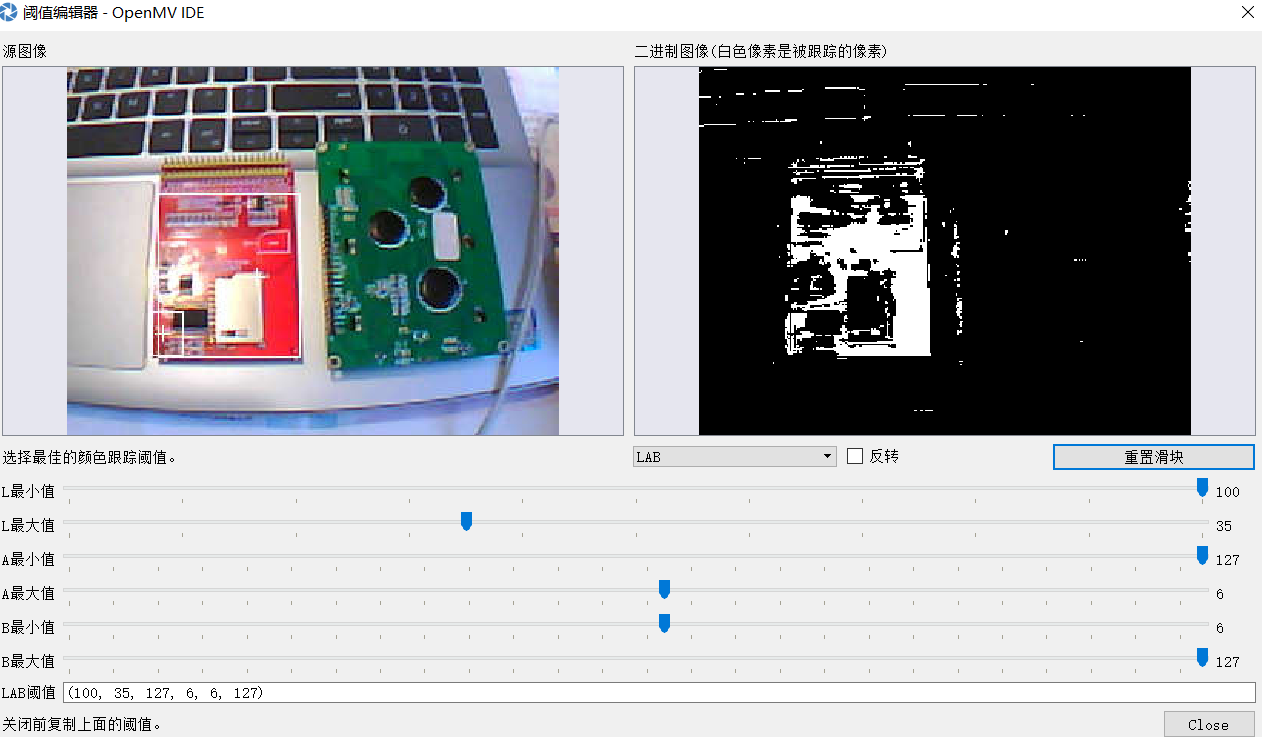
颜色阈值选择工具:
OpenMV 的IDE里加入了阈值选择工具,极大的方便了对于颜色阈值的调试。
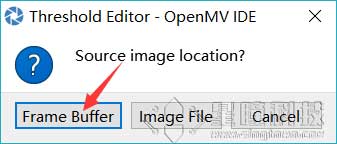
首先运行hello world.py让IDE里的framebuffer显示图案。

然后打开 工具 →机器视觉 → 阈值编译器

点击 Frame Buffer可以获取IDE中的图像,Image File可以自己选择一个图像文件。
拖动六个滑块,可以实时的看到阈值的结果,我们想要的结果就是,将我们的目标颜色变成白色,其他颜色全变为黑色。
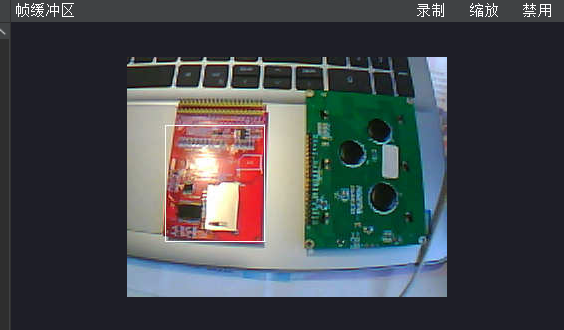
单颜色识别之红色:
import sensor, image, time

#thresholds = [(66, 0, -51, -8, 6, 127)]  #green
thresholds = [(30, 100, 15, 127, 15, 127)]  #red
#thresholds = [(66, 0, -51, -8, 6, 127),(30, 100, 15, 127, 15, 127)]  #元组里面,包含列表,进行多种颜色识别


sensor.reset()                      # Reset and initialize the sensor.
sensor.set_pixformat(sensor.RGB565) # Set pixel format to RGB565 (or GRAYSCALE)
sensor.set_framesize(sensor.QVGA)   # Set frame size to QVGA (320x240)
sensor.skip_frames(time = 2000)     # Wait for settings take effect.
sensor.set_auto_gain(False)
sensor.set_auto_whitebal(False)     #关掉白平衡和自动增益
clock = time.clock()                # Create a clock object to track the FPS.

while(True):
    clock.tick()                    # Update the FPS clock.
    img = sensor.snapshot()         # Take a picture and return the image.
    #for blob in img.find_blobs(thresholds,pixels_threshold=200,area_threshold=200,merge=True):
    #for blob in img.find_blobs(thresholds,pixels_threshold=200,area_threshold=200):
    for blob in img.find_blobs([thresholds[0]],pixels_threshold=200,area_threshold=200):
        img.draw_rectangle(blob.rect())
        img.draw_cross(blob.cx(),blob.cy())
    print(clock.fps())              # Note: OpenMV Cam runs about half as fast when connecte
现象:
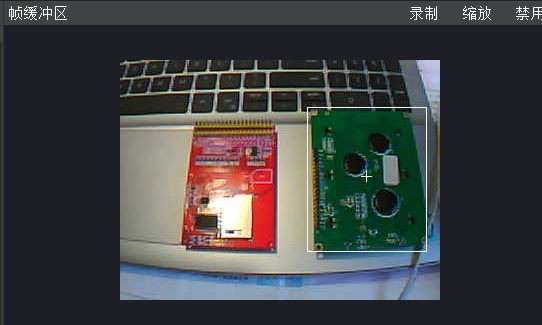
单颜色识别之绿色:
import sensor, image, time

thresholds = [(66, 0, -51, -8, 6, 127)]  #green
#thresholds = [(30, 100, 15, 127, 15, 127)]  #red
#thresholds = [(66, 0, -51, -8, 6, 127),(30, 100, 15, 127, 15, 127)]  #元组里面,包含列表,进行多种颜色识别


sensor.reset()                      # Reset and initialize the sensor.
sensor.set_pixformat(sensor.RGB565) # Set pixel format to RGB565 (or GRAYSCALE)
sensor.set_framesize(sensor.QVGA)   # Set frame size to QVGA (320x240)
sensor.skip_frames(time = 2000)     # Wait for settings take effect.
sensor.set_auto_gain(False)
sensor.set_auto_whitebal(False)     #关掉白平衡和自动增益
clock = time.clock()                # Create a clock object to track the FPS.

while(True):
    clock.tick()                    # Update the FPS clock.
    img = sensor.snapshot()         # Take a picture and return the image.
    #for blob in img.find_blobs(thresholds,pixels_threshold=200,area_threshold=200,merge=True):
    #for blob in img.find_blobs(thresholds,pixels_threshold=200,area_threshold=200):
    for blob in img.find_blobs([thresholds[0]],pixels_threshold=200,area_threshold=200):
        img.draw_rectangle(blob.rect())
        img.draw_cross(blob.cx(),blob.cy())
    print(clock.fps())              # Note: OpenMV Cam runs about half as fast when connected
现象:
多颜色识别之合并:
import sensor, image, time

#thresholds = [(66, 0, -51, -8, 6, 127)]  #green
#thresholds = [(30, 100, 15, 127, 15, 127)]  #red
thresholds = [(66, 0, -51, -8, 6, 127),(30, 100, 15, 127, 15, 127)]  #元组里面,包含列表,进行多种颜色识别


sensor.reset()                      # Reset and initialize the sensor.
sensor.set_pixformat(sensor.RGB565) # Set pixel format to RGB565 (or GRAYSCALE)
sensor.set_framesize(sensor.QVGA)   # Set frame size to QVGA (320x240)
sensor.skip_frames(time = 2000)     # Wait for settings take effect.
sensor.set_auto_gain(False)
sensor.set_auto_whitebal(False)     #关掉白平衡和自动增益
clock = time.clock()                # Create a clock object to track the FPS.

while(True):
    clock.tick()                    # Update the FPS clock.
    img = sensor.snapshot()         # Take a picture and return the image.
    for blob in img.find_blobs(thresholds,pixels_threshold=200,area_threshold=200,merge=True):
    #for blob in img.find_blobs(thresholds,pixels_threshold=200,area_threshold=200):
    #for blob in img.find_blobs([thresholds[0]],pixels_threshold=200,area_threshold=200):
        img.draw_rectangle(blob.rect())
        img.draw_cross(blob.cx(),blob.cy())
    print(clock.fps())              # Note: OpenMV Cam runs about half as fast when connected
现象:
多颜色识别之不合并:
import sensor, image, time

#thresholds = [(66, 0, -51, -8, 6, 127)]  #green
#thresholds = [(30, 100, 15, 127, 15, 127)]  #red
thresholds = [(66, 0, -51, -8, 6, 127),(30, 100, 15, 127, 15, 127)]  #元组里面,包含列表,进行多种颜色识别


sensor.reset()                      # Reset and initialize the sensor.
sensor.set_pixformat(sensor.RGB565) # Set pixel format to RGB565 (or GRAYSCALE)
sensor.set_framesize(sensor.QVGA)   # Set frame size to QVGA (320x240)
sensor.skip_frames(time = 2000)     # Wait for settings take effect.
sensor.set_auto_gain(False)
sensor.set_auto_whitebal(False)     #关掉白平衡和自动增益
clock = time.clock()                # Create a clock object to track the FPS.

while(True):
    clock.tick()                    # Update the FPS clock.
    img = sensor.snapshot()         # Take a picture and return the image.
    #for blob in img.find_blobs(thresholds,pixels_threshold=200,area_threshold=200,merge=True):
    for blob in img.find_blobs(thresholds,pixels_threshold=200,area_threshold=200):
    #for blob in img.find_blobs([thresholds[0]],pixels_threshold=200,area_threshold=200):
        img.draw_rectangle(blob.rect())
        img.draw_cross(blob.cx(),blob.cy())
    print(clock.fps())              # Note: OpenMV Cam runs about half as fast when connected
现象:

正是步行者,一步步登峰!

 浙公网安备 33010602011771号